Spring的基础知识
目录
- 1.简介
-
- 1.2 优点
- 1.3 Spring系统架构图
- 1.4 扩展
- 2、 IOC 理论推导
-
- 2.1 引言
- 2.2 IOC本质
- 2.3 控制反转
- 3. IOC创建对象的方式
-
- 3.1 使用无参构造创建对象,默认
- 3.2 有参构造创建对象有三种方式
-
- 3.2.1 下标匹配方式 0 表示下标为0的参数 (也就是第一个参数)
- 3.2.2 参数类型匹配方式,不建议使用,两个string会冲突
- 3.2.3 直接通过参数名匹配 ref
- 3.3 小总结
- 4. Spring配置
-
- 4.1 别名
- 4.2 bean的配置
- 4.3、 import
- 5. 依赖注入(DI)dependency injection
-
- 5.1 构造器注入
- 5.2 set方式注入【重点】
-
- 5.2.1 依赖注入:set注入
- 5.3 拓展方式注入
- 5.4 bean的作用域:6种
-
- 5.4.1 单例模式(spring默认机制)
- 5.4.2 原型模式 每一次从容器中get的时候,会产生新的对象
- 6.bean的自动装配
-
- 6.1 setter注入和自动装配的区别
-
- 展示setter注入
- 展示byName自动配置
- 展示byType自动配置
- 输出结果
- 6.2 测试
- 6.3 ByName自动装配
- 6.4 ByType自动装配
- 6.5 使用注解实现自动装配
-
- 6.5.1 @Autowired 注解
- 6.5.2 @Resource 注解
- 7. 使用注解开发
-
- xml配置与注解配置对比
- 8、 使用Java方式配置Spring
-
- 8.1 配置类
- 8.2 实体类
- 8.3 测试类
- 9、代理模式
-
- 9.1 静态代理
- 9.2 加深理解
- 9.3 动态代理
- 10、AOP
-
- 10.1 AOP概念
- 10.2 AOP在Spring中的作用
- 10.3 使用Spring实现AOP
- 10.4 自定义类实现AOP
- 10.5 使用注解实现AOP
- 11、整合Mybatis
-
- 11.1 回忆Mybatis
- 11.2 MyBatis-Spring
- 11.3 SqlSessionDaoSuppor
- 12、声明式事务
Spring官网
Spring框架文档
Sping函数文档
Sping下载路径
Spring和Spring Boot之间的区别
Spring(IOC)
Spring框架是一个开放源代码的J2EE应用程序框架,由Rod Johnson发起,是针对bean的生命周期进行管理的轻量级容器(lightweight container)。
Spring解决了开发者在J2EE开发中遇到的许多常见的问题,提供了功能强大IOC、AOP及Web MVC等功能 。
Spring可以单独应用于构筑应用程序,也可以和Struts、Webwork、Tapestry等众多Web框架组合使用,并且可以与 Swing等桌面应用程序AP组合。
因此, Spring不仅仅能应用于J2EE应用程序之中,也可以应用于桌面应用程序以及小应用程序之中。Spring框架主要由七部分组成,分别是 Spring Core、 Spring AOP、 Spring ORM、 Spring DAO、Spring Context、 Spring Web和 Spring Web MVC 。
1.简介
- Spring:春天----> 给软件行业带来了春天
- 2002,首次推出了Spring框架的出行:interface21框架
- Spring框架即以interface21框架为基础,经过重新设计,并不断丰富其内涵,于2004年3月24日正式发布1.0版本
- Rod Johnson ,Spring Framework创始人,著名作者,很难想象Rod Johnson的学历,真的让好多人大吃一惊,他是悉尼大学的博士,然而他不是计算机专业的,而是音乐学。
- Spring理念:是现有的技术更加容易使用,本身是一个大杂烩。
- SSH:Struct2 + Spring + Hibernate
- SSM: SpringMVC + Spring + Mybatis
官网: https://spring.io/projects/spring-framework#overview
官方下载: https://repo.spring.io/release/org/springframework/spring/
GitHub: https://github.com/spring-projects/spring-framework
依赖:
<dependency>
    <groupId>org.springframeworkgroupId>
    <artifactId>spring-webmvcartifactId>
    <version>5.3.9version>
dependency>
<dependency>
    <groupId>org.springframeworkgroupId>
    <artifactId>spring-jdbcartifactId>
    <version>5.3.9version>
dependency>
1.2 优点
- spring是开源的免费的容器。
- spring是一个轻量级的,非入侵式的框架。
- 控制反转(IOC),面向切面编程 (AOP)。
- 支持事务处理,对框架整合的支持。
OC和AOP简介
-
IOC:控制反转。
控制反转(Inversion of Control),又叫依赖注入(Dependency Injection)。简单来说,在未使用IOC之前,假如说有一个User类,要调用里面的方法(不是静态方法),就要new一个对象(如:User user=new User),然后进行调用。但对于Spring的IOC来说,把new对象这个过程交给了Spring来实现并进行管理,程序员只需要使用即可。 -
AOP:面向切面编程。
面向切面编程(Aspect Orient Programming)支持允许将一些通用的任务如安全、事务、日志、缓存等进行集中式处理,从而提供了更好的复用,AOP通常用来处理一些具有横切性质的系统级服务。
总结:spring是一个轻量级的控制反转(IOC)和面向切面编程(AOP)的框架。
1.3 Spring系统架构图

- Data Access:数据访问
- Data Integration:数据集成
- Web:Web开发
- AOP:面向切面编程
- Aspects:AOP思想实现
- Core Container:核心容器
- Test:单元测试与集成测试
1.4 扩展
在Spring的官网有这个介绍:现代的java开发!说白了就是基于Spring的开发!
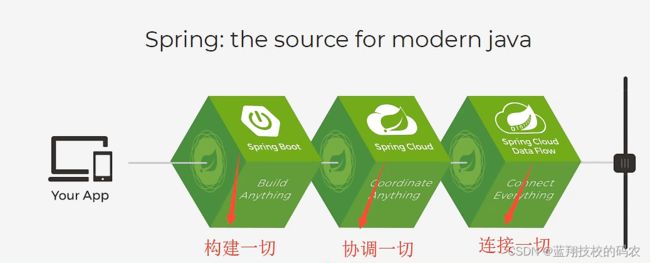
Spring Boot与Spring Cloud:
- Spring Boot是 Spring 的一套快速配置脚手架,可以基于Spring Boot快速开发单个微服务;
- Spring Cloud是基于Spring Boot实现的;
- Spring Boot专注于快速、方便集成的单个微服务个体,Spring Cloud关注全局的服务治理框架;
- Spring Boot使用了约束优于配置的理念,很多集成方案已经帮你选择好了,能不配置就不配置,Spring Cloud很大的一部分是基于Spring Boot来实现,,Spring Boot可以离开Spring Cloud独立使用开发项目,但是Spring Cloud离不开Spring Boot,属于依赖的关系。
- SpringBoot在SpringClound中起到了承上启下的作用,如果你要学习SpringCloud必须要学习SpringBoot.
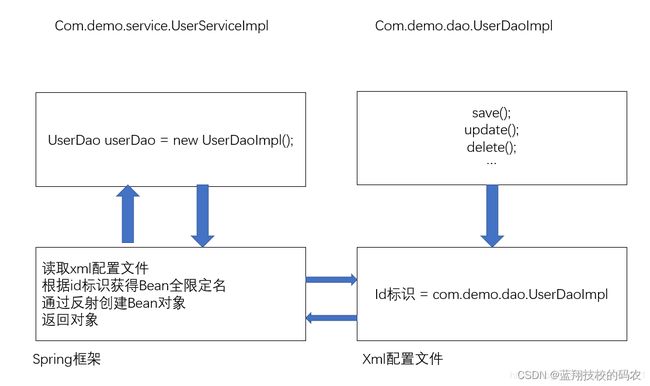
2、 IOC 理论推导
2.1 引言
- UserDao
- UserDaoImp 实现类
- UserSevice 业务接口
- UserServiceImp 业务实现类
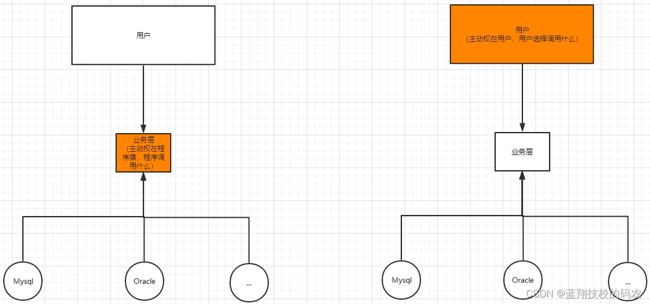
在之前,用户的需求可能会影响原来的代码。

之前,程序是主动创建对象,控制权在程序员手上。
使用set注入之后,程序不再具有主动性,变成了被动的接收对象。
IOC思想,从本质上解决了问题,程序员不用再去管理对象的创建了,系统的耦合性降低,可以更加专注的业务层
这是IOC的原型,反转就是把主动权交给用户
所以,使用Spring的开发步骤如下:
(1)导入Spring使用需要的maven坐标
(2)创建Bean对象,即dao层和service层中的类
(3)创建applicationContext.xml文件
(4)在配置文件中进行配置
(5)创建ApplicationContext对象getBean()
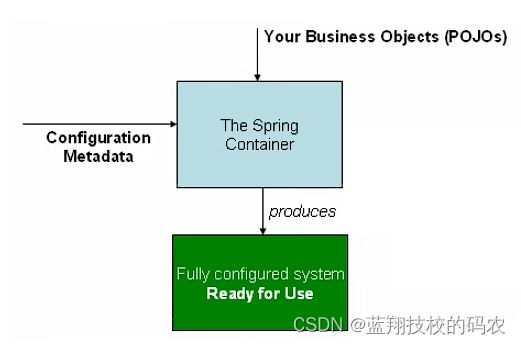
2.2 IOC本质
-
控制反转IoC(Inversion of Control),是一种设计思想,DI(依赖注入)是实现IoC的一种方法.
-
没有IoC的程序中 , 我们使用面向对象编程 , 对象的创建与对象间的依赖关系完全硬编码在程序中,对象的创建由程序自己控制
-
控制反转后将对象的创建转移给第三方,获得依赖对象的方式反转了。

-
IoC是Spring框架的核心内容,使用多种方式完美的实现了IoC,可以使用XML配置,也可以使用注解,新版本的Spring也可以零配置实现IoC。
-
Spring容器在初始化时先读取配置文件,根据配置文件或元数据创建与组织对象存入容器中,程序使用时再从Ioc容器中取出需要的对象。

- 控制反转是一种通过描述(XML或注解)并通过第三方去生产或获取特定对象的方式。在Spring中实现控制反转的是IoC容器,其实现方法是依赖注入(Dependency Injection,DI)。
2.3 控制反转
IOC
控制: 谁来控制对象的创建,传统应用是由程序员控制对象的创建,使用spring后,对象是由spring来控制
反转: 程序本身不创建对象,而变成被动的接收对象
依赖注入: 就是利用set方法来进行注入
IOC是一种编程思想,由主动的编程变成被动的接收,可以通过ClassPathXmlApplicationContext 去浏览一下底层源码
现在,我们彻底不用在程序中改动了,要实现不同的操作,只需要在xml配置中进行修改。所谓的IOC:对象由spring进行创建、管理、装配
xml模板
<beans xmlns="http://www.springframework.org/schema/beans"
       xmlns:xsi="http://www.w3.org/2001/XMLSchema-instance"
       xsi:schemaLocation="http://www.springframework.org/schema/beans
        https://www.springframework.org/schema/beans/spring-beans.xsd">


beans>

3. IOC创建对象的方式
public class User {
    private int id;
    private String name;

    public User(int id,String name) {
        System.out.println("--------这是有参构造方法--------");
        this.id = id;
        this.name = name;
    }
	//。。。省略 get / set 方法
3.1 使用无参构造创建对象,默认
<bean name="User" class="com.kuang.pojo.User">bean>
3.2 有参构造创建对象有三种方式
3.2.1 下标匹配方式 0 表示下标为0的参数 (也就是第一个参数)
        <bean id="user" class="com.hardy.pojo.User">
            <constructor-arg index="0" value="hardy"/>
        bean>
3.2.2 参数类型匹配方式,不建议使用,两个string会冲突
        <bean id="user" class="com.hardy.pojo.User">
            <constructor-arg type="java.lang.String" value="hardy"/>
        bean>
3.2.3 直接通过参数名匹配 ref
        <bean id="user" class="com.hardy.pojo.User">
            <constructor-arg name="name" value="hardy3"/>
        bean>
3.3 小总结
在配置文件加载的时候,所有的bean就已经被实例化了,要用直接去get就可以了
内存中只有一份实例
    public static void main(String[] args) {
    	//绑定完配置文件,bean就已经被实例化了
        ClassPathXmlApplicationContext context = new ClassPathXmlApplicationContext("beans.xml");

        User user = (User) context.getBean("user");
        user.show();
        System.out.println(user);
    }
4. Spring配置
4.1 别名
<alias name="user" alias="userNew"/>
4.2 bean的配置
    <bean id="user" class="com.hardy.pojo.User" name="user2,u2" scope="singleton">
    <constructor-arg name="name" value="hardy3"/>
    bean>
4.3、 import
这个import,一般用于团队开发使用,他可以将多个配置文件,导入合并为一个
applicationContext.xml
        <import resource="beans.xml"/>
        <import resource="beans2.xml"/>
        <import resource="beans3.xml"/>
5. 依赖注入(DI)dependency injection
5.1 构造器注入
前面讲过了
5.2 set方式注入【重点】
5.2.1 依赖注入:set注入
依赖 : bean对象的创建依赖于容器
注入 : bean对象中的所有属性,由容器来注入
【环境搭建】
- 复杂类型
public class Address {

    private String address;

    public String getAddress() {
        return address;
    }

    public void setAddress(String address) {
        this.address = address;
    }
}
- 真实测试对象
    private String name;
    private Address address;
    private String[] books;
    private List<String> hobbys;
    private Map<String,String> card;
    private Set<String> games;
    private String wife;
    private Properties info;
- beans.xml
<beans xmlns="http://www.springframework.org/schema/beans"
       xmlns:xsi="http://www.w3.org/2001/XMLSchema-instance"
       xsi:schemaLocation="http://www.springframework.org/schema/beans
        https://www.springframework.org/schema/beans/spring-beans.xsd">

    <bean id="address" class="com.hardy.pojo.Address">
        <property name="address" value="郑州"/>
    bean>

    <bean id="student" class="com.hardy.pojo.Student">

        <property name="name" value="hardy"/>

        <property name="address" ref="address"/>

        <property name="books">
            <array>
                <value>三国演义value>
                <value>水浒传value>
                <value>红楼梦value>
                <value>西游记value>
            array>
        property>

        <property name="hobbys">
            <list>
                <value>听歌value>
                <value>看书value>
                <value>学Javavalue>
            list>
        property>

        <property name="card">
            <map>
                <entry key="校园卡" value="201112084"/>
                <entry key="银行卡" value="2637643487362476376"/>
            map>
        property>

        <property name="games">
            <set>
                <value>LOLvalue>
                <value>梦幻西游value>
                <value>绝地求生value>
            set>
        property>

        <property name="wife">
            <null/>
        property>

        <property name="info">
            <props>
                <prop key="driver">201112084prop>
                <prop key="url">hardyprop>
                <prop key="username">rootprop>
                <prop key="password">rootprop>
            props>
        property>
    bean>
beans>
- 测试类
public class MyTest {
    public static void main(String[] args) {
            ClassPathXmlApplicationContext context = new ClassPathXmlApplicationContext("beans.xml");

        Student student = (Student) context.getBean("student");

        System.out.println(student.toString());
        /**
         * Student{
         *  name='hardy',
         *  address=Address{address='郑州'},
         *  books=[三国演义, 水浒传, 红楼梦, 西游记],
         *  hobbys=[听歌, 看书, 学Java],
         *  card={
         *      校园卡=201112084,
         *      银行卡=263764348736246},
         *  games=[LOL, 梦幻西游, 绝地求生],
         *  wife='null',
         *  info={
         *      password=root,
         *      url=hardy,
         *      driver=201112084,
         *      username=root}}
         */
    }
}
5.3 拓展方式注入
我们可以使用 P命名空间 和 C命名空间 注入
注意:需要导入xml约束
	xmlns:p="http://www.springframework.org/schema/p"

    <!--p命名空间注入,可以直接注入属性  property  -->
    <bean id="user" class="com.hardy.pojo.User" p:age="18" p:name="hardy"/>
	xmlns:c="http://www.springframework.org/schema/c"

	<!--C命名空间注入,通过有参构造器注入,constructor  -->
    <bean id="user2" class="com.hardy.pojo.User" c:name="张三" c:age="23"/>
5.4 bean的作用域:6种
- singleton:全局只能有1个
- prototype:每一个变量都有一个自己的
以下的只能在web中使用:
- request
- session
- application
- websocket
5.4.1 单例模式(spring默认机制)
<bean id="user2" class="com.hardy.pojo.User" c:name="张三" c:age="23" scope="singleton"/>
    @Test
    public void test(){
        ClassPathXmlApplicationContext context = new ClassPathXmlApplicationContext("userbean.xml");
        User user = (User) context.getBean("user2",User.class);
        User user2 = (User) context.getBean("user2",User.class);
        System.out.println(user==user2);
    }
    //结果为:true
5.4.2 原型模式 每一次从容器中get的时候,会产生新的对象
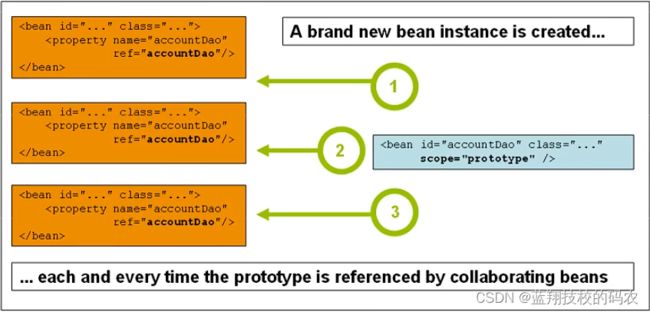
<bean id="user2" class="com.hardy.pojo.User" c:name="张三" c:age="23" scope="prototype"/>
	@Test
    public void test(){
        ClassPathXmlApplicationContext context = new ClassPathXmlApplicationContext("userbean.xml");
        User user = (User) context.getBean("user2",User.class);
        User user2 = (User) context.getBean("user2",User.class);
        System.out.println(user==user2);
    }
    //结果为:false
6.bean的自动装配
6.1 setter注入和自动装配的区别
自动装配用于引用类型依赖注入,不能对简单类型进行操作自动装配优先级低于setter注入与构造器注入,同时出现时自动装配失效。
展示setter注入
BookDao.java
package com.example.redis.dao;

public interface BookDao {
    void save();
}
BookDaoImpl.java
package com.example.redis.dao.impl;

import com.example.redis.dao.BookDao;

public class BookDaoImpl implements BookDao {
    @Override
    public void save() {
        System.out.println("book dao save.......");
    }
}
BookService.java
package com.example.redis.service;

public interface BookService {
    void save();
}
BookServiceImpl.java
package com.example.redis.service.impl;

import com.example.redis.dao.BookDao;
import com.example.redis.service.BookService;

public class BookServiceImpl implements BookService {

    private BookDao bookDao;

    public void setBookDao(BookDao bookDao) {
        this.bookDao=bookDao;
    }

    @Override
    public void save() {
        bookDao.save();
        System.out.println("book service save.......");
    }

}
配置xml:applicationContext.xml
<beans xmlns="http://www.springframework.org/schema/beans"
       xmlns:xsi="http://www.w3.org/2001/XMLSchema-instance"
       xsi:schemaLocation="http://www.springframework.org/schema/beans http://www.springframework.org/schema/beans/spring-beans.xsd">

    <bean id="bookDaox" class="com.example.redis.dao.impl.BookDaoImpl" />


    <bean id="bookService" class="com.example.redis.service.impl.BookServiceImpl" >
        <property name="bookDao" ref="bookDaox" >property>
    bean>

beans>
测试testbook
package com.example;

import com.example.redis.service.BookService;
import org.springframework.context.ApplicationContext;
import org.springframework.context.support.ClassPathXmlApplicationContext;

public class testbook {
    public static void main(String[] args) {
        ApplicationContext context =new ClassPathXmlApplicationContext("applicationContext.xml");
        BookService bookService = (BookService) context.getBean("bookService");
        bookService.save();
    }
}
展示byName自动配置
只用改变配置文件applicationContext.xml
<beans xmlns="http://www.springframework.org/schema/beans"
       xmlns:xsi="http://www.w3.org/2001/XMLSchema-instance"
       xsi:schemaLocation="http://www.springframework.org/schema/beans http://www.springframework.org/schema/beans/spring-beans.xsd">

    <bean id="bookDao" class="com.example.redis.dao.impl.BookDaoImpl" />


    <bean id="bookService" class="com.example.redis.service.impl.BookServiceImpl" autowire="byName" />
beans>
展示byType自动配置
只用改变配置文件applicationContext.xml
<beans xmlns="http://www.springframework.org/schema/beans"
       xmlns:xsi="http://www.w3.org/2001/XMLSchema-instance"
       xsi:schemaLocation="http://www.springframework.org/schema/beans http://www.springframework.org/schema/beans/spring-beans.xsd">

    <bean id="bookDao" class="com.example.redis.dao.impl.BookDaoImpl" />


    <bean id="bookService" class="com.example.redis.service.impl.BookServiceImpl" autowire="byType" />

beans>
byType可以省略id名称,比如:
输出结果
上面的输出结果都是:
book dao save.......
book service save.......
- 自动装配是spring满足bean依赖的一种方式
- spring会在上下文中自动寻找,并自动给bean装配属性
在spring中有三种装配方式:
- 在xml中显示的配置
- 在Java中显示的配置
- 隐式的自动装配bean【重要】
6.2 测试
【环境搭建】
一个人有两只宠物!
6.3 ByName自动装配
        <bean id="cat" class="com.hardy.pojo.Cat"/>
        <bean id="dog222" class="com.hardy.pojo.Dog"/>


        <bean id="people" class="com.hardy.pojo.People" autowire="byName">
            <property name="name" value="张三" />
        bean>
6.4 ByType自动装配
        <bean id="cat" class="com.hardy.pojo.Cat"/>
        <bean id="dog222" class="com.hardy.pojo.Dog"/>


        <bean id="people" class="com.hardy.pojo.People" autowire="byType">
            <property name="name" value="张三" />
        bean>
小结:
byname: 需要保证所有bean的ID唯一,并且这个bean需要和自动注入的属性的set方法的值一致
bytype: 需要保证所有bean的class唯一,并且这个bean需要和自动注入的类型一致。
6.5 使用注解实现自动装配
使用注解自动装配
jdk1.5支持的注解,spring2.5支持的注解
The introduction of annotation-based configuration raised the question of whether this approach is “better” than XML.
使用注解须知:
- 1、导入约束:
context约束 - 2、配置注解的支持:
context:annotation-config/
<beans xmlns="http://www.springframework.org/schema/beans"
    xmlns:xsi="http://www.w3.org/2001/XMLSchema-instance"
    xmlns:context="http://www.springframework.org/schema/context"
    xsi:schemaLocation="http://www.springframework.org/schema/beans
        https://www.springframework.org/schema/beans/spring-beans.xsd
        http://www.springframework.org/schema/context
        https://www.springframework.org/schema/context/spring-context.xsd">

    <context:annotation-config/>

beans>
6.5.1 @Autowired 注解
在属性上个使用,也可以在set上使用
我们可以不用编写set方法,前提是你自动装配的属性在IOC容器中,且符合名字byname
科普:
@Nullable  字段标记了这个注解,说明这个字段可以为null
//例如:
    public People(@Nullable String name) {
        this.name = name;
    }
源码:
public @interface Autowired {
    boolean required() default true;
}

@Autowired(required = false)
//说明这个对象可以为null,否则不允许为空,即使为null也不会报错
测试代码:
public class People {
    //说明这个对象可以为null,否则不允许为空,即使为null也不会报错
    @Autowired(required = false)
    private Cat cat;
    @Autowired
    private Dog dog;
    private String name;
}
如果@Autowired自动装配环境比较复杂。自动装配无法通过一个注解完成的时候
我们可以使用@Qualifier(value = “dog”)去配合使用,指定一个唯一的id对象
public class People {
    @Autowired
    private Cat cat;
    @Autowired
    @Qualifier(value = "dog222")
    private Dog dog;
    private String name;
}
6.5.2 @Resource 注解
public class People {

    @Resource(name = "cat2")
    private Cat cat;
    @Resource
    private Dog dog;
}
小结:
@Resource和@Autowired的区别:
- 都是用来自动装配的,都可以放在属性字段上
@Autowired默认通过byType的方式实现,当匹配到多个同类型时,使用byname进行装配@Resource默认通过byname的方式实现,如果找不到名字,则通过byType方式实现- 执行顺序不同:
@Autowired默认通过byType的方式实现,@Resource默认通过byname的方式实现

7. 使用注解开发
- 确定已经导入aop的包
- 增加注解支持
aop
<beans xmlns="http://www.springframework.org/schema/beans"
       xmlns:xsi="http://www.w3.org/2001/XMLSchema-instance"
       xmlns:context="http://www.springframework.org/schema/context"
       xmlns:aop="http://www.springframework.org/schema/aop"
       xsi:schemaLocation="http://www.springframework.org/schema/beans
        https://www.springframework.org/schema/beans/spring-beans.xsd
        http://www.springframework.org/schema/context
        https://www.springframework.org/schema/context/spring-context.xsd
        http://www.springframework.org/schema/aop
        https://www.springframework.org/schema/aop/spring-aop.xsd">


    <context:annotation-config/>
beans>
- bean
//@Component 组件
//等价于- 属性如何注入
@Component
public class User {
public String name;
@Value("hardy")
//相当于- 衍生的注解
@Component 有几个衍生的注解,我们在web开发中,会按照mvc三层架构分层
-
dao 【@Repository】
-
service 【@Service】
-
controller 【@Controller】
这四个注解功能都是一样的,都是代表将某个类注册到spring容器中,装配bean
- 自动装配置
- @Autowired:自动装配通过类型,名字
  如果autowired不能唯一自动装配上属性,则需要通过
- @Qualifier(value = "xxx")
- @Resource:自动装配通过名字,类型
- @Nullable:字段标记了这个注解,说明这个字段可以为null
- 作用域
@Component
@Scope("prototype")
public class User {
public String name;
@Value("hardy")
//相当于- 小结
- xml与注解:
- xml 更加万能,适用于任何场合,维护简单方便
- 注解 不是自己的类使用不了,维护相对复杂
- xml与注解的最佳实践:
- xml用来管理 bean,注解只负责完成属性的注入
- 生产过程中:唯一需要注意,想让注解生效,就必须开启注解的支持
    <context:component-scan base-package="com.hardy.dao"/>

    <context:annotation-config/>
xml配置与注解配置对比

8、 使用Java方式配置Spring
我们现在要完全不使用Spring的xml配置了,全权交给 java 来做!
JavaConfig是Spring的一个子项目,在Spring 4之后,它成为了一个核心功能!
8.1 配置类
@Configuration
/**
 * 在一个类上,加上Configuration 这个类就变成了配置类
 * Configuration也会被spring托管,因为他本身就是一个component
  */
@ComponentScan("com.hardy")
@Import(HardyConfig2.class)
public class HardyConfig {

    //注册一个bean
    //id 就是方法名
    //class属性  就是方法的返回值
    @Bean
    public User getUser(){
        return new User();
    }
}
8.2 实体类
@Component
public class User {
    private  String name;
    public String getName() {
        return name;
    }
   	//value对应  标签中的 property -- value
    @Value("hardy")
    public void setName(String name) {
        this.name = name;
    }
}
8.3 测试类
public class MyTest {
    public static void main(String[] args) {
        //如果完全使用了配置类方式去做,我们就只能通过AnnotationConfig 上下文来获取容器,
        // 通过配置类的class对象加载。
        ApplicationContext context = new AnnotationConfigApplicationContext(HardyConfig.class);
        User user = (User) context.getBean("getUser");//配置类的id名就是方法名
        System.out.println(user.getName());
    }
}
9、代理模式
为什么要学习代理模式?因为这就是Spring AOP的底层 【Spring AOP 和 Spring MVC】必问
代理模式的分类:
- 静态代理
- 动态代理

9.1 静态代理
角色分析:
- 抽象角色:一般会使用接口或者抽象类来解决
- 真实角色:被代理的角色
- 代理角色:代理别人的角色,里面处理一些业务
- 客户:访问代理对象的人
步骤:
- 接口
//租房
public interface Rent {
    public void rent();
}
- 真实角色
public class Host implements Rent{
    @Override
    public void rent() {
        System.out.println("房东要出租房子");
    }
}
- 代理角色
public class Proxy implements Rent{
    // 代理角色第一件事,找房东搭伙  先用组合,少用继承(有局限)
    private Host host;//组合

    public Proxy() {
    }

    public Proxy(Host host) {
        this.host = host;
    }

    @Override
    public void rent() {
        seeHouse();
        host.rent();
        contract();
        fare();
    }

    //看房
    public void seeHouse(){
        System.out.println("中介带你看房");
    }

    //签合同
    public void contract(){
        System.out.println("签租赁合同");
    }

    //收中介费
    public void fare(){
        System.out.println("收中介费");
    }
}
- 客户端访问代理
public class Client {
    public static void main(String[] args) {
        //房东要租房子
        Host host = new Host();
        //中介
        Proxy proxy = new Proxy(host);
        proxy.rent();
    }
}
代理模式的好处:
- 可以使真实角色的操作更加纯粹,不用去关注一些公共的业务
- 公共业务交给代理角色,实现业务分工
- 公共业务发生扩展时,方便集中管理
缺点:
一个真实角色就会产生一个代理角色:代码量会翻倍,开发效率变低
9.2 加深理解
9.3 动态代理
- 动态代理和静态代理角色一样
- 动态代理的代理类是动态生成的,不是我们直接写好的
- 动态代理分为两大类:基于接口的动态代理、基于类的动态代理
- 基于接口----JDK动态代理
- 基于类:cglib
- java字节码实现:javasist 【常用】
需要了解两个类:Proxy:代理,InvocationHandler:调用处理程序
- proxy 这个类用来动态生成代理对象
- InvocationHandler 用来处理业务
模板
public class ProxyInvocationHandler implements InvocationHandler {
    //与业务接口组合
    private Object Target;
    //set方法 注入业务
    public void setTarget(Object target) {
        Target = target;
    }

    //生成代理类
    //获取当前类的加载器,获取业务的接口,当前对象
    public Object getProxy(){
        return Proxy.newProxyInstance(this.getClass().getClassLoader(),
                Target.getClass().getInterfaces(),this);

    }

    //处理业务,并返回结果
    @Override
    public Object invoke(Object proxy, Method method, Object[] args) throws Throwable {
        //niubi
        log(method.getName());
        Object result = method.invoke(Target, args);
        return result;
    }

    //添加日志
    public void log(String msg){
        System.out.println("[debug]调用了"+msg+"方法");
    }
}
public class Client {
    public static void main(String[] args) {
        //真实角色
        UserServiceImpl userService = new UserServiceImpl();
        //代理角色,不存在,找他的处理程序
        ProxyInvocationHandler pih = new ProxyInvocationHandler();

        pih.setTarget(userService);//设置要代理的对象
        //动态生成代理类
        UserService proxy = (UserService) pih.getProxy();

        proxy.delete();
    }
}
动态代理的好处:
- 可以使真实角色的操作更加纯粹,不用去关注一些公共的业务
- 公共业务交给代理角色,实现业务分工
- 公共业务发生扩展时,方便集中管理
- 一个动态代理类代理的一个接口,一般就是对应的一类业务
- 一个动态代理类可以代理多个类,只要是实现了同一个接口即可
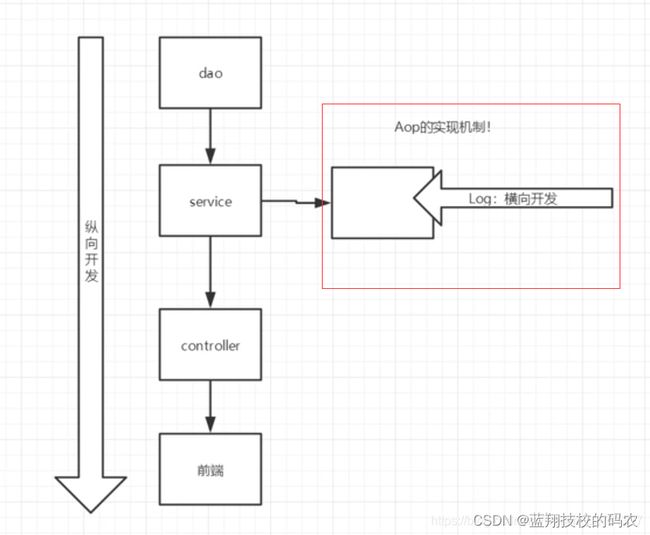
10、AOP
10.1 AOP概念
AOP(Aspect Oriented Programming)面向切面编程 ,通过 预编译方式 和 运行期动态代理 实现程序功能的 统一维护 的一种技术。AOP是OOP的延伸,是Spring框架中的一个重要内容,也是函数式编程的一种衍生范型。利用AOP可以对业务逻辑的各个部分进行隔离,降低耦合性,提高可用性
10.2 AOP在Spring中的作用
提供声明式事务;允许用户自定义切面
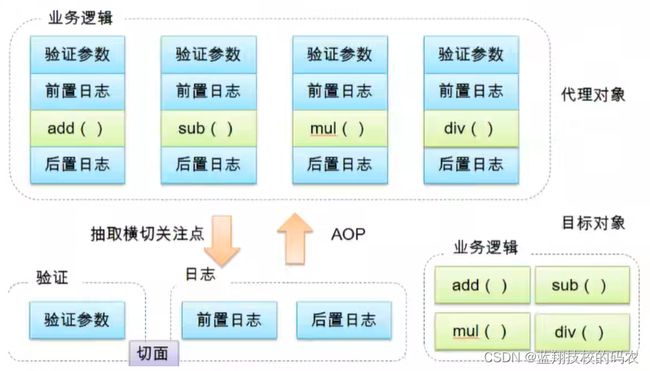
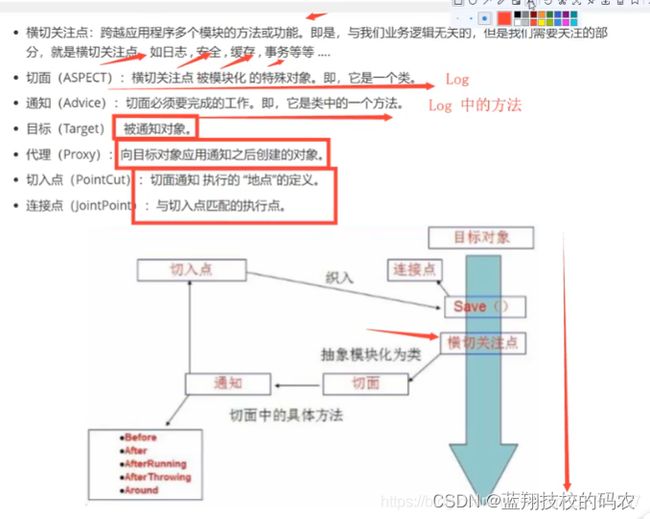
- 横切关注点: 跨越应用程序多个模块的方法或功能。就是于业务逻辑无关,但需要关注的部分,比如日志、安全、缓存、事务。。
- 切面(Aspect): 横切关注点被模块化的特殊对象(一个类)
- 通知(Advice): 切面需要完成的工作(类中的一个方法)
- 目标(Target): 被通知对象
- 代理(proxy): 向目标对象应用通知之后创建的对象
- 切入点(pointCut): 切面通知执行的 地点 的定义
- 连接点(JoinPoint): 与 切入点 匹配的 执行点
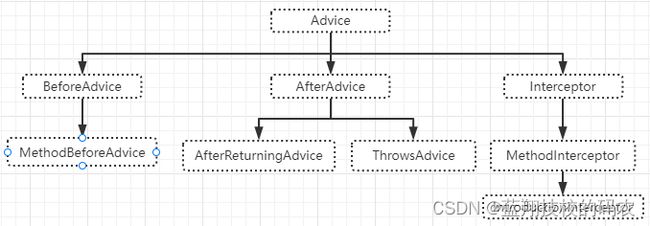
SpringAOP中,通过Advice定义横切逻辑,Spring中支持5种类型的Advice:
| 通知类型 | 连接点 | 实现接口 |
|---|---|---|
| 前置通知 | 方法前 | org.springframework.aop.MethodBeforeAdvice |
| 后置通知 | 方法后 | org.springframework.aop.AfterReturningAdvice |
| 环绕通知 | 方法前后 | org.aopalliance.intercept.MethodInterceptor |
| 异常抛出通知 | 方法抛出异常 | org.springframework.aop.ThrowsAdvice |
| 引介通知 | 类中增加新的方法属性 | org.springframework.aop.IntroductionInterceptor |
10.3 使用Spring实现AOP
使用AOP织入,需要导入依赖包
<dependencies>
    <dependency>
        <groupId>org.aspectjgroupId>
        <artifactId>aspectjweaverartifactId>
        <version>1.9.4version>
    dependency>
dependencies>
创建Service接口和实现类
//接口
public interface UserService {
    public void add();
    public String delete();
    public void update();
    public void select();
}
//实现类
public class UserServiceImpl implements UserService {
    public void add() {
        System.out.println("add");
    }
    public String delete() {
        System.out.println("delete");
        return "删除了一条数据";
    }
    public void update() {
        System.out.println("update");
    }
    public void select() {
        System.out.println("select");
    }
}
log类
//在方法调用之前执行
public class BeforeLog implements MethodBeforeAdvice {

    public void before(Method method, Object[] args, Object target) throws Throwable {
        System.out.println("before----------------------"+method.getClass().getName()+"类,执行了"+method.getName()+"方法");
    }
}

//方法调用之后执行
public class AfterLog implements AfterReturningAdvice {
    public void afterReturning(Object returnValue, Method method, Object[] args, Object target) throws Throwable {
        System.out.println("after-------"+method.getClass().getName()+"类,执行了"+method.getName()+"方法,返回值是----"+returnValue);
    }
}
Spring核心配置文件
<beans xmlns="http://www.springframework.org/schema/beans"
       xmlns:xsi="http://www.w3.org/2001/XMLSchema-instance"
       xmlns:aop="http://www.springframework.org/schema/aop"
       xsi:schemaLocation="http://www.springframework.org/schema/beans
        https://www.springframework.org/schema/beans/spring-beans.xsd
        http://www.springframework.org/schema/aop
        https://www.springframework.org/schema/aop/spring-aop.xsd">


    <bean id="userService" class="com.kuang.service.UserServiceImpl"/>
    <bean id="beforeLog" class="com.kuang.log.BeforeLog"/>
    <bean id="afterLog" class="com.kuang.log.AfterLog"/>


    <aop:config>

        <aop:pointcut id="pointCut" expression="execution(* com.kuang.service.UserServiceImpl.*(..))">aop:pointcut>

        <aop:advisor advice-ref="beforeLog" pointcut-ref="pointCut"/>
        <aop:advisor advice-ref="afterLog" pointcut-ref="pointCut"/>
    aop:config>

beans>
测试类
@Test
public void testLogAdd(){
    ApplicationContext context = new ClassPathXmlApplicationContext("application-context.xml");
    //动态代理代理的是接口
    UserService userService = context.getBean("userService", UserService.class);
    userService.add();
}

@Test
public void testLogDelete(){
    ApplicationContext context = new ClassPathXmlApplicationContext("application-context.xml");
    UserService userService = context.getBean("userService", UserService.class);
    userService.delete();
}
10.4 自定义类实现AOP
自定义类:
public class DiyPointCut {
    public void before(){
        System.out.println("========方法执行前=========");
    }
    public void after(){
        System.out.println("========方法执行后=========");
    }
}
xml配置
<bean id="diy" class="com.hardy.diy.DiyPointCut"/>

<aop:config>
    <aop:aspect ref="diy">

        <aop:pointcut id="point" expression="execution(* com.hardy.service.UserServiceImpl.*(..))"/>

        <aop:before method="before" pointcut-ref="point"/>
        <aop:after method="after" pointcut-ref="point"/>
    aop:aspect>
aop:config>
10.5 使用注解实现AOP
自定义类,添加注解:
@Aspect
public class AnnotationAspect {
    @Before("execution(* com.kuang.service.UserService.*(..))")
    public void before(){
        System.out.println("方法执行前-------------------");
    }

    @After("execution(* com.kuang.service.UserService.*(..))")
    public void after(){
        System.out.println("-------------------方法执行后");
    }

    @Around("execution(* com.kuang.service.UserService.*(..))")
    public void around(ProceedingJoinPoint pj) throws Throwable {
        System.out.println("----环绕前----");

        Signature signature = pj.getSignature();//获得签名
        System.out.println("方法签名:"+signature);

        pj.proceed();//执行方法(必须显示调用,否则方法不执行)

        System.out.println("----环绕后----");
    }
}
xml文件配置:
<bean id="userService" class="com.kuang.service.UserServiceImpl"/>

<bean id="annotationAspect" class="com.kuang.log.AnnotationAspect"/>


<aop:aspectj-autoproxy/>
执行结果:
----环绕前----
方法签名:String com.kuang.service.UserService.delete()
方法执行前-------------------
delete
-------------------方法执行后
----环绕后----
11、整合Mybatis
11.1 回忆Mybatis
导入相关jar包
- Junit
- mybatis
- MySQL
- spring相关
- aop织入
- mybatis-spring 【new】

<dependency>
    <groupId>junitgroupId>
    <artifactId>junitartifactId>
    <version>4.11version>
dependency>

<dependency>
    <groupId>mysqlgroupId>
    <artifactId>mysql-connector-javaartifactId>
    <version>8.0.29version>
dependency>

<dependency>
    <groupId>org.mybatisgroupId>
    <artifactId>mybatisartifactId>
    <version>3.5.10version>
dependency>

<dependency>
    <groupId>org.springframeworkgroupId>
    <artifactId>spring-jdbcartifactId>
    <version>5.3.20version>
dependency>

<dependency>
    <groupId>org.aspectjgroupId>
    <artifactId>aspectjweaverartifactId>
    <version>1.9.9.1version>
dependency>

<dependency>
    <groupId>org.mybatisgroupId>
    <artifactId>mybatis-springartifactId>
    <version>2.0.7version>
dependency>
<dependency>
    <groupId>org.springframeworkgroupId>
    <artifactId>spring-webmvcartifactId>
    <version>5.3.20version>
dependency>
Maven静态资源导出问题
<build>
    <resources>
        <resource>
            <directory>src/main/javadirectory>
            <includes>
                <include>**/*.propertiesinclude>
                <include>**/*.xmlinclude>
            includes>
            <filtering>falsefiltering>
        resource>
        <resource>
            <directory>src/main/resourcesdirectory>
            <includes>
                <include>**/*.propertiesinclude>
                <include>**/*.xmlinclude>
            includes>
            <filtering>falsefiltering>
        resource>
    resources>
build>
实体类
@Data
public class User {
    private int id;
    private String userName;
    private String userPwd;
}
Mapper接口
public interface UserMapper {
    //根据id查询用户
    User getUserById(int id);
}
Mapper.xml
DOCTYPE mapper
        PUBLIC "-//mybatis.org//DTD Mapper 3.0//EN"
        "http://mybatis.org/dtd/mybatis-3-mapper.dtd">

<mapper namespace="com.kuang.mapper.UserMapper">


    <select id="getUserById" parameterType="int" resultType="com.kuang.pojo.User">
        select * from user where id = #{id}
    select>
mapper>
配置文件
driver=com.mysql.cj.jdbc.Driver
url=jdbc:mysql://localhost:3306/stu?useSSL=false&useUnicode=true&characterEncoding=UTF-8
username=root
password=123456


DOCTYPE configuration
        PUBLIC "-//mybatis.org//DTD Config 3.0//EN"
        "http://mybatis.org/dtd/mybatis-3-config.dtd">
<configuration>
    <properties resource="db.properties">properties>

    <settings>

        <setting name="mapUnderscoreToCamelCase" value="true"/>
    settings>

    <environments default="development">
        <environment id="development">
            <transactionManager type="JDBC"/>
            <dataSource type="POOLED">
                <property name="driver" value="${driver}"/>
                <property name="url" value="${url}"/>
                <property name="username" value="${username}"/>
                <property name="password" value="${password}"/>
            dataSource>
        environment>
    environments>
    <mappers>
        <mapper resource="com/kuang/mapper/UserMapper.xml"/>
    mappers>
configuration>
MybatisUtils工具类:
public class MybatisUtils {
    /*
    每个基于 MyBatis 的应用都是以一个 SqlSessionFactory 的实例为核心的。SqlSessionFactory 的实例可以通过 SqlSessionFactoryBuilder 获得。
        而 SqlSessionFactoryBuilder 则可以从 XML 配置文件或一个预先配置的 Configuration 实例来构建出 SqlSessionFactory 实例。
    */
    private static SqlSessionFactory sqlSessionFactory;

    static{
        try {
            String resource = "mybatis-config.xml";
            InputStream inputStream = Resources.getResourceAsStream(resource);
            sqlSessionFactory = new SqlSessionFactoryBuilder().build(inputStream,"development");
        } catch (IOException e) {
            e.printStackTrace();
        }
    }

    /*
    * 有了 SqlSessionFactory,就可以从中获得 SqlSession 的实例。
    * SqlSession 提供了在数据库执行 SQL 命令所需的所有方法。
    */
    public static SqlSession getSqlSession(){
        return sqlSessionFactory.openSession();
    }
}
测试:
@Test
public void getUser(){
    SqlSession sqlSession = MybatisUtils.getSqlSession();
    UserMapper mapper = sqlSession.getMapper(UserMapper.class);
    User userById = mapper.getUserById(1);
    System.out.println(userById);
}
11.2 MyBatis-Spring
- 编写数据源配置
- sqlSessionFactory
- sqlSessionTemplete
mybatis-spring.xml
<beans xmlns="http://www.springframework.org/schema/beans"
       xmlns:xsi="http://www.w3.org/2001/XMLSchema-instance"
       xsi:schemaLocation="http://www.springframework.org/schema/beans
        https://www.springframework.org/schema/beans/spring-beans.xsd">


    <bean id="dataSource" class="org.springframework.jdbc.datasource.DriverManagerDataSource">
        <property name="driverClassName" value="com.mysql.cj.jdbc.Driver"/>
        <property name="url" value="jdbc:mysql://localhost:3306/stu?useSSL=false&useUnicode=true&characterEncoding=UTF-8"/>
        <property name="username" value="root"/>
        <property name="password" value="Wang.123456"/>
    bean>


    <bean id="sqlSessionFactoryBean" class="org.mybatis.spring.SqlSessionFactoryBean">

        <property name="dataSource" ref="dataSource" />

        <property name="configLocation" value="classpath:mybatis-config.xml"/>

        <property name="mapperLocations" value="classpath:com/kuang/mapper/*.xml"/>
    bean>


    <bean id="sqlSessionTemplate" class="org.mybatis.spring.SqlSessionTemplate">

        <constructor-arg index="0" ref="sqlSessionFactoryBean"/>
    bean>
beans>
- 给Mapper接口 添加实现类
public class UserMapperImpl implements UserMapper {

    //Spring中的SqlSessionTemplate,相当于mybatis中的sqlSession
    private SqlSessionTemplate sqlSessionTemplate;

    //添加set方法,在Spring配置文件中注入改属性
    //		也可通过@Resource 、@Autowired 注入
    public void setSqlSessionTemplate(SqlSessionTemplate sqlSessionTemplate) {
        this.sqlSessionTemplate = sqlSessionTemplate;
    }

    public User getUserById(int id) {
        UserMapper mapper = sqlSessionTemplate.getMapper(UserMapper.class);
        User userById = mapper.getUserById(id);
        return userById;
    }
}
- 在application-context.xml中,导入上面的配置信息,并注册Mapper实现类
<beans xmlns="http://www.springframework.org/schema/beans"
       xmlns:xsi="http://www.w3.org/2001/XMLSchema-instance"
       xmlns:aop="http://www.springframework.org/schema/aop"
       xsi:schemaLocation="http://www.springframework.org/schema/beans
        https://www.springframework.org/schema/beans/spring-beans.xsd
        http://www.springframework.org/schema/aop
        https://www.springframework.org/schema/aop/spring-aop.xsd">


    <import resource="mybatis-spring.xml"/>


    <bean id="userMapper" class="com.kuang.mapper.UserMapperImpl">
        <property name="sqlSessionTemplate" ref="sqlSessionTemplate"/>
    bean>

beans>
- 测试
@Test
public void getByS(){
    ApplicationContext context = new ClassPathXmlApplicationContext("application-context.xml");
    UserMapper userMapper = (UserMapper) context.getBean("userMapper");
    User userById = userMapper.getUserById(1);
    System.out.println(userById);
}
11.3 SqlSessionDaoSuppor
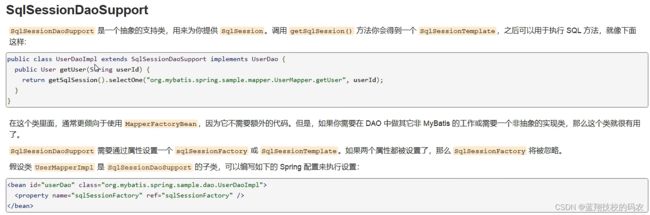
在上面的基础上,新建UserMapper 实现类 UserMapperImpl2
public class UserMapperImpl2 extends SqlSessionDaoSupport implements UserMapper {

    public User getUserById(int id) {
        //调用SqlSessionDaoSupport的方法,获取sqlSession
        SqlSession sqlSession = getSqlSession();
        //通过SqlSession获取mapper
        UserMapper mapper = sqlSession.getMapper(UserMapper.class);

        User userById = mapper.getUserById(id);
        return userById;
    }
在application-context.xml中注册bean。SqlSessionDaoSupport 需要通过属性设置一个 sqlSessionFactory 或 SqlSessionTemplate。如果两个属性都被设置了,那么 SqlSessionFactory 将被忽略。
<bean id="userMapper2" class="com.kuang.mapper.UserMapperImpl2">
    <property name="sqlSessionTemplate" ref="sqlSessionTemplate"/>
bean>
12、声明式事务
增删改需要事务,查询不需要(查询设置为只读)
- 声明式事务:AOP 【交由容器管理事务】
- 编程式事务:需要在代码中,进行事务的管理 【需要改变代码】
事务的7种传播行为
事务的使用过程中,用的最多的传播行为是require,能够满足大多数需要。一共7种行为:
| 行为 | 含义 |
|---|---|
| Require | 支持当前事务,如果没有事务,就建一个新的【Spring默认】 |
| Supports | 支持当前事务,如果当前没有事务,就以非事务方式执行 |
| Mandatory | 支持当前事务,如果当前没有事务,就抛出异常 |
| RequiresNew | 新建事务,如果当前存在事务,把当前事务挂起 |
| NotSupported | 以非事务方式执行操作,如果当前存在事务,就把事务挂起 |
| Never | 以非事务方式执行,如果当前存在事务,则抛出异常 |
| Nested | 建事务,如果当前存在事务,把当前事务挂起。与RequireNew的区别是与父事务相关,且有一个savepoint |
-
Mandatory是要求所有的操作必须在一个事务里,较Require来说,对事务要求的更加严格
-
RequireNew:当一个Require方法A调用RequireNew方法B时,B方法会新new一个事务,并且这个事务和A事务没有关系。也就是说B方法出现异常,不会导致A的回滚,同理当B已提交,A再出现异常,B也不会回滚
-
Nested:这个和RequireNew的区别是 B方法的事务和A方法的事务是相关的。只有在A事务提交的时候,B事务都会提交。也就是说当A发生异常时,A、B事务都回滚,而当B出现异常时,B回滚,而A回滚到savepoint。如下代码所示
public void A(){
	//操作1
	//操作2
	try{
		//savepoint
		B();//一个Nested的方法
	} catch{
	//出现异常,B方法回滚,A方法回滚到
	//savepoint,也就是说操作1、2、3 都还在
	C();
	} finally{
		...
	}
}
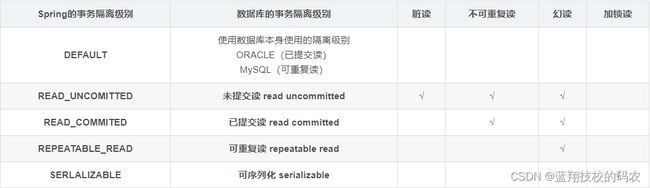
事务的隔离级别
数据库隔离级别有4种:读未提交、读已提交、可重复读、串行化。其实Spring也可以设置数据库隔离级别。
Spring事务隔离级别比数据库事务隔离级别多一个default
1)DEFAULT(默认)
这是一个PlatfromTransactionManager(通常使用子类DataSourceTransactionManager)默认的隔离级别,使用数据库默认的事务隔离级别。另外四个与JDBC的隔离级别相对应。
2)READ_UNCOMMITED(读取未提交)
这是事务最低的隔离级别,它允许另外一个事务可以看到这个事务未提交的数据。这种隔离级别会产生脏读,不可重复读和幻读。
3)READ_COMMITED(读取已提交)
保证一个事务修改的数据提交后才能被另外一个事务读取,另外一个事务不能读取该事务未提交的数据。这种事务隔离级别可以避免脏读出现,但是可能会出现不可重复读和幻读。
4)REPEATABLE_READ(可重复读)
这种事务隔离级别可以防止脏读、不可重复读,但是可能出现幻读(mysql已经通过采用next-key锁解决了幻读问题)。它除了保证一个事务不能读取另一个事务未提交的数据外,还保证了不可重复读。
5)SERIALIZABLE(串行化)
这是花费最高代价但是最可靠的事务隔离级别,事务被处理为顺序执行,相当于锁表。除了防止脏读、不可重复读外,还避免了幻读。
Spring的@Transactional注解的isolation属性可以设置隔离级别,它提供了以下枚举对应各个隔离级别
public enum Isolation {
    DEFAULT(-1),
    READ_UNCOMMITTED(1),
    READ_COMMITTED(2),
    REPEATABLE_READ(4),
    SERIALIZABLE(8);

    private final int value;

    private Isolation(int value) {
        this.value = value;
    }

    public int value() {
        return this.value;
    }
}
使用注解,在代码中设置事务的 隔离级别与传播特性:
/**
 * 通过注解设置隔离级别与传播特性
 * propagation 设置7大传播特性
 * isolation 设置4中隔离级别(默认使用数据库的隔离级别)
 */
@Transactional(propagation = Propagation.REQUIRES_NEW, isolation = Isolation.READ_UNCOMMITTED)
public User getReadUncommit(Long id) {
    return userMapper.selectByPrimaryKey(id);
}
配置事务
- 开启事务
- 结合aop实现事务的织入
- 配置事务的切入
<bean id="transactionManager" class="org.springframework.jdbc.datasource.DataSourceTransactionManager">
    <constructor-arg ref="dataSource" />
bean>


<tx:advice id="txAdvice" transaction-manager="transactionManager">

    <tx:attributes>
        <tx:method name="add" propagation="REQUIRED"/>
        <tx:method name="delete" propagation="REQUIRED"/>
        <tx:method name="update" propagation="REQUIRED"/>
        <tx:method name="select" read-only="true"/>
        <tx:method name="*" propagation="REQUIRED"/>
    tx:attributes>
tx:advice>


<aop:config>
    <aop:pointcut id="txPointCut" expression="execution(* com.kuang.mapper.*.*(..))"/>
    <aop:advisor advice-ref="txAdvice" pointcut-ref="txPointCut"/>
aop:config>