Springboot整合Redis哨兵模式(Windows版本学习)
Springboot整合Redis哨兵模式
说明:使用3台redis和3个哨兵(sentinel)保证集群可用性
哨兵系统的作用: 监控、自动故障转移、配置提供者、通知。
本展示基于windows系统
仅供参考,实际应用不会部署在同一台机器,也不会部署在windows上
- 设置主从机的redis配置文件
主机配置:
port 6380
loglevel notice
logfile "D:/redis-logs/redis6380_log.txt"
appendonly yes
appendfilename "appendonly.6380.aof"
两台从机的配置:
port 6382
loglevel notice
logfile "D:/redis-logs/redis6381_log.txt"
appendonly yes
appendfilename "appendonly.6381.aof"
port 6382
loglevel notice
logfile "D:/redis-logs/redis6382_log.txt"
appendonly yes
appendfilename "appendonly.6382.aof"
注意事项: 要先创建好D:/redis-logs/路径保证log文件存放。配上密码更佳,这里没有配置是不好滴。
- 编写sentinel配置文件
#当前Sentinel服务运行的端口
port 20060

#监视的主实例的IP地址,将这个主实例判断为失效至少需要2个Sentinel进程的同意
sentinel monitor mymaster 127.0.0.1 6380 2

#指定了Sentinel认为Redis实例已经失效所需的毫秒数。
sentinel down-after-milliseconds mymaster 5000

#指定了在执行故障转移时,最多可以有多少个从Redis实例在同步新的主实例
sentinel failover-timeout mymaster 15000

#如果在该时间(ms)内未能完成failover操作,则认为该failover失败
sentinel config-epoch mymaster 1
提示: 后面在创建两个sentinel,只需要修改port即可
- 配置服务,开启集群
在服务中注册redis和sentinel:
#注册redis
redis-server.exe --service-install redis6380.conf --service-name redis6380
redis-server.exe --service-install redis6381.conf --service-name redis6381
redis-server.exe --service-install redis6382.conf --service-name redis6382

#注册sentinel
redis-server.exe --service-install sentinel20060.conf --sentinel --service-name redis20060
redis-server.exe --service-install sentinel20061.conf --sentinel --service-name redis20061
redis-server.exe --service-install sentinel20062.conf --sentinel --service-name redis20062
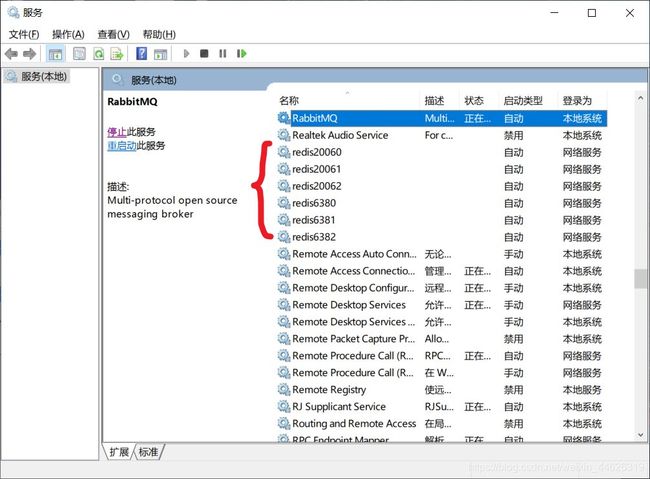
注册后在服务中就可以看见具体的事项:
步骤: 依次启动redis6380、redis6381、 redis6382、redis20060、redis20061、redis20062,要注意先启动redis,再启动sentinel!
后面可以在注册表中删去该服务路径为:\HKEY_LOCAL_MACHINE\SYSTEM\CurrentControlSet\Services\redis20060
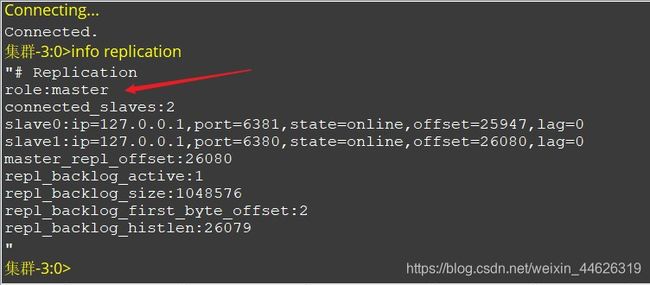
- 连接redis,使用info replication查看集群情况
Springboot集群方式
配置文件:
spring.redis.sentinel.master=mymaster
spring.redis.sentinel.nodes=127.0.0.1:20060,127.0.0.1:20061,127.0.0.1:20062
spring.redis.database=0
spring.redis.pool.max-idle=8
spring.redis.pool.min-idle=0
spring.redis.pool.max-active=8
spring.redis.pool.max-wait=-1
spring.datasource.url=jdbc:mysql://localhost:3306/jqrth?characterEncoding=utf-8
spring.datasource.driver-class-name=com.mysql.jdbc.Driver
spring.datasource.username=root
spring.datasource.type=com.alibaba.druid.pool.DruidDataSource
之后编写接口代码和服务: 项目中包括mysql、redis集成,编写了增删查改的接口
数据库文件(sql):
SET FOREIGN_KEY_CHECKS=0;

-- ----------------------------
-- Table structure for usertable  id是主键,name是唯一键
-- ----------------------------
DROP TABLE IF EXISTS `usertable`;
CREATE TABLE `usertable` (
  `id` int(11) NOT NULL,
  `name` varchar(255) DEFAULT NULL,
  PRIMARY KEY (`id`),
  UNIQUE KEY `name` (`name`)
) ENGINE=MyISAM DEFAULT CHARSET=utf8;

-- ----------------------------
-- Records of usertable
-- ----------------------------
INSERT INTO `usertable` VALUES ('1', 'c');
INSERT INTO `usertable` VALUES ('2', 'a');
INSERT INTO `usertable` VALUES ('3', 'd');
项目地址: https://gitee.com/g_night/springboot-redis-sentinel-demo
当主机down了后,会抛出Exception:
java.io.IOException: 远程主机强迫关闭了一个现有的连接。
	at sun.nio.ch.SocketDispatcher.read0(Native Method) ~[na:1.8.0_111]
	at sun.nio.ch.SocketDispatcher.read(SocketDispatcher.java:43) ~[na:1.8.0_111]
	at sun.nio.ch.IOUtil.readIntoNativeBuffer(IOUtil.java:223) ~[na:1.8.0_111]
	at sun.nio.ch.IOUtil.read(IOUtil.java:192) ~[na:1.8.0_111]
	at sun.nio.ch.SocketChannelImpl.read(SocketChannelImpl.java:380) ~[na:1.8.0_111]
	at io.netty.buffer.PooledByteBuf.setBytes(PooledByteBuf.java:253) ~[netty-buffer-4.1.59.Final.jar:4.1.59.Final]
	at io.netty.buffer.AbstractByteBuf.writeBytes(AbstractByteBuf.java:1134) ~[netty-buffer-4.1.59.Final.jar:4.1.59.Final]
	at io.netty.channel.socket.nio.NioSocketChannel.doReadBytes(NioSocketChannel.java:350) ~[netty-transport-4.1.59.Final.jar:4.1.59.Final]
	at io.netty.channel.nio.AbstractNioByteChannel$NioByteUnsafe.read(AbstractNioByteChannel.java:151) ~[netty-transport-4.1.59.Final.jar:4.1.59.Final]
	at io.netty.channel.nio.NioEventLoop.processSelectedKey(NioEventLoop.java:719) [netty-transport-4.1.59.Final.jar:4.1.59.Final]
	at io.netty.channel.nio.NioEventLoop.processSelectedKeysOptimized(NioEventLoop.java:655) [netty-transport-4.1.59.Final.jar:4.1.59.Final]
	at io.netty.channel.nio.NioEventLoop.processSelectedKeys(NioEventLoop.java:581) [netty-transport-4.1.59.Final.jar:4.1.59.Final]
	at io.netty.channel.nio.NioEventLoop.run(NioEventLoop.java:493) [netty-transport-4.1.59.Final.jar:4.1.59.Final]
	at io.netty.util.concurrent.SingleThreadEventExecutor$4.run(SingleThreadEventExecutor.java:989) [netty-common-4.1.59.Final.jar:4.1.59.Final]
	at io.netty.util.internal.ThreadExecutorMap$2.run(ThreadExecutorMap.java:74) [netty-common-4.1.59.Final.jar:4.1.59.Final]
	at io.netty.util.concurrent.FastThreadLocalRunnable.run(FastThreadLocalRunnable.java:30) [netty-common-4.1.59.Final.jar:4.1.59.Final]
	at java.lang.Thread.run(Thread.java:745) [na:1.8.0_111]
sentinel调用api告知客户端切换主机。
原理解释
1。哨兵 去每隔 1秒钟就像架构中所有的机器去ping一下,如果一台机器距离最后一次ping命令的时间超过
down-after-miliseconds配置的值就会被该哨兵标记为主观下线
2。如果哨兵标记了主服务器为主观下线,接下来他就会去问问其他的哨兵(sentinelis-masterdown-by-addr 命令询问)
3。当有超过一半的哨兵都认为主挂了,就把主改为客观下线
4。哨兵选出leader,哨兵leader来再存活的从里找一个出来成为主,并且进行故障转移
选举步骤:
过滤故障节点
根据优先级进行选择,配置文件
slave-priority的信息,数值越低优先级越高选择复制偏移量最大的从为主,即同步的数据最多
若上面两步都未能选择出主机则挑选runid最小的为主机

