windows宿主机ssh连接vmware ubuntu虚拟机
文章目录
-
- 首先获取 windows 宿主机的 ip 地址
- 配置虚拟机的虚拟网络编辑器
- 配置虚拟机ssh信息
- 测试ssh连接
首先获取 windows 宿主机的 ip 地址
win + R 输入CMD
在终端中输入:
ipconfig
找到无线局域网适配器 WLAN
无线局域网适配器 WLAN:

   连接特定的 DNS 后缀 . . . . . . . :
   IPv6 地址 . . . . . . . . . . . . : 2001:da8:258:d021:dd44:4c86:152b:237a
   临时 IPv6 地址. . . . . . . . . . : 2001:da8:258:d021:6da0:966e:4a06:16b8
   本地链接 IPv6 地址. . . . . . . . : fe80::dd44:4c87:1527:237b%20
   IPv4 地址 . . . . . . . . . . . . : 10.120.50.108
   子网掩码  . . . . . . . . . . . . : 255.254.0.0
   默认网关. . . . . . . . . . . . . : fe80::1253:72ff:fe36:2f01%20
                                       10.120.0.1
在这里我们要记下IPv4 地址和子网掩码
   IPv4 地址 . . . . . . . . . . . . : 10.120.50.108
   子网掩码  . . . . . . . . . . . . : 255.254.0.0
配置虚拟机的虚拟网络编辑器
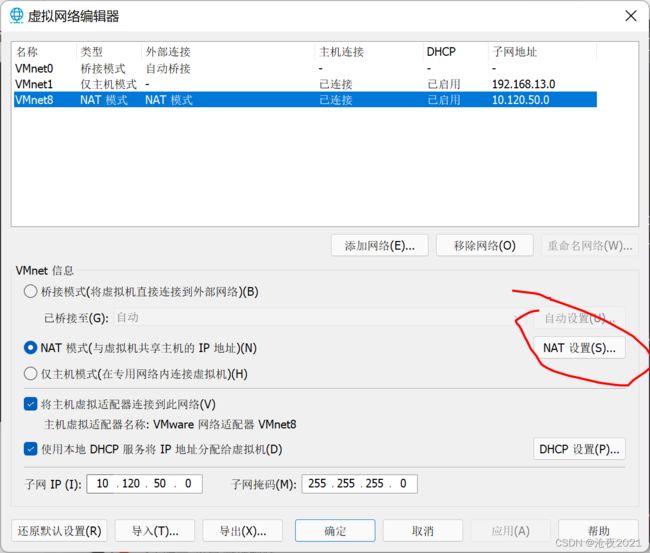
打开vmware ,先不要打开任何一个虚拟机,进入菜单栏,点击编辑,选择虚拟网络编辑器

点击还原默认设置,还原之前的网络设置
再次进入虚拟网络编辑器中
首先点击上部分的NAT模式类型,下图蓝色条状那个

之前记录的ip地址和子网掩码为:
   IPv4 地址 . . . . . . . . . . . . : 10.120.50.108
   子网掩码  . . . . . . . . . . . . : 255.254.0.0
重点:
子网IP应该填写为:10.120.50.0,最后的那个数字要为0
子网掩码:255.255.255,因为填写进去的子网IP是10.120.50.0,前三部分是不变的
填写完成后,点击确定
再打开虚拟机
查询虚拟机的ip地址
打开虚拟机后,需要查询虚拟机的ip地址
首先需要安装一些软件包:
sudo apt-get install openssh-server net-tools
安装完成后在终端输入:
ifconfig
我的虚拟机显示如下:
# mrcangye @ ubuntu in /etc/ssh [23:38:21]
$ ifconfig
ens33: flags=4163  mtu 1500
        inet 10.120.50.128  netmask 255.255.255.0  broadcast 10.120.50.255
        inet6 fe80::f4ef:14e:3d07:5b6b  prefixlen 64  scopeid 0x20
        ether 00:0c:29:a3:ba:a6  txqueuelen 1000  (以太网)
        RX packets 6447  bytes 6197333 (6.1 MB)
        RX errors 0  dropped 0  overruns 0  frame 0
        TX packets 2441  bytes 325496 (325.4 KB)
        TX errors 0  dropped 0 overruns 0  carrier 0  collisions 0
记住inet 10.120.50.128就是虚拟机的ip地址了
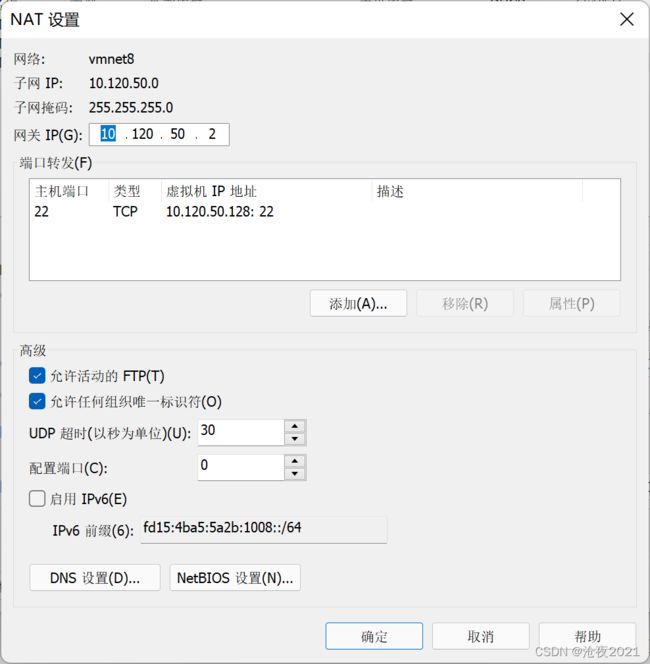
再打开虚拟网络编辑器
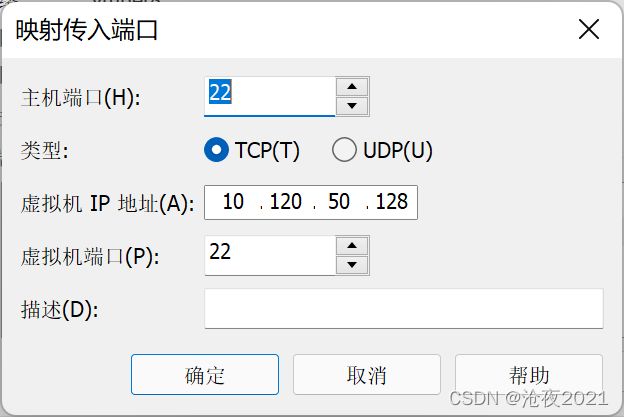
主机端口和虚拟机端口填写22即可,虚拟机IP地址输入之前获取的虚拟机IP地址填上去就可以了。填写完成后一路确定就行。

配置虚拟机ssh信息
进入虚拟机,打开终端输入以下命令进入ssh配置界面(需要会用vim编辑器)
sudo vim /etc/ssh/ssh_config
会看到:
# This is the ssh client system-wide configuration file.  See
# ssh_config(5) for more information.  This file provides defaults for
# users, and the values can be changed in per-user configuration files
# or on the command line.

# Configuration data is parsed as follows:
#  1. command line options
#  2. user-specific file
#  3. system-wide file
# Any configuration value is only changed the first time it is set.
# Thus, host-specific definitions should be at the beginning of the
# configuration file, and defaults at the end.

# Site-wide defaults for some commonly used options.  For a comprehensive
# list of available options, their meanings and defaults, please see the
# ssh_config(5) man page.

Include /etc/ssh/ssh_config.d/*.conf

Host *
#   ForwardAgent no
#   ForwardX11 no
#   ForwardX11Trusted yes
    PasswordAuthentication yes
#   HostbasedAuthentication no
#   GSSAPIAuthentication no
#   GSSAPIDelegateCredentials no
#   GSSAPIKeyExchange no
#   GSSAPITrustDNS no
#   BatchMode no
#   CheckHostIP yes
#   AddressFamily any
#   ConnectTimeout 0
#   StrictHostKeyChecking ask
#   IdentityFile ~/.ssh/id_rsa
#   IdentityFile ~/.ssh/id_dsa
#   IdentityFile ~/.ssh/id_ecdsa
#   IdentityFile ~/.ssh/id_ed25519
    Port 22
#   Ciphers aes128-ctr,aes192-ctr,aes256-ctr,aes128-cbc,3des-cbc
#   MACs hmac-md5,hmac-sha1,[email protected]
#   EscapeChar ~
#   Tunnel no
#   TunnelDevice any:any
#   PermitLocalCommand no
#   VisualHostKey no
#   ProxyCommand ssh -q -W %h:%p gateway.example.com
#   RekeyLimit 1G 1h
    SendEnv LANG LC_*
    HashKnownHosts yes
    GSSAPIAuthentication yes
按下键盘的 i 键,进入 vim 的编辑模式,将 PasswordAuthentication yes 和Port 22 前的注释取消。
修改好了后,依次按下键盘的esc + : + w +q 就可以保存并退出了
测试ssh连接
完成上面的步骤后,进入 windows 宿主机界面,打开终端 win + R 输入cmd
按以下格式 ssh 连接测试是否成功
ssh 你的虚拟机用户名@你的虚拟机IP地址
成功的话类似下面这样
(base) PS C:\Users\mrcan> ssh [email protected]
[email protected]'s password:
Welcome to Ubuntu 20.04.3 LTS (GNU/Linux 5.11.0-43-generic x86_64)

 * Documentation:  https://help.ubuntu.com
 * Management:     https://landscape.canonical.com
 * Support:        https://ubuntu.com/advantage

0 updates can be applied immediately.

Your Hardware Enablement Stack (HWE) is supported until April 2025.
Last login: Mon Dec 20 23:38:32 2021 from 10.120.50.1

# mrcangye @ ubuntu in ~ [0:19:46]
$

