Cocos Creator零基础小白超神教程
视频教程链接,视频录制时间大概在2018年底,cocos creator版本为2.0.4
Cocos Creator零基础小白超神教程
Cocos Creator零基础小白超神教程
-
- 01cocos creator简介
- 02变量与变量
- 03变量类型
- 04枚举
- 05运算符
- 06条件判断语句
- 07循环控制语句
- 09函数
- 09面向对象10构造与静态
- 11继承与抽象类
- 12接口
- 13名称空间
- 14泛型
- 15元组数组字典
- 16回调
- 17正则表达式
- 18访问修饰符19单例模式
- 20代理模式
- 21观察者模式
- 22工厂模式
- 23链表
- 24cocosCreator环境
- 25cocos与cocoscreator编程思想差异
- 26节点的使用
- 27锚点与坐标系
- 28精灵的使用
- 29精灵图集
- 30向量与标量
- 31向量的运算结果
- 32脚本解析
- 33脚本生命周期34节点常用属性方法
- 35预设体的使用
- 36资源动态加载
- 37场景管理
- 38键鼠操作39触摸事件
- 40碰撞
- 41微信飞机大战练习
-
- 遇到问题
- 代码
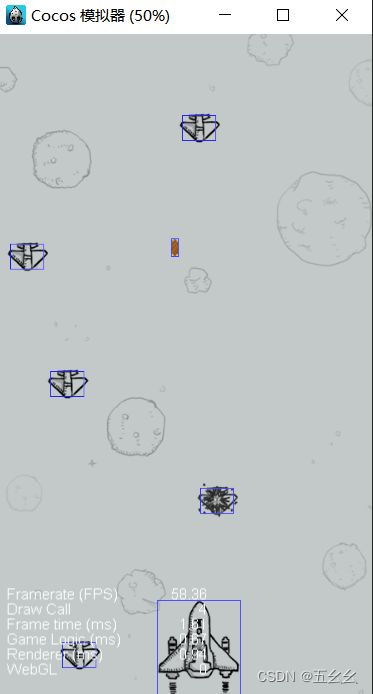
- 效果展示
- 42音频播放
- 43物理系统44物理碰撞
- 45射线
- 46射线小练习
- 47动作系统
- 48容器操作
- 49动画系统
- 动画曲线与事件
-
- 动画曲线
- 插入帧事件
- 人物跑步
- 51小游戏练习
-
- 遇到问题
- 背景设置
- 地面移动
- 鸟
- 管道
- 52屏幕canvas
- 53图文混排
- 54屏幕适配于遮罩
- 55按钮与布局
- 56滑动进度控件
- 57输入框
- 58补充控件
- 59对话框练习
- 60数据存储
- 61Json数据
- 62数据格式
- 63&64网络请求
- 65自定义Animation
- 66scoket
- 67node.js服务端
- 68socket.io客户端
- 69tieldmap
- 70cococs加载tieldmap
- 71控制封装
- 72打小鸟1
- 73打小鸟2
- 74打小鸟3
- 74打小鸟4
- 76粒子系统
- 77h5小游戏打包
- 78微信小游戏打包
- 79游戏框架1
- 游戏框架2
- 游戏框架3
- 82有限状态机1
- 83有限状态机2
- 84有限状态机3
01cocos creator简介
cocos creator文档
02变量与变量
//声明限制类型
var personName:string="李逍遥";
let personName="李星云";
personName="王小虎";
//声明常量
const tem:string="哈哈";
document.write(personName);
document.write("王小虎");
03变量类型
//null空number数字包括小数整数string字符串boolean布尔any任意类型array数组
let tmp:number=2;
document.write(tmp + "");
//换行
document.write(`sadf
adf`)
//数组
let a:number[]=[1,2,3,4,5];
let b:number=a[3];
let names:string[]=["asd","df"];
//联合类型
let c:string|number =0;
04枚举
//枚举 自己定义一个属于自己的类型
enum Color{
	red,
	blue,
	green
}
enum State{
	idle,
	run,
	death,
	attack
}
let color:number =0;//0白色 1黑色
let color:Color=Color.green;
let state:State=State.idle;
//类型验证
document.write(State.idle);//会打印一个数字
//类型别名
type NewNumber=number;
let num:NewNumber =3;
document.write(typeof num);//输出number
05运算符
//算术运算符
//+-* / %
let num=10%3;
num=num+1;
num++;
document.write(num+"");
//比较运算符>< >= <= ==只判断值 ===判断值与类型 != !==
let res:boolean=5>3;
document.write(res+"");//true
//逻辑运算符&& || !
res=num>2&&num<10;
res=!(num>1);
//赋值运算符 = += -= *= /= %=
num+=3;
06条件判断语句
//条件控制语句 判断语句
let age=20;
if(age<10){
document.write("未成年人");
}else{
document.write("成年人");
}
let score = 80;
if(score>=0&&score<60){
document,write("不合格");
}else if(score>=60&&score<80){
document.write("合格");
}else{
document.write("优秀");'
}
//三目运算符 条件?值1:值2; 条件为真值1,条件为假值2
num=num>100?100:num;
//选择语句
switch(state){
	case State.idle:
		document.write("站立");
		break;
	case State.run:
		document.write("跑步");
		break;
	case State.attack:
		document.write("攻击");
		break;
	default:
		document.write("1");
}
07循环控制语句
//循环控制语句 0+1+2+3...+100
let i:number=0;
let num:number=0;
while(i<105){
	if(i%2==0){
		num+=i;
	}
	num+=i;
	document.write("hello");
	i++;
}
let names:string[]={"王小虎","李星云"."赵老"};
let i:number=0;
for(let j=0;j<3;j++){
	document.write(names[j]);
}
for (let temp of names){//打印内容
document.write(temp);
}
for(let index in names){//打印索引
document.write(index);
}
09函数
//函数 流水线->输入 输出
//输入:参数 输出:返回值
function func(char:string){
	let arr:string[]=['a','b','c','d'];
	let char:string='b';
	for(let i=0;i<6;i++){
		if(char==arr[i]){
			document.write("sadf"+i+"三大方法");
		}
	}
}
func('a');
func('b');
//function 函数名(参数1:类型,参数2:类型...):string void{}
function add(num1: number.num2:number):number{
	let num=num1+num2;
	return num;
}
let test = add(3,4);
//匿名函数
let add2 = function(){}
let add3=():void=>{}
09面向对象10构造与静态
//类 人 对象:令狐冲
//成员属性 成员方法
//静态属性 静态方法
class Person{
	static des:string ="这是一个Person类";
	name:string="默认"
	age:number=0;
	say(){
		document.write(this.name);
	}
//构造方法
	construct(name:string,age:number){
		this.name=name;
		this.age=age;
	}
	static test(){
	}
}
let a=new Person();
a.name="冷藏柜";
a.age=20;
a.say();
let b=new Person("岳不群",40);
b.say();
11继承与抽象类
//继承
class Person{
	name:string="";
	say(){
		document.write("我是人,叫做"+this.name);
	}
}
class Student extends Person{
	num:number=0;
	score:number=0;
	say(){
		super.say();
		document.write("我是学生,"+this.name);
	}
}
let a=new Student();
a.name="aaa";
a.say();
//抽象类本身不能被实例化为对象,可以被继承
abstract class Person{
	name:string ="";
	run(){
	}
	abstract say();
}
class Student extends Person{
	say(){
	}
}
let a:Person = new Student();
a.say();
12接口
// 人 狼 狼人
interface Iwolf{
	attack();
}
interface Idog{
	eat();
}
class Person{
	name:string;
}
class wolfMan extends Person implements Iwolf,Idog{
	attack(){
	}
	eat(){
	}
}
//属性寄存器
class Person{
	_hp:number=100;
	//取值
	get hp(){
		return this._hp;
	}
	//赋值
	set hp(value){
		if(value<0){
			this._hp=0;
		}else{
			this._hp=value;
		}
	}
}
let a=new Person();
a.hp=-180;
document.write(a.hp+"");
13名称空间
//A B两人写代码合并
namespace aa{
//export 可以被外界调用
	export class Person{
		name:string;
	}
}
namespace bb{
	class Person{
		//...
	}
}
let person =new aa.Person();
14泛型
/*
function add(num:any):any{
	if(typeof num =="number"){
		num++;
		return num;
	}
	return num;
}*/
//相比于上面的函数,能保证传入与传出的类型一致
function add<T>(num:T):T{
	if(typeof num == "number"){
		num++;
		return num;
	}
	return num;
}
document.write(add<number>(3)+"");
document.write(add<string>("2")+"");
15元组数组字典
let hero:[string,number]=["superman",100];
hero[0]="蝙蝠侠";

//数组
let array1: number[]=[1,2,3];
let array2:Array<number>=new Array<number>();
//长度
document.write(array1.length+"");
//在数组后面添加元素
array1.push(4);
//在数组前面添加元素
array1.unshift(0);
//删除最后的元素
array1.pop();
//从第几位开始删除几个
array1.splice(0,1);
//删除最前面的
array1.shift();
//合并两个数组
array1=array1.concat(array2);
//查找元素位置
let index=array1.indexOf(3);
//排序
array1.sort();
//反转
array1.reverse();
document.write(array1+"");
//字典
let dic:{[key:string]:string}={
	"name":"wangxiaohu",
	"name2":"lixiaoyao"
};
//添加
dic["name3"]="lhc";
document.write(dic["name3"]);
16回调
//函数传参
function func(value: Function){
	//...
	value();
}
function test(){
	document.write("test");
}
func(test);//匿名函数调用
func(function({
document.write("test2");
}))
func(()->{
document.write("test3");
})
17正则表达式
A.正则表达式–正则表达式使用单个字符串来描述、匹配一系列符合某个句法规则的字符串。在很多文本编辑器里,正则表达式通常被用来检索、替换那些符合某个模式的文本。
B.原义文本字符-正常的文本字符。
C.元字符-具有特殊意义的专用字符,是代替正常文本字符的字符。
D.限定符-限定匹配的数量或特殊条件.
//正则表达式用来检测

\d 匹配数字
. 代表任意字符
\w 匹配字母数字下划线或汉字
\s 匹配空白符,如空格,tab
\bhh\b 查单词 hh ;
^haha^ 判定字符串
[a-z]判定a到z
[a-aA-Z0-9_]匹配大小写字母数字和下划线
$ 匹配字符串的结束
^ 匹配字符串的开始
例:匹配电话号码
\d\d\d\d-\d\d\d\d
{n} 重复n次
{n,} 重复大于等于n次
{n,m} 重复n次到m次
* 大于等于0次
+ 大于等于1次
? 0次或一次
//写正则表达式
let reg =/\d{4}-\d{7}/g;
let str="0234-2341123";
let res=reg.exec(str);

//是否匹配到
document.write(res.length+"");
//匹配到的内容
res.forEach(function(value,index){//index在第几位匹配到,value匹配到的值是什么
	document.write(value+" "+index);
})
18访问修饰符19单例模式
//public 公开的 protect受保护的 private私有的
class Person{
	public name:string;
	public say(){}
}
class Student extends Person{
	constructor(){
		super();
	}
}
let a=new Person();
//一个类只能产生一个对象,这就是单例模式,例如管理相关的类
class soundManger{
	static instance = new SoundManager();
	private constructor(){
	}
	private static instance:SoundManager;
	static Instance(){//实现单例模式的更好方法
		if(!SoundManager.instance){
			SoundManager.instance = new SoundManager();
		}
		return SoundManager.instance;
	}
}
//用声音管理类
soundManager.Instance;
20代理模式
任务交给其他人代理做
interface Icale{
	calc(num1,num2):number;
}
class Npc1 implements Icalc{
	calc(num1,num2){
		return num2+num1;
	}
}
class Person{
	delegate:Icalc;//遵循协议可以做代理
	GetNum(num1,num2){
		let num=this,delegate.calc(num1,num2);
		document.write(num+"");
	}
}
let person=new Person();
person.delegate=new Npc1();
person,GetNum(3,4);
21观察者模式
其他类监听状态的改变,如监听时间,在晚上背景,敌人状态同时间一起发生改变
//
interface IObserver{
	nameChanged(newName);
}
class Person{
	private _name:string;
	//所有的观察者
	observers:Array<IObserver> = new Array<IObserver>();
	set name(value){
		this._name=value;
		//发生变化,遍历观察者数组,给所有的观察者发信息
		for(let observer of this.observers){
			observer.nameChanged(this._name);
		}
	}
	get name(){
		return this._name;
	}
}
class Test implements IObserver{
	nameChanged(newName){
		document,write("监听到变化,名字变为"+newName);
	}
}
let person = new Person();
let test = new Test();
//设置为监听对象
person.observers.push(test);
person.name="hhh";
22工厂模式
工厂模式生产各种各样的小怪
//
enum CarType{
	Bmu,
	Audi,
	Benz
}
class Car{
	name:string;
	//工厂方法
	static Create(carType:CarType):Car{
		let car=Car;
		switch(carType){
			case CarType.Audi:
				car=new Audi();
				break;
			case CarType.Benz:
				car=new Benz();
				break;
			case CarType.Bmw:
				car=new Bmw();
				break;
		}
		return car;
	}
}
class Bmw extends Car{}
class Benz extends Car{}
class Audi extends Car{}
let bmw = Car.Create(CarType.Benz);
23链表
//
class Person{
	name:string;
	next:Person;

	constructor(name){
		this.name=name;
	}
}

let person = new Person("lxy");
person.next=new Person("wxh");
person.next.next=new Person("zl");

//删除
person.next=person.next.next;
//添加
let tempPerson=new Person("asdf");
tempPerson.next=person.next;
person.next=tempPerson;

while(person){
	document.write(person.name);
	//让节点向后移动
	person=person.next;
}
24cocosCreator环境
官网下载cocosCreator
打开项目注意点
1选择语言
2数据编辑
3预览使用浏览器
4开发者->vscode工作流->安装vscode扩展插件,更新vscode智能提示数据
5vscode设置->文本编辑器->文件->添加**/*.meta,这样设置可以让界面显示更简洁
25cocos与cocoscreator编程思想差异
cocos2d是面向对象的思想
cocoscreator面向节点
26节点的使用
创建空节点
图片显示在场景编辑器
position设置位置(本地坐标系,以父体锚点作为本地坐标系的原点)
rotation设置旋转角度
scale设置缩放
size按照像素缩放
color设置节点颜色与透明度
skew设置倾斜度
group分组,例如把子弹与敌机分为两组
27锚点与坐标系
设置图片左下角在坐标系原点
每个图片都有一个锚点,也有坐标轴,anchor设置锚点,0,0在左下角
坐标系设置,以锚点为原点,以中心点为原点,跟随图片的坐标轴,跟随世界的坐标轴
设置子节点,子节点的坐标系为本地坐标系,以父体锚点作为本地坐标系的原点
28精灵的使用
type:SIMPLE正常显示
SUCED九宫格图片.不同区域拉伸方法不一样,
应用场景:聊天框
TILED平铺填充
FILLED:百分比填充
应用场景:血条
TRIMMED:不使用透明边框
RAW:保留透明边框
CUSTOM:自定义
图片在层次管理器的位置越靠下图层越靠上
29精灵图集
texturepacker打包图片省内存
sprite frame拖入图片
30向量与标量
标量:只有大小的量.
向量:既有大小又有方向,例如速度.
向量的模:舍去向量的方向,只保留大小
单位向量:大小为1的向量
单位化,归一化:把向量转为单位向量的过程.
31向量的运算结果
向量加法减法
向量乘法,标量与向量的乘法
向量点乘,利用单位向量求向量之间的夹角
32脚本解析
脚本挂在组件上才会执行
脚本的组成
默认生成的基本不用管
改类名
可以设置label显示在面板上
33脚本生命周期34节点常用属性方法
onLoad(){//第一个被调用,做初始化的调用
}
start(){//初始化的调用,这两个初始化是为了保证某一个类的初始化更靠前.如子弹与枪,子弹要比枪先初始化
//获得子节点
this.node.children[0];
this.node.getChildByName("abc");
cc.find("Canvas/Main Camera")//填写路径
//获得父节点
this.node.getParent();
this.node.setParent(ddd);//设置父节点
//移除所有子节点
this.node.removeAllChildren();
//移除某个子节点
this.node.removeChild(ddd);
//从父节点中移除掉
this.node.removeFromParent();
//访问位置
this.node.x
this.node.y
this.node.setPosition(3,4);//设置位置
//旋转
this.node.rotation
//缩放
this.node.scale
//锚点
this.node.anchorX
//设置颜色
this.node.color=cc.Color.RED;
//节点开关
this.node.active=false;
//组件开关
this.enable=false;
//获取组件
let sprite=this.getComponent(cc.Sprite);
this.getComponentInChildren(cc.Sprite);
}
update(){//每帧调用
}
onDestroy(){//销毁
}
35预设体的使用
将节点拖入资源管理器便产生了预设体
//预设体
@property(cc.Prefab)
pre: cc.Prefab = null;
start(){
	//实例化预设体
	let node=cc.instantiate(this.pre);
	//设置父节点
	node.setParent(this.node);
}
36资源动态加载
待加载的资源放在文件夹resources
start(){
	let self=this;
	cc.loader.loadRes("test/land",cc.SpriterFrame,function(err,ziyuanming){
		self.getComponent(cc.Sprite).spriterFrame=sp;
	});
}
37场景管理
层级管理器添加场景
start(){
	cc.director.loadScene("game2",function(){
	});
	//大型游戏加载场景
	//预加载
	cc.director.preloadScene("game2",function(){
		//这个场景加载到内存了,但是还没有用
		cc.director.loadeScene("game2");
	});
	//切换场景,节点依然不会被销毁
	cc.game.addPersisRootNode(this.node);
	//移除
	cc.game.removePersistRootNode(this.node);
}
永久性节点,可以在多个场景切换中一直保持运行
38键鼠操作39触摸事件
start(){
//MOUSE_LEAVE移除,MOUSE_UP松开,
	this.node.on(cc.Node.EventType.MOUSE_DOWN,function(event){
		console.debug("鼠标按下了"+event.getLocation());
		if(event.getButton()==cc.Event.EventMouse.BUTTON_LEFT){
			console.debug("左键");
		}
		if(event.getButton()==cc.Event.EventMouse.BUTTON_RTGHT){
			console.debug("右键");
		}
	});
	this.node.off(cc.Node.EventType.MOUSE_DOWN);//off不去监听
	cc.systemEvent.on(cc.SystemEvent.EventType.KEY_DOWN,function(event){
		console.debug(event.keyCode);
		if(event.keyCode==cc.macro.KEY.w){
			console.debug("w");
		}
		if(event.keyCode==cc.macro.KEY.Q){
			console.debug("Q");
		}
	});
	//触摸事件 TOUCH_START
	this.node.on(cc.Node.EventType.TOUCH_START,function(event){
		console.debug("触摸,"+event.getLocation());
		self.node.emit("myevent1");//自定义事件
		self.node.dispatchEvent(new cc.Event.EventCustom("myevent1",true));//不仅给自己发,还给自己的父节点发
	});
	//监听自定义事件
	this.node.on("myevent1",function(event){
		console.debug("自定义事件");
	});
}
40碰撞
添加碰撞组件,默认和图片一样大
图像可以选择方形,圆形,多边形
start(){
	//碰撞检测
	cc.director.getCollisionManager().enabled=true;
}
//生产碰撞
onCollisionEnter(other){
	console.debug("碰撞发生"+other.tag);
}
onCollisionStay(other){
	console.debug("碰撞持续");
}
onCollisionExit(other){
	console.debug("碰撞结束");
}
41微信飞机大战练习
遇到问题
遇到问题:子弹无法与敌机发生碰撞,敌机与玩家无法发生碰撞
解决方法:重新挂预设体
具体步骤:
1.删除原来的预设体
2.重新生成预设体

3选择bullet1预设体重新挂在player预设体上

代码
//背景控制,让两张背景图片来回运动
const {ccclass, property} = cc._decorator;
@ccclass
export default class BgControl extends cc.Component {
    start () {
    }
    update (dt) {//dt两帧之间的间隔
        //移动
        //遍历子物体(背景)
        for(let bgNode of this.node.children){
            //移动,每秒移动50像素
            bgNode.y-=50*dt;
            if(bgNode.y<-850){
                bgNode.y+=852*2
            }
        }
    }
}
//子弹控制,控制子弹移动,出屏幕后销毁,子弹的碰撞判定
import EnemyControl from "./EnemyControl";
const {ccclass, property} = cc._decorator;
@ccclass
export default class BulletControl extends cc.Component {
    @property
    speed:number=600;

    start () {
    }

    update (dt) {
        //移动
        this.node.y+=this.speed*dt;
        //出屏幕销毁
        if(this.node.y>840){
            this.node.destroy();
        }
    }

    onCollisionEnter(other){
        console.log("碰撞发生"+other.tag);
        //如果碰到敌人.销毁自己,让敌人死亡
        if(other.tag==1){
            //销毁敌人,通知敌人销毁
            other.getComponent(EnemyControl).die();
            //销毁自己
            this.node.destroy();
        }
    }
}
//敌机控制,控制敌机向下移动,设置敌机死亡动画,设置与玩家的碰撞判定
import PlayerControl from "./PlayerControl";
const {ccclass, property} = cc._decorator;
@ccclass
export default class EnemyControl extends cc.Component {
    //是否死亡
    isDie:boolean=false;

    @property(cc.Label)
    label: cc.Label = null;

    start () {
    }

    update (dt) {
        //移动,死亡后不懂
        if(this.isDie==false){
            this.node.y-=300*dt;
        }
        if(this.node.y<-850){
            this.node.destroy();
        }
    }
    //死亡
    die() {
        this.isDie=true;
        //动态加载爆炸图片
        cc.loader.loadRes("enemy0_die",cc.SpriteFrame,(err,res)=>{//将图片换为加载完成的图片res;
            this.node.getComponent(cc.Sprite).spriteFrame=res;
        });
        //300毫秒后销毁节点
        setTimeout(() => {
            this.node.destroy();
        }, 300);

    }

    onCollisionEnter(other){
        console.log("碰撞发生"+other.tag);
        //如果碰到敌人.销毁自己,让敌人死亡
        if(other.tag==0){
            //销毁玩家,通知玩家销毁
            other.getComponent(PlayerControl).die();
            //销毁自己
            this.die();
        }
    }
}
//敌机管理器,想到了单例模式,挂载敌机预设体,每隔一段时间产生敌机
const {ccclass, property} = cc._decorator;
@ccclass
export default class EnemyManager extends cc.Component {
    //敌机预设体
    @property(cc.Prefab)
    enemyPre: cc.Prefab = null;
    start () {
        //每隔0.5s,创建一个敌机
        this.schedule(()=>{
            //创建敌机,	实例化预设体
            let enemy = cc.instantiate(this.enemyPre);
            //设置父物体
            enemy.setParent(cc.director.getScene());
            //设置敌机位置
            enemy.y=this.node.y+880;
            enemy.x=Math.random()*400+20;
        },0.5);
    }
}
//玩家控制,在玩家活着时可以触摸飞机从而移动,挂载子弹预设体,每隔一段时间产生子弹,开启碰撞检测,设置死亡动画
const {ccclass, property} = cc._decorator;
@ccclass
export default class PlayerControl extends cc.Component {

    @property(cc.Prefab)
    pre: cc.Prefab = null;

    isDie:boolean=false;
    start () {
        if(!this.isDie){
            let manager=cc.director.getCollisionManager();
            //移动
            let self=this;
            this.node.on(cc.Node.EventType.TOUCH_MOVE,function(event){
                self.node.setPosition(event.getLocation());
            });
            //攻击 计时器0.5秒调用一次
            this.schedule(function(){
                //创建子弹,	实例化预设体
                let buttet = cc.instantiate(this.pre);
                //设置父物体
                buttet.setParent(cc.director.getScene());
                //设置子弹位置
                buttet.x=this.node.x;
                buttet.y=this.node.y+100;
            },0.5);
            //开启碰撞检测
            manager.enabled=true;
            // Enabled draw collider
            manager.enabledDebugDraw = true;
            // Enabled draw collider bounding box
            manager.enabledDrawBoundingBox = true;
        }
    }

    update (dt) {
    }
    onCollisionEnter(other){
        console.log("碰 撞 发 生"+other.tag);
    }
    die() {
        this.isDie=true;
        //动态加载爆炸图片
        cc.loader.loadRes("hero1_die",cc.SpriteFrame,(err,res)=>{//将图片换为加载完成的图片res;
            this.node.getComponent(cc.Sprite).spriteFrame=res;
        });
        //300毫秒后销毁节点
        setTimeout(() => {
            this.node.destroy();
        }, 300);

    }
}
效果展示
42音频播放
有两种方式,一种是基于组件的方式,一种是cocos原本的播放方式
const {ccclass, property} = cc._decorator;
@ccclass
export default class NewClass extends cc.Component {
    start () {
        //以组件的方式
        let player:cc.AudioSource=this.getComponent(cc.AudioSource);
        cc.loader.loadRes("lose",cc.AudioClip,(res,clip)=>{
            //赋值音频
            player.clip=clip;
            //播放
            player.play();
            //是否正在播放
            // player.isPlaying
            //暂停
            // player.pause();
            // //恢复
            // player.resume();
            // //停止
            // player.stop();
            // //是否循环播放
            // player.loop=true;
            // //声音大小
            // player.volume=1;
        });
        //cocos原本的方式
        // cc.loader.loadRes("lose",cc.AudioClip,(res,clip)=>{
        //     //赋值音频
        //     player.clip=clip;
        //     //播放 playMusic播放背景音乐,playEffect播放环境声音,play播放音效
        //     let audioId:number=cc.audioEngine.playMusic(clip,true);//true是否循环,方法返回一个ID,针对ID进行操作
        //     player.play();
        //     //是否正在播放
        //     cc.audioEngine.isMusicPlaying();
        //     //暂停
        //     cc.audioEngine.pause(audioId);
        //     //恢复
        //     cc.audioEngine.resume(audioId);
        //     //停止
        //     cc.audioEngine.stop(audioId);
        //     //是否循环播放
        //     cc.audioEngine.setLoop(audioId,true);
        //     //声音大小
        //     cc.audioEngine.setVolume(audioId,1);
        // });
    }

    // update (dt) {}
}
43物理系统44物理碰撞
//物理组件rigid body界面中的含义,物理碰撞组件conllider的含义
const {ccclass, property} = cc._decorator;

@ccclass
export default class NewClass extends cc.Component {
    onLoad () {
        //开启物理系统,只能在onload开启
        cc.director.getPhysicsManager().enabled=true;
    }

    start () {
        let rbody=this.getComponent(cc.RigidBody);
        //给中心一个力
        // rbody.applyForceToCenter(cc.v2(5000,0),true);
        //直线速度
        rbody.linearVelocity=cc.v2(50,0);
    }
    // update (dt) {}
    //开始碰撞,enabled contact listener要打开
    onBeginContact(contact,self,other){
        //contact包含碰撞点
        let points = contact.getWorldManifold().points;
        console.log("发生碰撞"+points[0]);
        //法线
        let normal = contact.getWorldManifold().normal;
    }
    //结束碰撞
    onEndContact(contact,self,other){
        // console.log("发生碰撞");
    }
}
45射线
sensor传感器,勾选传感器选项,让节点成为传感器,刚体可以穿过节点,但会有判定碰撞.
应用场景:进入某个场景,游戏开始刷怪.
射线应用:怪物发射线,如果射线与周围物体碰撞,从而了解到周围环境.
  onLoad () {
        //开启物理系统,只能在onload开启
        cc.director.getPhysicsManager().enabled=true;
        //打出一条射线
        let results=cc.director.getPhysicsManager().rayCast(
        	this.node.getPosition(),cc.v2(this.node.x,this.node.y+100),
        	cc.RayCastType.Closest);//得到小鸟的中心点,发射射线,射线发生碰撞后返回最近的点
        for(let i=0;i<results.length;i++){
            let res=results[i];
            //射线碰到的碰撞器
            // res.collider
            //碰到的点
            // res.point
            //碰到的发现
            // res.normal
        }
    }
46射线小练习
const {ccclass, property} = cc._decorator;

@ccclass
export default class NewClass extends cc.Component {
    //方向
    dir:cc.Vec2=cc.v2(1,1);
    onLoad () {
        cc.director.getPhysicsManager().enabled=true;
    }
    start () {

    }
    update (dt) {
        //移动
        this.node.x+=this.dir.x*100*dt;
        this.node.y+=this.dir.y*100*dt;
        //射线检测
        let res=cc.director.getPhysicsManager().rayCast(this.node.getPosition(),cc.v2(this.node.x,this.node.y+this.dir.y*100),cc.RayCastType.Closest);
        console.log(res.length);
        if(res.length>0){
            this.dir.y*=-1;
            this.dir.x*=-1;
        }
    }
}
47动作系统
const {ccclass, property} = cc._decorator;

@ccclass
export default class NewClass extends cc.Component {
    start () {
        //动作
        let action=cc.moveTo(2,200,200);//花费2秒时间,移动到200,200
        action=cc.moveBy(2,200,200);//花费2秒,移动200,200
        //旋转
        action=cc.rotateTo(2,100);
        //缩放
        action=cc.scaleTo(2,1.5,0.5);
        //跳跃,向右跳200,y不变,100是跳的高度,跳1次
        action=cc.jumpBy(2,200,0,100,10);
        //闪烁
        action=cc.blink(3,5);
        //淡出
        action=cc.fadeOut(3);
        //淡入
        action=cc.fadeIn(3);
        //渐变
        action=cc.fadeTo(3,100);
        //颜色
        action=cc.tintTo(3,100,30,100);
        //执行动作
        this.node.runAction(action);
        //停止动作
        // this.node.stopAction(action);
        // action.setTag(22);
        // this.node.stopActionByTag(22);
        // this.node.stopAllActions();
        // //暂停动作
        // this.node.pauseAllActions();
        // //恢复动作
        // this.node.resumeAllActions();
    }
    // update (dt) {}
}
48容器操作
const {ccclass, property} = cc._decorator;
@ccclass
export default class NewClass extends cc.Component {
    start () {
        //动作
        //显示
        let action=cc.show();
        //隐藏
        action=cc.hide();
        //切换显示隐藏
        action=cc.toggleVisibility();
        //翻转
        action=cc.flipX(true);
        action=cc.flipY(true);
        //回调动作
        action=cc.callFunc(()=>{});

        action=cc.fadeOut(1);
        let action2=cc.fadeIn(1);
        //队列,按序执行队列中的多个动作,延时1秒,然后执行回调函数中的内容
        let seq=cc.sequence(action,action2,cc.delayTime(1),cc.callFunc(()=>{

        }));
        //重复
        let repeat=cc.repeat(seq,3);
        repeat=cc.repeatForever(seq);//一直重复,可以做游戏的警告灯
        //并列动作
        let move=cc.moveTo(3,500,500);
        let color=cc.tintTo(3,100,100,20);
        let spawn=cc.spawn(move,color);

        this.node.runAction(spawn);
    }

    // update (dt) {}
}
49动画系统
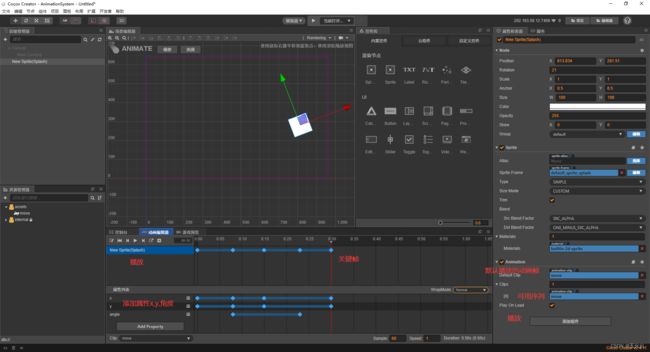
动画曲线与事件
动画曲线
插入帧事件
const {ccclass, property} = cc._decorator;
@ccclass
export default class NewClass extends cc.Component {
    start () {}
    custom(){
        console.log("播放");
    }
}
人物跑步
//属性列表添加cc.Sprite.spriteFrame,插入run的图片,设置sample,通常2d游戏设为12,精灵绑定脚本
const {ccclass, property} = cc._decorator;
@ccclass
export default class NewClass extends cc.Component {
    start () {
        let ani =this.getComponent(cc.Animation);
        //播放动画
        ani.play("run");
        // ani.pause();//暂停
        // ani.resume();//恢复
        // ani.stop();//停止
    }

    // update (dt) {}
}
51小游戏练习
遇到问题
1背景与地面移动存在缝隙,通过调整代码if(bg.x<(-this.width/2))中x小于的值,使得循环移动时没有问题
2管道移动时下面的管道不动,原因不明,我根据视频的步骤按部就班的来就没问题了
3碰撞包围盒有问题,小鸟有时会穿过包围盒,小鸟还会落在空中不下坠,这个问题没有解决.我绘制了包围盒,我发现小鸟
背景设置
背景图片以每秒4像素的速度向左循环移动,点击背景调用BgControl的fly(),控制鸟飞翔
import BirdControl from "./BirdControl";
const {ccclass, property} = cc._decorator;
@ccclass
export default class BgControl extends cc.Component {
    //速度
    @property
    speed: number = 4;
    //宽度
    @property
    width: number =288;
    //小鸟
    @property(BirdControl)
    bird:BirdControl = null;
    start () {
        //点击监听
        for(let bg of this.node.children){
            bg.on(cc.Node.EventType.MOUSE_DOWN,()=>{
                this.bird.fly();
            });
        }
    }

    update (dt) {
        for(let bg of this.node.children){
            bg.x -= dt*this.speed;
            if(bg.x<(-this.width/2)){
                bg.x+=this.width*2;
            }
        }
    }
}
地面移动
地面图片以每秒20像素的速度向左循环移动.
为地面添加物理系统的刚体组件与碰撞组件
const {ccclass, property} = cc._decorator;

@ccclass
export default class LandControl extends cc.Component {
    @property
    speed: number = 20;
    @property
    width: number =336;
    start () {
    }
    update (dt) {
        for(let bg of this.node.children){
            bg.x -= dt*this.speed;
            if(bg.x<(-this.width/2)){
                bg.x+=288*2;
            }
        }
    }
}
鸟
通过脚本开启物理引擎,写fly()方法控制小鸟向上飞,判定碰撞情况
为鸟添加物理系统的碰撞组件与刚体组件
为鸟设置动画
const {ccclass, property} = cc._decorator;
@ccclass
export default class BirdControl extends cc.Component {
    onLoad () {
        //物理引擎开启
        cc.director.getPhysicsManager().enabled = true;
         //设置调试绘制碰撞体标志
               cc.director.getPhysicsManager().debugDrawFlags = cc.PhysicsManager.DrawBits.e_aabbBit ||cc.PhysicsManager.DrawBits.e_shapeBit||cc.PhysicsManager.DrawBits.e_jointBit;
    }

    start () {
    }
    fly(){
        this.getComponent(cc.RigidBody).linearVelocity = cc.v2(0,150);
    }
    onBeginContact(contact,self,other){
        if(other.tag==1){
            console.log("加分");
        }else{
            console.log("死亡");
        }
    }
}
管道
设置上管道为下管道的子节点,下管道设置物理系统的刚体组件和三个碰撞组件,其中一个碰撞组件要打开sensor
设置管道循环移动,同时随机设置高度
const {ccclass, property} = cc._decorator;
@ccclass
export default class PipeControl extends cc.Component {
    @property
    speed:number= 50;
    start () {
    }
    update (dt) {
        for(let pipe of this.node.children){

                pipe.x-=dt*this.speed;
                if(pipe.x<-50){
                    pipe.x+=288*2;
                    pipe.y=Math.random()*150+400;
                }
        }
    }
}
52屏幕canvas
canvas
fit height 高填充满
fit width 宽填充满
label
Horizontal Align 水平方向调整
Veritical Align 垂直方向调整
overflow文字排版模式,包括以下三种:
1.CLAMP:节点约束框之外的文字会被截断
2.SHRINK:自动根据节点约束框缩小文字
3.RESIZE:根据文本内容自动更新节点的height属性.
Font字体
53图文混排
//RichText
	//string
我是<color=#ff0000>红色</color>,<size=60>大</size>号字体,<i>斜体</i><u>下划线</u><outline color=green>描边</outline>
<color=red><on click="test">点击</on></color>//调用脚本的方法
这是一个地面<img src='land' click='test'/>吗?//图文混合
54屏幕适配于遮罩
mask遮挡图片的一部分,应用场景:登录头像
屏幕适配
1将节点设置为canvas的子节点
2节点添加ui组件widget,设置与边的距离.
3不要把canvas 的fit Height和fit width都勾选
Align Mode通常选择模式ON_WINDOW_RESIZE
55按钮与布局
官方文档对按钮的描述
https://docs.cocos.com/creator/2.4/manual/zh/components/button.html
Color Transition
| 属性 | 功能说明 |
|---|---|
| Normal | Button 在 Normal 状态下的颜色。 |
| Pressed | Button 在 Pressed 状态下的颜色。 |
| Hover | Button 在 Hover状态下的颜色。 |
| Disabled | Button 在 Disabled 状态下的颜色。 |
| Duration | Button 在 Duration 状态下的颜色。 |
官方文档对布局的描述
https://docs.cocos.com/creator/2.4/manual/zh/components/layout.html
| 属性 | 功能说明 |
|---|---|
| Type | 布局类型,支持 NONE、HORIZONTAL、VERTICAL 和 GRID |
| Resize Mode | 缩放模式,支持 NONE,CHILDREN 和 CONTAINER |
| Padding Left | 排版时,子物体相对于容器左边框的距离 |
| Padding Right | 排版时,子物体相对于容器右边框的距离 |
| Padding Top | 排版时,子物体相对于容器上边框的距离 |
| Padding Bottom | 排版时,子物体相对于容器下边框的距离 |
| Spacing X | 水平排版时,子物体与子物体在水平方向上的间距。NONE 模式无此属性 |
| Spacing Y | 垂直排版时,子物体与子物体在垂直方向上的间距。NONE 模式无此属性 |
| Horizontal Direction | 指定水平排版时,第一个子节点从容器的左边还是右边开始布局 |
| Vertical Direction | 指定垂直排版时,第一个子节点从容器的上面还是下面开始布局 |
| Cell Size | 此属性只在 Grid 布局、Children 缩放模式时存在,指定网格容器里面排版 |
| Start Axis | 此属性只在 Grid 布局时存在,指定网格容器里面元素排版的起始方向轴 |
| Affected By Scale | 子节点的缩放是否影响布局 |
56滑动进度控件
官方文档对滚动视图scrollview的描述
https://docs.cocos.com/creator/2.4/manual/zh/components/scrollview.html
官方文档对滑动页面视图pageview的描述
https://docs.cocos.com/creator/2.4/manual/zh/components/pageview.html
官方文档对进度条progress的描述
https://docs.cocos.com/creator/2.4/manual/zh/components/progress.html
57输入框
官方文档对输入框editbox的描述
https://docs.cocos.com/creator/2.4/manual/zh/components/editbox.html
字体颜色大小设置
文本类型设置,如设置密码文本
在不同输入状态下如何设置回调方法
58补充控件
官方文档对滑块控件slider的描述
https://docs.cocos.com/creator/2.4/manual/zh/components/slider.html
toggle是CheckBox,如果要成为单选,需要将多个toggle节点成为一个空节点的子节点
官方文档对toggle的描述
https://docs.cocos.com/creator/2.4/manual/zh/components/toggle.html
toggleContainer可以用来修改一组 Toggle 组件的行为。当一组 Toggle 属于同一个 ToggleContainer 的时候,任何时候只能有一个 Toggle 处于选中状态。
官方文档对toggleContainer的描述
https://docs.cocos.com/creator/2.4/manual/zh/components/toggleContainer.html
videoplayer是一种视频播放组件,可通过该组件播放本地和远程视频。
官方文档对videoplayer的描述
https://docs.cocos.com/creator/2.4/manual/zh/components/videoplayer.html
WebView 是一种显示网页的组件,按照视频中的步骤,无法显示百度网页,
官方文档对webview的描述
https://docs.cocos.com/creator/2.4/manual/zh/components/webview.html
59对话框练习
1设置背景
2修改canvas大小,使得canvas大小与背景大小相同
3设置炮姐的位置
4设置脸的位置,(飞羽老师说把表情与人物分开是为了节省内存)
5设置对话框的位置
6创建脚本PaojieControl,实现设置表情功能
const {ccclass, property} = cc._decorator;
@ccclass
export default class paojieControl extends cc.Component {
    start () {
    }
    //设置表情
    setImage(face:string,mouth:string){
        //加载素材
        cc.loader.loadRes(face,cc.SpriteFrame,(err,sp)=>{
            this.node.children[0].getComponent(cc.Sprite).spriteFrame=sp;
        });
        cc.loader.loadRes(mouth,cc.SpriteFrame,(err,sp)=>{
            this.node.children[1].getComponent(cc.Sprite).spriteFrame=sp;
        });
    }
}
7创建脚本MsgControl,实现设置消息的功能
const {ccclass, property} = cc._decorator;
@ccclass
export default class MsgControl extends cc.Component {
    start () {}
    //刷新消息
    setMessage(name:string,content: string){
        this.node.children[0].getComponent(cc.Label).string=name;
        this.node.children[1].getComponent(cc.Label).string=content;
    }
}
8创建脚本BgControl,实现设置消息,通过点击鼠标调用setImage方法,与调用setMessage方法
记得要通过报错信息来定位bug位置
import MsgControl from "./MsgControl";
import paojieControl from "./paojieControl";
const {ccclass, property} = cc._decorator;
class Message{
    name:string;
    content:string;
    face:string;
    mouth:string;
    constructor(name:string,content:string,face:string,mouth:string){
        this.name=name;
        this.content=content;
        this.face=face;
        this.mouth=mouth;
    }
}
@ccclass
export default class BgControl extends cc.Component {
    //人物和消息的控制器
    @property(paojieControl)
    paojiecontrol: paojieControl = null;
    @property(MsgControl)
    msgControl: MsgControl = null;
    //消息数组
    msgs:Message[]=null;
    //当前是第几条消息
    index:number=0;

    start () {
        //初始化数组
        this.msgs=[
        new Message("御坂美琴","最近天气不错","paojieface_02","paojiemouth_02"),
        new Message("御坂美琴","天气不错","paojieface_01","paojiemouth_01"),
        new Message("御坂美琴","最近不错","paojieface_02","paojiemouth_02")
    ];
    //鼠标点击对话
        this.node.on(cc.Node.EventType.MOUSE_DOWN,(event)=>{
            if(this.index<=this.msgs.length){
                //如果对话面板没显示,显示
                if(this.msgControl.node.active==false){
                    this.msgControl.node.active=true;
                }
                //读消息
                let message=this.msgs[this.index++];
                //显示消息
                this.paojiecontrol.setImage(message.face,message.mouth);
                this.msgControl.setMessage(message.name,message.content);
            }
        });
    }
}
60数据存储
const {ccclass, property} = cc._decorator;

@ccclass
export default class NewClass extends cc.Component {
    start () {
        //存储数据
        cc.sys.localStorage.setItem("name","蝙蝠侠");
        //获取数据
        let name=cc.sys.localStorage.getItem("name");
        console.log(name);
        //移除一个数据
        cc.sys.localStorage.removeItem("name");
        //清空
        cc.sys.localStorage.clear();
    }
    // update (dt) {}
}
61Json数据
const {ccclass, property} = cc._decorator;
class Person{
    id:number;
    name:string;
    wuogng:string[];
}
@ccclass
export default class NewClass extends cc.Component {
    start () {
        /*
            json:
            数据格式:json xml csv 写文本
            客户端 - 客户端
            游戏存档 -> 地图,坐标,等级,攻击,防御,物品,好友度......
        */
        let person:Person=new Person();
        person.id=10;
        person.name="李星云";
        //对象->字符串
        /*
            json:{} 对象 [] 数组
            '{"id":10,"name":"李星云","wugong":["华阳针法","青莲剑歌"]}'
        */
       //对象->json
       let json=JSON.stringify(person);
       console.log(json);
       cc.sys.localStorage.setItem("save2",json);
       //json->对象
       let person2:Person=Object.assign(new Person(),JSON.parse(json));
       console.log(person2.id);
    }
}
62数据格式
介绍了xml数据格式和csv数据格式
       //存person[]->字符串
       //json
       /**
        * [
        *   {
        * "id":10,"name":"李星云","wugong":["华阳针法","青莲剑歌"]
        * },{
        * "id":1,"name":"姬如雪","wugong":["幻音诀"]
        * }
        * ]
        */
       //xml
       /*


                    李星云
                    华阳针法,青莲剑歌


                    姬如雪
                    幻音诀


        */
       //csv
       /**
        * 10,李星云,华阳针法/青莲剑歌
        * 2,姬如雪,幻音诀
        */
63&64网络请求
客户端-请求->网页服务端
网页<–相应–
响应头:type length
响应体:内容
通信协议:http://
域名:www.baidu.com->ip->服务器
访问的服务器文件:/aann/aaa.php
参数:?a=1&b=2
get请求:请求服务器内容
post请求:上传大部分是post请求
//请求
const {ccclass, property} = cc._decorator;
@ccclass
export default class NewClass extends cc.Component {
    start () {
        //url
        let url="http://api.douban.com/v2/movie/top250?start=25&count=25";
        //请求
        let request = cc.loader.getXMLHttpRequest();
        request.open("GET",url,true);//异步
        //异步的意思是网络请求与后面的代码一起执行
        //同步的意思是按照代码顺序执行,只有执行完了网络请求才能进行执行下面的代码
        request.onreadystatechange=()=>{
            //请求状态改变
            //请求结束后,获取信息
            //不能跨域调用,只能在同一个ip内调用
            if(request.readyState==4&&request.status==200){
                console.log("请求完成");
                console.log(request.responseText);
            }
        };
        request.send();
    }
}
65自定义Animation
//设置动画每秒播放帧数
const {ccclass, property} = cc._decorator;
@ccclass
export default class MyAnomation extends cc.Component {
    //每秒播放速度
    @property
    speed:number = 0.1;
    //播放帧数组
    @property([cc.SpriteFrame])
    sprites:cc.SpriteFrame[]=[];
    //是否播放动画
    @property
    isPlay:boolean=false;
    //当前播放帧
    index:number=0;
    //计时器
    timer:number=0;
    start () {
    }
    play(){
        this.isPlay=true;
    }
    stop(){
        this.isPlay=false;
    }
    update (dt) {
        if(this.isPlay){
            //播放动画
            //计时器增加
            this.timer+=dt;
            if(this.timer>this.speed){
                this.timer=0;
                //切换帧0 1 2 0
                this.index++;
                if(this.index>=this.sprites.length){
                    this.index=0;
                }
                //更换帧图片
                this.getComponent(cc.Sprite).spriteFrame=this.sprites[this.index];
            }
        }
    }
}
//控制动画是否播放,控制小鸟向左上方飞翔
import MyAnomation from "./MyAnimation";
const {ccclass, property} = cc._decorator;
@ccclass
export default class NewClass extends cc.Component {
    @property
    speed: number = -10;
    start () {
        this.getComponent(MyAnomation).play();
    }
    update (dt) {
        this.node.x+=this.speed*dt;
        this.node.y-=this.speed*dt;
    }
}
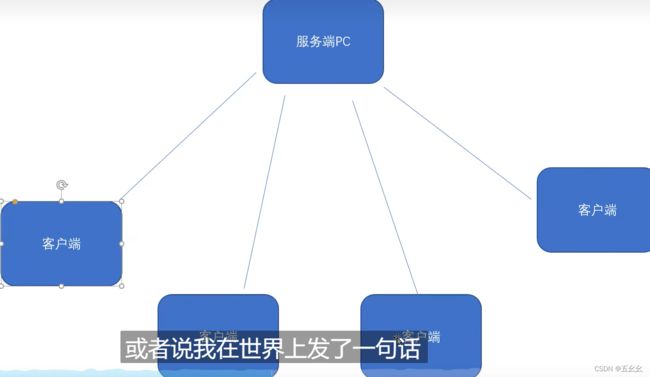
66scoket
在终端之间建立连接(基于tcp/ip实现)
67node.js服务端
//兄弟们需要把(http)改为(http,{cors:true})来解决跨域问题
//myserver.js
var app = require( 'express')();
var http = require('http').Server(app);
var io= require( 'socket.io')(http);

//在某个端口开始监听客户端连接
http.listen( 30001,function(){
	console.log( "server listen on 30001");
});
//监听有客户端连接
io.on( 'connection', function(socket){
	//发送消息
	socket.emit( 'message','连接成功了');
	//监听客户端发来的消息
	socket.on( 'message' , function(data){
		console.log("客户端发来消息:"+ data);
	});
});
68socket.io客户端
因为版本问题视频中的代码无法运行,我通过使用ChatGPT生成了 websocket客户端 服务端示例代码,把代码替换掉,然后按照视频操作即可
详细步骤参考:详解 Cocos Creator 如何使用websocket
//JavaScript服务端
//myserver.js
// var app = require('express')();
// var http = require('http').Server(app);
// var io= require('socket.io')(http);

// //在某个端口开始监听客户端连接
// http.listen( 30001,function(){
// 	console.log( "server listen on 30001");
// });
// //监听有客户端连接
// io.on( 'connection', function(socket){
// 	//发送消息
// 	// socket.emit( 'message','连接成功了');
// 	//监听客户端发来的消息
//     console.log("有客户端连接");
// 	socket.on( 'message' , function(data){
// 		console.log("客户端发来消息:"+ data);
// 	});
// });
const WebSocket = require('ws');

const server = new WebSocket.Server({ port: 30001 });

server.on('connection', (socket) => {
    console.log('New client connected!');

    socket.on('message', (message) => {
        console.log('Received message:', message);

        // 可以在此处处理收到的数据并发送回客户端
        socket.send('Server reply: ' + message);
    });

    socket.on('close', () => {
        console.log('Client disconnected!');
    });
});
客户端
cc.Class({
    extends: cc.Component,

    properties: {
        serverURL: 'ws://localhost:30001',
        socket: null,
    },

    // 初始化 WebSocket 连接
    initWebSocketConnection() {
        this.socket = new WebSocket(this.serverURL);

        this.socket.onopen = (event) => {
            console.log('WebSocket connected!');
            // 可以在此处发送初始数据到服务器
            this.sendWebSocketData("hello");
        };

        this.socket.onmessage = (event) => {
            console.log('Received message:', event.data);
        };

        this.socket.onerror = (error) => {
            console.error('WebSocket error:', error);
        };

        this.socket.onclose = (event) => {
            console.log('WebSocket closed:', event);
        };
    },

    // 发送数据到服务器
    sendWebSocketData(data) {
        if (this.socket && this.socket.readyState === WebSocket.OPEN) {
            this.socket.send(data);
        }
    },

    // 关闭 WebSocket 连接
    closeWebSocketConnection() {
        if (this.socket) {
            this.socket.close();
        }
    },

    // 开始时调用
    onLoad() {
        this.initWebSocketConnection();
    },

    start(){
        this.node.on(cc.Node.EventType.MOUSE_DOWN,(event)=>{
            this.onClickSendButton();
        });
    },

    // 点击按钮发送数据给服务器
    onClickSendButton() {
        let data = 'Hello, Server!';
        this.sendWebSocketData(data);
    },

    // 程序关闭时调用
    onDestroy() {
        this.closeWebSocketConnection();
    },
});
69tieldmap
下载安装tieldmap下载链接
没有素材没办法做
70cococs加载tieldmap
71控制封装
72打小鸟1
设置背景图片,调整canvas的大小
为背景,小鸟,草丛设置好对应的图层
随机产生小鸟飞行的目的地
判定小鸟飞行的方向,从而决定是否翻转
为小鸟设置飞行动画
利用容器操作,控制小鸟飞行
const {ccclass, property} = cc._decorator;
@ccclass
export default class NewClass extends cc.Component {
    //生命值
    hp:number=1;
    //目标位置+-110,185
    targetPos:cc.Vec2=null;
    //速度
    speed:number=50;
    start () {
        this.fly();
    }
    fly(){
        //随机目标点
        this.targetPos=cc.v2(Math.random()*220-100,185);
        //翻转精灵
        if(this.targetPos.x>this.node.x){
            this.node.scaleX=-1;
        }
        //移动 速度*时间=距离
        let move = cc.moveTo((this.targetPos.y-this.node.y)/this.speed,this.targetPos);
        this.node.runAction(move);
    }
    // update (dt) {}
}
73打小鸟2
设置小鸟死亡动画,下落与销毁
代码中有用到队列(按序执行队列中的多个动作)和回调函数
const {ccclass, property} = cc._decorator;
@ccclass
export default class NewClass extends cc.Component {
    //生命值
    hp:number=1;
    //目标位置+-110,185
    targetPos:cc.Vec2=null;
    //速度
    speed:number=50;
    //游戏结束,回调
    dieCallBack:Function;
    //加分回调
    addScoreCallBack:Function;
    start () {
        this.fly();
    }

    fly(){
        //随机目标点
        this.targetPos=cc.v2(Math.random()*220-100,185);
        //翻转精灵
        if(this.targetPos.x>this.node.x){
            this.node.scaleX=-1;
        }
        //移动 速度*时间=距离
        let move = cc.moveTo((this.targetPos.y-this.node.y)/this.speed,this.targetPos);
        let seq=cc.sequence(move,cc.callFunc(()=>{
            //游戏结束
            this.dieCallBack();
        }));
        this.node.runAction(move);
        //如果飞出了屏幕

        //如果触摸了精灵
        this.node.on(cc.Node.EventType.TOUCH_START,(event)=>{
            //如果还活着
            if(this.hp>0){
                //血量减少
                this.hp--;
                //停止飞翔动作
                this.node.stopAllActions();
                //向下掉落
                this.getComponent(cc.Animation).play("die");
                let moveDie=cc.moveTo((this.node.y+70)/(this.speed*2),cc.v2(this.node.x,-70));
                this.node.runAction(cc.sequence(moveDie,cc.callFunc(()=>{
                    //销毁自身
                    this.node.destroy();
                })));
                //加分
                this.addScoreCallBack();
            }
        });
    }
    // update (dt) {}
}
74打小鸟3
实现回调函数,添加UI
需要生成小鸟预设体,并且绑定在BirdManager 的birdPre上
在草丛中每隔1s随机产生小鸟
添加label,并绑定在BirdManager 的scoreLabel上
import BirdControl from "./BirdControl";
const {ccclass, property} = cc._decorator;
//加分 游戏结束
@ccclass
export default class BirdManager extends cc.Component {
    //小鸟的预设体
    @property(cc.Prefab)
    birdPre:cc.Prefab;
    //1s出现一只小鸟
    time:number=1;
    //分数
    score:number=0;
    @property(cc.Label)
    scoreLabel:cc.Label;

    start () {
        //每隔1s创建一只小鸟
        this.node.runAction(cc.repeatForever(cc.sequence(cc.delayTime(this.time),cc.callFunc(()=>{
            //创建小鸟
            let bird=cc.instantiate(this.birdPre);
            //设置父物体
            bird.setParent(this.node);
            bird.y=this.node.y;
            bird.x=Math.random()*220-110;
            //飞
            bird.getComponent(BirdControl).fly();
            //加分回调
            bird.getComponent(BirdControl).addScoreCallBack=()=>{
                this.score+=100;
                this.scoreLabel.string=this.score+"";
            }
            //游戏结束回调
            bird.getComponent(BirdControl).dieCallBack=()=>{
                this.node.destroyAllChildren();
                this.node.stopAllActions();
                console.log("死亡");
            }
        }))));
    }

    // update (dt) {}
}
74打小鸟4
添加开始场景与结束场景,并设置场景间的跳转
//开始场景的按钮绑定startGame
//startControl
const {ccclass, property} = cc._decorator;
@ccclass
export default class startControl extends cc.Component {
    start () {
    }
    //加载游戏场景
    startGame(){
        cc.director.loadScene("打小鸟");
    }
    // update (dt) {}
}
BirdManager 的backview绑定节点BackView
BackView的按钮绑定backView函数

import BirdControl from "./BirdControl";
const {ccclass, property} = cc._decorator;
//加分 游戏结束
@ccclass
export default class BirdManager extends cc.Component {
    //小鸟的预设体
    @property(cc.Prefab)
    birdPre:cc.Prefab;
    //1s出现一只小鸟
    time:number=1;
    //分数
    score:number=0;
    @property(cc.Label)
    scoreLabel:cc.Label;

    @property(cc.Node)
    backview:cc.Node;

    start () {
        //每隔1s创建一只小鸟
        this.node.runAction(cc.repeatForever(cc.sequence(cc.delayTime(this.time),cc.callFunc(()=>{
            //创建小鸟
            let bird=cc.instantiate(this.birdPre);
            //设置父物体
            bird.setParent(this.node);
            bird.y=this.node.y;
            bird.x=Math.random()*220-110;
            //飞
            bird.getComponent(BirdControl).fly();
            //加分回调
            bird.getComponent(BirdControl).addScoreCallBack=()=>{
                this.score+=100;
                this.scoreLabel.string=this.score+"";
            }
            //游戏结束回调
            bird.getComponent(BirdControl).dieCallBack=()=>{
                this.node.destroyAllChildren();
                this.node.stopAllActions();
                console.log("死亡");
                this.backview.active=true;
            }
        }))));
    }
    //切换游戏场景
    backView(){
        cc.director.loadScene("begin");
    }
    // update (dt) {}
}
76粒子系统
官方文档对粒子系统的介绍
https://docs.cocos.com/creator/2.4/manual/zh/components/particle-system.html?h=%E7%B2%92%E5%AD%90
77h5小游戏打包
78微信小游戏打包
1注册一个微信平台账号
2填写小程序信息
3获得小程序id
4安装对应版本的微信开发者工具
5扫码登录微信开发者工具
6在cocos creator打包小程序
7需要设置–>原生环境中,指定路径,路径为安装路径,我的路径为E:\Program Files (x86)\Tencent\微信web开发者工具
8进入开发者工具 ,打开设置,打开安全服务端口, cocos 重新运行就行
9在构建发布页面点击运行

10点击上传,上传成功,可以扫码体验
我在上传的时候遇到了类似这样的错误message:Error: 系统错误,错误码:80051,source size 3020KB exceed max limit 2MB,我删掉一些东西,然后重新打包就可以了


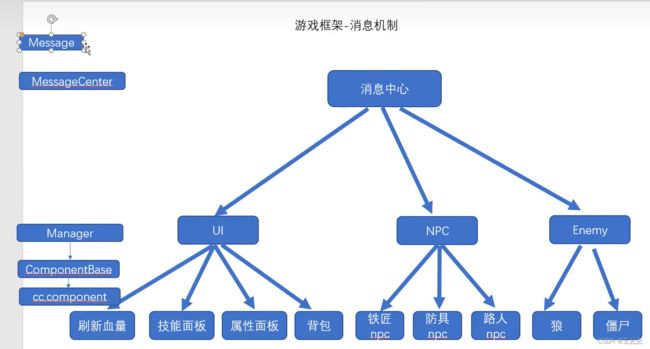
79游戏框架1
游戏框架2
const {ccclass, property} = cc._decorator;
export default class Message{
    //类型
    Type:number;
    //命令
    Command:number;
    //参数
    Content:any;

    //构造方法
    constructor(type,command,content){
        this.Type=type;
        this.Command=command;
        this.Content=content;
    }
}

export class MessageType{
    static Type_UI=1;
    static Type_NPC=2;
    static Type_Enemy=3;
    static Type_Audio=4;

    static UI_RefreshHp=101;
    static UI_RefreshScore=102;
    static UI_RefreshInventory=103;

    static NPC_npc1=201;
    static NPC_npc2=202;

    static Enemy_enemy1=301;
    static Enemy_enemy2=302;
}
import ComponentBase from "./ComponentBase";
import Message from "./Message";
const {ccclass, property} = cc._decorator;
@ccclass
export default class MessageCenter{
    //管理类列表
    static Managers:ComponentBase[]=[];
    //发送消息
    static SendMessage(msg:Message){
        for(let manager of this.Managers){
            manager.ReceiveMessage(msg);
        }
    }
    //发送消息
    static SendCustomMessage(type:number,command:number,content:any){
        let msg=new Message(type,command,content);
        this.SendMessage(msg);
    }
}
import Message from "./Message";
const {ccclass, property} = cc._decorator;
@ccclass
export default class ComponentBase extends cc.Component {
    //接收消息
    ReceiveMessage(message:Message){
    }
}
游戏框架3
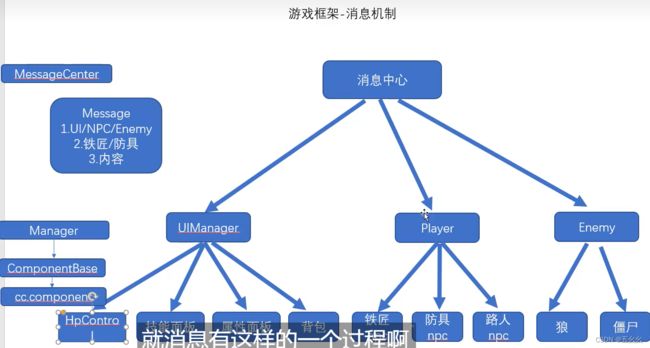
大概的逻辑:游戏运行后,UIManage类为 MessageCenter类的Managers数组添加一个ManagerBase对象,即向管理类列表添加一个元素
HpControl类为注册为ManagerBase类的ReceiveList数组添加了一个元素,即注册为ui的消息接受者
玩家点击后发送消息,管理类数组Managers的ManagerBase对象给ReceiveList数组中的HpControl对象发送消息
HpControl对象收到消息后,修改血量.
import ComponentBase from "./Scripts/ComponentBase";
import Message, { MessageType } from "./Scripts/Message";
import UIManage from "./UIManage";

const {ccclass, property} = cc._decorator;

@ccclass
export default class HpControl extends ComponentBase {
    hp:number=100;

    start () {
        //注册为ui的消息接受者
        UIManage.Instance.RegisterReceiver(this);
    }
    //接收到的消息
    ReceiveMessage(message: Message): void {
        super.ReceiveMessage(message);
        if(message.Command==MessageType.UI_RefreshHp){
            //得到参数
            let num=<number>message.Content;
            this.ChangeHp(num);
        }
    }

    //改变血量
    ChangeHp(attack:number){
        this.hp-=attack;
        this.node.children[1].getComponent(cc.Label).string=this.hp+"";
    }
    // update (dt) {}
}
import { MessageType } from "./Scripts/Message";
import MessageCenter from "./Scripts/MessageCenter";

const {ccclass, property} = cc._decorator;

@ccclass
export default class PlayerControl extends cc.Component {
    start () {
        //点击
        this.node.on(cc.Node.EventType.MOUSE_DOWN,(event)=>{
            //血量减少
            MessageCenter.SendCustomMessage(MessageType.Type_UI,MessageType.UI_RefreshHp,10)
        });
    }

    // update (dt) {}
}
import ManagerBase from "./Scripts/ManagerBase";
import { MessageType } from "./Scripts/Message";

const {ccclass, property} = cc._decorator;

@ccclass
export default class UIManage extends ManagerBase {

   static Instance: UIManage;

    onLoad () {
        super.onLoad();//这里给MessageCenter的messages列表添加了一个元素
        UIManage.Instance=this;
    }
    //接收的消息类型
    SetMessageType(): number {
        return MessageType.Type_UI;
    }
    // update (dt) {}
}
82有限状态机1
import FSMManager from "./FSMManager";

const {ccclass, property} = cc._decorator;

//状态
export default class FSMState {
    //当前状态id
    StateID:number;
    //状态拥有者
    component:cc.Component;
    //所属状态机
    fsmManager:FSMManager;
    constructor(stateID:number,component:cc.Component,fsmmanger:FSMManager){
        this.StateID=stateID;
        this.component=component;
        this.fsmManager=fsmmanger;
    }
    //进入状态
    OnEnter(){

    }
    //状态更新中
    OnUpdate(){

    }
}
import FSMState from "./FSMState";

const {ccclass, property} = cc._decorator;
export default class FSMManager {
    //状态列表
    StateList:FSMState[]=[];
    //当前状态id
    CurrentIndex:number=-1;
    //改变状态
    ChangeState(StateID:number){
        //改变状态ID
        this.CurrentIndex=StateID;
        //调用新状态的enter方法
        this.StateList[this.CurrentIndex].OnEnter();
    }
    //更新调用
    OnUpdate(){
        if(this.CurrentIndex!=-1){
            //调用当前状态的update方法
            this.StateList[this.CurrentIndex].OnUpdate();
        }
    }
}
83有限状态机2
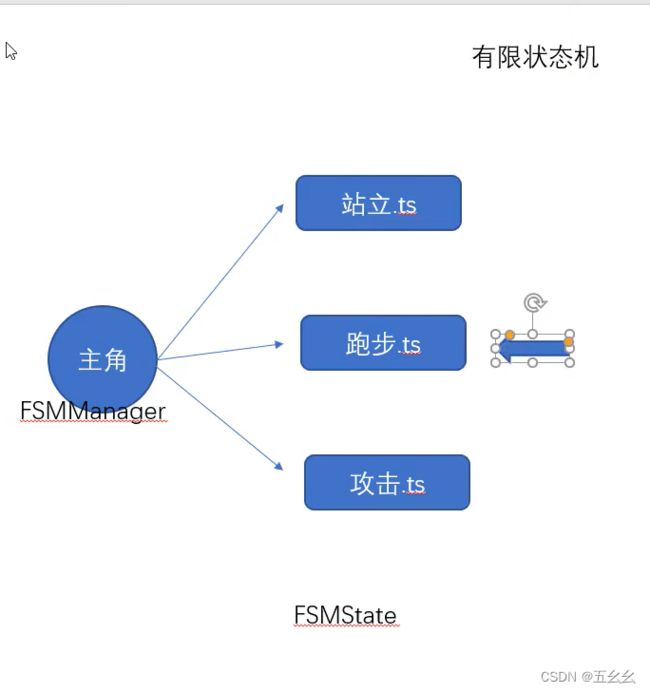
BirdControl类通过创建状态,通过FSMManager 控制状态的执行与切换
import DieState from "./DieState";
import FlyState from "./FlyState";
import FSMManager from "./Scripts/FSMManager";

const {ccclass, property} = cc._decorator;

enum BirdState{
    Fly,
    Die
}

@ccclass
export default class NewClass extends cc.Component {

    ani:cc.Animation;
    //状态机
    fsmManger:FSMManager;
    start () {
        this.ani=this.getComponent(cc.Animation);
        this.fsmManger=new FSMManager();
        //创建两个状态
        let fly=new FlyState(BirdState.Fly,this,this.fsmManger);
        let die=new DieState(BirdState.Die,this,this.fsmManger);
        this.fsmManger.StateList=[fly,die];
        //开始执行状态
        this.fsmManger.ChangeState(BirdState.Fly);
    }

    update (dt) {
        if(this.fsmManger.CurrentIndex!=-1){
            this.fsmManger.OnUpdate();
        }
    }

    fly(){
        // this.ani.play("fly");
        this.fsmManger.ChangeState(BirdState.Fly);
    }

    die(){
        // this.ani.play("die");
        this.fsmManger.ChangeState(BirdState.Die);
    }

}
import FSMState from "./Scripts/FSMState";

const {ccclass, property} = cc._decorator;

export default class DieState extends FSMState {

    //进入状态
    OnEnter(){
        super.OnEnter();
        this.component.getComponent(cc.Animation).play("die");
     }
     //状态更新中
     OnUpdate(){
         super.OnUpdate();
     }
}
import FSMState from "./Scripts/FSMState";

const {ccclass, property} = cc._decorator;

export default class FlyState extends FSMState {

     //进入状态
     OnEnter(){
        super.OnEnter();
        this.component.getComponent(cc.Animation).play("fly");
     }
     //状态更新中
     OnUpdate(){
         super.OnUpdate();
     }
}
84有限状态机3
没提到什么知识点
终于学完了,完结散花!

