Nginx结合Lua——Nginx通过Lua+Redis实现自动封禁访问频率高的IP
文章目录
- 实验背景
- 实验
-
- 一、安装使用 OpenResty
- 二、安装Redis
- 三、在Nginx中使用Lua脚本访问Redis
- 四、Nginx+Lua+Redis
实验背景
为了防止某恶意用户多次对服务器端口进行攻击,我们需要建立一个动态的 IP 黑名单。对于黑名单之内的 IP ,拒绝提供服务。
实现 IP 黑名单的功能有很多途径:
- 在操作系统层面,配置 iptables,拒绝指定 IP 的网络请求;
- 在 Web Server 层面,通过 Nginx 自身的 deny 选项 或者 lua 插件 配置 IP 黑名单;
- 在应用层面,在请求服务之前检查一遍客户端 IP 是否在黑名单。
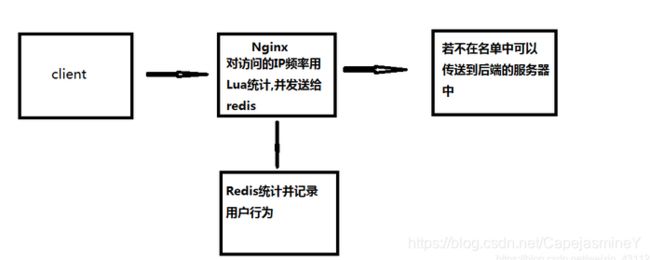
为了方便管理和共享,我们通过 Nginx+Lua+Redis 的架构实现 IP 黑名单的功能,架构图如下:

实验
一、安装使用 OpenResty
OpenResty是一个集成了各种 Lua 模块的 Nginx 服务器,是一个以Nginx为核心同时包含很多第三方模块的Web应用服务器,使用Nginx的同时又能使用lua等模块实现复杂的控制
1、安装OpenResty
[root@server1 local]# yum -y install readline-devel pcre-devel openssl-devel gcc
2、下载openresty-1.13.6.1.tar.gz 源码包,并解压;下载ngx_cache_purge模块,该模块用于清理nginx缓存;下载nginx_upstream_check_module模块,该模块用于ustream健康检查
[root@server1 ~]# cd /usr/local
[root@server1 local]# wget https://openresty.org/download/openresty-1.13.6.1.tar.gz
[root@server1 local]# tar -zxvf openresty-1.13.6.1.tar.gz
[root@server1 local]# cd openresty-1.13.6.1/bundle
[root@server1 local]# wget http://labs.frickle.com/files/ngx_cache_purge-2.3.tar.gz
[root@server1 local]# tar -zxvf ngx_cache_purge-2.3.tar.gz
[root@server1 local]# wget https://github.com/yaoweibin/nginx_upstream_check_module/archive/v0.3.0.tar.gz
[root@server1 local]# tar -zxvf v0.3.0.tar.gz
3、配置需安装的模块
# ./configure --help可查询需要安装的模块并编译安装
[root@server1 openresty-1.13.6.1]# ./configure --prefix=/usr/local/openresty --with-luajit --with-http_ssl_module --user=root --group=root --with-http_realip_module --add-module=./bundle/ngx_cache_purge-2.3/ --add-module=./bundle/nginx_upstream_check_module-0.3.0/ --with-http_stub_status_module
[root@server1 openresty-1.13.6.1]# make && make install
4、创建一个软链接方便启动停止
[root@server1 openresty-1.13.6.1]# ln -s /usr/local/openresty/nginx/sbin/nginx /bin/nginx
![]()
5、启动nginx
[root@server1 ~]# nginx
如果启动时候报错找不到PID的话就用以下命令解决(如果没有更改过目录的话,让它去读nginx的配置文件就好了)
[root@server1 ~]# /usr/local/openresty/nginx/sbin/nginx -c /usr/local/openresty/nginx/conf/nginx.conf
6、查看端口
[root@server1 ~]# netstat -antuple | grep 80
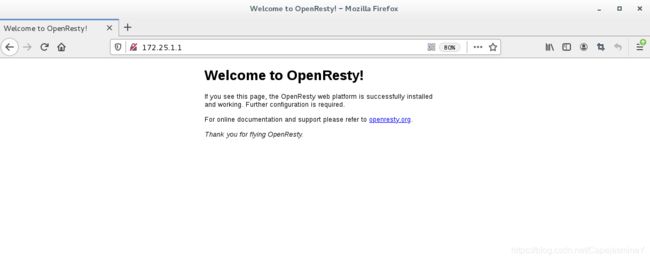
7、测试:浏览器访问这台机器的地址
出现下图的页面就是成功了
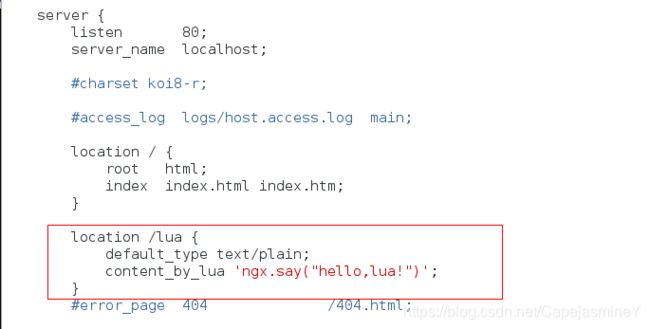
8、在Nginx上测试一下能否使用Lua脚本
[root@server1 ~]# vim /usr/local/openresty/nginx/conf/nginx.conf
        location /lua {
            default_type text/plain;
            content_by_lua 'ngx.say("hello,lua!")';
        }
加完后重启nginx
[root@server1 ~]# nginx -s reload
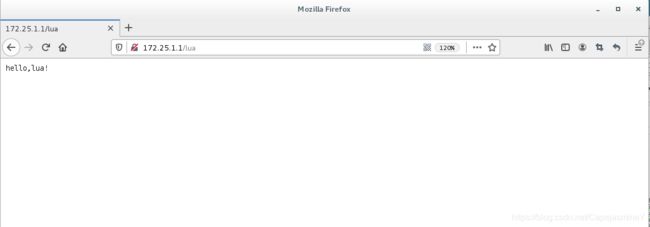
在浏览器里输入 ip地址/lua
出现下面的字就表示Nginx能够成功使用lua了

二、安装Redis
1、下载、解压、编译安装
[root@server1 ~]# cd /usr/local/
[root@server1 local]# wget http://download.redis.io/releases/redis-3.2.5.tar.gz
[root@server1 local]# tar -zxvf redis-3.2.5.tar.gz
[root@server1 local]# cd redis-3.2.5
[root@server1 redis-3.2.5]# make
[root@server1 redis-3.2.5]# make install
2、查看是否安装成功
[root@server1 redis-3.2.5]# ls -lh /usr/local/bin/
[root@server1 redis-3.2.5]# redis-server -v
3、配置redis 创建dump file、进程pid、log目录
[root@server1 redis-3.2.5]# cd /etc/
[root@server1 etc]# mkdir redis
[root@server1 etc]# cd /var/
[root@server1 var]# mkdir redis
[root@server1 var]# cd redis/
[root@server1 redis]# mkdir  data log  run
4、修改配置文件
[root@server1 redis]# cd /usr/local/redis-3.2.5/
[root@server1 redis-3.2.5]# cp redis.conf /etc/redis/6379.conf
[root@server1 redis-3.2.5]# vim /etc/redis/6379.conf
  61 bind 172.25.1.1  #绑定的主机地址
  84 port 6379  #端口
 271 #requirepass  #认证密码(方便测试不设密码,注释掉)
 150 pidfile /var/run/redis_6379.pid  #pid目录
 163 logfile /var/redis/log/redis.log  #log存储目录
 247 dir /var/redis/data   #dump目录
 128 daemonize yes   #Redis默认不是以守护进程的方式运行,可以通过该配置项修改,使用yes启用守护进程
5、设置启动方式
[root@server1 redis-3.2.5]# cd /usr/local/redis-3.2.5/utils/
[root@server1 utils]# cp redis_init_script /etc/init.d/redis
[root@server1 utils]# vim /etc/init.d/redis   #根据自己实际情况修改,我在这里没有改
[root@server1 utils]# chmod a+x /etc/init.d/redis   #所有用户增加执行权限
[root@server1 utils]# service redis start     #启动redis
6、查看redis是否启动
[root@server1 utils]# redis-cli -h 172.25.1.1 -p 6379
172.25.1.1:6379> set hello "hi,redis"
OK
172.25.1.1:6379> KEYS *
1) "hello"
172.25.1.1:6379> get "hello"
"hi,redis"
三、在Nginx中使用Lua脚本访问Redis
1、连接redis,然后添加一些测试参数
[root@server1 utils]# redis-cli -h 172.25.1.1 -p 6379
172.25.1.1:6379> set "123" "456"
OK
172.25.1.1:6379>
2、编写连接Redis的Lua脚本
[root@server1 utils]# vim /usr/local/openresty/nginx/conf/lua/redis.lua
local redis = require "resty.redis"
local conn = redis.new()
conn.connect(conn, '172.25.1.1', '6379')   #根据自己情况写ip和端口号
local res = conn:get("123")
if res==ngx.null then
    ngx.say("redis集群中不存在KEY——'123'")
    return
end
ngx.say(res)
3、在nginx配置文件中添加以下location
[root@server1 utils]# vim /usr/local/openresty/nginx/conf/nginx.conf
        location /lua_redis {
            default_type text/plain;
            content_by_lua_file /usr/local/openresty/nginx/conf/lua/redis.lua;
        }
4、重启nginx
[root@server1 utils]# nginx -s reload
5、验证
在浏览器输入ip/lua_redis
看能不能获取到刚才在redis添加的"123" 这个key 并获取到他的值
如果能看到下图的内容表示可以访问redis

好的,准备工作已经准备好了,现在要来最终的Nginx+Lua+Redis自动封禁并解封IP了
四、Nginx+Lua+Redis
1、添加访问控制的Lua脚本
(此脚本需要改的只有下面的这一句,把redis的ip和端口替换一下即可
ok, err = conn:connect(“172.25.1.1”, 6379)
温馨提示:如果在nginx的上层有用到SLB负载均衡的话需要修改一下脚本里的所有…ngx.var.remote_addr
把remote_addr替换成从SLB获取真实IP的字段即可,不然获取到的IP全都是SLB发过来处理过的IP,全都是一个网段的,根本没有办法起到封禁的效果)
[root@server1 lua]# vim /usr/local/openresty/nginx/conf/lua/access.lua
local ip_block_time=300  #封禁IP时间(秒)
local ip_time_out=30     #指定ip访问频率时间段(秒)
local ip_max_count=20   #指定ip访问频率计数最大值(秒)
local BUSINESS = ngx.var.business   ##nginx的location中定义的业务标识符,也可以不加,不过加了后方便区分

#连接redis
local redis = require "resty.redis"
local conn = redis:new()
ok, err = conn:connect("192.168.1.222", 6379)
conn:set_timeout(2000)   #超时时间2秒

#如果连接失败,跳转到脚本结尾
if not ok then
    goto FLAG
end

#查询ip是否被禁止访问,如果存在则返回403错误代码
is_block, err = conn:get(BUSINESS.."-BLOCK-"..ngx.var.remote_addr)
if is_block == '1' then
    ngx.exit(403)
    goto FLAG
end

#查询redis中保存的ip的计数器
ip_count, err = conn:get(BUSINESS.."-COUNT-"..ngx.var.remote_addr)

if ip_count == ngx.null then   #如果不存在,则将该IP存入redis,并将计数器设置为1、该KEY的超时时间为ip_time_out
    res, err = conn:set(BUSINESS.."-COUNT-"..ngx.var.remote_addr, 1)
	res, err = conn:expire(BUSINESS.."-COUNT-"..ngx.var.remote_addr, ip_time_out)
else
    ip_count = ip_count + 1   #存在则将单位时间内的访问次数加1

    if ip_count >= ip_max_count then   #如果超过单位时间限制的访问次数,则添加限制访问标识,限制时间为ip_block_time
        res, err = conn:set(BUSINESS.."-BLOCK-"..ngx.var.remote_addr, 1)
        res, err = conn:expire(BUSINESS.."-BLOCK-"..ngx.var.remote_addr, ip_block_time)
	else
        res, err = conn:set(BUSINESS.."-COUNT-"..ngx.var.remote_addr,ip_count)
		res, err = conn:expire(BUSINESS.."-COUNT-"..ngx.var.remote_addr, ip_time_out)
    end
end

#结束标记
::FLAG::
local ok, err = conn:close()
2、在需要做访问限制的location里加两段代码即可,这里用刚才的/lua做演示
[root@server1 utils]# vim /usr/local/openresty/nginx/conf/nginx.conf
        location /lua {
            set $business "lua";  #加这个的目的是为了知道存在redis的数据是哪个location的,也可以不加
            access_by_lua_file /usr/local/openresty/nginx/conf/lua/access.lua;
            default_type text/plain;
            content_by_lua 'ngx.say("hello,lua!")';
        }
主要添加:
access_by_lua_file /usr/local/openresty/nginx/conf/lua/access.lua;
让每一个请求都去调用这个lua脚本,注意路径和名字不要写错
set $business “lua” 是为了把IP放进redis的时候标明是哪个location的,可以不加
3、重启nginx
[root@server1 utils]# nginx -s reload
5、连接redis
[root@server1 utils]# redis-cli -h 172.25.1.1 -p 6379
172.25.1.1:6379> KEYS *
1) "lua-COUNT-172.25.1.250"
172.25.1.1:6379> GET "lua-COUNT-172.25.1.250"
"9"
172.25.1.1:6379>
这个key的过期时间是30秒,如果30秒没有重复访问20次这个key就会消失,所以说正常用户一般不会触发这个封禁的脚本
[root@server1 utils]# redis-cli -h 172.25.1.1 -p 6379
172.25.1.1:6379> GET "lua-COUNT-172.25.1.250"
(nil)
进到redis里发现多了一个lua-block-192.168.1.158
过期时间是300秒,就是说在300秒内这个ip无法继续访问192.168.1.222/lua这个页面了
这个脚本的目的很简单:一个IP如果在30秒内其访问次数达到20次则表明该IP访问频率太快了,因此将该IP封禁5分钟。同时由于计数的KEY在Redis中的超时时间设置成了30秒,所以如果两次访问间隔时间大于30秒将会重新开始计数


