python制作gif动图_PIL生成透明GIF动图
最近使用PIL来将多张图片合并为一张GIF动图,结果发现在生成背景透明的GIF时总是有问题。研究一番终于解决,遂记之……
首先,安装一下PIL:
pillow
ZSH
sudo pip pinstall pillow -i http://pypi.douban.com/simple
1sudopippinstallpillow-ihttp://pypi.douban.com/simple
基本用法
PIL的用法可以参考官方文档,对于其中具体的参数,也可查看PIL handbook。
使用PIL读取GIF图片,我们以下面的图片为例:
read_gif
Python
#!/usr/bin/env python
# -*- coding: utf-8 -*-
from PIL import Image
from PIL import ImageSequence
def read_gif(gif):
img = Image.open(gif)
i = 0
for frame in ImageSequence.Iterator(img):
frame.save("gif_%d.png" % i)
i += 1
img.close()
1
2
3
4
5
6
7
8
9
10
11
12
13
14
15#!/usr/bin/env python
# -*- coding: utf-8 -*-
fromPILimportImage
fromPILimportImageSequence
defread_gif(gif):
img=Image.open(gif)
i=0
forframeinImageSequence.Iterator(img):
frame.save("gif_%d.png"%i)
i+=1
img.close()
将GIF动图的每一帧重新合并回来:
write_gif
Python
def write_gif(gif):
frames = []
img = Image.open(gif)
for frame in ImageSequence.Iterator(img):
frames.append(frame.copy().convert("RGBA"))
img = Image.new("RGBA", frame.size, (255, 255, 255, 0))
img.save("output.gif", save_all=True, append_images=frames, loop=0)
1
2
3
4
5
6
7
8defwrite_gif(gif):
frames=[]
img=Image.open(gif)
forframeinImageSequence.Iterator(img):
frames.append(frame.copy().convert("RGBA"))
img=Image.new("RGBA",frame.size,(255,255,255,0))
img.save("output.gif",save_all=True,append_images=frames,loop=0)
结果生成的动图(暂时先忽略第一帧的白屏):
由于背景透明,我们需要特殊处理:
write_gif
Python
def write_gif2(gif):
frames = []
img = Image.open(gif)
mask = Image.new("RGBA", img.size, (255, 255, 255, 0))
for frame in ImageSequence.Iterator(img):
f = frame.copy().convert("RGBA")
frames.append(Image.alpha_composite(mask, f))
img = Image.new("RGBA", frame.size, (255, 255, 255, 0))
img.save("output.gif", save_all=True, append_images=frames, loop=0, transparency=0)
1
2
3
4
5
6
7
8
9
10defwrite_gif2(gif):
frames=[]
img=Image.open(gif)
mask=Image.new("RGBA",img.size,(255,255,255,0))
forframeinImageSequence.Iterator(img):
f=frame.copy().convert("RGBA")
frames.append(Image.alpha_composite(mask,f))
img=Image.new("RGBA",frame.size,(255,255,255,0))
img.save("output.gif",save_all=True,append_images=frames,loop=0,transparency=0)
结果生成的动图:
虽然解决了背景透明的问题,然而生成的动图却仍然有问题,前一帧的内容不断叠加在一起。
ImageMagick
参考 ImageMagick 中关于动画的文档,其中 convert 命令有一个参数 dispose,具体的区别可以查看文档说明:Dispose None – each frame overlaid in sequence
Dispose Previous – preserve background canvas
Dispose Background – clear to background
PIL中 Image.save() 不同的图像类型有不同的存储参数,找到 GIF格式,其提供的参数:save_all:If present and true, all frames of the image will be saved. If not, then only the first frame of a multiframe image will be saved.
append_images:A list of images to append as additional frames. Each of the images in the list can be single or multiframe images.
duration:The display duration of each frame of the multiframe gif, in milliseconds. Pass a single integer for a constant duration, or a list or tuple to set the duration for each frame separately.
loop:Integer number of times the GIF should loop.
optimize:If present and true, attempt to compress the palette by eliminating unused colors. This is only useful if the palette can be compressed to the next smaller power of 2 elements.
palette:Use the specified palette for the saved image. The palette should be a bytes or bytearray object containing the palette entries in RGBRGB… form. It should be no more than 768 bytes. Alternately, the palette can be passed in as an PIL.ImagePalette.ImagePalette object.
发现其并未提供 dispose 相关的选项。
Whatsinagif
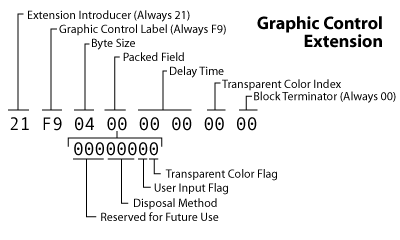
参考 这里 and 这里 的介绍,其中主要是 Graphics Control Extension几个字节进行控制。因此,我们只需要在 Disposal Method 的 3bit 写入正确的数据即可。The first byte is the extension introducer. All extension blocks begin with 21. Next is the graphic control label, F9, which is the value that says this is a graphic control extension. Third up is the totalblock size in bytes. Next is a packed field. Bits 1-3 are reserved for future use. Bits 4-6 indicate disposal method. The penult bit is the user input flag and the last is the transparent color flag. The delay time value follows in the next two bytes stored in the unsigned format. After that we have the transparent color index byte. Finally we have the block terminator which is always 00.
GifImagePlugin
在 PIL 库中,针对每一种图像格式都有专门的Plugin,具体可以参考文档。其中 GifImagePlugin 专门用来处理gif图像,根据上面gif图像的介绍,我们可以按自己的需要添加 disposal 参数,修改PIL库下的GifImagePlugin.py:
GifImagePlugin.py
Python
# 修改写入 header 的内容
def _write_local_header(fp, im, offset, flags):
......
disposal = int(im.encoderinfo.get('disposal', 0))
if transparent_color_exists or duration != 0 or disposal:
packed_flag = 1 if transparent_color_exists else 0
packed_flag |= disposal << 2
if not transparent_color_exists:
transparency = 0
fp.write(b"!" +
o8(249) + # extension intro
o8(4) + # length
o8(packed_flag) + # packed fields
o16(duration) + # duration
o8(transparency) + # transparency index
o8(0))
......
1
2
3
4
5
6
7
8
9
10
11
12
13
14
15
16
17
18
19# 修改写入 header 的内容
def_write_local_header(fp,im,offset,flags):
......
disposal=int(im.encoderinfo.get('disposal',0))
iftransparent_color_existsorduration!=0ordisposal:
packed_flag=1iftransparent_color_existselse0
packed_flag|=disposal<<2
ifnottransparent_color_exists:
transparency=0
fp.write(b"!"+
o8(249)+# extension intro
o8(4)+# length
o8(packed_flag)+# packed fields
o16(duration)+# duration
o8(transparency)+# transparency index
o8(0))
......
修改源码后重新生成动图:
write_gif
Python
def write_gif3(gif):
frames = []
img = Image.open(gif)
mask = Image.new("RGBA", img.size, (255, 255, 255, 0))
for frame in ImageSequence.Iterator(img):
f = frame.copy().convert("RGBA")
frames.append(Image.alpha_composite(mask, f))
img = Image.new("RGBA", frame.size, (255, 255, 255, 0))
img.save("pipixia4.gif", save_all=True, append_images=frames, loop=0, transparency=0, disposal=2)
1
2
3
4
5
6
7
8
9
10defwrite_gif3(gif):
frames=[]
img=Image.open(gif)
mask=Image.new("RGBA",img.size,(255,255,255,0))
forframeinImageSequence.Iterator(img):
f=frame.copy().convert("RGBA")
frames.append(Image.alpha_composite(mask,f))
img=Image.new("RGBA",frame.size,(255,255,255,0))
img.save("pipixia4.gif",save_all=True,append_images=frames,loop=0,transparency=0,disposal=2)
效果展示
使用 PIL 可以很方便实现各种图片处理需求,具体可以关注下面的公众号体验一下。


