手写Spring扫描逻辑模拟实现
手写spring准备和扫描逻辑模拟实现

1、首先来回顾一下我们最初学习 Spring 的时候是如何从容器中获取一个 Bean
根据 xml 配置文件构建容器获取 bean
public class MyTest {
    public static void main(String[] args) {
        //获取spring的上下文对象
        //传入一个路径,告诉spring,你需要按照我的这个配置文件构建一个spring容器
        ClassPathXmlApplicationContext context = new ClassPathXmlApplicationContext("beans.xml");
        Hello hello = (Hello) context.getBean("hello");
        System.out.println(hello.toString());
    }
}
根据 Java 配置类构建容器获取 bean
public class MyTest {
    public static void main(String[] args) {
        // 根据传入的 Java 配置类构建一个 Spring 容器
        AnnotationConfigApplication context = new AnnotationConfigApplication(AppConfig.class);
        Hello hello = (Hello) context.getBean("hello");
        System.out.println(hello.toString());
    }
}
我们接下来要手写的就是后者(根据Java配置构建容器获取bean)
先来想一下我们实现这个spring大概思路(这是最开始的思路,后面中会不断完善,文章的最后有总结):
-
刚开始我们传入一个 Java.class 给 AnnotationConfigApplication 中,然后 AnnotationConfigApplication 内部应该会对这个 Class 类进行解析
-
首先会对这个 Class 类头上的注解进行解析,解析啥注解?这里我们分别解析:
@Configuration:声明一个Java配置类
@ComponentScan(“com.路径”):扫描路径
-
判断成功后,就扫描指定路径下的类,将标注
@Component的注解全部加入到容器中(这里我们用一个Map作为存储bean的容器) -
然后当用户调用
getBean方法的时候就根据传入的这个key去map中寻找bean最后返回给用户
这个是刚开始的一个思路,实现起来会比想的要复杂一些…
准备环境
创建一个maven空项目,为了方便我们引入 lombok,只需要引入这一个包就足够了
<dependencies>
    <dependency>
        <groupId>org.projectlombokgroupId>
        <artifactId>lombokartifactId>
        <version>1.18.20version>
    dependency>
dependencies>
准备几个类
先看一下我这边的目录结构,就参考一哈,这块可以自由发挥:

首先创建一个 YuanApplication 作为 spring 容器
package com.spring;

public class YuanApplicationContext {
    private Class configClass;//需要解析的配置类

    //构建容器时注入配置类
    public YuanApplicationContext(Class configClass) {
        this.configClass = configClass;
    }
}
建立三个注解,分别是:
@Retention(RetentionPolicy.RUNTIME)
@Target(ElementType.TYPE) //作用于类上
public @interface Configuration {
}
@Retention(RetentionPolicy.RUNTIME)
@Target(ElementType.TYPE) //作用于类上
public @interface ComponentScan {
    String value();
}
@Retention(RetentionPolicy.RUNTIME)
@Target(ElementType.TYPE) //作用于类上
public @interface Component {
    String value() default "";
}
创建一个配置类:
@Configuration //声明这是一个配置类
@ComponentScan("com.yuan.service")
public class AppConfig {

}
创建 service
public interface UserService {
    void test1();
}
@Component("userService")
public class UserServiceImpl implements UserService {
    @Override
    public void test1() {
        System.out.println("执行了test1方法");
    }
}
最后再建立一个MyTest:
public class MyTest {

    public static void main(String[] args) {
        YuanApplicationContext applicationContext = new YuanApplicationContext(AppConfig.class);

    }

}
这样就够了,刚开始的时候不需要建立太多类,简洁一点,不然:把自己脑阔都绕晕了
扫描逻辑模拟实现
我们接下来的代码基本上都会在构造函数中实现
首先我们要校验用户传入的这个类是否合法:
/**
 * 校验类是否合法
 */
private void detectionAnnotation(){
    /**
     * 1、判断这个类是否带有 @Configuration ,没有就抛异常
     * 2、判断这个类是否带有 @ComponentScan,没有就抛异常
     */
    if (!configClass.isAnnotationPresent(Configuration.class)){
        try {
            throw new Exception("你忘记加Configuration这个注解了,哈麻批");
        } catch (Exception e) {
            e.printStackTrace();
        }
    }
    if (!configClass.isAnnotationPresent(ComponentScan.class)){
        try {
            throw new Exception("不给ComponentScan我就迷失方向,啥事不敢");
        } catch (Exception e) {
            e.printStackTrace();
        }
    }
}
这段代码写完之后加入到构造函数中,接下来下一段逻辑:
//构建容器时注入配置类
public YuanApplicationContext(Class configClass) {
    this.configClass = configClass;

    //扫描逻辑模拟实现
    detectionAnnotation();

}
扫描解析指定配置类
在开工之前,先想一哈思路:
- 首先要得到ComponentScan上面的扫描路径
- 判断扫描路径是否为文件,扫描该文件下所有 class 文件
- 判断 class 文件上是否带有 Component 注解,带有 Component 注解的类就是我们需要注入到容器中的类
大概就这三个步骤,哈哈,具体我们代码见:
第一步:得到扫描路径,同时我们还要将扫描路径的 . 替换成 /,例如:
com.yuan.service 处理 com/yuan/service
//得到 ComponentScan 注解
ComponentScan componentScan  = (ComponentScan) configClass.getDeclaredAnnotation(ComponentScan.class);
String path = componentScan.value();//获得扫描路径
ClassLoader classLoader = YuanApplicationContext.class.getClassLoader();//获得类加载器
//构建URL
URL resource = classLoader.getResource(path.replace(".", "/"));
第二部:判断扫描路径是否为文件,扫描该文件下所有 class 文件
//根据这个类路径生成一个 file 类
File file = new File(resource.getFile());
//判断这个 file 是否为文件夹
if (file.isDirectory()) {
    File[] files = file.listFiles();
    for (File f : files) {
        //得到文件路径
        String fileName = f.getAbsolutePath();
        System.out.println("初始文件路径 = " + fileName);
        //判断是否为 class 文件
        if (fileName.endsWith(".class")) {
            //处理一下字符串,截取 com 开头 .class 结尾 这段字符
            //同时将 \ 替换成 .
            String className = fileName.substring(fileName.indexOf("com"), fileName.indexOf(".class"));
            System.out.println("加工1 = " + className);
            className = className.replace("\\", ".");
            System.out.println("加工2 = " + className);
        }

    }
}
到了这一步,可以先运行测试一下效果看看:

咋没效果。。。。。。不慌,先debug调试一下,看一下代码在哪里停止的
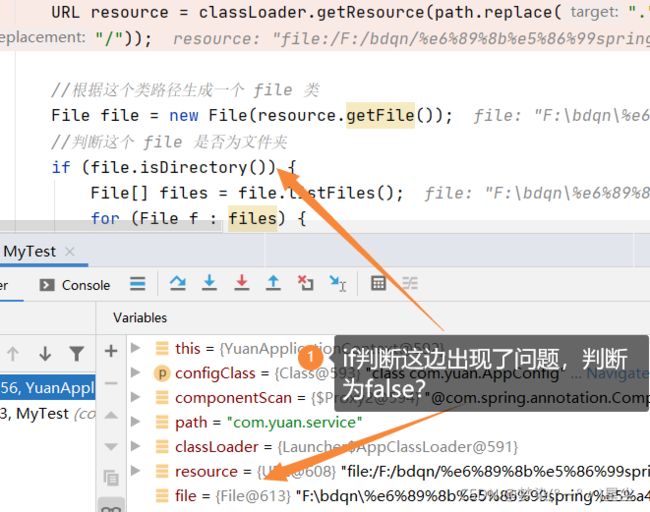
看一下我们debug分析这段路径:
![]()
欸嘿,这一坨乱码是啥子鬼?乱码的的对象刚好是我用中文命名的文件夹?会不会就是这玩意的问题?
我们使用 URLDecoder.decode() 来指定编码,先处理一下这段乱码:
//根据这个类路径生成一个 file 类
File file = null;
try {
    //乱码处理
    file = new File(URLDecoder.decode(resource.getFile(),"utf-8"));
} catch (UnsupportedEncodingException e) {
    e.printStackTrace();
}
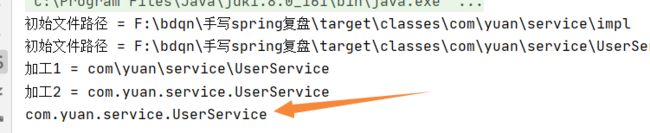
看一下修改后的完整代码,然后在运行一下:
//根据这个类路径生成一个 file 类
File file = null;
try {
    //乱码处理
    file = new File(URLDecoder.decode(resource.getFile(),"utf-8"));
} catch (UnsupportedEncodingException e) {
    e.printStackTrace();
}
//判断这个 file 是否为文件夹
if (file.isDirectory()) {
    File[] files = file.listFiles();
    for (File f : files) {
        //得到文件路径
        String fileName = f.getAbsolutePath();
        System.out.println("初始文件路径 = " + fileName);
        //判断是否为 class 文件
        if (fileName.endsWith(".class")) {
            //处理一下字符串,截取 com 开头 .class 结尾 这段字符
            //同时将 \ 替换成 .
            String className = fileName.substring(fileName.indexOf("com"), fileName.indexOf(".class"));
            System.out.println("加工1 = " + className);
            className = className.replace("\\", ".");
            System.out.println("加工2 = " + className);
        }

    }
}

代码接着往下写:
//根据类路径构建出类的 class 对象
try {
    Class<?> clazz = classLoader.loadClass(className);
} catch (ClassNotFoundException e) {
    e.printStackTrace();
}
第二步编码完毕!
第三步:判断 class 文件上是否带有 Component 注解,带有 Component 注解的类就是我们需要注入到容器中的类
接着下面写这段代码,完事。记得把这段逻辑封装成一个方法
//判断该类中是否存在Component注解,如果存在就对该类的方法属性进行解析
if (!clazz.isAnnotationPresent(Component.class)) {
    System.out.println(clazz.getTypeName());
}
运行代码:
下面展示关于 YuanApplication 这里的完整代码:
public class YuanApplicationContext {
    private Class configClass;//需要解析的配置类

    //构建容器时注入配置类
    public YuanApplicationContext(Class configClass) {
        this.configClass = configClass;

        //扫描逻辑模拟实现
        detectionAnnotation();

        //解析配置类
        scan();

    }

    private void scan() {
        //得到 ComponentScan 注解
        ComponentScan componentScan = (ComponentScan) configClass.getDeclaredAnnotation(ComponentScan.class);
        String path = componentScan.value();//获得扫描路径
        ClassLoader classLoader = YuanApplicationContext.class.getClassLoader();//获得类加载器
        //构建URL
        URL resource = classLoader.getResource(path.replace(".", "/"));

        //根据这个类路径生成一个 file 类
        File file = null;
        try {
            file = new File(URLDecoder.decode(resource.getFile(), "utf-8"));
        } catch (UnsupportedEncodingException e) {
            e.printStackTrace();
        }
        //判断这个 file 是否为文件夹
        if (file.isDirectory()) {
            File[] files = file.listFiles();
            for (File f : files) {
                //得到文件路径
                String fileName = f.getAbsolutePath();
                System.out.println("初始文件路径 = " + fileName);
                //判断是否为 class 文件
                if (fileName.endsWith(".class")) {
                    //处理一下字符串,截取 com 开头 .class 结尾 这段字符
                    //同时将 \ 替换成 .
                    String className = fileName.substring(fileName.indexOf("com"), fileName.indexOf(".class"));
                    System.out.println("加工1 = " + className);
                    className = className.replace("\\", ".");
                    System.out.println("加工2 = " + className);
                    //根据类路径构建出类的 class 对象
                    Class<?> clazz = null;
                    try {
                        clazz = classLoader.loadClass(className);
                    } catch (ClassNotFoundException e) {
                        e.printStackTrace();
                    }
                    //判断该类中是否存在Component注解,如果存在就对该类的方法属性进行解析
                    if (!clazz.isAnnotationPresent(Component.class)) {
                        System.out.println(clazz.getTypeName());
                    }
                }

            }
        }
    }

    /**
     * 校验类是否合法
     */
    private void detectionAnnotation() {
        /**
         * 1、判断这个类是否带有 @Configuration ,没有就抛异常
         * 2、判断这个类是否带有 @ComponentScan,没有就抛异常
         */
        if (!configClass.isAnnotationPresent(Configuration.class)) {
            try {
                throw new Exception("你忘记加Configuration这个注解了,哈麻批");
            } catch (Exception e) {
                e.printStackTrace();
            }
        }
        if (!configClass.isAnnotationPresent(ComponentScan.class)) {
            try {
                throw new Exception("不给ComponentScan我就迷失方向,啥事不敢");
            } catch (Exception e) {
                e.printStackTrace();
            }
        }
    }


    public Object getBean(String key) {

        return null;
    }
}
ok,第一篇手写 spring 就先写到这里,明天更新 BenaDefinition 对象(好吧,可能会拖)
感谢你能看到这里!

如有不足的地方或者错误的地方,欢迎大佬们指出…
欸嘿,好像忘记差点忘记总结了,对思路的优化总结:
-
刚开始我们传入一个 Java.class 给 AnnotationConfigApplication 中,然后 AnnotationConfigApplication 内部应该会对这个 Class 类进行解析
-
首先会对这个 Class 类头上的注解进行解析,解析啥注解?这里我们分别解析:
@Configuration:声明一个Java配置类
@ComponentScan(“com.路径”):扫描路径
-
判断成功后,就扫描指定路径下的类,将标注
@Component的注解全部加入到容器中(这里我们用一个Map作为存储bean的容器)- 首先需要对路径进行utf-8的编码处理,防止中文路径乱码
- 然后获取该文件夹下的所有文件,判断文件后缀是否带有 .class
- 处理一下 .class 的文件路径,然后转为代码运行时的 class 对象
- 判断 class 对象是否是我们容器中需要的 bean(指是否有加上 Component 注解)
-
然后当用户调用
getBean方法的时候就根据传入的这个key去map中寻找bean最后返回给用户
emmmm,这样看起来会不会太枯燥了?感觉好像可以再优化一点,过两天在优化一下吧(说不定就是过了两个月)