从Spring说起
一. Spring是什么
在前面的博文中,我们学会了SpringMVC的使用,可以完成一些基本功能的开发了,但是铁子们肯定有很多问题,下面来从Spring开始介绍,第一个问题,什么是Spring?
Spring是包含了众多工具方法的IOC容器.
Spring有两个核心思想--IOC和AOP,本章先来讲解IOC......
1.1 IOC思想
IOC(Inversion Of Control),控制反转,更详细的解释就是反转对象的控制权.
你们肯定更懵了,对象的控制权是啥,在谁手里?
实际上,这里的控制权指的是对象的创建和销毁,本来控制权是在程序猿手里的
来举个栗子~滑稽老铁攒够了养老钱,准备建一个自己的院子,于是他买好了一套毛坯别墅
要想住进去得有家具呀,老铁高低得给自己整一套舒服的.
public class DeluxeRoom {
    private  Furniture furniture;
    public DeluxeRoom(){
        furniture=new Furniture();
        System.out.println("建好了一套精装房");
    }
}
可是安家具之前得先铺一套地板.
public class Furniture {
    private  Floor floor;

    public Furniture(){
        floor=new Floor();
        System.out.println("安装了一套家具");
    }
}
滑稽又想起来马上就冬天了,要是不安地暖得给自己冻死,于是他在铺地板前又安上了地暖.
public class Floor {
    private HeatingSystem heatingSystem;
    public Floor() {
        this.heatingSystem = new HeatingSystem();
        System.out.println("安装好了地板");
    }
}
public class HeatingSystem {
public HeatingSystem() {
System.out.println("安装好了地暖");
}
}到此,滑稽老铁的房子终于完工了,虽然从外面看起来没多大区别...
我们的代码也写完了
public class App {
public static void main(String[] args) {
DeluxeRoom room=new DeluxeRoom();
}
}滑稽老铁的朋友鸡哥一看,这房子不错,我也要整一套.
但是鸡哥不想要水地暖了,想整一套电地暖.
于是我们在创建地暖的时候要增加一个参数--type,一连串的,其他类的初始化方法都要增加这个参数
//传统写法
public class HeatingSystem {
private String type;//地暖分成水地暖和电地暖
public HeatingSystem(String type) {
this.type=type;
System.out.println("安装好了地暖");
}
}
public class Floor {
private HeatingSystem heatingSystem;
public Floor(String type) {
this.heatingSystem = new HeatingSystem(type);
System.out.println("安装好了地板");
}
}
public class Furniture {
private Floor floor;
public Furniture(String type){
floor=new Floor(type);
System.out.println("安装了一套家具");
}
}
public class DeluxeRoom {
private Furniture furniture;
public DeluxeRoom(String type){
furniture=new Furniture(type);
System.out.println("建好了一套精装房");
}
}
因为地暖种类的改动,整套代码都要改变...
但是如果我们将代码改成下面这样,就不会发生导致蝴蝶效应~
//IOC实现
public class DeluxeRoom {
private Furniture furniture;
public DeluxeRoom(Furniture furniture){
this.furniture=furniture;
System.out.println("建好了一套精装房");
}
}
public class Furniture {
private Floor floor;
public Furniture(Floor floor){
this.floor=floor;
System.out.println("安装了一套家具");
}
}
public class Floor {
private HeatingSystem heatingSystem;
public Floor(HeatingSystem heatingSystem) {
this.heatingSystem=heatingSystem;
System.out.println("安装好了地板");
}
}
public class HeatingSystem {
private String type;
public HeatingSystem(String type) {
this.type=type;
System.out.println("安装好了地暖");
}
}public class App {
public static void main(String[] args) {
HeatingSystem system=new HeatingSystem("电地暖");
Floor floor=new Floor(system);
Furniture furniture=new Furniture(floor);
DeluxeRoom room=new DeluxeRoom(furniture);
}
}这两段代码有什么不同呢?
传统写法,一个类需要什么资源,就在类的内部构造这个对象;IOC实现,一个类需要什么资源,就让别人将这个资源传进来.
不难看出,当底层代码(HeatSystem)改动后,如果依照传统写法,整个调用链的所有代码都需要改动.
用术语来讲叫做"高耦合".
软件设计的原则: 高内聚低耦合
高内聚: 一个模块中的各个元素联系比较紧密,可以共同完成某一功能
低耦合: 不同模块之间的依赖程度越低越好,修改其中一个模块不会影响到其他模块的执行
实际上.生活中还是有很多这样的例子的.比如学校开展"六一"活动,要求每个班表演一个节目,不能因为滑稽老铁拉肚子,导致整个年级不能上台.
这与Spring有什么关系呢?
Spring就是将资源注入进来的工具.当我们需要一个对象时,可以不用手动创建,,而是从Spring中拿.
(APP类中的new可以全部不要,而是交给Spring注入)
1.2 DI实现
了解完IOC后,恭喜你,身为程序猿的觉悟又高了一层~
实际上,IOC是Spring的核心思想,而Spring是怎么实现这思想的呢?
DI(Dependencey Injection),依赖注入----Spring在运行期间,动态地为应用程序提供所依赖的资源.
我们可以使用Spring的方式更改一下IOC代码.
@Component//表示将该类交给Spring保管
public class DeluxeRoom {
private Furniture furniture;
public DeluxeRoom(Furniture furniture){
this.furniture=furniture;
System.out.println("建好了一套精装房");
}
}
@Component
public class Furniture {
private Floor floor;
public Furniture(Floor floor){
this.floor=floor;
System.out.println("安装了一套家具");
}
}
@Component
public class Floor {
private HeatingSystem heatingSystem;
public Floor(HeatingSystem heatingSystem) {
this.heatingSystem=heatingSystem;
System.out.println("安装好了地板");
}
}
@Component
public class HeatingSystem {
    public HeatingSystem() {
        System.out.println("安装好了地暖");
    }
}下面修改一下Spring的启动类
@SpringBootApplication
public class DemoApplication {
	public static void main(String[] args) {
		ApplicationContext context=SpringApplication.run(DemoApplication.class, args);
		DemoApplication room=context.getBean(DemoApplication.class);
	}
}
运行启动类,你就会得到一套精装房.
做个小小的总结,IOC是一种思想,而Spring使用了DI来实现这种思想.
就比如,独在异乡,非常想看见父母,这就是你的想法,给他们打视频就是一种实现方式.
1.3 容器
回顾Spring的定义,似乎还有一个词我们没搞懂---Spring是包含众多工具方法的IOC容器.
那么什么是容器呢?
从小的方面来看,一个水杯就是一个容器,我们可以用它来存水,想喝水的时候也可以从里面取.联系前面学过的Tomcat,不难想象它也是一个webapp容器,用来存储和运行多个webapp项目.
容器,就是帮助我们存取某一资源的工具
Spring也是一个容器,只不过它帮助我们管理的资源就是对象.
所有的容器不外乎两种操作----存和取,下面就来学习一下如何从Spring存取对象吧
二. 往Spring中存对象
有两种方式可以实现:
1. 五大类注解: @Controller,@Service,@Repository,@Component,@Configuration
2. 方法注解: @Bean
来看一下它们的使用吧
2.1 五大注解
2.1.1 @Controller
先创建一个UserController类
@Controller//表示将该类注入到Spring容器中
public class UserController {
    public void sayHi(){
        System.out.println("Hi,Controller!");
    }
}
那么我们怎么知道Spring中是否有这个对象?需要从Spring中取出来.
来看Spring启动类代码.
@SpringBootApplication
public class DemoApplication {
	public static void main(String[] args) {
		//运行run方法,会返回Spring上下文对象,也就是Spring
		ApplicationContext context=SpringApplication.run(DemoApplication.class, args);
		//从Spring中得到UserController对象
		UserController controller=context.getBean(UserController.class);
		//调用该对象的sayHi方法
		controller.sayHi();
	}
}
启动Spring项目,就会惊奇的发现我们确实取出了UserController对象.
如果我们将@Controller删掉,就会抛出NoSuchBeanDefinitionException这个异常(Bean在Spring就是对象的意思)
下面来逐次演示一下其他四大类注解,代码重复度很高,已经懂的老铁可以跳过~
2.1.2 @Service&@Repository&@Component&@Configuration
再来演示一下其他四大类注解
@Service
public class UserService {
    public void sayHi(){
        System.out.println("Hi,Service");
    }
}

@Repository
public class UserRepo {
    public void sayHi(){
        System.out.println("Hi,Repository!");
    }
}

@Configuration
public class UserConfig {
    public void sayHi(){
        System.out.println("Hi,Configuration!");
    }
}

@Component
public class UserCom {
    public void sayHi(){
        System.out.println("Hi,Component");
    }
}
同样可以从Spring中取出这些对象,然后你就得到了一堆Hi~
@SpringBootApplication
public class DemoApplication {
	public static void main(String[] args) {
		//运行run方法,会返回Spring上下文对象,也就是Spring
		ApplicationContext context=SpringApplication.run(DemoApplication.class, args);
		//从Spring中得到UserController对象
		UserController controller=context.getBean(UserController.class);
		//调用该对象的sayHi方法
		controller.sayHi();

		UserService service=context.getBean(UserService.class);
		service.sayHi();

		UserRepo userRepo=context.getBean(UserRepo.class);
		userRepo.sayHi();

		UserConfig userConfig=context.getBean(UserConfig.class);
		userConfig.sayHi();

		UserCom userCom=context.getBean(UserCom.class);
		userCom.sayHi();

	}
}
2.1.3 getBean方法的使用
getBean有很多重载,这里只介绍三种常见的.
| 参数 | 说明 |
getBean(Class |
根据参数类型返回对象 |
getBean(String var1) |
根据名称返回对象 |
getBean(String var1, Class |
根据名称和类型返回对象 |
其中根据类型返回对象我们已经使用过了,那么怎么根据名称取得对象呢?
在idea中找到下面这个类
用我蹩脚的English翻译一下吧,
- 如果名字的第一个字母和第二个字母都是大写,就返回这个名字
- 其余情况,将第一个字母改成小写,然后返回
- 这里的name是指类名
用代码来实现一下,帮助理解~
UserService service= (UserService) context.getBean("userService");//返回的是Object对象,需要强转
service.sayHi();
代码可以正常运行,表明我们取到了UserService对象.这种方式需要强转,接下来演示类型+名字的方式取到对象.
UserService service=context.getBean("userService",UserService.class);
service.sayHi();
2.1.4 ApplicationContext和BeanFactory
来简单了解一下ApplicationContext的源码,就会发现BeanFactory的痕迹
![]()
接着追溯到顶级接口BeanFactory接口,可以发现getBean这个方法就是这个接口提供的.
在SpringBoot出现之前,Spring中对象的存取是通过配置文件实现的.
BeanFactory也是这时候诞生的.下面简单演示一下(作为了解即可)
创建一个maven项目,下面是目录结构
需要先在pom.xml中引入Spring依赖
            org.springframework
            spring-context
            5.2.3.RELEASE


            org.springframework
            spring-beans
            5.2.3.RELEASE
//用App来演示Spring的存取
public class App {
    public static void main(String[] args) {
        BeanFactory factory=new XmlBeanFactory(new ClassPathResource("config.xml"));//使用配置文件获取到Spring上下文

        User user= (User) factory.getBean("user");//从Spring中获取User对象

        user.sayHi();//调用User对象的sayHi方法
    }
}
下面是User类的代码
public class User {
   public void sayHi(){
       System.out.println("Hi,User");
   }
}
Spring的配置文件如下
运行App的main方法,我们就能调用User对象的sayHi方法了.
![]()
然而,Spring并不推荐使用配置文件来实现对象的存取,而更推荐使用注解的方式.
可以看到,通过ApplicationContext和BeanFactory都可以获取到Spring上下文,下面来讲述一下二者的区别.
- ApplicationContext也是一个接口,并且扩展了BeanFactory接口,属于BeanFactory的子类
- ApplicationContext添加了对国际化支持,资源访问支持以及事件传播等方面的支持
- BeanFactory的出现比较早,硬件的存储空间小,因此BeanFactory采用懒加载的方式去加载对象(用到哪个加载哪个);ApplicationContext采用预加载的方式加载.实际上这是可以通过代码改变加载方式的,此处不再拓展.
2.1.5 五大注解之间的关系和区别
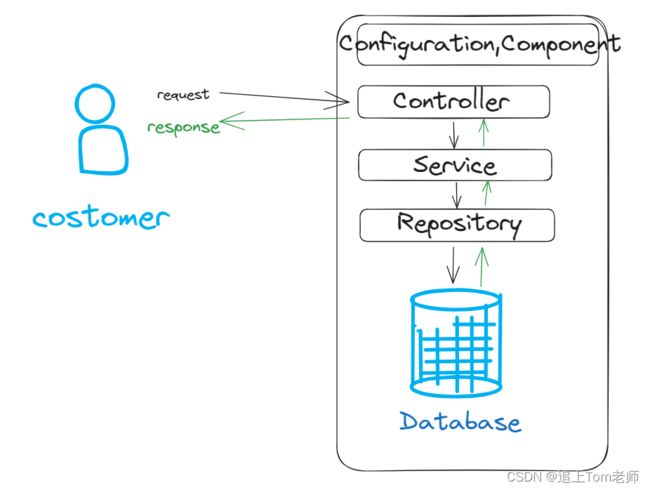
同学们有没有想过一个问题,既然任意五大类注解中任意一个都可以实现对象的存储,为啥不直接搞成一个呢?
这涉及到另一种思想----应用分层.
Controller: 控制层,接收请求,响应请求
Service: 服务层,处理具体的业务逻辑
Repository: 数据访问层也称为持久层,负责访问数据库
Configuration: 配置层,处理项目中的一些配置信息
Component: 组件层,处理一些公用信息
来举个例子说明一下吧~
就好比你去面试,保安就是第一个看见你的人(Controller层),负责对你的身份进行检验;
进入公司后,你要先去找前台小姐姐(Service层),小姐姐知道你是来面试的,就会把你带到面试官面前;
如果你足够幸运,得到了面试官的认可,他就会把你分配到某一部门(把公司人员的信息当成一个数据库的话,面试官就是Repository层)
至于配置层和组件层,我们在后面创建SSM项目的时候会有更深层次的理解,这里先按下不表.
这些层之间的调用关系如下图
当程序抛出异常时,我们还可以根据异常信息定位到是哪一层出现了问题.
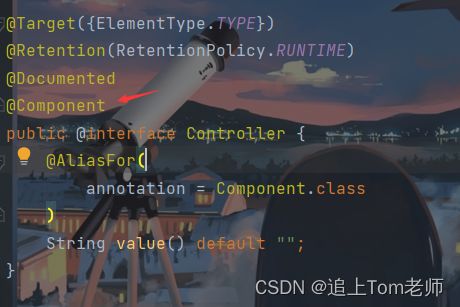
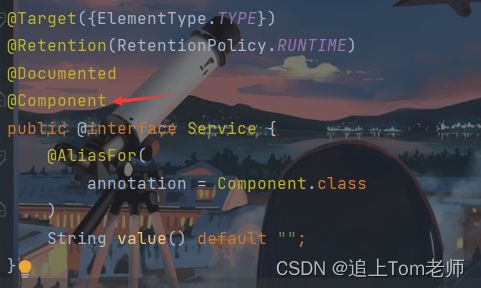
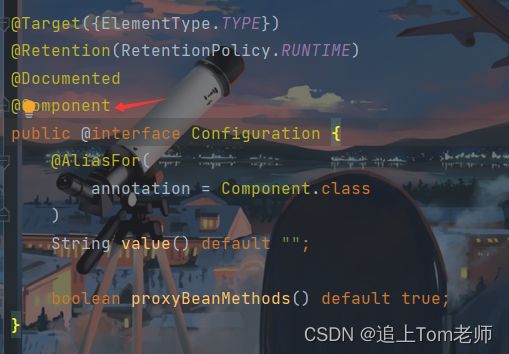
讲完这些注解的区别之后,我们来谈一下它们的联系.
可以发现,其余四个注解都是@Component的衍生注解,除此之外看起来并无区别.
当然,在这里展示的只是注解的声明,有关这些注解的源码需要看Spring源码.
在实际的开发中,我们也要实现应用分层,用包名划分不同层的类
2.2 方法注解@Bean
五大注解是添加到方法上的,这就产生了两个问题:
- 使用外部库中的类时,我们无法在这些类上添加注解,也就不能让Spring帮忙管理这些类对象
- 一个类需要注入多个对象时无法实现
来看一下类注解获取的对象是否是同一个
@SpringBootApplication
public class DemoApplication {
	public static void main(String[] args) {
		//获取Spring上下文
		ApplicationContext context=SpringApplication.run(DemoApplication.class, args);

		UserController controller=context.getBean(UserController.class);//根据类型获取bean
		UserController controller1=context.getBean("userController",UserController.class);//根据名称+类型获取bean
		System.out.println(controller1==controller);//判断两个引用指向的是否是同一个对象

	}
}
答案是true
于是就引入了方法注解@Bean,我们先来看看@Bean如何使用.
先创建一个实体类User,作为返回类型.
@Data
public class User {
    private String name;
    private Integer age;
}
因为直接操作实体类对象的往往是持久层,因此我们给UserRepo类添加一个getUser方法.
public class UserRepo {
    @Bean//将该方法的返回值注入到Spring容器中

    public User getUser(){
        User user=new User();//在实际项目中,这个user是从数据库中取出来的,不是我们new的
        user.setName("张三");
        user.setAge(18);
        return user;
    }
}
然后我们尝试获取一下这个User
@SpringBootApplication
public class DemoApplication {
	public static void main(String[] args) {
		//获取Spring上下文
		ApplicationContext context=SpringApplication.run(DemoApplication.class, args);

		//获取User对象并输出
		User user=context.getBean(User.class);
		System.out.println(user);
	}
}
运行代码,就会很幸运的遇见这位老朋友.
可以想象一下方法注入的工作过程----如果我们使用@Bean进行方法注入的话,Spring需要扫描所有类,然后对每个类的每个方法进扫描,这样的工作量无疑是巨大的!
为了缩短项目的启动时间,Spring规定@Bean要配合类注解使用.
@Repository
public class UserRepo {
    @Bean
    public User getUser(){
        User user=new User();//在实际项目中,这个user是从数据库中取出来的,不是我们new的
        user.setName("张三");
        user.setAge(18);
        return user;
    }
}
再次启动项目,就可以看到控制台的打印日志了.
2.2.1 定义多个对象
前面还提到过,方法注解用来解决针对同一个类,无法注入多个对象的问题.它是怎么解决的呢?
来看一下代码~
@Repository
public class UserRepo {
    @Bean
    public User getUser(){
        User user=new User();//在实际项目中,这个user是从数据库中取出来的,不是我们new的
        user.setName("张三");
        user.setAge(18);
        return user;
    }

    @Bean
    public User getUser2(){
        User user=new User();
        user.setName("王五");
        user.setAge(58);
        return user;
    }
}
这时候,如果在getBean方法中传的是类型参数的话,就会触发NoUniqueBeanDefinitionException异常
因此我们在使用getBean方法的时候还应该传入名字.
那么@Bean注入的对象,名字应该是什么呢?是方法名.
来验证一下.
@SpringBootApplication
public class DemoApplication {
	public static void main(String[] args) {
		//获取Spring上下文
		ApplicationContext context=SpringApplication.run(DemoApplication.class, args);

		//获取User对象并输出
		User user=context.getBean("getUser",User.class);
		System.out.println(user);

		User user1=context.getBean("getUser2",User.class);
		System.out.println(user1);
	}
}
我们可以在控制台上看到Spring确实取出了两个User对象
2.2.1 @Bean重命名
肯定有同学会想到,如果不想使用方法名作为Spring中对象的名字,可不可以自己设置?
@Bean提供了name的属性.
因此,我们还可以这样使用@Bean
@Repository
public class UserRepo {
    @Bean({"zhangsan","get1"})//将返回的对象命名为"zhangsan"和"get1"
    public User getUser(){
        User user=new User();//在实际项目中,这个user是从数据库中取出来的,不是我们new的
        user.setName("张三");
        user.setAge(18);
        return user;
    }

    @Bean("wangwu")//将返回的对象命名为"wangwu"
    public User getUser2(){
        User user=new User();
        user.setName("王五");
        user.setAge(58);
        return user;
    }
}
我们使用自己的命名来获取User对象.
@SpringBootApplication
public class DemoApplication {
	public static void main(String[] args) {
		//获取Spring上下文
		ApplicationContext context=SpringApplication.run(DemoApplication.class, args);

		User user=context.getBean("zhangsan",User.class);//获取zhangsan这个对象
		System.out.println(user);

	}
}
结果如下
注意: 如果给注入我的对象进行重命名,默认的名字无法继续使用.
@SpringBootApplication
public class DemoApplication {
	public static void main(String[] args) {
		//获取Spring上下文
		ApplicationContext context=SpringApplication.run(DemoApplication.class, args);
        //继续使用方法名获取对象
		User user=context.getBean("getUser",User.class);
		System.out.println(user);

	}
}
2.2.3 @Bean传递参数
同学们有没有发现,@Bean修饰的方法都是无参的,如果我们想让用户自己传递一个name作为User的属性,该怎么定义呢?
这就需要将name也作为对象交给Spring保管.
@Repository
public class UserRepo {

    //定义一个方法,返回String类型的对象并注入到Spring中
    @Bean
    public String getName(){
        return "赵四";
    }


    @Bean
    public User getUserByName(String name){//传递的name实际上也是从Spring取得的
        User user=new User();
        user.setName(name);
        return user;
    }
}
@SpringBootApplication
public class DemoApplication {
public static void main(String[] args) {
//获取Spring上下文
ApplicationContext context=SpringApplication.run(DemoApplication.class, args);
User user=context.getBean("getUserByName",User.class);
System.out.println(user);
}
}启动注解类,就会得到"赵四"对象
实际上,我们的问题并没有解决,传递的参数还是由程序猿指定的,而不是由用户动态输入确定的.关于这个问题在后面的文章再进行讨论...
2.3 @ComponentScan配置扫描路径
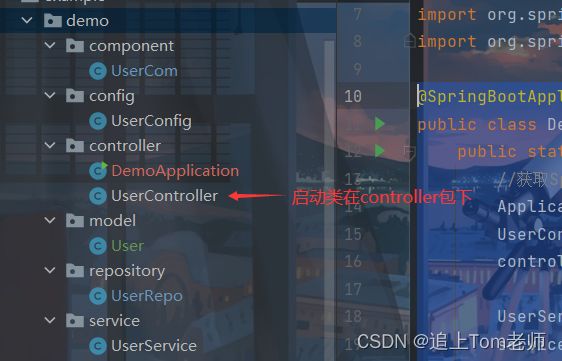
第一篇关于SpringMVC的文章中提到过,我们创建的对象要与启动类同级或者放在与启动类同级的目录下.
现在来解释一下为什么----
先改变一下目录结构
@SpringBootApplication
public class DemoApplication {
	public static void main(String[] args) {
		//获取Spring上下文
		ApplicationContext context=SpringApplication.run(DemoApplication.class, args);
		UserController controller=context.getBean(UserController.class);
		controller.sayHi();

		UserService service=context.getBean(UserService.class);
		service.sayHi();

	}
}
运行启动类,发现UserController对象正常执行sayHi方法,但是Spring却找不到UserService对象
需要使用@ComponentScan注解配置一下Spring的扫描路径
现在将UserSerivce的路径配置进去(以包为单位)
@SpringBootApplication
@ComponentScan("com.example.demo.service")//表示service包下的类让Spring扫描
public class DemoApplication {
	public static void main(String[] args) {
		//获取Spring上下文
		ApplicationContext context=SpringApplication.run(DemoApplication.class, args);
		UserController controller=context.getBean(UserController.class);
		controller.sayHi();

		UserService service=context.getBean(UserService.class);
		service.sayHi();

	}
}
然鹅程序却抛出了另一个异常----找不到UserController对象了
因此我们将两个包都放进去
@SpringBootApplication
@ComponentScan({"com.example.demo.service","com.example.demo.controller"})
public class DemoApplication {
	public static void main(String[] args) {
		//获取Spring上下文
		ApplicationContext context=SpringApplication.run(DemoApplication.class, args);
		UserController controller=context.getBean(UserController.class);
		controller.sayHi();

		UserService service=context.getBean(UserService.class);
		service.sayHi();

	}
}
这下程序终于可以正常运行了.
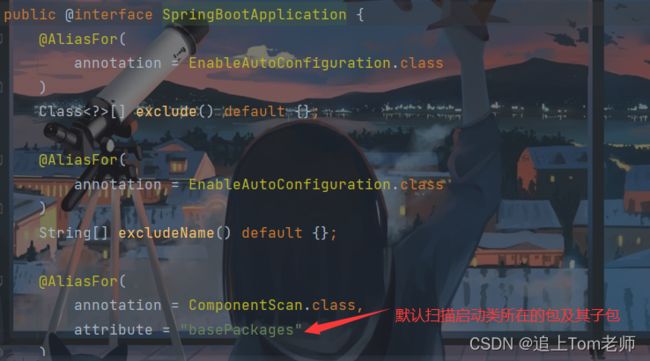
这是咋回事呢?来看一下启动类注解@SpringBootApplication
- 没有显式配置扫描路径时,Spring默认扫描启动类所在的包及其子包
- 如果程序员定义了扫描路径,默认路径不再使用
更推荐的做法还是不要移动启动类的位置,将它放到我们想要扫描的包下即可.
三. 从Spring中取对象
这一部分内容,实际上是DI(依赖注入)的实现,所谓依赖,指的是依赖的外部资源.
在上文演示的过程中,我们需要先获取Spring容器,再从这个容器中拿出来Spring存储的对象.
实际上,有三种简单的方式可以帮助获取到Spring存储的对象.
- 属注入
- Setter注入
- 构造方法注入
3.1 属性注入
属性注入,就是在对象中定义一个属性,然后借助@Autowired注解自动将这个属性初始化.
比如,Controller层要调用Service层的方法,可以在内部设置一个UserService类型的成员变量.
@Controller
public class UserController {
    @Autowired
    private UserService service;//在内部定义一个service成员变量,并使用注解自动初始化这个对象

    public void sayHi(){
        service.sayHi();
    }
}
然后我们让启动类调用UserController的sayHi方法,,实际上调用的就是UserService的sayHi
@SpringBootApplication
public class DemoApplication {
	public static void main(String[] args) {
		//获取Spring上下文
		ApplicationContext context=SpringApplication.run(DemoApplication.class, args);
		UserController controller=context.getBean(UserController.class);
		controller.sayHi();


	}
}
运行成功!
3.2 Setter方注入
Setter方法注入也需要借助@Autowired注解
@Controller
public class UserController {

    private UserService service;

    @Autowired
    public void setService(UserService service) {
        this.service = service;
    }

    public void sayHi(){
        service.sayHi();
    }
}
程序仍可以正常运行~
3.3 构造方法注入
可以借助 @Autowired 注解实现
@Controller
public class UserController {

    private UserService service;

    @Autowired//该注解可省略
    public UserController(UserService service) {
        this.service = service;
    }

    public void sayHi(){
        service.sayHi();
    }
}
UserController同样可以从Spring中获取到UserService对象.
因为构造方法注入是Spring官方推荐的做法,当类中只存在一个构造方法时,可以不加@Autowired
如果类中有多个构造方法,Sprig会优先使用无参构造,也就不会对属性进行注入.这时就必须加上@Autowired注解.
@Controller
public class UserController {

    private UserService service;


    public UserController() {//Spring会优先使用无参构造注入UserController对象,因此service属性并没有被注入
    }

    public UserController(UserService service) {
        this.service = service;
    }

    public void sayHi(){
        service.sayHi();
    }
}
程序抛出了空指针异常~
此时我们就必须要给有参数的构造方法添加注解了.
@Autowired
public UserController(UserService service) {
        this.service = service;
}
3.4 三种注入方法的优缺点
1. 属性注入
优点: 使用方便
缺点: 无法注入final修饰的属性 ; 只适用于IOC容器,如果换了其他容器会抛出空指针异常
由final修饰的属性只能进行就地初始化和构造方法初始化,如果用@Autowired修饰final修饰的属性,idea会直接报错
2. Setter注入
优点: 方便在类实例之后,重新对该对象进行修改
缺点: 不能注入一个final修饰的属性; 注入的对象可能会改变,因为Setter方法可以被其他类调用;
实际上这有点强扯~可修改既是Setter的优点也是它的缺点,但实际上我们既然已经将对象交给Spring管理,就不会轻易去改变这个对象
3. 构造函数注入
优点: 可以注入final修饰的属性,因此也可以保证注入的对象不会被修改;
是JDK支持的,所以更换任何框架都适用
3.5 指定注入的对象名
@Autowired默认根据类型注入对象.
- 当该类型的对象只有一个时,Spring直接注入
- 当该类型的对象有多个时,Spring会根据名称注入
来看一下代码>>
@Repository
public class UserRepo {

    @Bean({"zhangsan","get1"})//使用方法注解往Spring中注入User对象
    public User getUser(){
        User user=new User();
        user.setName("张三");
        user.setAge(18);
        return user;
    }

}


@Service
public class UserService {

    @Autowired//Spring容器中只有一个User类型的对象,直接注入,与属性名无关
    private User user;

    public void sayUser(){
        System.out.println(user.toString());
    }
}
然后我们让启动类调用UserService对象的sayUser方法.
@SpringBootApplication
public class DemoApplication {
	public static void main(String[] args) {
		//获取Spring上下文
		ApplicationContext context=SpringApplication.run(DemoApplication.class, args);
		UserService service=context.getBean(UserService.class);
		service.sayUser();

	}
}
可以正确拿到User对象~
但是,如果我们注入多个User对象时
@Repository
public class UserRepo {
    @Bean({"zhangsan","get1"})
    public User getUser(){
        User user=new User();
        user.setName("张三");
        user.setAge(18);
        return user;
    }

    @Bean("wangwu")
    public User getUser2(){
        User user=new User();
        user.setName("王五");
        user.setAge(58);
        return user;
    }
}
再次调用sayUser方法,Spring发现了两个User类型的对象,注入时发生冲突
有两种解决办法:
- 更改USerService中的属性名
- 指定要取哪个对象
@Service
public class UserService {
    @Autowired
    private User zhangsan;//变量名要与@Bean重命名后的名字匹配

    public void sayUser(){
        System.out.println(zhangsan.toString());
    }
}
于是正确的拿到了zhangsan对象
@Autowired不能指定要拿的对象名称,我们需要借助另外一个注解@Qualifier来实现
@Service
public class UserService {
    @Autowired
    @Qualifier("zhangsan")//指定要取名称为zhangsan的这个对象,()中的对象名只能有一个
    private User user;

    public void sayUser(){
        System.out.println(user.toString());
    }
}
除了在DI时指定要注入的对象名,将对象注入到Spring容器中时还可以使用@Primary注解表示这个类型优先取这个对象
@Repository
public class UserRepo {
    @Bean({"zhangsan","get1"})
    public User getUser(){
        User user=new User();
        user.setName("张三");
        user.setAge(18);
        return user;
    }

    @Bean("wangwu")
    @Primary//除非用户显式指定要取的对象名,否则取出的对象就是该方法返回的对象
    public User getUser2(){
        User user=new User();
        user.setName("王五");
        user.setAge(58);
        return user;
    }
}


@Service
public class UserService {
    @Autowired
    private User user;

    public void sayUser(){
        System.out.println(user.toString());
    }
}
@SpringBootApplication
public class DemoApplication {
public static void main(String[] args) {
//获取Spring上下文
ApplicationContext context=SpringApplication.run(DemoApplication.class, args);
UserService service=context.getBean(UserService.class);
service.sayUser();
}
}运行启动类,确实取出来的是王五User
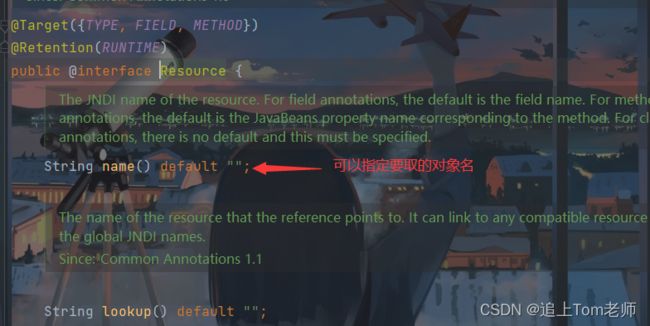
仅一个@Autowired无法指定要取哪个对象,JDK给我们提供了另一个注解 @Resource
@Service
public class UserService {
    @Resource(name = "zhangsan")//要拿zhangsan这个对象
    private User user;

    public void sayUser(){
        System.out.println(user.toString());
    }
}
来简单总结一下@Autowired和@Resource注解的区别吧
- @Autowired是Spring框架提供的,@Resource是JDK提供的注解
- @Autowired不能指定要取的对象名,需要借助其他注解来实现;@Resource可以根据对象名唯一指定要取的对象
- @Autowired默认优先按照类型进行注入, @Resource按照名称注入
四. Spring中的对象名
前文我们已经见过,Spring容器中对象的名字是非常重要的,必要情况下,我们取对象时就是根据对象名来取的.
五大类注解对象名规则:
- 如果类名的首字母大写,将首字母改为小写就是对象名
- 如果类名的首字母和第二个字母都是大写,类名就是对象名
我们在注入的时候可以更改默认的对象名,但是默认的名字无法继续使用
@Controller("userCon")//Spring中该对象的名字是userCon,只能指定一个
public class UserController {
    public void sayHi(){
        System.out.println("Hi,Controller");
    }
}

@SpringBootApplication
public class DemoApplication {
	public static void main(String[] args) {
		//获取Spring上下文
		ApplicationContext context=SpringApplication.run(DemoApplication.class, args);
		UserController controller=context.getBean("userCon",UserController.class);//使用对象名+类型的方式获取对象
		controller.sayHi();

	}
}
可以正确取到Controller
但是如果我们继续使用默认的名字获取对象,就会抛出我们的老朋友~
UserController controller=context.getBean("userController",UserController.class);//使用默认的名字获取对象
controller.sayHi(); ![]()
其余的四大类注解雷同,不再演示~~
@Bean方法注入默认对象名规则
- 对象名即为方法名
- 可以显式修改对象名,并且可以设置为多个,但是默认的名字无法继续使用
这个在前文2.2.1中做过演示,不再展示
实际上,对象名就是对象的身份标识,就好像我们的身份证一样,不同对象的名字必须不同(哪怕是不同类型的对象)
@Controller("user")//Spring容器中该对象的名字是user
public class UserController {
    public void sayHi(){
        System.out.println("Hi,Controller");
    }
}


@Service("user")//Spring容器中该对象的名字是user
public class UserService {

    public void sayHi(){
        System.out.println("Hi,service");
    }
}
@SpringBootApplication
public class DemoApplication {
public static void main(String[] args) {
ApplicationContext context=SpringApplication.run(DemoApplication.class, args);
UserController controller=context.getBean("user",UserController.class);
controller.sayHi();
UserService service=context.getBean("user",UserService.class);
service.sayHi();
}
}运行启动类,会抛出对象名存储异常


