hexo博客部署到云服务器
欢迎大家到我的博客浏览。hexo博客部署到云服务器 | YinKai's Blog
这篇文章带大家将hexo博客部署到云服务器上!
一、服务器环境安装
1、安装 node js
yum install gcc-c++ make
yum -y install nodejs
yum -y install npm
验证
node -v
npm -v
2、安装git、nginx
yum install git nginx -y3、安装 hexo
npm install hexo-cli hexo-server -g
验证
hexo二、创建服务器git环境
1、创建 git 用户
adduser git
passwd git
2、创建证书
-
切换到git用户:
su git -
创建.ssh目录:
mkdir ~/.ssh && chmod 700 ~/.ssh -
然后在云服务创建
authorized_keys公钥保存文件:touch ~/.ssh/authorized_keys && chmod 600 ~/.ssh/authorized_keys -
将本地的公钥粘贴到 authorized_keys 文件中:
cat ~/.ssh/id_rsa.pub -
如果本地没有公钥或者后续上传失败,,可以使用下面的命令重新生成一个公钥。
ssh-keygen -t rsa -b 2048 -C "[email protected]"
__ tip: __ 公钥保存文件
authorized_keys是一行添加一个
3、创建 git 仓库目录
回到服务器目录,创建名为 blog 的 git 仓库目录。
su -
mkdir /var/repo
cd /var/repo
git init --bare blog.git
4、配置 git hooks
vim /var/repo/blog.git/hooks/post-receive添加内容
#!/bin/sh
git --work-tree=/var/www/hexo --git-dir=/var/repo/blog.git checkout -f
保存退出,并设置权限
chmod +x /var/repo/blog.git/hooks/post-receive5、改变 BLOG.GIT 目录的拥有者为 GIT 用户
chown -R git:git blog.git6、创建静态文件目录并将第 3 步骤生成的git仓库链接到静态文件目录下
-
创建静态文件目录(文章网页):
mkdir /var/www、mkdir /var/www/hexo -
链接git仓库:
chown -R git:git /var/www/hexo -
配置权限:
chmod -R 755 /var/www/hexo这样git仓库更新便会自动同步到hexo目录下
7、为了安全考虑,禁用GIT用户的SHELL 登录权限配置(下面两个步骤非常重要,否则客户端总是提示密码错误!!!)
首先你必须确保 git-shell 已存在于 /etc/shells 文件中
-
使用命令 which git-shell 判断系统是否安装了 git-shell。如果已经安装,则返回 git-shell 的安装目录,如:
/usr/bin/git-shell;如果未安装则需要安装git-shell命令,安装命令:yum install git -
判断shells文件是否存在,判断命令:
cat /etc/shells -
如果文件不存在或没有
/usr/bin/git-shell则需要使用vim增加这个路径:
sudo vim /etc/shells
在最后一行添加
git-shell路径
/bin/sh
/bin/bash
/usr/bin/sh
/usr/bin/bash
/usr/bin/git-shell # 添加你的git-shell
在终端中,输入 sudo chsh git,然后在New shell [/bin/bash]: 后输入git-shell路径/usr/bin/git-shell
修改完成后验证: vim /etc/passwd找到类似git:x:1000:1000:,,,:/home/git:/usr/bin/git-shell,看看git用户是否是以git-shell结尾
-
这样,git用户就只能使用SSH连接对Git仓库进行推送和拉取操作,而不能登录机器并取得普通shell命令
三、配置本地创建
本地安装 hexo 的过程,这里省略了,大家可以参考 GitHub Pages + Hexo搭建个人博客网站,史上最全教程 。
在 hexo 根目录用 管理员身份 打开 cmd,执行
npm install hexo-deployer-git --save打开本地 hexo 博客目录,编辑_config.yml文件 修改repository为:
deploy:
  type: git
  repository: git@ip或域名:/var/repo/blog.git
  branch: master
然后执行下面的命令,将文件上传到你部署的服务器上,如果上传成功则本地配置创建完成。
hexo clean # 清缓存 可选
hexo g
hexo d
四、nginx 配置
1、修改 nginx 的 DEFAULT 设置
为了能让浏览器能直接访问静态页面,需要使用nginx将端口或域名指向hexo静态文件目录。
-
ubuntu
vim /etc/nginx/sites-available/default -
centos
vim /etc/nginx/conf.d/default.conf
注意:不同版本的nginx或系统,nginx的配置文件不一定相同,根据具体情况来修改配置。
2、将其中的 ROOT 指令指向 /var/www/hexo 目录(也就是GIT钩子目录)

3、 最后重启服务,让NGINX生效
service nginx restart 4、然后在浏览器中输入网址即可看到网站。
五、补充命令
补充点有用的命令
1、生成一篇文章
在hexo-blog目录下用git-bash
hexo new post 我的文章
2、上传新文章
hexo g -d3、后台admin/界面编辑文章
在hexo根路径下用bash下载
npm install --save hexo-admin 只能在localhost:4000编辑 输入localhost:4000/admin进入界面 可以在编辑文章的同时实时预览效果
六、配置服务器域名与https证书
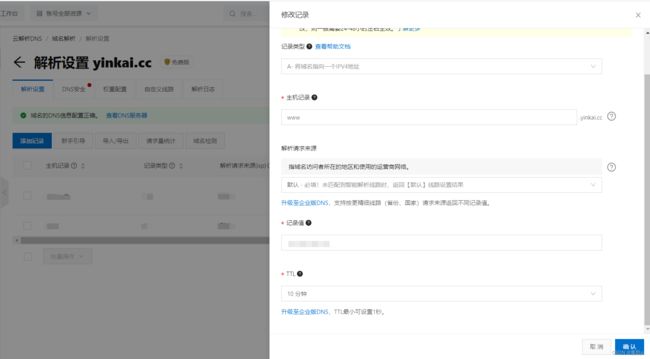
1、服务器绑定域名
直接到购买域名的服务商,对域名进行解析,并添加记录值(服务器ip地址),等待一段时间后,便可访问了。但这个时候,网站显示不安全,即非 https,需要进行域名备案,然后绑定证书。
域名备案周期会比较长,大概需要 20 天,大家可以根据自己的用途,考虑是否需要备案。
2、https 证书绑定
首先需要获取一个证书,详情可以参考 Nginx配置SSL证书。
获取到证书后,将证书所带的两个文件,我的是 .pem 和 .key 文件,上传到服务器的某个文件夹里存放好。
然后打开服务器 nginx 配置文件,我的是 /etc/nginx/nginx.conf:
# For more information on configuration, see:
# * Official English Documentation: http://nginx.org/en/docs/
# * Official Russian Documentation: http://nginx.org/ru/docs/
user nginx;
worker_processes auto;
error_log /var/log/nginx/error.log;
pid /run/nginx.pid;
# Load dynamic modules. See /usr/share/doc/nginx/README.dynamic.
include /usr/share/nginx/modules/*.conf;
events {
worker_connections 1024;
}
http {
log_format main '$remote_addr - $remote_user [$time_local] "$request" '
'$status $body_bytes_sent "$http_referer" '
'"$http_user_agent" "$http_x_forwarded_for"';
access_log /var/log/nginx/access.log main;
sendfile on;
tcp_nopush on;
tcp_nodelay on;
keepalive_timeout 65;
types_hash_max_size 4096;
include /etc/nginx/mime.types;
default_type application/octet-stream;
# Load modular configuration files from the /etc/nginx/conf.d directory.
# See http://nginx.org/en/docs/ngx_core_module.html#include
# for more information.
include /etc/nginx/conf.d/*.conf;
server {
listen 80;
listen [::]:80;
server_name yinkai.cc; # 一:修改域名
root /var/www/hexo; # 二:修改为你的项目根目录
rewrite ^(.*)$ https://$host$1; # 三:重定向到https
# Load configuration files for the default server block.
include /etc/nginx/default.d/*.conf;
error_page 404 /404.html;
location = /404.html {
}
error_page 500 502 503 504 /50x.html;
location = /50x.html {
}
}
# Settings for a TLS enabled server.
server {
listen 443 ssl http2;
listen [::]:443 ssl http2;
server_name yinkai.cc; # 四:修改为你的域名
root /var/www/hexo; # 五:修改为你的项目根目录
ssl_certificate "/etc/nginx/SSL/yinkai.cc.pem"; # 六:修改到你的 .pem 文件路径
ssl_certificate_key "/etc/nginx/SSL/yinkai.cc.key"; # 七:修改到你的 .key 文件路径
ssl_session_cache shared:SSL:1m;
ssl_session_timeout 10m;
ssl_ciphers HIGH:!aNULL:!MD5;
ssl_prefer_server_ciphers on;
# Load configuration files for the default server block.
include /etc/nginx/default.d/*.conf;
error_page 404 /404.html;
location = /40x.html {
}
error_page 500 502 503 504 /50x.html;
location = /50x.html {
}
location / {
try_files $uri $uri/ /index.html;
}
}
}上面标注的地方,就是需要修改的配置文件的内容。
修改完成后使用下面的命令重启 nginx 即可:
systemctl restart nginx3、api 访问域名绑定
我这里因为使用了 valine 评论插件,所以需要将域名绑定到 leancloud 上。
4、LeanCloud 安全中心增加 Web 安全域名
若有多个,可以填写多个,统计的数据是不一样的,每一行一个域名,用换行进行分割。
