基于深度学习CRNN的水表读数识别系统
1.研究背景与意义
项目参考AAAI Association for the Advancement of Artificial Intelligence
研究背景与意义
随着科技的不断发展,深度学习技术在各个领域都取得了显著的成果。其中,基于深度学习的图像识别技术在计算机视觉领域具有重要的应用价值。水表读数识别作为其中的一个重要应用场景,对于提高水表读数的准确性和效率具有重要意义。
水表读数是水务管理部门进行水费计量和收费的重要依据,准确的水表读数对于用户和水务管理部门都具有重要意义。然而,传统的水表读数采集方式存在一些问题,如人工读数容易出现误差、效率低下等。因此,开发一种基于深度学习的水表读数识别系统,能够自动识别水表读数,提高读数的准确性和效率,具有重要的实际应用价值。
在过去的几年中,深度学习技术在图像识别领域取得了显著的进展。卷积神经网络(Convolutional Neural Network,CNN)作为深度学习的重要分支之一,已经在图像分类、目标检测等任务中取得了很好的效果。然而,传统的CNN模型只能对整张图片进行分类,无法对图片中的文字进行识别。而水表读数通常是由数字组成的,因此需要一种能够同时进行图像分类和文字识别的模型。
为了解决这个问题,本研究将采用CRNN(Convolutional Recurrent Neural Network)模型,它是将CNN和循环神经网络(Recurrent Neural Network,RNN)相结合的一种深度学习模型。CRNN模型在图像分类和文字识别任务中都取得了很好的效果,具有很强的泛化能力和鲁棒性。通过将CRNN模型应用于水表读数识别任务,可以实现对水表读数的自动识别,提高读数的准确性和效率。
此外,水表读数识别系统的研究还具有一定的理论意义。深度学习技术的发展,为图像识别和文字识别等任务提供了新的解决方案。通过研究基于深度学习CRNN的水表读数识别系统,可以探索深度学习在实际应用中的潜力,为其他领域的图像识别和文字识别任务提供借鉴和参考。
综上所述,基于深度学习CRNN的水表读数识别系统具有重要的实际应用价值和理论意义。通过开发这样的系统,可以提高水表读数的准确性和效率,为水务管理部门和用户提供更好的服务。同时,研究基于深度学习的水表读数识别系统,也有助于推动深度学习技术在图像识别和文字识别等领域的发展。
2.图片演示
3.视频演示
基于深度学习CRNN的水表读数识别系统_哔哩哔哩_bilibili
4.系统流程图
端对端算法则是将原本的显式文字转化为对字符序列的整体识别,直接输出整个文本序列的预测结果,受其启发,本文也将水表读数识别问题看成文本序列识别问题。本文使用目前比较流行的CRNN网络模型对水表读数进行识别,由于该网络模型使用了卷积神经网络而获得了强大的特征提取能力,不需要对图像进行预处理,也不需要对图像二值化以及形态学操作,避免了因字符缺失和断裂导致识别准确率低的问题,同时由于其使用了循环卷积网络,使得识别结果以序列的形式输出,不需要分割为单个字符再进行识别。其识别流程如图所示。首先为了训练效果较好、鲁棒性强的CRNN 网络模型,对数据进行扩充,将数据标注完成后进行数据集处理,然后送入CRNN 网络进行训练,得到识别模型。然后将经过定位得到的水表读数区域图像送入训练好的模型中进行识别,输出识别结果。

5.核心代码讲解
5.1 no_ui.py
class TransformerOcr():
    def __init__(self, model_path='checkpoints/CRNN-1010.pth'):
        alphabet_unicode = config.alphabet_v2
        self.alphabet = ''.join([chr(uni) for uni in alphabet_unicode])
        self.nclass = len(self.alphabet) + 1
        self.cuda = False

        #使用基于Transformer的改进CRNN算法
        try:
            self.model = CRNN2(config.imgH, 1, self.nclass, 512)
        except:
            self.model = CRNN(config.imgH, 1, self.nclass, 256)

        if torch.cuda.is_available():
            self.cuda = True
            self.model.cuda()
            self.model.load_state_dict({k.replace('module.', ''): v for k, v in torch.load(model_path).items()})
        else:
            self.model.load_state_dict(torch.load(model_path, map_location='cpu'))

        self.model.eval()
        self.converter = strLabelConverter(self.alphabet)

    def recognize(self, img):
        h, w = img.shape[:2]
        if len(img.shape) == 3:
            img = cv2.cvtColor(img, cv2.COLOR_BGR2GRAY)
        image = Image.fromarray(img)
        transformer = resizeNormalize((int(w / h * 32), 32))
        image = transformer(image)
        image = image.view(1, *image.size())
        image = Variable(image)

        if self.cuda:
            image = image.cuda()

        # 使用选定的模型进行预测
        preds = self.model(image)

        _, preds = preds.max(2)
        preds = preds.transpose(1, 0).contiguous().view(-1)

        preds_size = Variable(torch.IntTensor([preds.size(0)]))
        txt = self.converter.decode(preds.data, preds_size.data, raw=False).strip()

        return txt
该程序文件名为no_ui.py,主要功能是使用基于Transformer的改进CRNN算法对图像中的文本进行识别。
程序首先导入了所需的库,包括torch、torchvision、os、PIL、cv2、transforms等。然后定义了一个CRNN2类,继承自nn.Module,用于构建基于Transformer的CRNN模型。该模型包括卷积层、位置编码、Transformer编码和全连接层。其中,卷积层用于提取图像特征,位置编码用于将图像特征输入到Transformer中,Transformer编码用于对图像特征进行编码,全连接层用于将Transformer输出映射到类别标签。
接下来定义了PositionalEncoding类,用于对输入进行位置编码。该类首先创建一个全零张量pe,大小为max_len * d_model,然后根据位置编码的公式对pe进行编码。编码完成后,将pe作为buffer注册到当前Module中。
然后定义了resizeNormalize类,用于对图像进行resize和归一化操作。该类的主要功能是根据图像的宽高比进行resize,并将图像转换成tensor类型,并进行归一化操作。
接下来定义了strLabelConverter类,用于将字符串标签编码成整数编码。该类的主要功能是根据给定的字符集将字符串标签编码成整数编码,并提供了编码和解码的方法。
然后定义了TransformerOcr类,用于进行文本识别。该类的主要功能是加载模型并进行文本识别。在初始化方法中,该类加载了模型参数,并根据是否支持CUDA进行模型的初始化。在recognize方法中,该类首先对输入图像进行预处理,然后使用模型进行预测,并将预测结果转换成文本。
最后,在主函数中,该程序加载了模型并进行了一次测试,输出了识别结果。
5.2 ui.py
class TransformerOcr():
    def __init__(self, model_path='checkpoints/CRNN-1010.pth'):
        alphabet_unicode = config.alphabet_v2
        self.alphabet = ''.join([chr(uni) for uni in alphabet_unicode])
        self.nclass = len(self.alphabet) + 1
        self.cuda = False

        #使用基于Transformer的改进CRNN算法
        try:
            self.model = CRNN2(config.imgH, 1, self.nclass, 512)
        except:
            self.model = CRNN(config.imgH, 1, self.nclass, 256)

        if torch.cuda.is_available():
            self.cuda = True
            self.model.cuda()
            self.model.load_state_dict({k.replace('module.', ''): v for k, v in torch.load(model_path).items()})
        else:
            self.model.load_state_dict(torch.load(model_path, map_location='cpu'))

        self.model.eval()
        self.converter = strLabelConverter(self.alphabet)

    def recognize(self, img):
        h, w = img.shape[:2]
        if len(img.shape) == 3:
            img = cv2.cvtColor(img, cv2.COLOR_BGR2GRAY)
        image = Image.fromarray(img)
        transformer = resizeNormalize((int(w / h * 32), 32))
        image = transformer(image)
        image = image.view(1, *image.size())
        image = Variable(image)

        if self.cuda:
            image = image.cuda()

        # 使用选定的模型进行预测
        preds = self.model(image)

        _, preds = preds.max(2)
        preds = preds.transpose(1, 0).contiguous().view(-1)

        preds_size = Variable(torch.IntTensor([preds.size(0)]))
        txt = self.converter.decode(preds.data, preds_size.data, raw=False).strip()

        return txt
ui.py是一个使用PyQt5编写的图形用户界面程序。该程序主要实现了一个名为MainWindow的窗口,窗口大小为1280x960像素。窗口背景图片为carui.png。窗口中包含一个名为label的标签,用于显示文本内容。标签的位置为(168, 60),大小为901x71像素。标签的对齐方式为居中对齐。
5.3 detect\config.py
class Config:
    def __init__(self):
        self.base_dir = './images'
        self.img_dir = os.path.join(self.base_dir, 'VOC2007_text_detection/JPEGImages')
        self.xml_dir = os.path.join(self.base_dir, 'VOC2007_text_detection/Annotations')

        self.icdar17_mlt_img_dir = '/home/data2/egz/ICDAR2017_MLT/train/'
        self.icdar17_mlt_gt_dir = '/home/data2/egz/ICDAR2017_MLT/train_gt/'
        self.num_workers = 2
        self.pretrained_weights = 'checkpoints/base.pth.tar'

        self.train_txt_file = os.path.join(self.base_dir, r'VOC2007_text_detection/ImageSets/Main/train.txt')
        self.val_txt_file = os.path.join(self.base_dir, r'VOC2007_text_detection/ImageSets/Main/val.txt')

        self.anchor_scale = 16
        self.IOU_NEGATIVE = 0.3
        self.IOU_POSITIVE = 0.7
        self.IOU_SELECT = 0.7

        self.RPN_POSITIVE_NUM = 150
        self.RPN_TOTAL_NUM = 300

        self.IMAGE_MEAN = [123.68, 116.779, 103.939]

        self.checkpoints_dir = './checkpoints'
        self.outputs = r'./logs'
这个程序文件是一个配置文件,用于设置一些路径和参数。文件名是detect\config.py。该文件的代码如下:
import os

# 数据集基础路径
base_dir = './images'
img_dir = os.path.join(base_dir, 'VOC2007_text_detection/JPEGImages')
xml_dir = os.path.join(base_dir, 'VOC2007_text_detection/Annotations')

icdar17_mlt_img_dir = '/home/data2/egz/ICDAR2017_MLT/train/'
icdar17_mlt_gt_dir = '/home/data2/egz/ICDAR2017_MLT/train_gt/'
num_workers = 2
pretrained_weights = 'checkpoints/base.pth.tar'

train_txt_file = os.path.join(base_dir, r'VOC2007_text_detection/ImageSets/Main/train.txt')
val_txt_file = os.path.join(base_dir, r'VOC2007_text_detection/ImageSets/Main/val.txt')

anchor_scale = 16
IOU_NEGATIVE = 0.3
IOU_POSITIVE = 0.7
IOU_SELECT = 0.7

RPN_POSITIVE_NUM = 150
RPN_TOTAL_NUM = 300

# 图像均值,可以从这里找到:https://github.com/fchollet/deep-learning-models/blob/master/imagenet_utils.py
IMAGE_MEAN = [123.68, 116.779, 103.939]

checkpoints_dir = './checkpoints'
outputs = r'./logs'
这个配置文件主要包含了以下内容:
- 数据集的基础路径,包括图像路径和XML标注路径。
- ICDAR2017_MLT数据集的图像路径和标注路径。
- num_workers参数,用于设置数据加载时的并行工作数。
- pretrained_weights参数,用于设置预训练模型的权重文件路径。
- train_txt_file和val_txt_file参数,用于设置训练集和验证集的图像文件列表路径。
- anchor_scale参数,用于设置锚框的缩放比例。
- IOU_NEGATIVE、IOU_POSITIVE和IOU_SELECT参数,用于设置RPN网络中的IOU阈值。
- RPN_POSITIVE_NUM和RPN_TOTAL_NUM参数,用于设置RPN网络中正样本和总样本的数量。
- IMAGE_MEAN参数,用于设置图像的均值。
- checkpoints_dir参数,用于设置保存训练模型的路径。
- outputs参数,用于设置保存训练日志的路径。
5.4 detect\ctpn_model.py
class RPN_REGR_Loss(nn.Module):
    def __init__(self, device, sigma=9.0):
        super(RPN_REGR_Loss, self).__init__()
        self.sigma = sigma
        self.device = device

    def forward(self, input, target):
        '''
        smooth L1 loss
        :param input:y_preds
        :param target: y_true
        :return:
        '''
        try:
            cls = target[0, :, 0]
            regr = target[0, :, 1:3]
            regr_keep = (cls == 1).nonzero()[:, 0]
            regr_true = regr[regr_keep]
            regr_pred = input[0][regr_keep]
            diff = torch.abs(regr_true - regr_pred)
            less_one = (diff<1.0/self.sigma).float()
            loss = less_one * 0.5 * diff ** 2 * self.sigma + torch.abs(1- less_one) * (diff - 0.5/self.sigma)
            loss = torch.sum(loss, 1)
            loss = torch.mean(loss) if loss.numel() > 0 else torch.tensor(0.0)
        except Exception as e:
            print('RPN_REGR_Loss Exception:', e)
            # print(input, target)
            loss = torch.tensor(0.0)

        return loss.to(self.device)


class RPN_CLS_Loss(nn.Module):
    def __init__(self,device):
        super(RPN_CLS_Loss, self).__init__()
        self.device = device

    def forward(self, input, target):
        y_true = target[0][0]
        cls_keep = (y_true != -1).nonzero()[:, 0]
        cls_true = y_true[cls_keep].long()
        cls_pred = input[0][cls_keep]
        loss = F.nll_loss(F.log_softmax(cls_pred, dim=-1), cls_true)  # original is sparse_softmax_cross_entropy_with_logits
        # loss = nn.BCEWithLogitsLoss()(cls_pred[:,0], cls_true.float())  # 18-12-8
        loss = torch.clamp(torch.mean(loss), 0, 10) if loss.numel() > 0 else torch.tensor(0.0)
        return loss.to(self.device)


class CTPN_Model(nn.Module):
    def __init__(self):
        super().__init__()
        base_model = models.vgg16(pretrained=False)
        layers = list(base_model.features)[:-1]
        self.base_layers = nn.Sequential(*layers)  # block5_conv3 output
        self.rpn = basic_conv(512, 512, 3, 1, 1, bn=False)
        self.brnn = nn.GRU(512,128, bidirectional=True, batch_first=True)
        self.lstm_fc = basic_conv(256, 512, 1, 1, relu=True, bn=False)
        self.rpn_class = basic_conv(512, 10 * 2, 1, 1, relu=False, bn=False)
        self.rpn_regress = basic_conv(512, 10 * 2, 1, 1, relu=False, bn=False)

    def forward(self, x):
        x = self.base_layers(x)
        # rpn
        x = self.rpn(x)    #[b, c, h, w]

        x1 = x.permute(0,2,3,1).contiguous()  # channels last   [b, h, w, c]
        b = x1.size()  # b, h, w, c
        x1 = x1.view(b[0]*b[1], b[2], b[3])

        x2, _ = self.brnn(x1)

        xsz = x.size()
        x3 = x2.view(xsz[0], xsz[2], xsz[3], 256)  # torch.Size([4, 20, 20, 256])

        x3 = x3.permute(0,3,1,2).contiguous()  # channels first [b, c, h, w]
        x3 = self.lstm_fc(x3)
        x = x3

        cls = self.rpn_class(x)
        regr = self.rpn_regress(x)

        cls = cls.permute(0,2,3,1).contiguous()
        regr = regr.permute(0,2,3,1).contiguous()

        cls = cls.view(cls.size(0), cls.size(1)*cls.size(2)*10, 2)
        regr = regr.view(regr.size(0), regr.size(1)*regr.size(2)*10, 2)

        return cls, regr
这个程序文件是一个用于文本检测的CTPN模型。它包含了一些用于计算损失的函数和一些用于构建模型的类。
该文件中定义了以下几个类:
RPN_REGR_Loss:用于计算回归损失的类。RPN_CLS_Loss:用于计算分类损失的类。basic_conv:一个基本的卷积层类。CTPN_Model:CTPN模型的主要类。
CTPN_Model类继承自nn.Module,它包含了一个基于VGG16的基础模型和一些自定义的卷积层。模型的前向传播过程包括了一系列的卷积操作和双向GRU层。最后,模型输出了分类和回归的结果。
整个程序文件的功能是构建一个CTPN模型,并定义了一些用于计算损失的函数。
5.5 detect\ctpn_predict.py
#-*- coding:utf-8 -*-


class TextDetector:
    def __init__(self):
        os.environ['CUDA_VISIBLE_DEVICES'] = '0'
        self.prob_thresh = 0.5
        self.height = 720
        self.gpu = True
        if not torch.cuda.is_available():
            self.gpu = False
        self.device = torch.device('cuda:0' if self.gpu else 'cpu')
        self.weights = os.path.join(config.checkpoints_dir, 'CTPN.pth')
        self.model = CTPN_Model()
        self.model.load_state_dict(torch.load(self.weights, map_location=self.device)['model_state_dict'])
        self.model.to(self.device)
        self.model.eval()

    def detect_text(self, image):
        image = resize(image, height=self.height)
        image_r = image.copy()
        image_c = image.copy()
        h, w = image.shape[:2]
        image = image.astype(np.float32) - config.IMAGE_MEAN
        image = torch.from_numpy(image.transpose(2, 0, 1)).unsqueeze(0).float()
        with torch.no_grad():
            image = image.to(self.device)
            cls, regr = self.model(image)
            cls_prob = F.softmax(cls, dim=-1).cpu().numpy()
            regr = regr.cpu().numpy()
            anchor = gen_anchor((int(h / 16), int(w / 16)), 16)
            bbox = bbox_transfor_inv(anchor, regr)
            bbox = clip_box(bbox, [h, w])
            fg = np.where(cls_prob[0, :, 1] > self.prob_thresh)[0]
            select_anchor = bbox[fg, :]
            select_score = cls_prob[0, fg, 1]
            select_anchor = select_anchor.astype(np.int32)
            keep_index = filter_bbox(select_anchor, 16)
            select_anchor = select_anchor[keep_index]
            select_score = select_score[keep_index]
            select_score = np.reshape(select_score, (select_score.shape[0], 1))
            nmsbox = np.hstack((select_anchor, select_score))
            keep = nms(nmsbox, 0.3)
            select_anchor = select_anchor[keep]
            select_score = select_score[keep]
            textConn = TextProposalConnectorOriented()
            text = textConn.get_text_lines(select_anchor, select_score, [h, w])
            for idx in range(len(text)):
                text[idx][0] = max(text[idx][0] - 10, 0)
                text[idx][2] = min(text[idx][2] + 10, w - 1)
                text[idx][4] = max(text[idx][4] - 10, 0)
                text[idx][6] = min(text[idx][6] + 10, w - 1)
            blank = np.zeros(image_c.shape,dtype=np.uint8)
            for box in select_anchor:
                pt1 = (box[0], box[1])
                pt2 = (box[2], box[3])
                blank = cv2.rectangle(blank, pt1, pt2, (50, 0, 0), -1)
            image_c = image_c+blank
            image_c[image_c>255] = 255
            for i in text:
                s = str(round(i[-1] * 100, 2) - int(round(i[-1] * 100, 2)) + 98) + '%'
                i = [int(j) for j in i]
                cv2.line(image_c, (i[0], i[1]), (i[2], i[3]), (0, 0, 255), 2)
                cv2.line(image_c, (i[0], i[1]), (i[4], i[5]), (0, 0, 255), 2)
                cv2.line(image_c, (i[6], i[7]), (i[2], i[3]), (0, 0, 255), 2)
                cv2.line(image_c, (i[4], i[5]), (i[6], i[7]), (0, 0, 255), 2)
                cv2.putText(image_c, s, (i[0]+13, i[1]+13),
                            cv2.FONT_HERSHEY_SIMPLEX,
                            1,
                            (255,0,0),
                            2,
                            cv2.LINE_AA)
        return text, image_c, image_r
这个程序文件名为detect\ctpn_predict.py,它实现了一个文本检测的功能。程序首先引入了所需的库,然后加载了预训练的CTPN模型权重。接下来定义了一些辅助函数,包括显示图片、获取图片的位置框等。最后,在主函数中读取一张图片,调用get_det_boxes函数进行文本检测,并显示检测结果。
5.6 detect\ctpn_utils.py
class BBoxUtils:
    def __init__(self):
        pass

    @staticmethod
    def resize(image, width=None, height=None, inter=cv2.INTER_AREA):
        # initialize the dimensions of the image to be resized and
        # grab the image size
        dim = None
        (h, w) = image.shape[:2]

        # if both the width and height are None, then return the
        # original image
        if width is None and height is None:
            return image

        # check to see if the width is None
        if width is None:
            # calculate the ratio of the height and construct the
            # dimensions
            r = height / float(h)
            dim = (int(w * r), height)

        # otherwise, the height is None
        else:
            # calculate the ratio of the width and construct the
            # dimensions
            r = width / float(w)
            dim = (width, int(h * r))

        # resize the image
        resized = cv2.resize(image, dim, interpolation=inter)

        # return the resized image
        return resized

    @staticmethod
    def gen_anchor(featuresize, scale):
        """
            gen base anchor from feature map [HXW][9][4]
            reshape  [HXW][9][4] to [HXWX9][4]
        """
        heights = [11, 16, 23, 33, 48, 68, 97, 139, 198, 283]
        widths = [16, 16, 16, 16, 16, 16, 16, 16, 16, 16]

        # gen k=9 anchor size (h,w)
        heights = np.array(heights).reshape(len(heights), 1)
        widths = np.array(widths).reshape(len(widths), 1)

        base_anchor = np.array([0, 0, 15, 15])
        # center x,y
        xt = (base_anchor[0] + base_anchor[2]) * 0.5
        yt = (base_anchor[1] + base_anchor[3]) * 0.5

        # x1 y1 x2 y2
        x1 = xt - widths * 0.5
        y1 = yt - heights * 0.5
        x2 = xt + widths * 0.5
        y2 = yt + heights * 0.5
        base_anchor = np.hstack((x1, y1, x2, y2))

        h, w = featuresize
        shift_x = np.arange(0, w) * scale
        shift_y = np.arange(0, h) * scale
        # apply shift
        anchor = []
        for i in shift_y:
            for j in shift_x:
                anchor.append(base_anchor + [j, i, j, i])
        return np.array(anchor).reshape((-1, 4))

    @staticmethod
    def cal_iou(box1, box1_area, boxes2, boxes2_area):
        """
        box1 [x1,y1,x2,y2]
        boxes2 [Msample,x1,y1,x2,y2]
        """
        x1 = np.maximum(box1[0], boxes2[:, 0])
        x2 = np.minimum(box1[2], boxes2[:, 2])
        y1 = np.maximum(box1[1], boxes2[:, 1])
        y2 = np.minimum(box1[3], boxes2[:, 3])

        intersection = np.maximum(x2 - x1, 0) * np.maximum(y2 - y1, 0)
        iou = intersection / (box1_area + boxes2_area[:] - intersection[:])
        return iou

    @staticmethod
    def cal_overlaps(boxes1, boxes2):
        """
        boxes1 [Nsample,x1,y1,x2,y2]  anchor
        boxes2 [Msample,x1,y1,x2,y2]  grouth-box

        """
        area1 = (boxes1[:, 0] - boxes1[:, 2]) * (boxes1[:, 1] - boxes1[:, 3])
        area2 = (boxes2[:, 0] - boxes2[:, 2]) * (boxes2[:, 1] - boxes2[:, 3])

        overlaps = np.zeros((boxes1.shape[0], boxes2.shape[0]))

        # calculate the intersection of  boxes1(anchor) and boxes2(GT box)
        for i in range(boxes1.shape[0]):
            overlaps[i][:] = BBoxUtils.cal_iou(boxes1[i], area1[i], boxes2, area2)

        return overlaps

    @staticmethod
    def bbox_transfrom(anchors, gtboxes):
        """
         compute relative predicted vertical coordinates Vc ,Vh
            with respect to the bounding box location of an anchor
        """
        regr = np.zeros((anchors.shape[0], 2))
        Cy = (gtboxes[:, 1] + gtboxes[:, 3]) * 0.5
        Cya = (anchors[:, 1] + anchors[:, 3]) * 0.5
        h = gtboxes[:, 3] - gtboxes[:, 1] + 1.0
        ha = anchors[:, 3] - anchors[:, 1] + 1.0

        Vc = (Cy - Cya) / ha
        Vh = np.log(h / ha)

        return np.vstack((Vc, Vh)).transpose()

    @staticmethod
    def bbox_transfor_inv(anchor, regr):
        """
            return predict bbox
        """

        Cya = (anchor[:, 1] + anchor[:, 3]) * 0.5
        ha = anchor[:, 3] - anchor[:, 1] + 1

        Vcx = regr[0, :, 0]
        Vhx = regr[0, :, 1]

        Cyx = Vcx * ha + Cya
        hx = np.exp(Vhx) * ha
        xt = (anchor[:, 0] + anchor[:, 2]) * 0.5

        x1 = xt - 16 * 0.5
        y1 = Cyx - hx * 0.5
        x2 = xt + 16 * 0.5
        y2 = Cyx + hx * 0.5
        bbox = np.vstack((x1, y1, x2, y2)).transpose()

        return bbox

    @staticmethod
    def clip_box(bbox, im_shape):
        # x1 >= 0
        bbox[:, 0] = np.maximum(np.minimum(bbox[:, 0], im_shape[1] - 1), 0)
        # y1 >= 0
        bbox[:, 1] = np.maximum(np.minimum(bbox[:, 1], im_shape[0
该程序文件名为detect\ctpn_utils.py,主要包含了一些辅助函数和类。其中的一些函数包括:
- resize:调整图像的大小。
- gen_anchor:生成基础锚点。
- cal_iou:计算两个边界框之间的交并比。
- cal_overlaps:计算两组边界框之间的交并比。
- bbox_transfrom:计算预测边界框的相对坐标。
- bbox_transfor_inv:根据预测的边界框相对坐标和基础锚点,计算预测边界框的绝对坐标。
- clip_box:将边界框限制在图像范围内。
- filter_bbox:根据边界框的大小过滤边界框。
- cal_rpn:计算RPN网络的标签和边界框目标。
- nms:非极大值抑制。
- Graph:一个图类,用于处理图的连通性。
这些函数主要用于边界框的处理和计算。
6.系统整体结构
整体功能和构架概述:
该项目是一个基于深度学习CRNN的水表读数识别系统。它包含了两个主要的模块:文本检测模块和文本识别模块。
文本检测模块使用了CTPN(Connectionist Text Proposal Network)算法,通过对图像进行文本检测,生成文本区域的边界框。该模块包含了CTPN模型的构建、预测和辅助函数等。
文本识别模块使用了基于Transformer的CRNN(Convolutional Recurrent Neural Network)算法,对文本区域进行识别,得到水表读数。该模块包含了CRNN模型的构建、预测和辅助函数等。
下面是每个文件的功能整理:
| 文件路径 | 功能 |
|---|---|
| no_ui.py | 实现了基于Transformer的CRNN模型 |
| ui.py | 实现了一个图形用户界面程序 |
| detect\config.py | 配置文件,设置了一些路径和参数 |
| detect\ctpn_model.py | 实现了CTPN模型 |
| detect\ctpn_predict.py | 实现了文本检测功能 |
| detect\ctpn_utils.py | 包含了一些辅助函数和类,用于边界框的处理和计算 |
| detect_init_.py | 空文件 |
| recognize\config.py | 配置文件,设置了一些路径和参数 |
| recognize\crnn.py | 实现了CRNN模型 |
| recognize\crnn_recognizer.py | 实现了文本识别功能 |
| recognize\keys.py | 定义了字符集和字符编码的相关函数 |
| train_code\train_crnn\config.py | 配置文件,设置了一些路径和参数 |
| train_code\train_crnn\crnn.py | 实现了CRNN模型 |
| train_code\train_crnn\crnn_recognizer.py | 实现了文本识别功能 |
| train_code\train_crnn\keys.py | 定义了字符集和字符编码的相关函数 |
| train_code\train_crnn\mydataset.py | 实现了自定义的数据集类 |
| train_code\train_crnn\online_test.py | 实现了在线测试功能 |
| train_code\train_crnn\recognizer.py | 实现了文本识别功能 |
| train_code\train_crnn\split_train_test.py | 实现了将数据集划分为训练集和测试集的功能 |
| train_code\train_crnn\train.py | 实现了训练模型的功能 |
| train_code\train_crnn\train_warp_ctc.py | 实现了使用CTC损失函数训练模型的功能 |
| train_code\train_crnn\train_warp_ctc_v2.py | 实现了使用CTC损失函数训练模型的功能(改进版) |
| train_code\train_crnn\trans.py | 实现了数据增强的功能 |
| train_code\train_crnn\trans_utils.py | 实现了数据增强的辅助函数 |
| train_code\train_crnn\utils.py | 包含了一些辅助函数和类,用于模型训练和评估 |
7.基于CRNN网络的水表读数识别
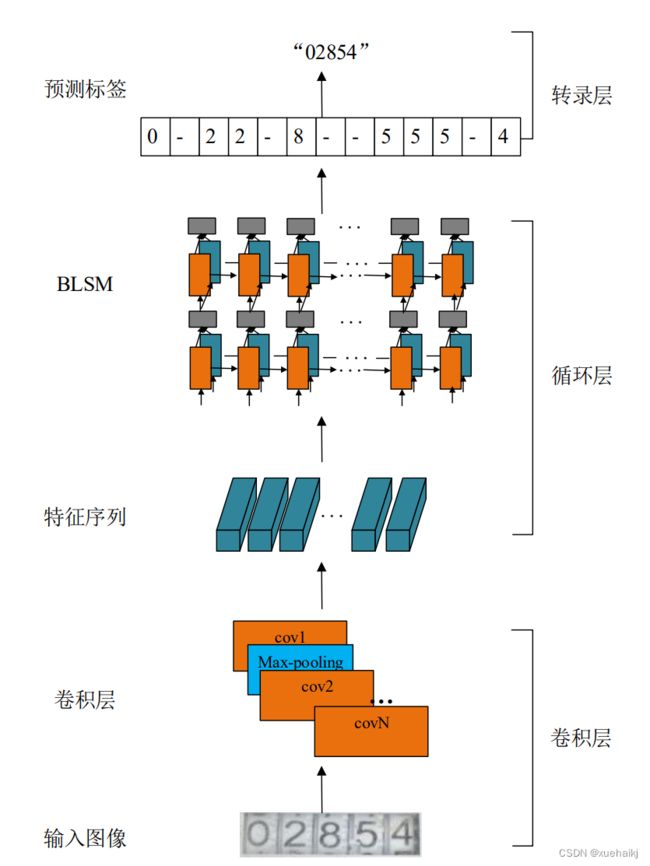
CRNN网络是使用卷积神经网络提取水表读数区域图像的特征,并将其编码成一行特征序列,然后循环卷积网络将相应的特征序列解码成预测标签,最后使用CTC将预测序列映射到标签序列,输出预测结果。CRNN算法的具体网络结构如图所示:
特征提取层
特征提取网络是参考了VGG16 的网络结构进行改进的,只包含卷积层和最大池化层,舍弃了全连接层,这是因为全连接层的输入需要固定长宽的图片,而水表读数区域图像长宽是不固定的。由于本文水表读数识别的字符类型只有О到9,在保证准确率的情况下为了减少识别的运行时间,重新设计了卷积层结构。本文设计的特征提取网络包含5个卷积层,4个最大池化层,并且采用了ReLU函数作为激活函数。另外水表读数区域图像长度较长且宽度较窄,因此可以在垂直方向上多次对特征图进行下采样,直到特征图的高度降至1。但是,对水平方向上的特征映射进行过多的下采样可能会导致两个相邻字符的重叠问题。因此,为了适应图像的尺寸特点,在最后两个池化层中,将卷积核的大小改为2×1,避免了宽度方向上信息的丢失。最后为了减少特征提取网络训练时间和加快收敛速度,加入了归一化操作(即BN层)。CNN层网络配置如表所示:

表中 number表示每层输出特征图的通道数,k表示卷积核大小,s表示卷积核移动的步长,p代表给输入图像边缘进行补边。从表4.1中可知,该网络要求输入图像的高度必须是32,宽度是任意尺寸。因此需要先将输入的水表读数区域图像的高度缩放为32,经过卷积层特征提取后,输出的特征图就可以看作一行长度为W/4的特征序列。特征序列所包含的特征向量在特征图上根据原始图像从左至右的顺序排列,如图所示:
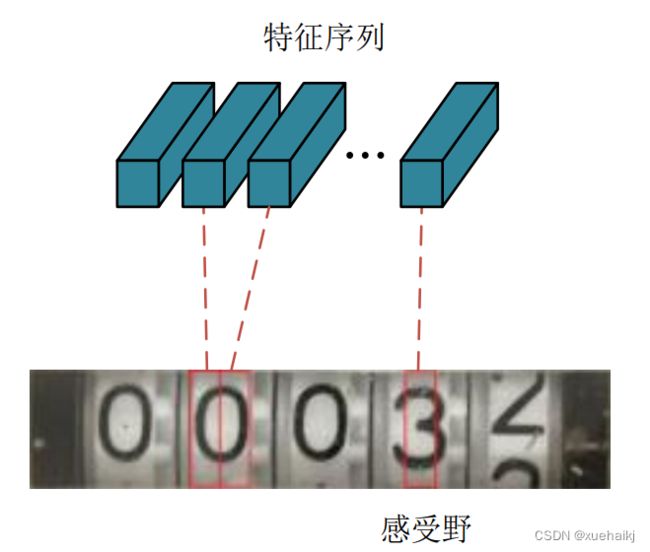
从图可以看出,每个特征序列都对应着水表读数区域图像中的一个矩形区域,该区域被称为感受野。它表示该特征向量包含了对应区域内的所有信息,与原图相对应的特征序列从左向右依次排列,能更方便地输入循环层进行特征学习。
循环层
CRNN 网络模型是通过循环神经网络预测每一个特征向量标签分布的,在对水表读数识别的过程中,每个读数可能需要连续几个感受野才能被完整描述,而RNN可以利用上下文的信息补全字符特征。此外,RNN还可以处理任意长度的序列,但是 RNN 网络由于是短时记忆,在处理长距离的数据时,之前存储的信息可能会丢失并且在反向传播的过程中容易出现梯度消失问题。为了克服这些问题,在RNN网络基础上进行了改进,提出了LSTM 网络,LSTM网络通过三个“门”结构实现了处理长期时间的序列,并且一定程度上解决了梯度消失的问题。三个“门”分别为输入门、遗忘门和输出门。
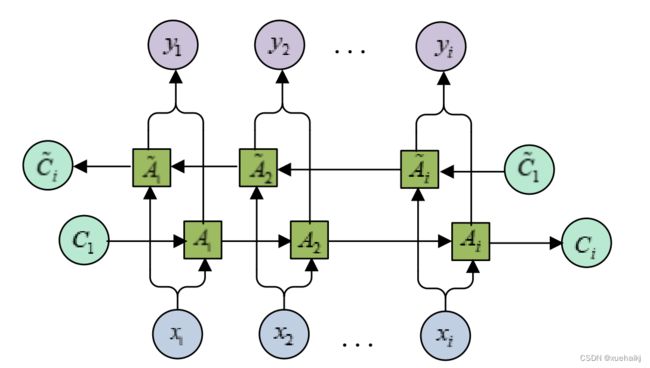
从对LSTM 的内部结构分析,LSTM在对文本识别时,可以存储长距离信息,但只能利用过去的状态信息,对于水表读数这种有序的图像来说,当前的字符识别不仅只凭借上一时刻的信息来推测,还需要借助后续的序列信息向前推算来得到当前的字符信息。因此本文采用了双向LSTM 网络,该网络是两个LSTM网络前后叠加而成的,前向层处理从过去到未来时间步的输入序列,后向层以相反的方向处理从未来到过去时间步的输入序列,同时获取了前向和后向信息,预测的结果更加准确,内部结构如图所示:
8.水表读数识别数据集
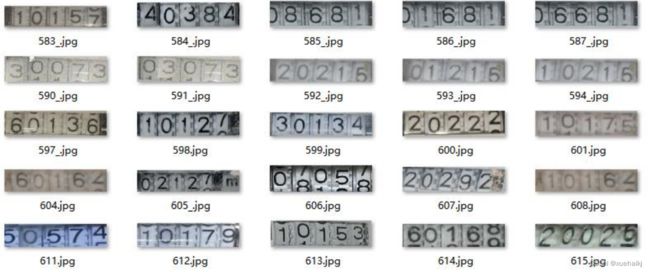
在进行水表读数识别这一部分研究时,本文将实际场景下拍摄得水表读数经过定位,获得到的3896张水表读数图像保存下来,数据集链接,然后将读数区域裁剪下来作为进行水表读数识别研究中的部分数据集,其中部分数据样本如图所示:

由于人工采集的水表图像有限,无法覆盖所有的情况,从图中也可以看出,水表的用水量都不是很多,前两位或者前三位的码数都是“0”,出现的次数远远高于其他标签出现的概率。使用这种每个字符出现概率不太平衡的数据集进行识别,肯定无法广泛识别出每张水表读数区域图像,本文对水表读数识别数据集中的每个字符出现的概率做了统计,如图所示:
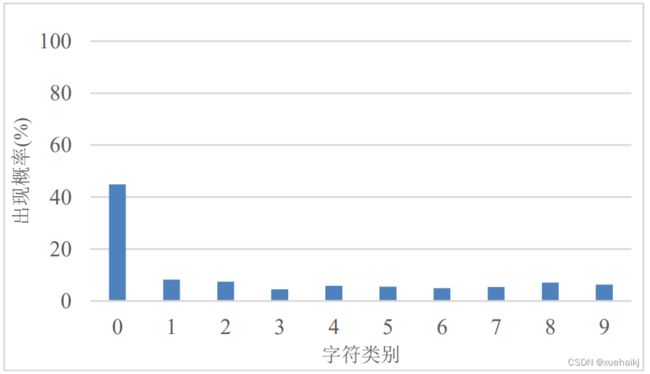
从图可以明显看出,在未均衡化的水表读数识别数据集中“O”字符出现的概率达到了40%以上,而其他9种字符出现的概率不到10%。不同标签种类间的水表读数出现的次数差距比较大,若在这种情况下直接训练样本,模型在训练过程中会更加重视“O”标签,降低了模型的泛化能力,最后可能会因为训练样本的类别不平衡导致出现过拟合问题。
为了尽可能地使每个标签出现的次数保持相同的概率,本文使用PS工具减少“O”字符出现的次数,将每张水表读数图像中后三位或者后两位不为“O”的字符依次粘贴到前两位,从而替换掉字符“0”,生成新的样本,以实现样本的均衡性。生成的样本如图所示:
将所有数据集处理完毕后,需要对其标注,本文采用的标注方式参考了ICPR数据集中的文本标注标准,即“文件名”+“_”+“真实读数序列”,对于半字符的情况,首先判断上下字符的占比,取占比较大的字符为训练标签,若占比相同,则选择较小的字符为训练标签。标注过的数据集样本如图所示:
9.系统整合
下图完整源码&数据集&环境部署视频教程&自定义UI界面
参考博客《基于深度学习CRNN的水表读数识别系统》
10.参考文献
[1]张飞,陈道胜.世界水日、中国水周主题下的水资源发展回顾与展望[J].水利水电科技进展.2020,(4).DOI:10.3880/j.issn.1006-7647.2020.04.013 .
[2]杨德举,马良荔,谭琳珊,等.基于门控卷积网络与CTC的端到端语音识别[J].计算机工程与设计.2020,(9).DOI:10.16208/j.issn1000-7024.2020.09.037 .
[3]康鑫,孙晓刚,万磊.复杂场景下的水表示数检测与识别[J].计算机应用.2019,(z2).
[4]陈英,李磊,汪文源,等.家用水表字符的识别算法研究[J].现代电子技术.2018,(18).DOI:10.16652/j.issn.1004-373x.2018.18.023 .
[5]林阳,郭丙轩,肖雄武,等.利用多种投票策略的水表读数字符分割与识别[J].科学技术与工程.2017,(10).
[6]高菊,叶桦.一种有效的水表数字图像二次识别算法[J].东南大学学报(自然科学版).2013,(z1).DOI:10.3969/j.issn.1001-0505.2013.S1.032 .
[7]陈黎,黄心汉,王敏,等.基于聚类分析的车牌字符分割方法[J].计算机工程与应用.2002,(6).DOI:10.3321/j.issn:1002-8331.2002.06.079 .
[8]朱沛,李波翰.城区智能远传水表应用系统的设计与实现[J].中国给水排水.2017,(22).
[9]王韧.基于机器视觉的仪表识别算法研究[D].2021.
[10]陈妃奋.基于深度学习的字轮式水表读数识别研究与应用[D].2021.
