tomcat之源码分析
Tomcat是比较流行的web服务器之一。是一种轻量级应用服务器。
严谨来说,Apache是web服务器,Tomcat是 应用服务器(Java)或者servlet容器或者jsp解释器:
- Apache:专门提供HTTP服务。处理静态资源,例如HTML,代表NGINX。一般使用apache & tomcat的话,apache只是作为一个转发,对jsp的处理是由tomcat来处理的。
- Tomcat 是Java语言编写用于处理动态资源,主要负责解析jsp、执行servlet等动态资源。由apache转发请求至Tomcat处理动态资源。
- 理论上 Tomcat 是可以取代 Apache 独立运行。
Web服务器称为超文本传输协议服务器,使用http与其客户端(通常是web浏览器)进行通信。基于Java的web服务器使用两个重要的类:Socket&ServerSocket,并通过发送HTTP消息进行通信。
Catalina就是Tomcat应用服务器中真正实现servlet的容器。也是最受欢迎的Servlet容器之一。
Servlet容器的工作模式:
- 创建一个Request对象,用可能会在调用的Servlet中使用到的信息填充该Request对象,如参数、头、cookie、查询字符串、URI等。
- 创建Response对象,用来向web客户端发送响应。
- 调用Servlet的service方法,将Request&Response对象作为参数传入。Servlet从Request对象中读取信息,并通过Response对象发送响应。
Tomcat的核心分为3个部分:
- Web容器:处理静态页面。
- Catalina:一个处理servlet的容器。也是JSP容器。
- JSP容器:把jsp页面翻译成一般的servlet。
Catalina
Catalina作为Servlet容器之一,基于“Servlet容器的工作模式”划分为连接器&Servlet容器两个模块。

连接器负责将一个请求与容器相关连。工作包括为它接收到的每个HTTP请求创建一个request对象和一个response对象。然后将处理过程交给容器。
容器从连接器中接收到request对象和response对象,并负责调用相应的servlet的service方法。
Catalina四个相关的接口:Pipeline、Value、ValueContext、Container。
Servlet容器
一个Servlet容器可以处理Servlet 、静态资源等。当处理Servlet时,对应的Servlet类(Servlet编程)必须实现javax.servlet.Servlet接口。由Servlet容器 封装HTTP请求为ServletRequest(封装客户端的HTTP请求信息)&ServletResponse对象(封装Servlet的响应信息),并调用Servlet的service方法。

Servlet容器是用来处理请求Servlet资源,并为web客户端填充response对象的模块。Servlet容器是Container接口的实例。

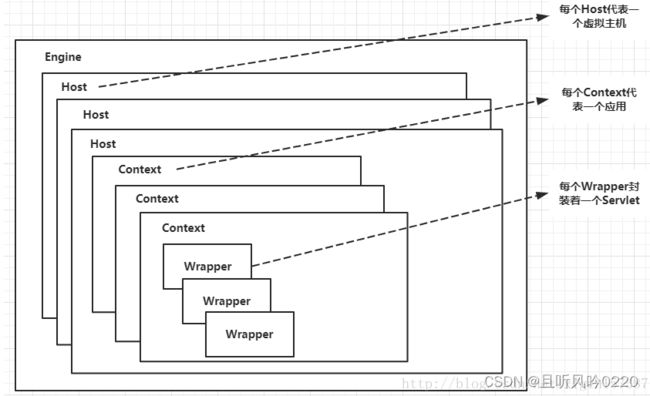
Container中包括4种类型的Servlet容器,其概念层次分别是:
- Engine:引擎,用来管理多个站点,一个Service最多只能有一个Engine。
- Host:表示包含一个或者多个Context容器的虚拟主机。
- Context:代表一个web应用程序,对应着平时开发的一套程序,或者一个WEB-INF目录以及下面的web.xml文件。如果web应用程序需要多个servlet合作,此时需要的servlet容器是 Context,并非Wrapper。
- Wrapper:每个该实例表示一个具体的Servlet定义。
每个概念层次都通过实现于接口container的接口表示。其标准实现分别是StandardHost、StandardEngine、EngineContext以及ContextWrapper。
层次容器
pipeline:每个层次容器都实现该接口,容器并持有该接口的实现类 SimplePipeline,管道中包含该Servlet 容器调用的任务,即阀 value。
value:阀作为 SimplePipeline 成员属性,持有该容器所有的 阀。
ValveContext:作为 SimplePipeline 的内部类,可以访问管道 SimplePipeline 类下所有成员变量。负责通过invokeNext调用管道中所有阀。
每个层次的容器是通过pipeline实现链条上任务的调用。每个链条上的节点也就是具体的任务是通过阀Value表示的。pipeline是通过ValueContext接口保证其所有阀 & 基础阀 被调用一次。
每个阀选择是否实现contained接口。该接口的实现类可以通过接口中的方法至多跟一个servlet容器相关联。
管道任务
管道任务(当连接器调用容器的invoke方法之后):HttpProcessor 接收到Socket连接,并封装完HTTP请求后,执行管道任务。
- 管道中存在Context容器要调用的任务。一个阈代表一个任务。
- 连接器调用当前容器StandardContext的invoke方法。
- StandardContext容器的invoke方法调用其容器中StandardPipeline的invoke方法。
- pipeline通过创建ValveContext,调用ValveContext之invokeNext方法。
- ValveContext调用管道中的每一个任务(Value阈),直到调用当前容器的基本阀StandardContextValve。
- StandardContextValve阀从其集合属性Map中获取Wrapper容器。
- … 步骤类似 2,3,4,5…。
- 当调用最终的基本阀SimpleWrapperValve后,就会通过allocate创建Servlet实例。
- 调用Servlet.service方法。
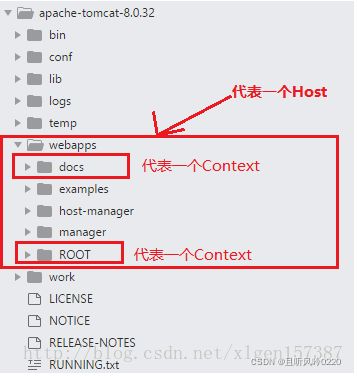
下面找一个Tomcat的文件目录对照一下,如下图所示:

Context和Host的区别是Context表示一个应用,我们的Tomcat中默认的配置下webapps下的每一个文件夹目录都是一个Context,其中ROOT目录中存放着主应用,其他目录存放着子应用,而整个webapps就是一个Host站点。
我们访问应用Context的时候,如果是ROOT下的则直接使用域名就可以访问,例如:www.ledouit.com,如果是Host(webapps)下的其他应用,则可以使用www.ledouit.com/docs进行访问,当然默认指定的根应用(ROOT)是可以进行设定的,只不过Host站点下默认的主营用是ROOT目录下的。
责任链模式
Container处理请求(连接器调用了Servlet容器的invoke方法)是使用Pipeline-Valve管道来处理的。
connector.getContainer().invoke(request, response);

public void invokeNext(Request request, Response response)
      throws IOException, ServletException {
      int subscript = stage;
      stage = stage + 1;
      // Invoke the requested Valve for the current request thread
      if (subscript < valves.length) {//如果当前容器存在多个阈或者任务,优先执行
        valves[subscript].invoke(request, response, this);
      }
      else if ((subscript == valves.length) && (basic != null)) {//当前容器基本阀会调用其子容器pipeline继续完成子容器的任务
        basic.invoke(request, response, this);
      }
      else {
        throw new ServletException("No valve");
      }
    }
Pipeline-Valve使用的责任链模式和普通的责任链模式有些不同!区别主要有以下两点:
- 每个Pipeline都有特定的Valve,而且是在管道的最后一个执行,这个Valve叫做BaseValve,BaseValve是不可删除的。
- 在上层容器的管道的BaseValve中会调用下层容器的管道。
我们知道Container包含四个子容器,而这四个子容器对应的BaseValve分别在:StandardEngineValve、StandardHostValve、StandardContextValve、StandardWrapperValve。
Pipeline的处理流程图(管道任务)如下(图D):
- Connector在接收到请求后会首先调用最顶层容器的Pipeline来处理,这里的最顶层容器的Pipeline就是EnginePipeline(Engine的管道)。
- 在Engine的管道中依次会执行EngineValve1、EngineValve2等等,最后会执行StandardEngineValve,在StandardEngineValve中会调用Host管道,然后再依次执行Host的HostValve1、HostValve2等,最后在执行StandardHostValve,然后再依次调用Context的管道和Wrapper的管道,最后执行到StandardWrapperValve。
- 当执行到StandardWrapperValve的时候,会在StandardWrapperValve中创建FilterChain,并调用其doFilter方法来处理请求,这个FilterChain包含着我们配置的与请求相匹配的Filter和Servlet,其doFilter方法会依次调用所有的Filter的doFilter方法和Servlet的service方法,这样请求就得到了处理。
- 当所有的Pipeline-Valve都执行完之后,并且处理完了具体的请求,这个时候就可以将返回的结果交给Connector了,Connector在通过Socket的方式将结果返回给客户端。
连接器
Tomcat连接器现在被Coyote取代。
满足条件
- 实现org.apache.catalina.Connector接口。
生命周期
单一启动关闭原则

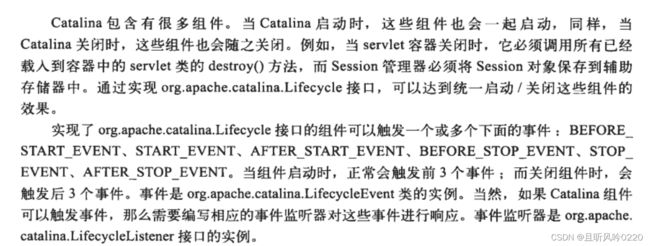
组件(层次容器 & pipeline等)必须实现Lifecycle接口中start & stop 方法,供其父组件调用,以实现对其进行启动/关闭操作。
流程:
- 每个组件(容器、pipeline等)通过 addLifecycleListener 委托 LifecycleSupport 添加自己的监听器。
- 父容器调用start | stop方法,会顺便执行其所有子容器 & pipeline等的start | stop方法。
- 各组件通过调用自己的start | stop 方法在其内部通过 LifecycleSupport 触发自己的监听事件。
父容器启动
public synchronized void start() throws LifecycleException {
    if (started)
      throw new LifecycleException("SimpleContext has already started");

    // Notify our interested LifecycleListeners
    lifecycle.fireLifecycleEvent(BEFORE_START_EVENT, null);
    started = true;
    try {
      // Start our subordinate components, if any
      if ((loader != null) && (loader instanceof Lifecycle))
        ((Lifecycle) loader).start();

      // 启动所有的子容器:wrapper、context等
      Container children[] = findChildren();
      for (int i = 0; i < children.length; i++) {
        if (children[i] instanceof Lifecycle)
          ((Lifecycle) children[i]).start();
      }

      // Start the Valves in our pipeline (including the basic),
      // if any 同时启动 pipeline
      if (pipeline instanceof Lifecycle)
        ((Lifecycle) pipeline).start();
      // Notify our interested LifecycleListeners
      lifecycle.fireLifecycleEvent(START_EVENT, null);
    }
    catch (Exception e) {
      e.printStackTrace();
    }

    // Notify our interested LifecycleListeners
    lifecycle.fireLifecycleEvent(AFTER_START_EVENT, null);
  }
  // 调用父容器 stop时,同时也会关系所有子容器以及pipeline
  public void stop() throws LifecycleException {
    if (!started)
      throw new LifecycleException("SimpleContext has not been started");
    // Notify our interested LifecycleListeners
    lifecycle.fireLifecycleEvent(BEFORE_STOP_EVENT, null);
    lifecycle.fireLifecycleEvent(STOP_EVENT, null);
    started = false;
    try {
      // Stop the Valves in our pipeline (including the basic), if any
      if (pipeline instanceof Lifecycle) {
        ((Lifecycle) pipeline).stop();
      }

      // Stop our child containers, if any
      Container children[] = findChildren();
      for (int i = 0; i < children.length; i++) {
        if (children[i] instanceof Lifecycle)
          ((Lifecycle) children[i]).stop();
      }
      if ((loader != null) && (loader instanceof Lifecycle)) {
        ((Lifecycle) loader).stop();
      }
    }
    catch (Exception e) {
      e.printStackTrace();
    }
    // Notify our interested LifecycleListeners
    lifecycle.fireLifecycleEvent(AFTER_STOP_EVENT, null);
  }
LifecycleSupport
该组件是为了管理实现Lifecycle接口的组件。也就是所有实现Lifecycle接口的组件必须通过持有LifecycleSupport实例,通过该实例完成Lifecycle接口3个方法的重写。
//添加监听器LifecycleListener.
public void addLifecycleListener(LifecycleListener listener);
//触发事件
 public void fireLifecycleEvent(String type, Object data);
LifecycleListener
public void lifecycleEvent(LifecycleEvent event);
Lifecycle
实现该接口的组件必须实现以下该方法。在其实现方式下最终都委托到 LifecycleSupport 管理监听器周期。
public void addLifecycleListener(LifecycleListener listener);
public LifecycleListener[] findLifecycleListeners();
public void removeLifecycleListener(LifecycleListener listener);
protected LifecycleSupport lifecycle = new LifecycleSupport(this);
public void addLifecycleListener(LifecycleListener listener) {
    lifecycle.addLifecycleListener(listener);
  }
LifecycleEvent
public void fireLifecycleEvent(String type, Object data) {
		//初始化 LifecycleEvent
        LifecycleEvent event = new LifecycleEvent(lifecycle, type, data);
        LifecycleListener interested[] = null;
        synchronized (listeners) {
            interested = (LifecycleListener[]) listeners.clone();
        }
        for (int i = 0; i < interested.length; i++){
            interested[i].lifecycleEvent(event);
        }
    }
类加入器
使用系统类的载入器载入某个servlet类所使用的全部类,那么servlet就能够访问所有的类,包括当前运行的Java虚拟机中环境变量CLASSPATH指明的路径下啊所有的类和库。servlet应该只能允许载入WEB-INF/classes目录及其子目录下的类,和从部署的库到WEB-INF/lib目录载入类。
Tomcat自定义类加载器的另一个原因是为了提供自动重载的功能,即当WEB-INF/classes或WEB-INF/lib目录下的类发生变化时,web应用程序会重新载入这些类。
在Tomcat的载入器的实现中,类载入器使用一个额外的线程来不断检查servlet类和其他类的文件时间戳。
仓库(repository):类载入器会在哪里搜索要载入的类。
资源(resource):类载入器中DirContext对象,它的文件根路径指的就是上下文的文件根路径。
web应用程序中WEB-INF/classes和WEB-INF/lib下的目录作为仓库添加到载入器中的。

session
Catalina通过一个session管理器的组件来管理建立的session对象,该组件由org.apache.catalina.Manager接口表示。
session管理器需要与一个Context容器关联,且必须与一个Context容器关联。负责创建、更新、销毁Session对象,当有请求到来时,要返回一个有效的session对象。
servlet实例可以通过调用HttpServletRequest接口的getSession()方法获取一个session对象。
Session接口标准实现类是StandardSession,为了安全起见外观类StandardSessionFacade可以提供servlet直接使用。
StandardWrapper
SingleThreadModel
调用Servlet
StandardWrapperValve
public void invoke(Request request, Response response,
                       ValveContext valveContext)
        throws IOException, ServletException {
        // Initialize local variables we may need
        ...
        // Check for the application being marked unavailable
        ...
        // Check for the servlet being marked unavailable
        ...
        // Allocate a servlet instance to process this request
        try {
            if (!unavailable) {
                servlet = wrapper.allocate();
            }
        } catch (ServletException e) {
            ...
        } catch (Throwable e) {
            ...
        }
        // Acknowlege the request
        ...
        // Create the filter chain for this request
        ...
        // Release the filter chain (if any) for this request
        ...
        // Deallocate the allocated servlet instance
       ...
    }
public Servlet allocate() throws ServletException {

        ...
        // If not SingleThreadedModel, return the same instance every time
        if (!singleThreadModel) {
            // Load and initialize our instance if necessary
            if (instance == null) {
                synchronized (this) {
                    if (instance == null) {
                        try {
                            instance = loadServlet();
                        }
                    }
                }
            }
        }
    }

    public synchronized Servlet loadServlet() throws ServletException {
            ...
        try {
            // If this "servlet" is really a JSP file, get the right class.
            // HOLD YOUR NOSE - this is a kludge that avoids having to do special
            // case Catalina-specific code in Jasper - it also requires that the
            // servlet path be replaced by the  element content in
            // order to be completely effective
            // 处理jsp Servlet容器
            String actualClass = servletClass;
            if ((actualClass == null) && (jspFile != null)) {
                Wrapper jspWrapper = (Wrapper)
                    ((Context) getParent()).findChild(Constants.JSP_SERVLET_NAME);
                if (jspWrapper != null)
                    actualClass = jspWrapper.getServletClass();
            }

            // Acquire an instance of the class loader to be used
            Loader loader = getLoader();
            ClassLoader classLoader = loader.getClassLoader();

            // Special case class loader for a container provided servlet
            if (isContainerProvidedServlet(actualClass)) {
                classLoader = this.getClass().getClassLoader();
            }

            // Load the specified servlet class from the appropriate class loader
            Class classClass = null;
            try {
                if (classLoader != null) {
                    classClass = classLoader.loadClass(actualClass);
                } else {
                    classClass = Class.forName(actualClass);
                }
            }
            // Instantiate and initialize an instance of the servlet class itself
            try {
                servlet = (Servlet) classClass.newInstance();
            }

            // Check if loading the servlet in this web application should be
            // allowed
            ...

            // Call the initialization method of this servlet
            try {
                instanceSupport.fireInstanceEvent(InstanceEvent.BEFORE_INIT_EVENT,
                                                  servlet);
                //StandardWrapperFacade 采用facade模式避免 StandardWrapper 实例中许多公有方法暴露给Servlet程序员
                servlet.init(facade);
                // Invoke jspInit on JSP pages
                if ((loadOnStartup > 0) && (jspFile != null)) {
                    // Invoking jspInit
                    HttpRequestBase req = new HttpRequestBase();
                    HttpResponseBase res = new HttpResponseBase();
                    req.setServletPath(jspFile);
                    req.setQueryString("jsp_precompile=true");
                    servlet.service(req, res);
                }
              ...
            }

            // Register our newly initialized instance
            ...
            fireContainerEvent("load", this);
        } finally {
            ...
        }
        return servlet;

    }
StandardContext
Context容器代表一个具体的Web应用程序。
http1.1新特性
持久连接
在Http 1.1 之前,无论浏览器何时连接到web服务器,当服务器将请求的资源返回之后,就会断开与浏览器的连接。但是网页上会包含一些其他资源如图片文件,applet等。因此,当请求一个页面时,浏览器还需要下载这也被页面引用的资源。如果页面和其他引用的所有资源文件都使用不同的连接进行下载的话,处理过程非常慢。这就是为什么Http 1.1中会引入持久化连接。使用持久化连接后当下载了页面后服务器并不会立即关闭连接。相反,会等待web客户端请求被该页面所引用的所有资源。如此页面和被页面引用的资源都会使用同一个连接来下载。考虑到建立/关闭Http连接是一个系统开销很大的操作,使用同一个连接来下载所有的资源会为web服务器、客户端和网络节省很多时间的工作量。
在Http 1.1 中,会默认使用持久化连接。当前可以显示使用,方法是在浏览器发送如下的请求头信息:
connection:keep-alive
块编码
建立了持久化连接后服务器可以从多个资源发送字节流,而客户端也可以使用该连接发送多个请求。这样的结果及时发送方必须在每个请求或者响应中添加“content-length”头信息,这样接收方才能知道如何解释这些字节信息。通常情况下发送方并不知道要发送多少字节。例如servlet容器可能在接收到一些字节之后,就开始发送相应信息,而不必要等到接收完所有的信息。这就是说必须有一种方式来告诉接收方在不知道发送内容长度的情况下如何解析已经接收到的内容。
其实即使没有发送多个请求或者发送多个响应,服务器或者客户端也不需要知道有多少字节需要发送。在Http 1.0中服务器可以不写“content-length”头信息,尽管往连接中写响应内容就行了。当发送完响应消息后就直接关闭连接。这种情况下客户端会一直读取内容,直到读方法返回-1,这表明已经读到了文件尾部。
Http 1.1使用一个名“trans-encoding”的特殊请求头,来指明字节流将会分块发送。对每一个块,块的长度(十六进制表示)会有一个回车/换行符(CR/LF),然后是具体的数据。一个事务以一个长度为0的块标记。假设要用两个块发送下面38个字节的内容,其中第一个块为28个字节,第2个块为9个字节:
i am as helpless as a kitten up a tree.
那么实际上应该发送如下内容:
1D\r\n
i am as helpless as kitten u
9\r\n
p a tree.
0\r\n
“1D”的十进制表示为29,表明第一个块的长度为29个字节,“0\r\n”表明事务已经完成。
状态码100的使用
使用Http 1.1的客户端可以在向服务器发送请求体之前发送如下的请求头,并等待服务器的确认:
Expect: 100-continue
当客户端准备发送一个较长的请求体,而不确定服务器是否会接收时就可能发送上面的头信息。如果客户端发送较长的请求体发现服务器拒绝接收时会是较大的浪费。
接收到“Expect: 100-continue”请求头后服务器可以接受并处理请求时,可以发送如下的响应头:
HTTP/1.1 100 continue
注意:返回内容加上CRLF字符,然后服务器继续读取输入流的内容。


