Elasticsearch集群部署 head监控插件 Kibana部署 Nginx反向代理 Logstash部署
一、组件介绍
1、Elasticsearch:
是基于一个Lucene的搜索引擎,提供搜索,分析。存储数据三大功能,他提供了一个分布式多用户能力的全文搜索引擎,基于RESTful web接口,Elasticsearch是用Java开发的,并作为Apache许可条款下的开放源码发布,是当前流行的企业级搜索引擎。设计用于云计算中,能够达到实时搜索,稳定,可靠,快速,安装使用方便
2 、Logstash
主要是用来日志的搜集、分析、过滤日志的工具。用于管理日志和事件的工具,你可以用它去收集日志、转换日志、解析日志并将他们作为数据提供给其它模块调用,例如搜索、存储等。
3、Kibana
是一个优秀的前端日志展示框架,它可以非常详细的将日志转化为各种图表,为用户提供强大的数据可视化支持,它能够搜索、展示存储在 Elasticsearch 中索引数据。使用它可以很方便的用图表、表格、地图展示和分析数据。
4、Kafka:
数据缓冲队列。作为消息队列解耦合处理过程,同时提高了可扩展性。具有峰值处理能力,使用消息队列能够使关键组件顶住突发的访问压力,而不会因为突发的超负荷的请求而完全崩溃。
1.发布和订阅记录流,类似于消息队列或企业消息传递系统。
2.以容错持久的方式存储记录流。
3.处理记录发生的流。
5、Filebeat:
隶属于Beats,轻量级数据收集引擎。基于原先 Logstash-fowarder 的源码改造出来。换句话说:Filebeat就是新版的 Logstash-fowarder,也会是 ELK Stack 在 Agent 的第一选择,目前Beats包含四种工具:
1.Packetbeat(搜集网络流量数据)
2.Metricbeat(搜集系统、进程和文件系统级别的 CPU 和内存使用情况等数据。通过从操作系统和服务收集指标,帮助您监控服务器及其托管的服务。)
3.Filebeat(搜集文件数据)
4.Winlogbeat(搜集 Windows 事件日志数据)
二、 Elasticsearch集群部署
server
| hostname | ip | version | configuration |
| elk | 192.168.20.153 | centos7.5.1804 | 2核4G |
| es1 | 192.168.20.157 | centos7.5.1804 | 2核4G |
| es2 | 192.168.20.159 | centos7.5.1804 | 2核4G |
创建用户
#创建用户
[root@elk ~]# useradd es
[root@elk ~]# echo "123456" | passwd --stdin "es"
更改用户 es 的密码 。
passwd:所有的身份验证令牌已经成功更新。
安装ES
#上传解压安装包
[root@elk ~]# tar -xf elasticsearch-7.13.2-linux-x86_64.tar.gz  -C /usr/local
[root@elk ~]# cd /usr/local
[root@elk local]# mv elasticsearch-7.13.2/ es
修改配置文件
[root@elk local]# cd es/config
[root@elk config]# cp elasticsearch.yml  elasticsearch.yml.back
[root@elk config]# vim /usr/local/es/config/elasticsearch.yml
 cluster.name: zxjq
 cluster.initial_master_nodes: ["192.168.20.153","192.168.20.157", "192.168.20.159"]
 node.name: elk01
 node.master: true
 node.data: true
 path.data: /data/elasticsearch/data
 path.logs: /data/elasticsearch/logs
 bootstrap.memory_lock: false
 bootstrap.system_call_filter: false
 network.host: 0.0.0.0
 http.port: 9200
 transport.tcp.port: 9300
 discovery.seed_hosts: ["192.168.20.157", "192.168.20.159"]
 discovery.zen.minimum_master_nodes: 2
 discovery.zen.ping_timeout: 150s
 discovery.zen.fd.ping_retries: 10
 client.transport.ping_timeout: 60s
 http.cors.enabled: true
 http.cors.allow-origin: "*"
cluster.name 集群名称,各节点配成相同的集群名称。
cluster.initial_master_nodes 集群ip,默认为空,如果为空则加入现有集群,第一次需配置
node.name 节点名称,各节点配置不同。
node.master 指示某个节点是否符合成为主节点的条件。
node.data 指示节点是否为数据节点。数据节点包含并管理索引的一部分。
path.data 数据存储目录。
path.logs 日志存储目录。
bootstrap.memory_lock 内存锁定,是否禁用交换,测试环境建议改为false。
bootstrap.system_call_filter 系统调用过滤器。
network.host 绑定节点IP。
http.port rest api端口。
discovery.seed_hosts 提供其他 Elasticsearch 服务节点的单点广播发现功能,这里填写除了本机的其他ip
discovery.zen.minimum_master_nodes 集群中可工作的具有Master节点资格的最小数量,官方的推荐值是(N/2)+1,其中N是具有master资格的节点的数量。
discovery.zen.ping_timeout 节点在发现过程中的等待时间。
discovery.zen.fd.ping_retries 节点发现重试次数。
http.cors.enabled 是否允许跨源 REST 请求,用于允许head插件访问ES。
http.cors.allow-origin 允许的源地址
创建数据和日志目录
[root@elk config]# mkdir -p /data/elasticsearch/data
[root@elk config]# mkdir -p /data/elasticsearch/logs
设置JVM堆大小 #7.0默认为4G
[root@elk config]# sed -i 's/## -Xms4g/-Xms4g/' /usr/local/es/config/jvm.options
[root@elk config]# sed -i 's/## -Xmx4g/-Xmx4g/' /usr/local/es/config/jvm.options
修改安装目录及存储目录权限
[root@elk config]# chown -R es.es /data/elasticsearch
[root@elk config]# chown -R es.es /usr/local/es
确保堆内存最小值(Xms)与最大值(Xmx)的大小相同,防止程序在运行时改变堆内存大小。
如果系统内存足够大,将堆内存最大和最小值设置为31G,因为有一个32G性能瓶颈问题。
堆内存大小不要超过系统内存的50%
系统优化
(1)增加最大文件打开数
永久生效方法
[root@elk ~]# echo "* soft nofile 65536" >> /etc/security/limits.conf
(2)增加最大进程数
[root@elk ~]# echo "* soft nproc 65536" >> /etc/security/limits.conf
(3)增加最大内存映射数
[root@elk ~]# echo "vm.max_map_count=262144" >> /etc/sysctl.conf
[root@elk ~]# sysctl -p
[root@elk ~]# vim /etc/security/limits.conf
* hard nofile 65536
启动ES
[root@elk config]# su - es
上一次登录:五 11月 24 17:56:53 CST 2023pts/0 上
[es@elk ~]$ cd /usr/local/es
[es@elk es]$ ./bin/elasticsearch
三台机器做相同操作
三、安装配置head监控插件
只在第一台es部署
| hostname | ip | version | configuration |
| elk | 192.168.20.153 | centos7.5.1804 | 2核4G |
安装node
[root@elk ~]# tar -xf node-v10.24.1-linux-x64.tar.gz  -C /usr/local
[root@elk ~]# cd /usr/local
[root@elk local]# mv node-v10.24.1-linux-x64/ node
[root@elk local]# vim /etc/profile.d/node.sh
NODE_HOME=/usr/local/node
PATH=$NODE_HOME/bin:$PATH
[root@elk local]# source /etc/profile.d/node.sh
[root@elk ~]# node --version
v10.24.1
下载head插件
[root@elk ~]# wget https://github.com/mobz/elasticsearch-head/archive/master.zip
[root@elk ~]# unzip –d /usr/local elasticsearch-head-master.zip
安装grunt
[root@elk ~]# cd /usr/local/elasticsearch-head-master
[root@elk elasticsearch-head-master]# ls
crx                elasticsearch-head.sublime-project  index.html    plugin-descriptor.properties  _site
Dockerfile         Gruntfile.js                        LICENCE       proxy                         src
Dockerfile-alpine  grunt_fileSets.js                   package.json  README.textile                test
[root@elk elasticsearch-head-master]# npm install -g grunt-cli
/usr/local/node/bin/grunt -> /usr/local/node/lib/node_modules/grunt-cli/bin/grunt
+ [email protected]
added 59 packages from 69 contributors in 21.93s
[root@elk elasticsearch-head-master]# grunt -version
grunt-cli v1.4.3
修改head配置文件
[root@elk ~]#vi /usr/local/elasticsearch-head-master/Gruntfile.js +95 
[root@elk ~]# vim /usr/local/elasticsearch-head-master/_site/app.js +4373
下载head必要的插件
[root@elk ~]# yum -y install bzip2
[root@elk ~]# mkdir /tmp/phantomjs
[root@elk ~]# mv phantomjs-2.1.1-linux-x86_64.tar.bz2  /tmp/phantomjs/
[root@elk ~]# chmod 777 /tmp/phantomjs -R
[root@elk ~]# cd /usr/local/elasticsearch-head-master/
[root@elk elasticsearch-head-master]# npm install
[root@elk elasticsearch-head-master]# nohup grunt server &
执行错误可以再次执行npm install [email protected] --ignore-scripts
浏览器访问测试
访问http://192.168.20.153:9100
四、Kibana部署
| hostname | ip | version | configuration |
| Elk | 192.168.20.153 | centos7.5.1804 | 2核4G |
安装配置Kibana
[root@elk ~]# tar zxf kibana-7.13.2-linux-x86_64.tar.gz -C /usr/local/
[root@elk ~]# vim /usr/local/kibana-7.13.2-linux-x86_64/config/kibana.yml
server.port: 5601
server.host: "192.168.20.153"
elasticsearch.hosts: ["http://192.168.20.153:9200"]
kibana.index: ".kibana"
i18n.locale: "zh-CN"
server.port kibana服务端口,默认5601
server.host kibana主机IP地址,默认localhost
elasticsearch.url 用来做查询的ES节点的URL,默认http://localhost:9200
kibana.index kibana在Elasticsearch中使用索引来存储保存的searches, visualizations和dashboards,默认.kibana
启动
[root@elk ~]# cd /usr/local/kibana-7.13.2-linux-x86_64/
[root@elk ~]# nohup ./bin/kibana --allow-root  &
[root@elk kibana-7.13.2-linux-x86_64]# ss -nplt |grep 5601
State       Recv-Q Send-Q                         Local Address:Port                                        Peer Address:Port
LISTEN      0      128                           192.168.20.153:5601                                                   *:*                   users:(("node",pid=2236,fd=18))
五、安装配置Nginx反向代理
(1)配置YUM源:
[root@elk ~]# rpm -ivh http://nginx.org/packages/centos/7/noarch/RPMS/nginx-release-centos-7-0.el7.ngx.noarch.rpm
(2) 配置反向代理
user  nginx;
worker_processes  auto;
error_log  /var/log/nginx/error.log;
pid        /var/run/nginx.pid;
worker_rlimit_nofile 65535;

events {
    worker_connections  65535;
    use epoll;
}

http {
    include       mime.types;
    default_type  application/octet-stream;

    log_format  main  '$remote_addr - $remote_user [$time_local] "$request" '
                      '$status $body_bytes_sent "$http_referer" '
                      '"$http_user_agent" "$http_x_forwarded_for"';

    access_log  /var/log/nginx/access.log  main;
    server_names_hash_bucket_size 128;
    autoindex on;

    sendfile        on;
    tcp_nopush     on;
    tcp_nodelay on;

    keepalive_timeout  120;
    fastcgi_connect_timeout 300;
    fastcgi_send_timeout 300;
    fastcgi_read_timeout 300;
    fastcgi_buffer_size 64k;
    fastcgi_buffers 4 64k;
    fastcgi_busy_buffers_size 128k;
    fastcgi_temp_file_write_size 128k;

    #gzip模块设置
    gzip on; #开启gzip压缩输出
    gzip_min_length 1k;    #最小压缩文件大小
    gzip_buffers 4 16k;    #压缩缓冲区
    gzip_http_version 1.0;    #压缩版本(默认1.1,前端如果是squid2.5请使用1.0)
    gzip_comp_level 2;    #压缩等级
    gzip_types text/plain application/x-javascript text/css application/xml;    #压缩类型,默认就已经包含textml,所以下面就不用再写了,写上去也不会有问题,但是会有一个warn。
    gzip_vary on;
    #开启限制IP连接数的时候需要使用
    #limit_zone crawler $binary_remote_addr 10m;
    #tips:
    #upstream bakend{#定义负载均衡设备的Ip及设备状态}{
    #    ip_hash;
    #    server 127.0.0.1:9090 down;
    #    server 127.0.0.1:8080 weight=2;
    #    server 127.0.0.1:6060;
    #    server 127.0.0.1:7070 backup;
    #}
    #在需要使用负载均衡的server中增加 proxy_pass http://bakend/;
    server {
        listen       80;
        server_name  192.168.20.153;

        #charset koi8-r;

       # access_log  /var/log/nginx/host.access.log  main;
        access_log off;

         location / {
             auth_basic "Kibana";   #可以是string或off,任意string表示开启认证,off表示关闭认证。
             auth_basic_user_file /etc/nginx/passwd.db;   #指定存储用户名和密码的认证文件。
             proxy_pass http://192.168.20.153:5601;
             proxy_set_header Host $host:5601;
             proxy_set_header X-Real-IP $remote_addr;
             proxy_set_header X-Forwarded-For $proxy_add_x_forwarded_for;
             proxy_set_header Via "nginx";
                     }
         location /status {
             stub_status on; #开启网站监控状态
             access_log /var/log/nginx/kibana_status.log; #监控日志
             auth_basic "NginxStatus"; }

         location /head/{
             auth_basic "head";
             auth_basic_user_file /etc/nginx/passwd.db;
             proxy_pass http://192.168.20.153:9100/;
             proxy_set_header Host $host:9100;
             proxy_set_header X-Real-IP $remote_addr;
             proxy_set_header X-Forwarded-For $proxy_add_x_forwarded_for;
             proxy_set_header Via "nginx";
                         }

        # redirect server error pages to the static page /50x.html
        error_page   500 502 503 504  /50x.html;
        location = /50x.html {
            root   html;
        }
    }
}
[root@elk ~]# yum install -y nginx httpd-tools
[root@elk ~]# htpasswd -cm /etc/nginx/passwd.db kibana
New password:
Re-type new password:
Adding password for user kibana
[root@elk ~]# htpasswd -m /etc/nginx/passwd.db head
New password:
Re-type new password:
Adding password for user head
(3)启动nginx
[root@elk ~]# systemctl start nginx
http://192.168.20.153/head/
六、Logstash部署
| hostname | ip | version | configuration |
| Elk | 192.168.20.153 | centos7.5.1804 | 2核4G |
1.安装配置Logstash
1)安装
[root@elk ~]# tar -xf logstash-7.13.2-linux-x86_64.tar.gz -C /usr/local(2)配置
[root@elk ~]# cd /usr/local/logstash-7.13.2/
[root@elk logstash-7.13.2]# mkdir conf
[root@elk logstash-7.13.2]# cd conf
[root@elk conf]# vim input.conf
input {
	stdin {}
}
[root@elk conf]# vim output.conf
output {
	stdout {
		codec => rubydebug
	}
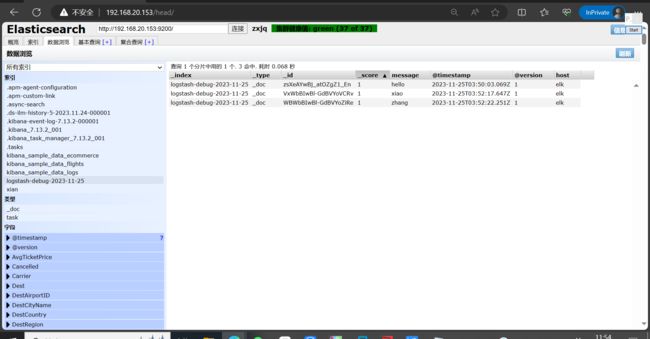
	elasticsearch {
      hosts => ["192.168.20.153","192.168.20.157","192.168.20.159"]
      index => 'logstash-debug-%{+YYYY-MM-dd}'
    }
}
启动
[root@elk logstash-7.13.2]# ./bin/logstash -f /usr/local/logstash-7.13.2/conf  --config.reload.automatic
......
[2023-11-25T11:49:50,132][INFO ][logstash.agent           ] Pipelines running {:count=>1, :running_pipelines=>[:main], :non_running_pipelines=>[]}
hello
{
       "message" => "hello",
    "@timestamp" => 2023-11-25T03:50:03.069Z,
      "@version" => "1",
          "host" => "elk"
}
xiao
{
       "message" => "xiao",
    "@timestamp" => 2023-11-25T03:52:17.647Z,
      "@version" => "1",
          "host" => "elk"
}
zhang
{
       "message" => "zhang",
    "@timestamp" => 2023-11-25T03:52:22.251Z,
      "@version" => "1",
          "host" => "elk"

}


