UITableviewCell------自定义cell
目录
cell的两种复用方式:
自定义cell
对于UITableView创建的cell,系统只能在cell里面添加一些固定的东西,如果想要添加一些不一样的东西,我们就需要创建一个自己的cell。
cell的两种复用方式:
一种是非注册的类型:
    NSString* strID = @"ID";
    //尝试获取可以复用的单元格
    //如果得不到,返回nil
    UITableViewCell* cell = [_tableView dequeueReusableCellWithIdentifier:strID];
    if(cell == nil) {
        cell = [[UITableViewCell alloc] initWithStyle:UITableViewCellStyleSubtitle reuseIdentifier:strID];
    }
先判断是否有复用的cell,如果没有,则返回nil,然后再判断cell是否为空,如果为空则重新创建
另一种是注册类型:
[self.tableView registerClass:[myTableViewCell class] forCellReuseIdentifier:@"688"];

myTableViewCell* cell = [self.tableView dequeueReusableCellWithIdentifier:@"688" forIndexPath:indexPath];
先获取复用的cell,如果位未获取到,就系统自动利用获取的类和identifier绑定创建新的cell返回。
两者的区别:
未注册的需要自己判断是否获取到可复用的cell,如果没有则手动创建cell返回,注册的则无须判断,如果说未获取到,系统则自动创建返回
自定义cell
首先创建一个UITableView对象
Viewcontroller.h
@interface ViewController : UIViewController

@property (nonatomic, strong) UITableView* tableView;


@end
ViewController .m
    _tableView = [[UITableView alloc] initWithFrame:self.view.bounds style:UITableViewStylePlain];
    _tableView.delegate = self;
    _tableView.dataSource = self;
    [self.view addSubview: _tableView];
    [_tableView registerClass:[myTableViewCell class] forCellReuseIdentifier:@"688"];
要实现的代理方法
- (NSInteger)numberOfSectionsInTableView:(UITableView *)tableView  {
    return 2;
}
- (NSInteger)tableView:(UITableView *)tableView numberOfRowsInSection:(NSInteger)section {
    return 2;
}
- (CGFloat)tableView:(UITableView *)tableView heightForRowAtIndexPath:(NSIndexPath *)indexPath {
    return 60;
}
- (UITableViewCell*)tableView:(UITableView *)tableView cellForRowAtIndexPath:(NSIndexPath *)indexPath {
    myTableViewCell* cell = [self.tableView dequeueReusableCellWithIdentifier:@"688" forIndexPath:indexPath];
    cell.accessoryType = UITableViewCellAccessoryNone;
    return cell;
}
然后自定义一个myTableViewCell继承于UITableviewCell
在myTableViewCell.h中添加这个cell需要的控件
@interface myTableViewCell : UITableViewCell

@property (nonatomic, strong) UILabel* lable;
@property (nonatomic, strong) UIImageView* imageview;

@end
再在mytablrView.m中重写- (instancetype)initWithStyle:(UITableViewCellStyle)style reuseIdentifier:(NSString *)reuseIdentifier方法对属性赋值并添加。
- (instancetype)initWithStyle:(UITableViewCellStyle)style reuseIdentifier:(NSString *)reuseIdentifier {
    self = [super initWithStyle:style reuseIdentifier:reuseIdentifier];
    if ([self.reuseIdentifier isEqualToString:@"688"]) {
        _lable = [[UILabel alloc] init];
        _lable.text = @"688";
        _lable.textColor = [UIColor grayColor];
        NSString* str = [NSString stringWithFormat:@"_1.jpg"];
        UIImage* image = [UIImage imageNamed:str];
        _imageview = [[UIImageView alloc] init];
        _imageview.image = image;
    }
    [self.contentView addSubview:_lable];
    [self.contentView addSubview:_imageview];
    return self;
}
设置控件的位置
- (void)layoutSubviews {
    _lable.frame = CGRectMake(30, 10, 50, 50);
    _imageview.frame = CGRectMake(100, 10, 50, 50);
}
上面的自定义cell,用到的是注册的cell复用方法。
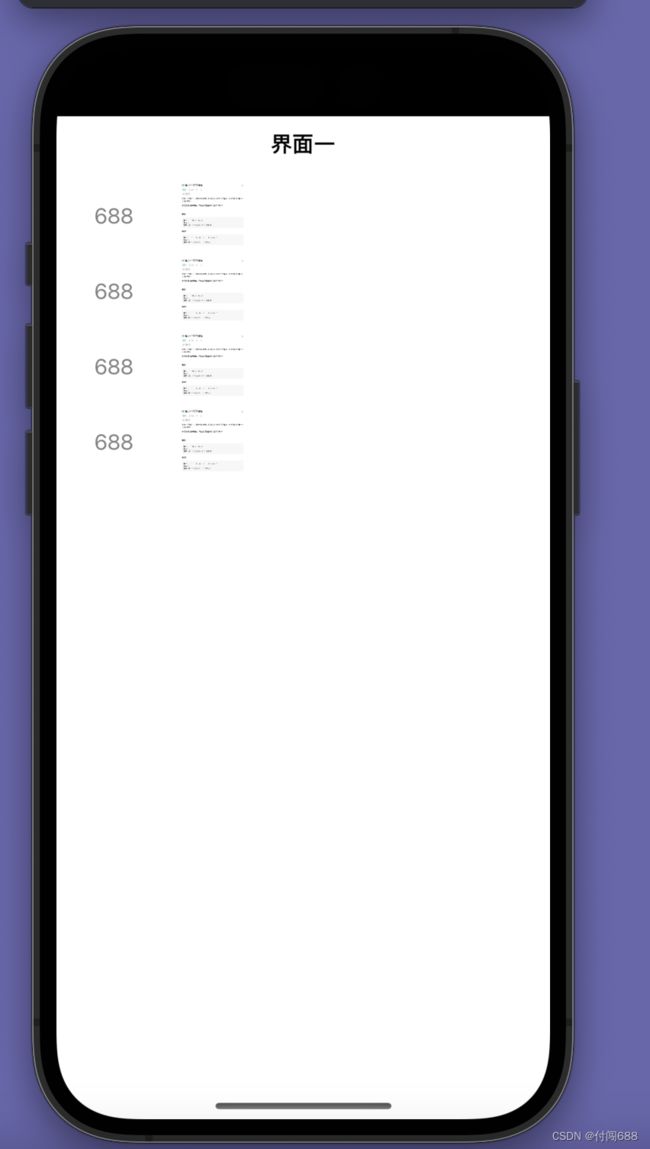
运行结果