MyBatis源码分析
MyBatis源码分析
MyBatis是常用的持久层框架,帮助我们减少了很多的访问数据库的代码。这次我们就来看看MyBatis是怎么做到这些的?看看它里面用到了哪些值得我们借鉴的技术。
一、示例程序
为了方便后续在本地进行debug调试,首先准备一个示例程序。
1、项目工程结构
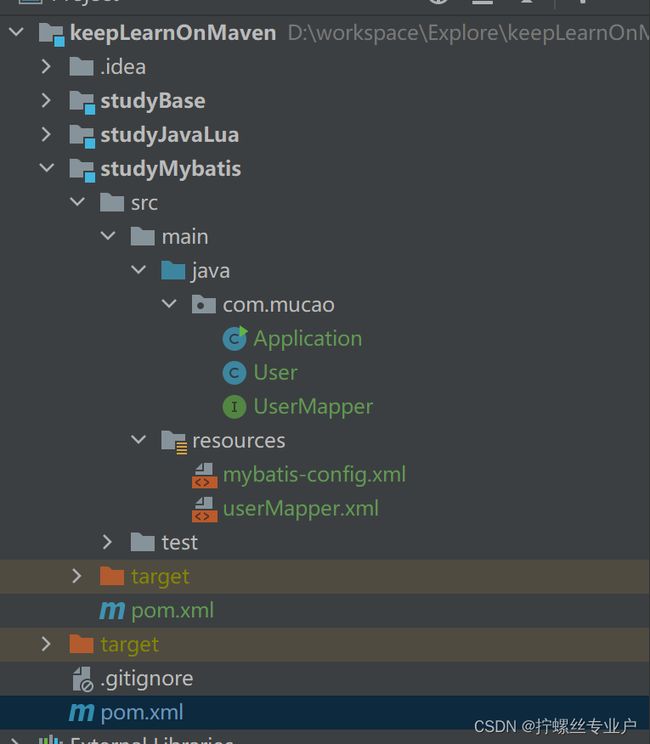
2、父工程pom.xml文件内容:
<project xmlns="http://maven.apache.org/POM/4.0.0"
         xmlns:xsi="http://www.w3.org/2001/XMLSchema-instance"
         xsi:schemaLocation="http://maven.apache.org/POM/4.0.0 http://maven.apache.org/xsd/maven-4.0.0.xsd">
    <modelVersion>4.0.0modelVersion>

    <groupId>org.examplegroupId>
    <artifactId>keepLearnOnMavenartifactId>
    <packaging>pompackaging>
    <version>1.0-SNAPSHOTversion>
    <modules>
        <module>studyJavaLuamodule>
        <module>studyBasemodule>
        <module>studyMybatismodule>
    modules>

    <properties>
        <maven.compiler.source>8maven.compiler.source>
        <maven.compiler.target>8maven.compiler.target>
    properties>

    <dependencies>
        <dependency>
            <groupId>org.projectlombokgroupId>
            <artifactId>lombokartifactId>
            <version>1.18.24version>
            <scope>providedscope>
        dependency>
    dependencies>

project>
3、studyMybatis项目的pom.xml文件内容:
<project xmlns="http://maven.apache.org/POM/4.0.0"
         xmlns:xsi="http://www.w3.org/2001/XMLSchema-instance"
         xsi:schemaLocation="http://maven.apache.org/POM/4.0.0 http://maven.apache.org/xsd/maven-4.0.0.xsd">
    <parent>
        <artifactId>keepLearnOnMavenartifactId>
        <groupId>org.examplegroupId>
        <version>1.0-SNAPSHOTversion>
    parent>
    <modelVersion>4.0.0modelVersion>

    <artifactId>studyMybatisartifactId>

    <properties>
        <maven.compiler.source>8maven.compiler.source>
        <maven.compiler.target>8maven.compiler.target>
    properties>

    <dependencies>

        <dependency>
            <groupId>mysqlgroupId>
            <artifactId>mysql-connector-javaartifactId>
            <version>5.1.47version>
        dependency>

        <dependency>
            <groupId>org.mybatisgroupId>
            <artifactId>mybatisartifactId>
            <version>3.5.2version>
        dependency>
    dependencies>
project>
4、mybatis-config.xml文件内容:
DOCTYPE configuration
        PUBLIC "-//mybatis.org//DTD Config 3.0//EN"
        "http://mybatis.org/dtd/mybatis-3-config.dtd">
<configuration>
    <environments default="development">
        <environment id="development">
            <transactionManager type="JDBC"/>
            <dataSource type="POOLED">
                <property name="driver" value="com.mysql.jdbc.Driver"/>
                <property name="url" value="jdbc:mysql://localhost:3306/test?useUnicode=true&characterEncoding=utf8"/>
                <property name="username" value="mucao"/>
                <property name="password" value="123456"/>
            dataSource>
        environment>
    environments>
    <mappers>
        <mapper resource="userMapper.xml"/>
    mappers>
configuration>
5、userMapper.xml文件内容:
DOCTYPE mapper
        PUBLIC "-//mybatis.org//DTD Mapper 3.0//EN"
        "http://mybatis.org/dtd/mybatis-3-mapper.dtd">
<mapper namespace="com.mucao.UserMapper">
    <select id="selectUser" resultType="com.mucao.User">
        select * from user
    select>
mapper>
6、User.java文件内容:
package com.mucao;

import lombok.*;

@Getter
@Setter
@ToString
@NoArgsConstructor
@AllArgsConstructor
public class User {

    private int id;  //id

    private String name;   //姓名

    private String pwd;   //密码
}
7、UserMapper.java文件内容:
package com.mucao;

import java.util.List;

public interface UserMapper {

    List<User> selectUser();

}
8、Application.java文件内容:
package com.mucao;

import org.apache.ibatis.io.Resources;
import org.apache.ibatis.session.SqlSession;
import org.apache.ibatis.session.SqlSessionFactory;
import org.apache.ibatis.session.SqlSessionFactoryBuilder;

import java.io.IOException;
import java.io.InputStream;
import java.util.List;

public class Application {

    public static void main(String[] args) throws IOException {

        String resource = "mybatis-config.xml";
        InputStream inputStream = Resources.getResourceAsStream(resource);
        SqlSessionFactory sqlSessionFactory = new SqlSessionFactoryBuilder().build(inputStream);

        SqlSession sqlSession = sqlSessionFactory.openSession();

        UserMapper userMapper = sqlSession.getMapper(UserMapper.class);
        List<User> users = userMapper.selectUser();

        for (User user: users) {
            System.out.println(user);
        }

        sqlSession.close();
    }
}
运行结果如下所示:
User(id=1, name=王二, pwd=123456)
User(id=2, name=张三, pwd=abcdef)
User(id=3, name=李四, pwd=987654)

Process finished with exit code 0
二、MyBatis启动流程分析
2.1 SqlSessionFactory的创建
先看创建SqlSessionFactory的地方,入口代码如下所示:
String resource = "mybatis-config.xml";
InputStream inputStream = Resources.getResourceAsStream(resource);
SqlSessionFactory sqlSessionFactory = new SqlSessionFactoryBuilder().build(inputStream); // ref-1
ref-1处的代码会创建一个SqlSessionFactory出来,我们看下build方法内部实现:
// SqlSessionFactoryBuilder.java文件

public SqlSessionFactory build(InputStream inputStream) {
    return build(inputStream, null, null);
}

public SqlSessionFactory build(InputStream inputStream, String environment, Properties properties) {
    try {
        XMLConfigBuilder parser = new XMLConfigBuilder(inputStream, environment, properties);
        return build(parser.parse()); // ref-12
    } catch (Exception e) {
        throw ExceptionFactory.wrapException("Error building SqlSession.", e);
    } finally {
        ErrorContext.instance().reset();
        try {
            inputStream.close();
        } catch (IOException e) {
            // Intentionally ignore. Prefer previous error.
        }
    }
}

public SqlSessionFactory build(Configuration config) {
    return new DefaultSqlSessionFactory(config);  // ref-2
}
最终会在ref-2处创建一个DefaultSqlSessionFactory,调用的构建函数如下所示:
public DefaultSqlSessionFactory(Configuration configuration) {
    this.configuration = configuration;
}
总结一下,读取配置文件的xml内容作为配置数据Configuration, 然后依据配置数据创建DefaultSqlSessionFactory。
2.2 SqlSession的创建
下面接着看SqlSession的获取。
// Application.java文件

SqlSession sqlSession = sqlSessionFactory.openSession(); // ref-3
ref-3处的代码会进入到如下的逻辑中:
// DefaultSqlSessionFactory.java文件

@Override
public SqlSession openSession() {
    return openSessionFromDataSource(configuration.getDefaultExecutorType(), null, false);
}

private SqlSession openSessionFromDataSource(ExecutorType execType, TransactionIsolationLevel level, boolean autoCommit) {
    Transaction tx = null;
    try {
        // 获取环境设置,就是mybatis-config.xml文件中的environments标签内容
        final Environment environment = configuration.getEnvironment();
        // 获取事务工厂,示例程序的事务管理工厂是直接从Environment对象中获取的
        final TransactionFactory transactionFactory = getTransactionFactoryFromEnvironment(environment);
        // 依据数据源(environment.getDataSource())、事务隔离级别(level)和是否自动提交(autoCommit)创建事务
        tx = transactionFactory.newTransaction(environment.getDataSource(), level, autoCommit); // ref-4
		// 创建执行器
        final Executor executor = configuration.newExecutor(tx, execType); // ref-5
        // 创建默认的session
        return new DefaultSqlSession(configuration, executor, autoCommit); // ref-7
    } catch (Exception e) {
        closeTransaction(tx); // may have fetched a connection so lets call close()
        throw ExceptionFactory.wrapException("Error opening session.  Cause: " + e, e);
    } finally {
        ErrorContext.instance().reset();
    }
}
ref-4处创建事务的实际代码如下所示:
// JdbcTransactionFactory.java文件

@Override
public Transaction newTransaction(DataSource ds, TransactionIsolationLevel level, boolean autoCommit) {
    return new JdbcTransaction(ds, level, autoCommit);
}
ref-5处创建执行器的实际代码如下所示:
// Configuration.java文件

public Executor newExecutor(Transaction transaction, ExecutorType executorType) {
    executorType = executorType == null ? defaultExecutorType : executorType;
    executorType = executorType == null ? ExecutorType.SIMPLE : executorType;
    Executor executor;
    if (ExecutorType.BATCH == executorType) {
        executor = new BatchExecutor(this, transaction);
    } else if (ExecutorType.REUSE == executorType) {
        executor = new ReuseExecutor(this, transaction);
    } else {
        // 示例程序会走到这儿来
        executor = new SimpleExecutor(this, transaction);
    }
    if (cacheEnabled) { // 判断为true
        // 对执行器进行装饰,使其有缓存能力
        executor = new CachingExecutor(executor);
    }
    // 拦截器会对执行器进行封装(责任链模式)
    executor = (Executor) interceptorChain.pluginAll(executor); // ref-6
    return executor;
}
ref-6处使用到了责任链模式,Mybatis中责任链模式的实现和我们常见的实现不太一样,先分析完主干流程,后面再对这个点进行详细分析。
2.3 UserMapper实现对象的获取
通过SqlSession可以获取UserMapper接口的实现对象,如下所示:
UserMapper userMapper = sqlSession.getMapper(UserMapper.class); // ref-8
ref-8处代码实际执行逻辑如下:
// DefaultSqlSession.java文件

@Override
public <T> T getMapper(Class<T> type) {
    return configuration.getMapper(type, this);
}
// Configuration.java文件

public <T> T getMapper(Class<T> type, SqlSession sqlSession) {
    // 这个mapperRegistry就代表userMapper.xml文件
    return mapperRegistry.getMapper(type, sqlSession);
}
// MapperRegistry.java文件

public <T> T getMapper(Class<T> type, SqlSession sqlSession) {
    // 获取提前注册好的工程对象
    // ref-10
    final MapperProxyFactory<T> mapperProxyFactory = (MapperProxyFactory<T>) knownMappers.get(type);
    if (mapperProxyFactory == null) {
        throw new BindingException("Type " + type + " is not known to the MapperRegistry.");
    }
    try {
        // 工厂对象创建实例对象
        return mapperProxyFactory.newInstance(sqlSession);  // ref-9
    } catch (Exception e) {
        throw new BindingException("Error getting mapper instance. Cause: " + e, e);
    }
}
我们来看看ref-9处是怎么创建实例对象的:
// MapperProxyFactory.java文件

@SuppressWarnings("unchecked")
protected T newInstance(MapperProxy<T> mapperProxy) {
    // 使用jdk的动态代理创建代理对象
    // 这个mapperInterface就是UserMapper接口对应的class对象
    return (T) Proxy.newProxyInstance(mapperInterface.getClassLoader(), new Class[] { mapperInterface }, mapperProxy);
}

public T newInstance(SqlSession sqlSession) {
	// 这儿的mapperProxy其实是个InvocationHandler
    // 这个mapperInterface就是UserMapper接口对应的class对象
    final MapperProxy<T> mapperProxy = new MapperProxy<>(sqlSession, mapperInterface, methodCache);
    return newInstance(mapperProxy);
}
简单总结就是使用jdk的动态代理创建UserMapper接口的实现对象。
还有一个遗留问题,那就是ref-10处的mapperProxyFactory是什么时候注册进去的?答案就在下面的代码中:
// MapperRegistry.java文件

public <T> void addMapper(Class<T> type) {
    if (type.isInterface()) {
        if (hasMapper(type)) {
            throw new BindingException("Type " + type + " is already known to the MapperRegistry.");
        }
        boolean loadCompleted = false;
        try {
            knownMappers.put(type, new MapperProxyFactory<>(type));
            // It's important that the type is added before the parser is run
            // otherwise the binding may automatically be attempted by the
            // mapper parser. If the type is already known, it won't try.
            MapperAnnotationBuilder parser = new MapperAnnotationBuilder(config, type);
            parser.parse();
            loadCompleted = true;
        } finally {
            if (!loadCompleted) {
                knownMappers.remove(type);
            }
        }
    }
}
这个增加addMapper方法会是在ref-12处build(parser.parse())中parse()方法中被调用的,Mybatis会把从配置文件中解析到的Mapper注册到knownMappers中。
三、Mybatis执行SQL语句的过程
启动流程分析完了,我们大概知道Mybatis启动过程中干了哪些事情,这些事情都是为执行SQL语句做准备的,接下来我们就分析下Mybatis执行SQL语句的过程。
入口代码如下所示:
// Application.java文件

List<User> users = userMapper.selectUser(); // ref-11

for (User user: users) {
    System.out.println(user);
}
重点语句就是ref-10处的代码。我们来详细分析下执行过程:
// MapperProxy.java文件

private final Map<Method, MapperMethod> methodCache;

public Object invoke(Object proxy, Method method, Object[] args) throws Throwable {
    try {
        if (Object.class.equals(method.getDeclaringClass())) {
            return method.invoke(this, args);
        } else if (method.isDefault()) {
            return invokeDefaultMethod(proxy, method, args);
        }
    } catch (Throwable t) {
        throw ExceptionUtil.unwrapThrowable(t);
    }
    // 尝试从缓存中获取对应的MapperMethod对象,如果获取不到就进行创建
    final MapperMethod mapperMethod = cachedMapperMethod(method);
    // 真正的执行方法
    return mapperMethod.execute(sqlSession, args); // ref-13
}

private MapperMethod cachedMapperMethod(Method method) {
    return methodCache.computeIfAbsent(method, k -> new MapperMethod(mapperInterface, method, sqlSession.getConfiguration()));
}
ref-13处会进行方法的真正执行,具体代码如下:
// MapperMethod.java文件

public Object execute(SqlSession sqlSession, Object[] args) {
    Object result;
    switch (command.getType()) {
        case INSERT: {
            Object param = method.convertArgsToSqlCommandParam(args);
            result = rowCountResult(sqlSession.insert(command.getName(), param));
            break;
        }
        case UPDATE: {
            Object param = method.convertArgsToSqlCommandParam(args);
            result = rowCountResult(sqlSession.update(command.getName(), param));
            break;
        }
        case DELETE: {
            Object param = method.convertArgsToSqlCommandParam(args);
            result = rowCountResult(sqlSession.delete(command.getName(), param));
            break;
        }
        case SELECT:
            if (method.returnsVoid() && method.hasResultHandler()) {
                executeWithResultHandler(sqlSession, args);
                result = null;
            } else if (method.returnsMany()) { // 示例程序会进入到这个分支
                result = executeForMany(sqlSession, args); // ref-14
            } else if (method.returnsMap()) {
                result = executeForMap(sqlSession, args);
            } else if (method.returnsCursor()) {
                result = executeForCursor(sqlSession, args);
            } else {
                Object param = method.convertArgsToSqlCommandParam(args);
                result = sqlSession.selectOne(command.getName(), param);
                if (method.returnsOptional()
                    && (result == null || !method.getReturnType().equals(result.getClass()))) {
                    result = Optional.ofNullable(result);
                }
            }
            break;
        case FLUSH:
            result = sqlSession.flushStatements();
            break;
        default:
            throw new BindingException("Unknown execution method for: " + command.getName());
    }
    if (result == null && method.getReturnType().isPrimitive() && !method.returnsVoid()) {
        throw new BindingException("Mapper method '" + command.getName()
                                   + " attempted to return null from a method with a primitive return type (" + method.getReturnType() + ").");
    }
    return result;
}
execute方法会依据command的类型执行不同的分支,具体的就是对应到不同类别的SQL语句,这和之前分析过的H2数据库执行SQL语句的过程很像。我们着重看一下示例程序会进入的executeForMany方法,具体代码如下:
// MapperMethod.java文件

private <E> Object executeForMany(SqlSession sqlSession, Object[] args) {
    List<E> result;
    // 将UserMapper方法的参数转换为SQL命令的参数
    Object param = method.convertArgsToSqlCommandParam(args);
    if (method.hasRowBounds()) {
        RowBounds rowBounds = method.extractRowBounds(args);
        result = sqlSession.selectList(command.getName(), param, rowBounds);
    } else {
        result = sqlSession.selectList(command.getName(), param); // ref-15
    }
    // issue #510 Collections & arrays support
    if (!method.getReturnType().isAssignableFrom(result.getClass())) {
        if (method.getReturnType().isArray()) {
            return convertToArray(result);
        } else {
            return convertToDeclaredCollection(sqlSession.getConfiguration(), result);
        }
    }
    return result;
}
ref-15处代码会真正的执行SQL语句,我们进行分析下:
// DefaultSqlSession.java文件

public <E> List<E> selectList(String statement, Object parameter) {
    return this.selectList(statement, parameter, RowBounds.DEFAULT);
}

@Override
public <E> List<E> selectList(String statement, Object parameter, RowBounds rowBounds) {
    try {
        // 通过配置信息将接口方法语句'com.mucao.UserMapper.selectUser'映射为对应的SQL语句(ms)
        MappedStatement ms = configuration.getMappedStatement(statement);
        // 调用执行器的查询方法 // ref-16
        return executor.query(ms, wrapCollection(parameter), rowBounds, Executor.NO_RESULT_HANDLER);
    } catch (Exception e) {
        throw ExceptionFactory.wrapException("Error querying database.  Cause: " + e, e);
    } finally {
        ErrorContext.instance().reset();
    }
}
ref-16处的调用执行器执行查询信息,我们在分析启动过程的时候,知道这个执行器是缓存执行器,把真正的执行器包装了一层。我们接着看执行器的查询操作:
// CachingExecutor.java文件

@Override
public <E> List<E> query(MappedStatement ms, Object parameterObject, RowBounds rowBounds, ResultHandler resultHandler) throws SQLException {
    // 依据参数对象获取约束的SQL对象
    BoundSql boundSql = ms.getBoundSql(parameterObject);
	// 计算用于缓存结果的key,这儿计算的值为:1053852532:2785247288:com.mucao.UserMapper.selectUser:0:2147483647:select * from user:development
    CacheKey key = createCacheKey(ms, parameterObject, rowBounds, boundSql);
    return query(ms, parameterObject, rowBounds, resultHandler, key, boundSql);
}

@Override
public CacheKey createCacheKey(MappedStatement ms, Object parameterObject, RowBounds rowBounds, BoundSql boundSql) {
    return delegate.createCacheKey(ms, parameterObject, rowBounds, boundSql);
}

@Override
public <E> List<E> query(MappedStatement ms, Object parameterObject, RowBounds rowBounds, ResultHandler resultHandler, CacheKey key, BoundSql boundSql)
    throws SQLException {
    Cache cache = ms.getCache();
    if (cache != null) {
        flushCacheIfRequired(ms);
        if (ms.isUseCache() && resultHandler == null) {
            ensureNoOutParams(ms, boundSql);
            @SuppressWarnings("unchecked")
            List<E> list = (List<E>) tcm.getObject(cache, key);
            if (list == null) {
                list = delegate.query(ms, parameterObject, rowBounds, resultHandler, key, boundSql);
                tcm.putObject(cache, key, list); // issue #578 and #116
            }
            return list;
        }
    }
    // 示例程序会走这儿,这个delegate才是真正执行计算的执行器
    return delegate.query(ms, parameterObject, rowBounds, resultHandler, key, boundSql); // ref-17
}
ref-17处代码会调用被装饰的那个执行的查询方法,具体代码如下所示:
// BaseExecutor.java文件

@SuppressWarnings("unchecked")
@Override
public <E> List<E> query(MappedStatement ms, Object parameter, RowBounds rowBounds, ResultHandler resultHandler, CacheKey key, BoundSql boundSql) throws SQLException {
    ErrorContext.instance().resource(ms.getResource()).activity("executing a query").object(ms.getId());
    if (closed) {
        throw new ExecutorException("Executor was closed.");
    }
    if (queryStack == 0 && ms.isFlushCacheRequired()) {
        clearLocalCache();
    }
    List<E> list;
    try {
        queryStack++;
        // 优先从缓存中去获取结果。
        list = resultHandler == null ? (List<E>) localCache.getObject(key) : null;
        if (list != null) {
            handleLocallyCachedOutputParameters(ms, key, parameter, boundSql);
        } else {
            // 示例程序会进入到这儿
            list = queryFromDatabase(ms, parameter, rowBounds, resultHandler, key, boundSql); // ref-18
        }
    } finally {
        queryStack--;
    }
    if (queryStack == 0) {
        for (DeferredLoad deferredLoad : deferredLoads) {
            deferredLoad.load();
        }
        // issue #601
        deferredLoads.clear();
        if (configuration.getLocalCacheScope() == LocalCacheScope.STATEMENT) {
            // issue #482
            clearLocalCache();
        }
    }
    return list;
}
ref-18处会从数据库查询结果,代码如下:
// BaseExecutor.java文件

private <E> List<E> queryFromDatabase(MappedStatement ms, Object parameter, RowBounds rowBounds, ResultHandler resultHandler, CacheKey key, BoundSql boundSql) throws SQLException {
    List<E> list;
    // 先在缓存中放一个占位标识。疑问:为什么要提前在缓存中放这么一个占位标识?
    localCache.putObject(key, EXECUTION_PLACEHOLDER);
    try {
        // 执行查询操作
        list = doQuery(ms, parameter, rowBounds, resultHandler, boundSql);  // ref-19
    } finally {
        // 清楚提前放置的占位标识
        localCache.removeObject(key);
    }
    // 将查询结果放入缓存中
    localCache.putObject(key, list);
    if (ms.getStatementType() == StatementType.CALLABLE) {
        localOutputParameterCache.putObject(key, parameter);
    }
    return list;
}
我们接着看ref-19处的查询操作具体逻辑,代码如下所示:
// SimpleExecutor.java文件

public <E> List<E> doQuery(MappedStatement ms, Object parameter, RowBounds rowBounds, ResultHandler resultHandler, BoundSql boundSql) throws SQLException {
    Statement stmt = null;
    try {
        // 获取配置信息
        Configuration configuration = ms.getConfiguration();
        // 创建StatementHandler
        StatementHandler handler = configuration.newStatementHandler(wrapper, ms, parameter, rowBounds, resultHandler, boundSql);
        // 准备jdbc的Statement
        stmt = prepareStatement(handler, ms.getStatementLog());
        // 由handler来执行jdbc的Statement
        return handler.query(stmt, resultHandler);  // ref-20
    } finally {
        closeStatement(stmt);
    }
}

private Statement prepareStatement(StatementHandler handler, Log statementLog) throws SQLException {
    Statement stmt;
    // 获取连接
    Connection connection = getConnection(statementLog);
    // 由handler准备jdbc的Statement
    stmt = handler.prepare(connection, transaction.getTimeout());
    handler.parameterize(stmt);
    return stmt;
}
ref-20处的代码昭示着快要和jdbc联系到一起了,我们尽一步分析handler是如何执行jdbc的Statement,详细代码如下:
// RoutingStatementHandler.java文件

@Override
public <E> List<E> query(Statement statement, ResultHandler resultHandler) throws SQLException {
    // 这个delegate是PreparedStatementHandler实例
    return delegate.query(statement, resultHandler);
}
// PreparedStatementHandler.java文件

@Override
public <E> List<E> query(Statement statement, ResultHandler resultHandler) throws SQLException {
    // 回到了jdbc,将statement强转成PreparedStatement
    PreparedStatement ps = (PreparedStatement) statement;
    // 执行jdbc的PreparedStatement
    ps.execute();
    // 调用结果集处理器处理结果
    return resultSetHandler.handleResultSets(ps); // ref-21
}
我们已经跟进到Mybatis使用jdbc执行SQL语句的部分了,基本的执行路径已经分析完了,最后再来看看ref-21处是如何对结果进行处理的:
// DefaultResultSetHandler.java文件

@Override
public List<Object> handleResultSets(Statement stmt) throws SQLException {
    ErrorContext.instance().activity("handling results").object(mappedStatement.getId());

    final List<Object> multipleResults = new ArrayList<>();

    int resultSetCount = 0;
    ResultSetWrapper rsw = getFirstResultSet(stmt);

    List<ResultMap> resultMaps = mappedStatement.getResultMaps();
    int resultMapCount = resultMaps.size();
    validateResultMapsCount(rsw, resultMapCount);
    while (rsw != null && resultMapCount > resultSetCount) {
        ResultMap resultMap = resultMaps.get(resultSetCount);
        handleResultSet(rsw, resultMap, multipleResults, null);
        rsw = getNextResultSet(stmt);
        cleanUpAfterHandlingResultSet();
        resultSetCount++;
    }

    String[] resultSets = mappedStatement.getResultSets();
    if (resultSets != null) {
        while (rsw != null && resultSetCount < resultSets.length) {
            ResultMapping parentMapping = nextResultMaps.get(resultSets[resultSetCount]);
            if (parentMapping != null) {
                String nestedResultMapId = parentMapping.getNestedResultMapId();
                ResultMap resultMap = configuration.getResultMap(nestedResultMapId);
                handleResultSet(rsw, resultMap, null, parentMapping);
            }
            rsw = getNextResultSet(stmt);
            cleanUpAfterHandlingResultSet();
            resultSetCount++;
        }
    }

    return collapseSingleResultList(multipleResults);
}
这个结果处理有点儿复杂,大概意思是将jdbc的返回结果封装为User对象的List,然后返回给上层。
四、Mybatis中责任链模式特殊的实现
最后我们来看一下ref-6处,Mybatis中责任链的实现。ref-6处代码逻辑如下:
// InterceptorChain.java文件

public class InterceptorChain {

    private final List<Interceptor> interceptors = new ArrayList<>();

    public Object pluginAll(Object target) {
        for (Interceptor interceptor : interceptors) {
            // 使用拦截器对target进行包装
            target = interceptor.plugin(target); // ref-22
        }
        return target;
    }

    public void addInterceptor(Interceptor interceptor) {
        interceptors.add(interceptor);
    }

    public List<Interceptor> getInterceptors() {
        return Collections.unmodifiableList(interceptors);
    }

}
ref-22处代码如下所示:
// org.apache.ibatis.plugin.Interceptor.java文件

public interface Interceptor {

  Object intercept(Invocation invocation) throws Throwable;

  default Object plugin(Object target) {
    return Plugin.wrap(target, this); // ref-23
  }

  default void setProperties(Properties properties) {
    // NOP
  }

}
ref-23处代码如下所示:
// org.apache.ibatis.plugin.Plugin.java文件

public class Plugin implements InvocationHandler {

    private final Object target;
    private final Interceptor interceptor;
    private final Map<Class<?>, Set<Method>> signatureMap;

    private Plugin(Object target, Interceptor interceptor, Map<Class<?>, Set<Method>> signatureMap) {
        this.target = target;
        this.interceptor = interceptor;
        this.signatureMap = signatureMap;
    }

    public static Object wrap(Object target, Interceptor interceptor) {
        Map<Class<?>, Set<Method>> signatureMap = getSignatureMap(interceptor);
        Class<?> type = target.getClass();
        Class<?>[] interfaces = getAllInterfaces(type, signatureMap);
        if (interfaces.length > 0) {
            // 使用jdk的动态代理对target对象进行包装
            return Proxy.newProxyInstance(
                type.getClassLoader(),
                interfaces,
                new Plugin(target, interceptor, signatureMap));
        }
        return target;
    }

    @Override
    public Object invoke(Object proxy, Method method, Object[] args) throws Throwable {
        try {
            Set<Method> methods = signatureMap.get(method.getDeclaringClass());
            if (methods != null && methods.contains(method)) {
                // 对方法调用进行拦截
                return interceptor.intercept(new Invocation(target, method, args));
            }
            return method.invoke(target, args);
        } catch (Exception e) {
            throw ExceptionUtil.unwrapThrowable(e);
        }
    }

    // ...... 省略其他部分

}
简单总结一下,Mybatis中利用jdk的动态代理对目标对象和拦截器进行一层套一层的封装,使得它们组成了一个链式结构。