stm32使用串口空闲中断+DMA接收不定长度数据
目录
1. 介绍
2. 代码
2.1 数组定义
2.2 初始化
2.3 发送函数
2.4 中断服务函数
3. 实现效果
4. 源码地址
1. 介绍
上篇文章中介绍了stm32使用串口空闲中断和接收中断实现接收不定长度数据的方式,这篇文章来介绍一下如何使用串口空闲中断和DMA实现接收不定长度数据。主要的实现方式是使用DMA将串口接收到的数据接收到一个接收数组中,通过空闲中断判断接收数据完成,然后将接收到的数据发送出去,另外需要说明的是发送过程未使用DMA,仅接收过程使用DMA。
程序源码在文章最后。
2. 代码
2.1 数组定义
#define     DATA_SIZE     256//接收数组长度;
uint8_t 	ReceiveData[DATA_SIZE];	//定义接收数组;

#define 	SIZE          512//发送数组长度;
uint8_t  	SendBuffer[SIZE];//定义发送数组;
2.2 初始化
void USART1_DMA_Config(void)//接收通道DMA初始化;
{
//	DMA_DeInit(DMA1_Channel5);
	DMA_InitTypeDef  DMA_InitStruct;
	RCC_AHBPeriphClockCmd(RCC_AHBPeriph_DMA1, ENABLE);

	DMA_InitStruct.DMA_PeripheralBaseAddr 	= (uint32_t)(USART1_BASE + 0x04);
	DMA_InitStruct.DMA_MemoryBaseAddr 		= (uint32_t)ReceiveData;
	DMA_InitStruct.DMA_DIR 					= DMA_DIR_PeripheralSRC; 			//传输方向;

	DMA_InitStruct.DMA_BufferSize 			= DATA_SIZE;
	DMA_InitStruct.DMA_PeripheralInc 		= DMA_PeripheralInc_Disable;
	DMA_InitStruct.DMA_MemoryInc			= DMA_MemoryInc_Enable;
	DMA_InitStruct.DMA_PeripheralDataSize 	= DMA_PeripheralDataSize_Byte;
	DMA_InitStruct.DMA_MemoryDataSize 		= DMA_MemoryDataSize_Byte;

	DMA_InitStruct.DMA_Mode 				= DMA_Mode_Normal;
	DMA_InitStruct.DMA_Priority 			= DMA_Priority_High;
	DMA_InitStruct.DMA_M2M 					= DMA_M2M_Disable;

	DMA_Init(DMA1_Channel5, &DMA_InitStruct);

	DMA_ClearFlag(DMA1_FLAG_TC5);
}

void NVIC_Configuration(void)//配置中断函数;
{
	NVIC_InitTypeDef NVIC_InitStructure;

	NVIC_PriorityGroupConfig(NVIC_PriorityGroup_2);

	NVIC_InitStructure.NVIC_IRQChannel = USART1_IRQn;
	NVIC_InitStructure.NVIC_IRQChannelPreemptionPriority = 1;
	NVIC_InitStructure.NVIC_IRQChannelSubPriority = 1;
	NVIC_InitStructure.NVIC_IRQChannelCmd = ENABLE;

	NVIC_Init(&NVIC_InitStructure);
}

void USART_Config(void)//串口初始化函数;
{
	USART_DeInit(USART1);
	GPIO_InitTypeDef 	GPIO_InitStructure;
	USART_InitTypeDef 	USART_InitStructure;

	RCC_APB2PeriphClockCmd(RCC_APB2Periph_GPIOA, ENABLE);

	RCC_APB2PeriphClockCmd(RCC_APB2Periph_USART1, ENABLE);

	GPIO_InitStructure.GPIO_Mode 	= GPIO_Mode_AF_PP;
	GPIO_InitStructure.GPIO_Pin  	= GPIO_Pin_9;
	GPIO_InitStructure.GPIO_Speed 	= GPIO_Speed_50MHz;
	GPIO_Init(GPIOA, &GPIO_InitStructure);

	GPIO_InitStructure.GPIO_Mode 	= GPIO_Mode_IN_FLOATING;
	GPIO_InitStructure.GPIO_Pin  	= GPIO_Pin_10;
	GPIO_InitStructure.GPIO_Speed 	= GPIO_Speed_50MHz;
	GPIO_Init(GPIOA, &GPIO_InitStructure);

	USART_InitStructure.USART_BaudRate  = 115200;//波特率115200;
	USART_InitStructure.USART_WordLength = USART_WordLength_8b;
	USART_InitStructure.USART_StopBits = USART_StopBits_1;
	USART_InitStructure.USART_Parity = USART_Parity_No;
	USART_InitStructure.USART_HardwareFlowControl = USART_HardwareFlowControl_None;
	USART_InitStructure.USART_Mode = USART_Mode_Rx | USART_Mode_Tx;

	USART_Init(USART1, &USART_InitStructure);

	NVIC_Configuration();

	USART_ITConfig(USART1, USART_IT_RXNE, ENABLE);//设置RXNE中断;
	USART_ITConfig(USART1, USART_IT_IDLE, ENABLE);//设置IDLE中断;

	USART_ClearFlag(USART1, USART_FLAG_IDLE | USART_FLAG_RXNE);//清除状态标志位;

	USART_Cmd(USART1, ENABLE);//使能串口;
}
2.3 发送函数
void Usart_SendBuffer(uint8_t * sendbuffer)//发送数组函数;
{
	uint16_t len = strlen((char *)sendbuffer);
	uint16_t i = 0;
	while(i < len)
	{
		USART_SendData(USART1, (uint8_t) sendbuffer[i]);
		while (USART_GetFlagStatus(USART1, USART_FLAG_TXE) == RESET);
		i++;
	}
}

void Usart_Printf(const char * format, ...)//发送数据函数;
{
	va_list args;
	va_start(args, format);
	vsnprintf((char *)SendBuffer,SIZE,format,args);
	va_end(args);
	Usart_SendBuffer(SendBuffer);
	memset(SendBuffer, 0, SIZE);
}
2.4 中断服务函数
void USART1_IRQHandler(void)//串口中断服务函数;
{
	if(USART_GetITStatus(USART1, USART_IT_IDLE) != RESET)//判断是否发生了空闲中断;
	{
		DMA_Cmd(DMA1_Channel5, DISABLE);

		//buffersize = (DATA_SIZE - DMA_GetCurrDataCounter(DMA1_Channel5));//获取接收数据的长度;

		Usart_Printf("%s\n", ReceiveData);//将接收到的数据发送出去;
		memset(ReceiveData, 0, DATA_SIZE);//将接收数组ReceiveBuffer清除;
		DMA_SetCurrDataCounter(DMA1_Channel5, DATA_SIZE);

//		DMA_ClearFlag(DMA1_FLAG_TC5);

		DMA_DeInit(DMA1_Channel5);//将DMA重新初始化;
		USART1_DMA_Config();
		USART_DMACmd(USART1, USART_DMAReq_Rx, ENABLE);
		DMA_Cmd(DMA1_Channel5, ENABLE);

		USART_ReceiveData(USART1);//清除空闲中断标志位;
		USART_ClearITPendingBit(USART1, USART_IT_IDLE);
	}
}
3. 实现效果
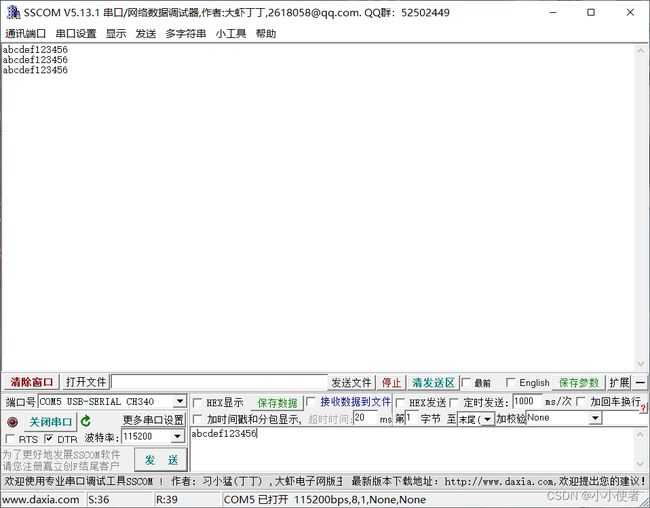
将程序下载到stm32单片机中,开发板使用的正点原子的stm32mini板,其他开发板需要适当修改代码,使用串口工具发送字符串,实现效果如下:
4. 源码地址
百度云盘地址:https://pan.baidu.com/s/1E3WbRpUQVL4NUfQSlLNAwQ?pwd=kvk6 提取码: kvk6
