在sae配置django项目
1:使用sae开发必须有sae帐号,自己注册吧;
2:在sae上新建立一个python项目;
3:建立完成之后新建一个版本,即版本1;
4:获取svn的地址在eclipse中check下来;
5:注意check过程中本地建立的项目名称要和sae中建立的应用名称相同;
6:注意在建立本地的django项目时不用勾选生成src目录;
7:check完成之后建立views.py文件并且编写:
from django.http import HttpResponse
def hello(request):
return HttpResponse("Hello, world! - Django")
8:配置config.yaml文件
libraries:
- name: "django"
version: "1.4"
9:创建文件index.wsgi,内容如下
import sys
import os.path
# manage.py is automatically created in each Django project. manage.py is a thin
# wrapper around django-admin.py that takes care of two things for you before
# delegating to django-admin.py:
#
# It puts your project's package on sys.path.
# It sets the DJANGO_SETTINGS_MODULE environment variable so that it points to
# your project's settings.py file.
#
# ref: https://docs.djangoproject.com/en/1.4/ref/django-admin/
os.environ['DJANGO_SETTINGS_MODULE'] = 'theonlyyou.settings'
sys.path.append(os.path.join(os.path.dirname(__file__), 'theonlyyou'))
import sae
import django.core.handlers.wsgi
application = sae.create_wsgi_app(django.core.handlers.wsgi.WSGIHandler())
10:Add “django.contrib.admin” to your INSTALLED_APPS setting.在setttings.py文件中打开注释即可;
11:编写urls.py文件
from django.conf.urls.defaults import *
# Uncomment the next two lines to enable the admin:
from django.contrib import admin
admin.autodiscover()
urlpatterns = patterns('',
# Example:
# (r'^mysite/', include('mysite.foo.urls')),
(r'^$', 'theonlyyou.views.hello'),
(r'^demo/$', 'theonlyyou.demo.views.showdemo'),
# Uncomment the admin/doc line below to enable admin documentation:
# (r'^admin/doc/', include('django.contrib.admindocs.urls')),
# Uncomment the next line to enable the admin:
(r'^admin/', include(admin.site.urls)),
)
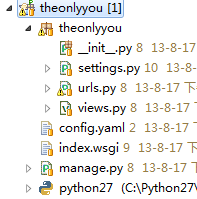
12:最后完成的项目目录如下图:

13:完成后提交代码
14:访问应用地址,显示结果:Hello, world! - Django