docker-centos中基于keepalived+niginx模拟主从热备完整过程
文章目录
- 一、环境准备
- 二、主机
-
- 1、环境搭建
-
- 1.1 镜像拉取
- 1.2 创建网桥
- 1.3 启动容器
- 1.4 配置镜像源
- 1.5 下载工具包
- 1.6 下载keepalived
- 1.7 下载nginx
- 2、配置
-
- 2.1 配置keepalived
- 2.2 配置nginx
-
- 2.2.1 查看nginx.conf
- 2.2.2 修改index.html
- 3、启动
-
- 3.1 启动nginx
- 3.2 启动keepalived
- 4、状态查看
- 4.1 查看nginx状态
-
- 4.2 查看keepalived状态
- 4、停止
-
- 4.1 停止nginx
- 4.2 停止keepalived
- 三、从机
-
- 1、方法一:重复主机步骤
-
- 1.1 将步骤 (1.2 创建网桥)改为如下:
- 1.2 将步骤2.1 配置keepalived内容改为如下
- 1.3 将步骤(2.2.2 修改index.html)修改网页内容(可选)
- 2、方法二:克隆主机虚拟机
-
- 2.1 克隆完成、启动虚拟机,修改网桥
-
- 2.1.1 创建网桥
- 2.1.2 启动容器连接到创建的网桥
- 2.2 修改keepalived的配置
- 四、路由
-
- 1、主机
-
- 1.1 网卡情况
- 1.2 查看路由
- 1.3 添加路由
- 1.4 最后路由表
- 2、从机
-
- 2.1 网卡情况
- 2.2 查看路由
- 2.3 添加路由
- 2.4 最后路由情况
- 3、宿主机(windows主机)
-
- 3.1 添加路由
一、环境准备
| 根据宿主机的系统选择安装docker 在Ubuntu中安装docker 在CentOS中安装docker |
二、主机
1、环境搭建
1.1 镜像拉取
docker pull centos
1.2 创建网桥
docker network create -d=bridge --subnet=192.168.99.0/24 br2
1.3 启动容器
docker run -it --name centos-1 --privileged -v /home/vac/linux:/mnt/software -p 9901:80 --net=br2 centos bash
1.4 配置镜像源
找到目录
cd /etc/yum.repos.d/
修改源
sed -i 's/mirrorlist/#mirrorlist/g' /etc/yum.repos.d/CentOS-*
修改url
sed -i 's|#baseurl=http://mirror.centos.org|baseurl=http://vault.centos.org|g' /etc/yum.repos.d/CentOS-*
更新一下(时间较长)
yum -y update
1.5 下载工具包
ifconfig、route命令使用的net-tools工具包
yum -y install net-tools
vim编辑器
yum -y install vim
1.6 下载keepalived
yum -y install keepalived
1.7 下载nginx
yum -y install nginx
2、配置
2.1 配置keepalived
编辑keepalived.conf文件
vim /etc/keepalived/keepalived.conf
输入以下内容
! Configuration File for keepalived

global_defs {
   #路由id:当前安装keepalived节点主机的标识符,全局唯一
   router_id keep_150
}

vrrp_instance VI_1 {
    # 表示的状态,当前的130服务器为nginx的主节点,MASTER/BACKUP
    state MASTER
    # 当前实例绑定的网卡
    interface eth0
    # 保证主备节点一致
    virtual_router_id 51
    # 优先级/权重,谁的优先级高,在MASTER挂掉以后,就能成为MASTER
    priority 100
    # 主备之间同步检查的时间间隔,默认1s
    advert_int 1
    # 认证授权的密码,防止非法节点的进入
    authentication {
        auth_type PASS
        auth_pass 1111
    }
    virtual_ipaddress {
        192.168.200.17
    }
}
2.2 配置nginx
2.2.1 查看nginx.conf
vim /etc/nginx/nginx.conf
内容如下
# For more information on configuration, see:
#   * Official English Documentation: http://nginx.org/en/docs/
#   * Official Russian Documentation: http://nginx.org/ru/docs/

user nginx;
worker_processes auto;
error_log /var/log/nginx/error.log;
pid /run/nginx.pid;

# Load dynamic modules. See /usr/share/doc/nginx/README.dynamic.
include /usr/share/nginx/modules/*.conf;

events {
    worker_connections 1024;
}

http {
    log_format  main  '$remote_addr - $remote_user [$time_local] "$request" '
                      '$status $body_bytes_sent "$http_referer" '
                      '"$http_user_agent" "$http_x_forwarded_for"';

    access_log  /var/log/nginx/access.log  main;

    sendfile            on;
    tcp_nopush          on;
    tcp_nodelay         on;
    keepalive_timeout   65;
    types_hash_max_size 2048;

    include             /etc/nginx/mime.types;
    default_type        application/octet-stream;

    # Load modular configuration files from the /etc/nginx/conf.d directory.
    # See http://nginx.org/en/docs/ngx_core_module.html#include
    # for more information.
    include /etc/nginx/conf.d/*.conf;

    server {
        listen       80 default_server;
        listen       [::]:80 default_server;
        server_name  _;
        root         /usr/share/nginx/html;

        # Load configuration files for the default server block.
        include /etc/nginx/default.d/*.conf;

        location / {
        }

        error_page 404 /404.html;
            location = /40x.html {
        }

        error_page 500 502 503 504 /50x.html;
            location = /50x.html {
        }
    }

# Settings for a TLS enabled server.
#
#    server {
#        listen       443 ssl http2 default_server;
#        listen       [::]:443 ssl http2 default_server;
#        server_name  _;
#        root         /usr/share/nginx/html;
#
#        ssl_certificate "/etc/pki/nginx/server.crt";
#        ssl_certificate_key "/etc/pki/nginx/private/server.key";
2.2.2 修改index.html
vim /usr/share/nginx/html/index.html
输入以下内容
DOCTYPE html PUBLIC "-//W3C//DTD XHTML 1.1//EN" "http://www.w3.org/TR/xhtml11/DTD/xhtml11.dtd">

<html xmlns="http://www.w3.org/1999/xhtml" xml:lang="en">
    <head>
        <title>Test Page for the Nginx HTTP Server on Red Hat Enterprise Linuxtitle>
        <meta http-equiv="Content-Type" content="text/html; charset=UTF-8" />
        <style type="text/css">
            /**/
            body {
                background-color: #fff;
                color: #000;
                font-size: 0.9em;
                font-family: sans-serif,helvetica;
                margin: 0;
                padding: 0;
            }
            :link {
                color: #c00;
            }
            :visited {
                color: #c00;
            }
            a:hover {
                color: #f50;
            }
            h1 {
                text-align: center;
                margin: 0;
                padding: 0.6em 2em 0.4em;
                background-color: #900;
                color: #fff;
                font-weight: normal;
                font-size: 1.75em;
                border-bottom: 2px solid #000;
            }
            h1 strong {
                font-weight: bold;
                font-size: 1.5em;
            }
            h2 {
                text-align: center;
                background-color: #900;
                font-size: 1.1em;
                font-weight: bold;
                color: #fff;
                margin: 0;
                padding: 0.5em;
                border-bottom: 2px solid #000;
            }
            hr {
                display: none;
            }
            .content {
                padding: 1em 5em;
            }
            .alert {
                border: 2px solid #000;
            }

            img {
                border: 2px solid #fff;
                padding: 2px;
                margin: 2px;
            }
            a:hover img {
                border: 2px solid #294172;
            }
            .logos {
                margin: 1em;
                text-align: center;
            }
            /*]]>*/
        style>
    head>

    <body>
        <h1>Welcome to <strong>nginxstrong> on Red Hat Enterprise Linux!(Master)h1>
        <h1>192.168.99.2h1>
        <div class="content">
            <p>This page is used to test the proper operation of the
            <strong>nginxstrong> HTTP server after it has been
            installed. If you can read this page, it means that the
            web server installed at this site is working
            properly.p>

            <div class="alert">
                <h2>Website Administratorh2>
                <div class="content">
                    <p>This is the default <tt>index.htmltt> page that
                    is distributed with <strong>nginxstrong> on
                    Red Hat Enterprise Linux.  It is located in
                    <tt>/usr/share/nginx/htmltt>.p>

                    <p>You should now put your content in a location of
                    your choice and edit the <tt>roottt> configuration
                    directive in the <strong>nginxstrong>
                    configuration file
                    <tt>/etc/nginx/nginx.conftt>.p>

                    <p>For information on Red Hat Enterprise Linux, please visit the <a href="http://www.redhat.com/">Red Hat, Inc. websitea>. The documentation for Red Hat Enterprise Linux is <a href="http://www.redhat.com/docs/manuals/enterprise/">available on the Red Hat, Inc. websitea>.p>

                div>
            div>

            <div class="logos">
                <a href="http://nginx.net/"><img
                    src="nginx-logo.png"
                    alt="[ Powered by nginx ]"
                    width="121" height="32" />a>
                <a href="http://www.redhat.com/"><img
                    src="poweredby.png"
                    alt="[ Powered by Red Hat Enterprise Linux ]"
                    width="88" height="31" />a>
            div>
        div>
    body>
html>
3、启动
3.1 启动nginx
nginx
3.2 启动keepalived
keepalived -l -f /etc/keepalived/keepalived.conf
4、状态查看
4.1 查看nginx状态
ps -ef|grep nginx
打印返回
root          43       1  0 08:40 ?        00:00:00 nginx: master process nginx
nginx         44      43  0 08:40 ?        00:00:00 nginx: worker process
nginx         45      43  0 08:40 ?        00:00:00 nginx: worker process
nginx         46      43  0 08:40 ?        00:00:00 nginx: worker process
nginx         47      43  0 08:40 ?        00:00:00 nginx: worker process
root          57      19  0 08:49 pts/1    00:00:00 grep --color=auto nginx
4.2 查看keepalived状态
查看进程
ps -ef|grep keepalived
打印返回
root          62       1  2 08:51 ?        00:00:00 keepalived -l -f /etc/keepalived/keepalived.conf
root          63      62  4 08:51 ?        00:00:00 keepalived -l -f /etc/keepalived/keepalived.conf
root          67      19  0 08:51 pts/1    00:00:00 grep --color=auto keepalived
查看vip挂载情况
ip a
打印返回
1: lo: <LOOPBACK,UP,LOWER_UP> mtu 65536 qdisc noqueue state UNKNOWN group default qlen 1000
    link/loopback 00:00:00:00:00:00 brd 00:00:00:00:00:00
    inet 127.0.0.1/8 scope host lo
       valid_lft forever preferred_lft forever
26: eth0@if27: <BROADCAST,MULTICAST,UP,LOWER_UP> mtu 1500 qdisc noqueue state UP group default
    link/ether 02:42:c0:a8:63:02 brd ff:ff:ff:ff:ff:ff link-netnsid 0
    inet 192.168.99.2/24 brd 192.168.99.255 scope global eth0
       valid_lft forever preferred_lft forever
    inet 192.168.200.17/32 scope global eth0
       valid_lft forever preferred_lft forever
4、停止
4.1 停止nginx
nginx -s stop
4.2 停止keepalived
pkill keepalived
三、从机
1、方法一:重复主机步骤
1.1 将步骤 (1.2 创建网桥)改为如下:
docker network create -d=bridge --subnet=192.168.111.0/24 br2
1.2 将步骤2.1 配置keepalived内容改为如下
! Configuration File for keepalived

global_defs {
   #路由id:当前安装keepalived节点主机的标识符,全局唯一
   router_id keep_151
}

vrrp_instance VI_1 {
    # 表示的状态,当前的130服务器为nginx的主节点,MASTER/BACKUP
    state BACKUP
    # 当前实例绑定的网卡
    interface eth0
    # 保证主备节点一致
    virtual_router_id 51
    # 优先级/权重,谁的优先级高,在MASTER挂掉以后,就能成为MASTER
    priority 60
    # 主备之间同步检查的时间间隔,默认1s
    advert_int 1
    # 认证授权的密码,防止非法节点的进入
    authentication {
        auth_type PASS
        auth_pass 1111
    }
    virtual_ipaddress {
        192.168.200.17
    }
}
1.3 将步骤(2.2.2 修改index.html)修改网页内容(可选)
DOCTYPE html PUBLIC "-//W3C//DTD XHTML 1.1//EN" "http://www.w3.org/TR/xhtml11/DTD/xhtml11.dtd">

<html xmlns="http://www.w3.org/1999/xhtml" xml:lang="en">
    <head>
        <title>Test Page for the Nginx HTTP Server on Red Hat Enterprise Linuxtitle>
        <meta http-equiv="Content-Type" content="text/html; charset=UTF-8" />
        <style type="text/css">
            /**/
            body {
                background-color: #fff;
                color: #000;
                font-size: 0.9em;
                font-family: sans-serif,helvetica;
                margin: 0;
                padding: 0;
            }
            :link {
                color: #c00;
            }
            :visited {
                color: #c00;
            }
            a:hover {
                color: #f50;
            }
            h1 {
                text-align: center;
                margin: 0;
                padding: 0.6em 2em 0.4em;
                background-color: #900;
                color: #fff;
                font-weight: normal;
                font-size: 1.75em;
                border-bottom: 2px solid #000;
            }
            h1 strong {
                font-weight: bold;
                font-size: 1.5em;
            }
            h2 {
                text-align: center;
                background-color: #900;
                font-size: 1.1em;
                font-weight: bold;
                color: #fff;
                margin: 0;
                padding: 0.5em;
                border-bottom: 2px solid #000;
            }
            hr {
                display: none;
            }
            .content {
                padding: 1em 5em;
            }
            .alert {
                border: 2px solid #000;
            }

            img {
                border: 2px solid #fff;
                padding: 2px;
                margin: 2px;
            }
            a:hover img {
                border: 2px solid #294172;
            }
            .logos {
                margin: 1em;
                text-align: center;
            }
            /*]]>*/
        style>
    head>

    <body>
        <h1>Welcome to <strong>nginxstrong> on Red Hat Enterprise Linux!(Master)h1>
        <h1>192.168.111.2h1>
        <div class="content">
            <p>This page is used to test the proper operation of the
            <strong>nginxstrong> HTTP server after it has been
            installed. If you can read this page, it means that the
            web server installed at this site is working
            properly.p>

            <div class="alert">
                <h2>Website Administratorh2>
                <div class="content">
                    <p>This is the default <tt>index.htmltt> page that
                    is distributed with <strong>nginxstrong> on
                    Red Hat Enterprise Linux.  It is located in
                    <tt>/usr/share/nginx/htmltt>.p>

                    <p>You should now put your content in a location of
                    your choice and edit the <tt>roottt> configuration
                    directive in the <strong>nginxstrong>
                    configuration file
                    <tt>/etc/nginx/nginx.conftt>.p>

                    <p>For information on Red Hat Enterprise Linux, please visit the <a href="http://www.redhat.com/">Red Hat, Inc. websitea>. The documentation for Red Hat Enterprise Linux is <a href="http://www.redhat.com/docs/manuals/enterprise/">available on the Red Hat, Inc. websitea>.p>

                div>
            div>

            <div class="logos">
                <a href="http://nginx.net/"><img
                    src="nginx-logo.png"
                    alt="[ Powered by nginx ]"
                    width="121" height="32" />a>
                <a href="http://www.redhat.com/"><img
                    src="poweredby.png"
                    alt="[ Powered by Red Hat Enterprise Linux ]"
                    width="88" height="31" />a>
            div>
        div>
    body>
html>
2、方法二:克隆主机虚拟机
2.1 克隆完成、启动虚拟机,修改网桥
2.1.1 创建网桥
docker network create -d=bridge --subnet=192.168.111.0/24 br0
2.1.2 启动容器连接到创建的网桥
docker run -it --name centos-1 --privileged -v /home/vac/linux:/mnt/software -p 9901:80 --network=br0 centos bash
2.2 修改keepalived的配置
输入命令
vim /etc/keepalived/keepalived.conf
修改内容如下:
! Configuration File for keepalived

global_defs {
   #路由id:当前安装keepalived节点主机的标识符,全局唯一
   router_id keep_151
}

vrrp_instance VI_1 {
    # 表示的状态,当前的130服务器为nginx的主节点,MASTER/BACKUP
    state BACKUP
    # 当前实例绑定的网卡
    interface eth0
    # 保证主备节点一致
    virtual_router_id 51
    # 优先级/权重,谁的优先级高,在MASTER挂掉以后,就能成为MASTER
    priority 60
    # 主备之间同步检查的时间间隔,默认1s
    advert_int 1
    # 认证授权的密码,防止非法节点的进入
    authentication {
        auth_type PASS
        auth_pass 1111
    }
    virtual_ipaddress {
        192.168.200.17
    }
}
四、路由
具体路由情况示意图
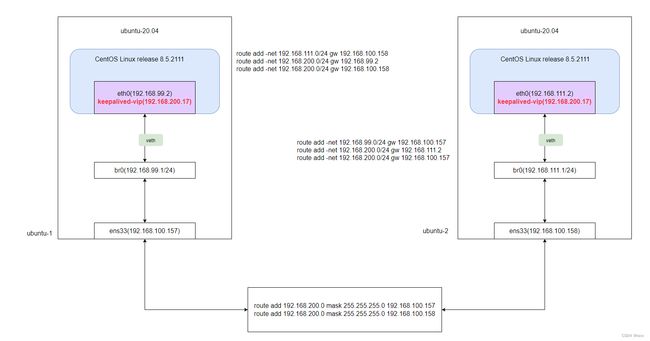
1、主机
1.1 网卡情况
输入命令
ifconfig
打印返回
br-4bd1ee90e211: flags=4163<UP,BROADCAST,RUNNING,MULTICAST>  mtu 1500
        inet 192.168.99.1  netmask 255.255.255.0  broadcast 192.168.99.255
        inet6 fe80::42:29ff:fee8:aade  prefixlen 64  scopeid 0x20<link>
        ether 02:42:29:e8:aa:de  txqueuelen 0  (Ethernet)
        RX packets 51808  bytes 3263249 (3.2 MB)
        RX errors 0  dropped 0  overruns 0  frame 0
        TX packets 71190  bytes 130020293 (130.0 MB)
        TX errors 0  dropped 0 overruns 0  carrier 0  collisions 0

docker0: flags=4099<UP,BROADCAST,MULTICAST>  mtu 1500
        inet 172.17.0.1  netmask 255.255.0.0  broadcast 172.17.255.255
        inet6 fe80::42:65ff:fe2d:ef09  prefixlen 64  scopeid 0x20<link>
        ether 02:42:65:2d:ef:09  txqueuelen 0  (Ethernet)
        RX packets 4  bytes 224 (224.0 B)
        RX errors 0  dropped 0  overruns 0  frame 0
        TX packets 228  bytes 23485 (23.4 KB)
        TX errors 0  dropped 0 overruns 0  carrier 0  collisions 0

ens33: flags=4163<UP,BROADCAST,RUNNING,MULTICAST>  mtu 1500
        inet 192.168.100.157  netmask 255.255.255.0  broadcast 192.168.100.255
        inet6 fe80::f040:fdbe:78e1:5077  prefixlen 64  scopeid 0x20<link>
        ether 00:0c:29:b6:5d:6c  txqueuelen 1000  (Ethernet)
        RX packets 4329116  bytes 940869997 (940.8 MB)
        RX errors 0  dropped 345204  overruns 0  frame 0
        TX packets 284583  bytes 29536782 (29.5 MB)
        TX errors 0  dropped 0 overruns 0  carrier 0  collisions 0

lo: flags=73<UP,LOOPBACK,RUNNING>  mtu 65536
        inet 127.0.0.1  netmask 255.0.0.0
        inet6 ::1  prefixlen 128  scopeid 0x10<host>
        loop  txqueuelen 1000  (Local Loopback)
        RX packets 26728  bytes 3141066 (3.1 MB)
        RX errors 0  dropped 0  overruns 0  frame 0
        TX packets 26728  bytes 3141066 (3.1 MB)
        TX errors 0  dropped 0 overruns 0  carrier 0  collisions 0

vethd5c0922: flags=4163<UP,BROADCAST,RUNNING,MULTICAST>  mtu 1500
        inet6 fe80::a075:3cff:fe3c:d62  prefixlen 64  scopeid 0x20<link>
        ether a2:75:3c:3c:0d:62  txqueuelen 0  (Ethernet)
        RX packets 385  bytes 20670 (20.6 KB)
        RX errors 0  dropped 0  overruns 0  frame 0
        TX packets 1841  bytes 83533 (83.5 KB)
        TX errors 0  dropped 0 overruns 0  carrier 0  collisions 0
1.2 查看路由
输入命令
route -n
打印返回
Kernel IP routing table
Destination     Gateway         Genmask         Flags Metric Ref    Use Iface
0.0.0.0         192.168.100.1   0.0.0.0         UG    100    0        0 ens33
169.254.0.0     0.0.0.0         255.255.0.0     U     1000   0        0 ens33
172.17.0.0      0.0.0.0         255.255.0.0     U     0      0        0 docker0
192.168.99.0    0.0.0.0         255.255.255.0   U     0      0        0 br-4bd1ee90e211
192.168.100.0   0.0.0.0         255.255.255.0   U     100    0        0 ens33
1.3 添加路由
主机到从机的路由
route add -net 192.168.111.0/24 gw 192.168.100.158
主机到vip的路由
route add -net 192.168.200.0/24 gw 192.168.99.2
vip到从机的路由
route add -net 192.168.200.0/24 gw 192.168.100.158
1.4 最后路由表
输入命令
route -n
打印返回
Kernel IP routing table
Destination     Gateway         Genmask         Flags Metric Ref    Use Iface
0.0.0.0         192.168.100.1   0.0.0.0         UG    100    0        0 ens33
169.254.0.0     0.0.0.0         255.255.0.0     U     1000   0        0 ens33
172.17.0.0      0.0.0.0         255.255.0.0     U     0      0        0 docker0
192.168.99.0    0.0.0.0         255.255.255.0   U     0      0        0 br-4bd1ee90e211
192.168.100.0   0.0.0.0         255.255.255.0   U     100    0        0 ens33
192.168.111.0   192.168.100.158 255.255.255.0   UG    0      0        0 ens33
192.168.200.0   192.168.99.2    255.255.255.0   UG    0      0        0 br-4bd1ee90e211
192.168.200.0   192.168.100.158 255.255.255.0   UG    0      0        0 ens33
2、从机
2.1 网卡情况
输入命令
ip a
打印返回
br-feca604495c7: flags=4099<UP,BROADCAST,MULTICAST>  mtu 1500
        inet 192.168.111.1  netmask 255.255.255.0  broadcast 192.168.111.255
        inet6 fe80::42:7ff:fe57:5d4d  prefixlen 64  scopeid 0x20<link>
        ether 02:42:07:57:5d:4d  txqueuelen 0  (Ethernet)
        RX packets 86544  bytes 7152949 (7.1 MB)
        RX errors 0  dropped 0  overruns 0  frame 0
        TX packets 92024  bytes 132312772 (132.3 MB)
        TX errors 0  dropped 0 overruns 0  carrier 0  collisions 0

docker0: flags=4099<UP,BROADCAST,MULTICAST>  mtu 1500
        inet 172.17.0.1  netmask 255.255.0.0  broadcast 172.17.255.255
        inet6 fe80::42:69ff:fe89:fc8c  prefixlen 64  scopeid 0x20<link>
        ether 02:42:69:89:fc:8c  txqueuelen 0  (Ethernet)
        RX packets 4358  bytes 264361 (264.3 KB)
        RX errors 0  dropped 0  overruns 0  frame 0
        TX packets 8778  bytes 19961998 (19.9 MB)
        TX errors 0  dropped 0 overruns 0  carrier 0  collisions 0

ens33: flags=4163<UP,BROADCAST,RUNNING,MULTICAST>  mtu 1500
        inet 192.168.100.158  netmask 255.255.255.0  broadcast 192.168.100.255
        inet6 fe80::5d22:1c65:d887:63e6  prefixlen 64  scopeid 0x20<link>
        ether 00:0c:29:6a:2e:27  txqueuelen 1000  (Ethernet)
        RX packets 4140156  bytes 766431979 (766.4 MB)
        RX errors 0  dropped 342651  overruns 0  frame 0
        TX packets 212125  bytes 22585816 (22.5 MB)
        TX errors 0  dropped 0 overruns 0  carrier 0  collisions 0

lo: flags=73<UP,LOOPBACK,RUNNING>  mtu 65536
        inet 127.0.0.1  netmask 255.0.0.0
        inet6 ::1  prefixlen 128  scopeid 0x10<host>
        loop  txqueuelen 1000  (Local Loopback)
        RX packets 47516  bytes 4932330 (4.9 MB)
        RX errors 0  dropped 0  overruns 0  frame 0
        TX packets 47516  bytes 4932330 (4.9 MB)
        TX errors 0  dropped 0 overruns 0  carrier 0  collisions 0

vethbe7b7fe: flags=4163<UP,BROADCAST,RUNNING,MULTICAST>  mtu 1500
        inet6 fe80::18e7:2fff:fea9:3b8e  prefixlen 64  scopeid 0x20<link>
        ether 1a:e7:2f:a9:3b:8e  txqueuelen 0  (Ethernet)
        RX packets 271733  bytes 15045369 (15.0 MB)
        RX errors 0  dropped 0  overruns 0  frame 0
        TX packets 43223  bytes 2358797 (2.3 MB)
        TX errors 0  dropped 0 overruns 0  carrier 0  collisions 0
2.2 查看路由
输入命令
route -n
打印返回
Kernel IP routing table
Destination     Gateway         Genmask         Flags Metric Ref    Use Iface
0.0.0.0         192.168.100.1   0.0.0.0         UG    100    0        0 ens33
169.254.0.0     0.0.0.0         255.255.0.0     U     1000   0        0 ens33
172.17.0.0      0.0.0.0         255.255.0.0     U     0      0        0 docker0
192.168.100.0   0.0.0.0         255.255.255.0   U     100    0        0 ens33
192.168.111.0   0.0.0.0         255.255.255.0   U     0      0        0 br-feca604495c7
2.3 添加路由
从机到主机的路由
route add -net 192.168.99.0/24 gw 192.168.100.157
从机到vip的路由
route add -net 192.168.200.0/24 gw 192.168.111.2
vip到主机的路由
route add -net 192.168.200.0/24 gw 192.168.100.157
2.4 最后路由情况
route -n
Kernel IP routing table
Destination     Gateway         Genmask         Flags Metric Ref    Use Iface
0.0.0.0         192.168.100.1   0.0.0.0         UG    100    0        0 ens33
169.254.0.0     0.0.0.0         255.255.0.0     U     1000   0        0 ens33
172.17.0.0      0.0.0.0         255.255.0.0     U     0      0        0 docker0
192.168.99.0    192.168.100.157 255.255.255.0   UG    0      0        0 ens33
192.168.100.0   0.0.0.0         255.255.255.0   U     100    0        0 ens33
192.168.111.0   0.0.0.0         255.255.255.0   U     0      0        0 br-feca604495c7
192.168.200.0   192.168.111.2   255.255.255.0   UG    0      0        0 br-feca604495c7
192.168.200.0   192.168.100.157 255.255.255.0   UG    0      0        0 ens33
3、宿主机(windows主机)
3.1 添加路由
vip到主机
route add 192.168.200.0 mask 255.255.255.0 192.168.100.157
vip到从机
route add 192.168.200.0 mask 255.255.255.0 192.168.100.158