Three.js+pcl.js 实现Web端的点云处理+显示
1 功能实现
在前面我们实现了PCD的加载器的基础上,这次将加上 pcl.js —— 著名的PCL库的web版本,详情见https://pcl.js.org/,来处理我们加载上去的点云。
具体实现如下:
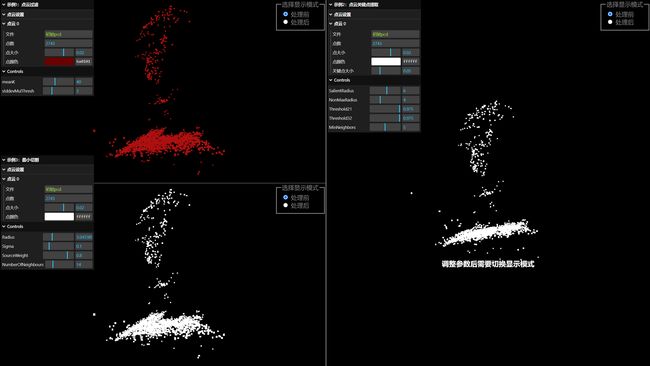
用户可以通过每个板块的右上角进行处理前 / 后的切换,还可以通过一些参数调控pcl算法(注意:调完参数后需要切换显示模式才能生效)
- 点云过滤示例1:
- 主要功能:通过统计离群值移除算法,用户可以调整参数
meanK和stddevMulThresh查看过滤效果。
- 主要功能:通过统计离群值移除算法,用户可以调整参数
- 点云关键点提取示例2:
- 主要功能:应用 ISS(Intrinsic Shape Signatures) 算法进行关键点提取,用户可以调整参数
SalientRadius、NonMaxRadius、Threshold21、Threshold32和MinNeighbors查看效果。
- 主要功能:应用 ISS(Intrinsic Shape Signatures) 算法进行关键点提取,用户可以调整参数
- 最小切割示例3:
- 主要功能:通过最小切割算法,用户可以调整参数
Radius、Sigma、SourceWeight和NumberOfNeighbours查看效果。
- 主要功能:通过最小切割算法,用户可以调整参数
2 具体实现
本项目是基于 Three.js 和 pcl.js 实现的简单一个Web应用程序,用于可视化三维点云数据并且处理三维点云。
使用 VSCode 的 Live Serve 搭建网络编程的环境,采用CDN的方式引入 Three.js (版本:r158) 和 pcl.js(版本:1.16.0)
2.1 html
HTML 代码定义了一个基本网页,用于使用三个不同的JS文件处理点云数据:
PCLFilter.jsPCLKeyPoints.jsPCLCutter.js
结构:
-
页面包含一个分为三个面板的容器
-
每个面板都有一个用于选择“原始”和“过滤”点云数据显示的单选按钮组
通过 radio 按钮选择不同的显示模式,可以查看原始点云数据或经过处理后的点云数据。
-
每个面板还有一个引用特定
.js文件的脚本标签 -
使用 flex 布局来布局三个面板,使页面分为左上,左下,右,三个板块
DOCTYPE html>
<html>

<head>
	<meta charset="utf-8">
	<title>PCD visulizetitle>
	<style>
		body {
			margin: 0;
			padding: 0;
			overflow: hidden;
		}
	style>
head>

<body style="color: rgb(131, 131, 131);">
	<script type="importmap">
		{
		  "imports": {
			"three": "https://cdn.jsdelivr.net/npm/[email protected]/build/three.module.js",
			"three/addons/": "https://cdn.jsdelivr.net/npm/[email protected]/examples/jsm/"
		  }
		}
	script>
	<div class="container">
		<div class="panel panel1" id="Panel1"
			style="position: relative;height: calc(50vh - 2px);width: 50vw;border-bottom: #ccc 2px solid;border-right: #ccc 2px solid">
			<fieldset style="position: absolute; right: 0; top: 0;">
				<legend>选择显示模式legend>
				<div>
					<input type="radio" id="original1" name="display1" value="original1" checked />
					<label for="original1">处理前label>
				div>
				<div>
					<input type="radio" id="filtered1" name="display1" value="filtered1" />
					<label for="filtered1">处理后label>
				div>
			fieldset>

			<script type="module" src="js/PCLFilter.js"> script>
		div>
		<div class="panel panel2" id="Panel2"
			style="position: absolute;right: 0;top: 0;height: 100vh;width: calc(50vw - 4px);">
			<fieldset style="position: absolute; right: 0; top: 0;">
				<legend>选择显示模式legend>
				<div>
					<input type="radio" id="original2" name="display2" value="original2" checked />
					<label for="original2">处理前label>
				div>
				<div>
					<input type="radio" id="filtered2" name="display2" value="filtered2" />
					<label for="filtered2">处理后label>
				div>
			fieldset>

			<script type="module" src="js/PCLKeyPoints.js"> script>
		div>
		<div class="panel panel3" id="Panel3"
			style="position: relative;height: 50vh;width: 50vw;border-right: #ccc 2px solid">
			<fieldset style="position: absolute; right: 0; top: 0;">
				<legend>选择显示模式legend>
				<div>
					<input type="radio" id="original3" name="display3" value="original3" checked />
					<label for="original3">处理前label>
				div>
				<div>
					<input type="radio" id="filtered3" name="display3" value="filtered3" />
					<label for="filtered3">处理后label>
				div>
			fieldset>

			<script type="module" src="js/PCLCutter.js"> script>
		div>

	div>
	<style>
		.container {
			/* display: grid; */
			/* grid-template-columns: 1fr 1fr;
			grid-template-rows: 1fr 1fr; */
			height: 100vh;
		}

		.panel {
			flex: 1 0 50%;
			border: 1px solid #ccc;
			display: flex;
			justify-content: center;
			align-items: center;
		}

		#panel2 {
			height: 100vh;
		}
	style>
body>
html>
2.2 js
该项目中有三个类似的JS文件,每个都大同小异,只是使用了不同的PCL功能罢了,我将主要详细讲解其中一个的全流程
2.2.1 PCLFilter.js
实现点云过滤处理
1. 引入库
通过 import 方式引入了 pcl.js 和 three.js 库,以及一些 three.js 相关的模块。
import * as PCL from "https://cdn.jsdelivr.net/npm/[email protected]/dist/pcl.esm.js";
import * as THREE from 'three';
import { OrbitControls } from 'three/addons/controls/OrbitControls.js';
import { PCDLoader } from 'three/addons/loaders/PCDLoader.js';
import { GUI } from 'three/addons/libs/lil-gui.module.min.js';
2. three.js 初始化
three.js 的经典三大件,初始化了 OrbitControls 使我们可以用鼠标控制点云,还创建了一个GUI
const container = document.getElementById('Panel1');
// 创建场景、相机、渲染器
const scene = new THREE.Scene();
const camera = new THREE.PerspectiveCamera(80, container.offsetWidth / container.offsetHeight, 0.01, 10000000);
camera.position.set(0, 0, 1.5);
const renderer = new THREE.WebGLRenderer();
renderer.setSize(container.offsetWidth, container.offsetHeight);
container.appendChild(renderer.domElement);
// 创建控制器
const controls = new OrbitControls(camera, renderer.domElement);

var gui = new GUI();
gui.title('示例1:点云过滤');
var attributesFolder = gui.addFolder('点云设置');
gui.domElement.style.left = '0.1%';
gui.domElement.style.position = 'absolute';
3. 加载点云数据执行滤波
- 异步加载点云数据: 通过
fetch函数异步获取点云数据,将数据转换为ArrayBuffer;使用PCL.init初始化 pcl.js 库,指定 wasm 文件的路径;再使用PCL.loadPCDData函数加载点云数据 - 创建 StatisticalOutlierRemoval 滤波器: 使用
new PCL.StatisticalOutlierRemoval()创建统计离群值滤波器;使用sor.setMeanK和sor.setStddevMulThresh设置滤波器的参数;再使用sor.filter()对点云进行滤波 - 保存滤波后和原始点云的数据: 使用
PCL.savePCDDataASCII将滤波后和原始点云的数据保存为 ASCII 格式 - 绑定事件: 调用
bindEvent()函数,用于处理滤波后数据
let cloud;                // 存储点云数据
let cloudOriginalData;    // 存储原始点云数据
let cloudFilteredData;    // 存储滤波后的点云数据

async function main() {
    // 异步获取点云数据
    const cloudBuffer = await fetch("./images/point_cloud.pcd").then((res) =>
        res.arrayBuffer()
    );

    // 初始化 pcl.js 库
    await PCL.init({
        url: `https://cdn.jsdelivr.net/npm/pcl.js/dist/pcl-core.wasm`
    });

    // 加载点云数据
    cloud = PCL.loadPCDData(cloudBuffer, PCL.PointXYZ);

    // 创建 StatisticalOutlierRemoval 滤波器
    const sor = new PCL.StatisticalOutlierRemoval();
    sor.setInputCloud(cloud);
    sor.setMeanK(40);
    sor.setStddevMulThresh(3.0);

    // 对点云进行滤波
    const cloudFiltered = sor.filter();

    // 保存滤波后和原始点云的数据(ASCII格式)
    cloudFilteredData = PCL.savePCDDataASCII(cloudFiltered);
    cloudOriginalData = PCL.savePCDDataASCII(cloud);

    // 绑定事件
    bindEvent();
}

// 调用 main 函数
main();
4. 显示切换
-
bindEvent切换函数
为页面上的两个单选按钮添加 “change” 事件监听器,实现用户选择显示原始点云或滤波后点云的功能
function bindEvent() { // 初始显示原始点云 showPointCloud(cloudOriginalData); // 获取两个单选按钮元素 const radioOriginal = document.getElementById("original1"); const radioFiltered = document.getElementById("filtered1"); // 为两个单选按钮添加 "change" 事件监听器 [radioOriginal, radioFiltered].forEach((el) => { el.addEventListener("change", (e) => { const mode = e.target.id; // 获取选中按钮的 id reset(); // 重置 GUI // 根据选中的按钮 id,显示相应的点云数据 switch (mode) { case "original1": showPointCloud(cloudOriginalData); break; case "filtered1": showPointCloud(cloudFilteredData); break; } }); }); } -
GUI重置函数
- 删除之前的 GUI:使用
gui.destroy()方法删除之前的 GUI 实例。 - 创建新的 GUI 实例:创建一个新的 GUI 实例,并进行一些设置,如添加标题、文件夹等。
- 删除之前的点云:通过
scene.remove(scene.children[0])删除之前的点云对象。
function reset() { // 删除之前的 GUI gui.destroy(); // 创建一个新的 GUI 实例 gui = new GUI(); // gui.add(isRotation, 'bool').name('旋转'); gui.title('点云过滤'); attributesFolder = gui.addFolder('点云设置'); gui.domElement.style.left = '0.1%'; gui.domElement.style.position = 'absolute'; // 删除之前的点云 scene.remove(scene.children[0]); } - 删除之前的 GUI:使用
5. 点云显示
- 将PCL的点云的数据(ASCII格式),转换为URL以便 three.js 的PCD加载
- 将 ArrayBuffer 转换为字符串: 使用
TextDecoder将输入的ArrayBuffer数据解码为字符串。 - 从字符串创建 Blob: 使用
Blob构造函数将字符串数据转换为Blob对象,设置 MIME 类型为 ‘text/plain’。 - 从 Blob 创建 URL: 使用
URL.createObjectURL创建一个包含Blob数据的 URL,用于加载点云模型。
- 将 ArrayBuffer 转换为字符串: 使用
- three.js 的点云加载显示
- 加载点云模型:使用点云加载器的
load方法加载点云模型。在加载完成后,调用回调函数,其中points包含了点云的几何信息。 - 几何变换:对点云的几何进行居中和绕 X 轴旋转。
- 创建点云材质:使用
THREE.PointsMaterial创建点云的材质,设置颜色、点大小等属性。 - 根据点云数据设置颜色:根据当前点云是原始数据还是滤波后的数据,设置点云的颜色。
- 创建点云对象:使用
THREE.Points创建点云对象,将其添加到场景中。 - 在 GUI 中添加点云相关设置:使用
attributesFolder.addFolder创建一个 GUI 文件夹,添加文件名、点数、点大小、点颜色等设置。
- 加载点云模型:使用点云加载器的
function showPointCloud(currentPointCloud) {
    // 将 ArrayBuffer 转换为字符串
    const decoder = new TextDecoder('utf-8');
    const pcdString = decoder.decode(new Uint8Array(currentPointCloud));

    // 从字符串创建 Blob
    const blob = new Blob([pcdString], { type: 'text/plain' });

    // 从 Blob 创建 URL
    const url = URL.createObjectURL(blob);

    // 创建点云加载器
    const loader = new PCDLoader();

    // 加载点云模型
    loader.load(url, function (points) {
        // 将点云几何居中
        points.geometry.center();
        points.geometry.rotateX(Math.PI);

        // 创建点云材质
        const material = new THREE.PointsMaterial({ color: 0xffffff, size: 0.02, vertexColors: false });

        // 根据当前点云是原始数据还是滤波后的数据设置点云颜色
        if (currentPointCloud == cloudOriginalData) {
            material.color.setHex(0xad1010); // 设置为红色
        } else {
            material.color.setHex(0x1ea10c); // 设置为绿色
        }

        // 创建点云对象
        const pointCloud = new THREE.Points(points.geometry, material);
        scene.add(pointCloud);

        // 在 GUI 中添加点云相关设置
        const folder = attributesFolder.addFolder(`点云 0`);
        const text = { pointsNum: points.geometry.attributes.position.count, file: "初始pcd" };
        folder.add(text, 'file').name('文件');
        folder.add(text, 'pointsNum').name('点数');
        folder.add(material, 'size', 0.001, 0.03).name('点大小');
        folder.addColor(material, 'color').name('点颜色');
    });
}
6. 参数调整更新
-
创建和配置 GUI
- 创建 GUI 实例:使用
GUI类创建了一个 GUI 实例。 - 设置 GUI 样式:通过
domElement对象的样式属性设置 GUI 的位置和样式。
var plcgui = new GUI(); plcgui.domElement.style.left = '0.1%'; plcgui.domElement.style.top = '175px'; plcgui.domElement.style.position = 'absolute';- 定义参数对象
params:包含两个属性meanK和stddevMulThresh,分别表示均值的 K 值和标准差的倍数阈值。 - 使用
plcgui.add添加控件:将参数添加到 GUI 中,并使用onChange事件指定在值变化时调用filterPointCloud函数。 - 设置控件的范围和名称:对
meanK设置范围为 1 到 100,对stddevMulThresh设置范围为 0.1 到 10,并为每个控件指定名称。
const params = { meanK: 40, stddevMulThresh: 3.0 }; plcgui.add(params, 'meanK', 1, 100).name('meanK').onChange(filterPointCloud); plcgui.add(params, 'stddevMulThresh', 0.1, 10).name('stddevMulThresh').onChange(filterPointCloud); - 创建 GUI 实例:使用
-
过滤点云函数
与之前的初始滤波的操作一致
async function filterPointCloud() {
    const cloudBuffer = await fetch("./images/point_cloud.pcd").then((res) =>
        res.arrayBuffer()
    );
    cloud = PCL.loadPCDData(cloudBuffer, PCL.PointXYZ);
    const sor = new PCL.StatisticalOutlierRemoval();
    sor.setInputCloud(cloud);
    sor.setMeanK(params.meanK);
    sor.setStddevMulThresh(params.stddevMulThresh);
    const cloudFiltered = sor.filter();

    cloudFilteredData = PCL.savePCDDataASCII(cloudFiltered);
    cloudOriginalData = PCL.savePCDDataASCII(cloud);
}
7. 渲染循环
function animate() {
    requestAnimationFrame(animate);

    // 渲染场景
    renderer.render(scene, camera);
}

animate();
2.2.2 PCLKeyPoints.js
实现点云关键点提取操作
大致内容与 PCLFilter.js 相似,这里只对关键差异之处进行描述
1. 关键点提取
- 计算点云分辨率: 使用
PCL.computeCloudResolution计算点云的分辨率。 - 创建 Kd 树和 ISS 关键点提取器: 使用
PCL.SearchKdTree创建 Kd 树,使用PCL.ISSKeypoint3D创建 ISS 关键点提取器。 - 设置参数: 设置 ISS 关键点提取器的各项参数,如搜索半径、非极大值抑制半径、阈值等。
- 计算关键点: 使用
compute方法计算关键点,并将结果保存在keypoints中。
注意:此处是将结果(关键点)保存到了
keypoints当中
let cloud;
let keypoints;

async function main() {
    const cloudBuffer = await fetch("./images/point_cloud.pcd").then((res) =>
        res.arrayBuffer()
    );

    await PCL.init({
        url: `https://cdn.jsdelivr.net/npm/pcl.js/dist/pcl-core.wasm`
    });

    cloud = PCL.loadPCDData(cloudBuffer, PCL.PointXYZ);
    const resolution = PCL.computeCloudResolution(cloud);
    const tree = new PCL.SearchKdTree();
    const iss = new PCL.ISSKeypoint3D();
    keypoints = new PCL.PointCloud();
    iss.setSearchMethod(tree);
    iss.setSalientRadius(6 * resolution);
    iss.setNonMaxRadius(4 * resolution);
    iss.setThreshold21(0.975);
    iss.setThreshold32(0.975);
    iss.setMinNeighbors(5);
    iss.setInputCloud(cloud);
    iss.compute(keypoints);

    cloudOriginalData = PCL.savePCDDataASCII(cloud);

    bindEvent();
}
2. 关键点显示
在 bindEvent() 函数中设置显示 false/true 来控制显示关键点
function bindEvent() {
...
    switch (mode) {
        case "original2":
            showPointCloud(false);
            break;
        case "filtered2":
            showPointCloud(true);
            break;
...
}
- 展示关键点:如果
showKeypoints为真,将关键点的坐标添加到pos数组中,并创建关键点的BufferGeometry和PointsMaterial。 - 创建点云对象:创建点云的
BufferGeometry和PointsMaterial。 - 组合点云和关键点:将点云和关键点组合到一个
THREE.Group中。 - 调整位置:通过计算包围盒中心,调整组的位置,使其居中。
- GUI 设置:在 GUI 中添加点云和关键点的相关设置,如文件名、点数、点大小、颜色等。
function showPointCloud(showKeypoints) {
...
    const pos = [];

    // 如果需要展示关键点
    if (showKeypoints) {
        for (let i = 0; i < keypoints.points.size; ++i) {
            const point = keypoints.points.get(i);
            pos.push(point.x, point.y, point.z);
        }
    }

    // 创建关键点 PointsMaterial
    const geometry = new THREE.BufferGeometry();
    geometry.setAttribute('position', new THREE.Float32BufferAttribute(pos, 3));
    const keypointsMaterial = new THREE.PointsMaterial({ size: 0.05, color: 0xff0000 });
    const keypointsMesh = new THREE.Points(geometry, keypointsMaterial);

    // 创建点云的 PointsMaterial
    const material = new THREE.PointsMaterial({ color: 0xffffff, size: 0.02, vertexColors: false });
    const pointCloud = new THREE.Points(points.geometry, material);

    // 创建一个组,将点云和关键点添加到组中
    const group = new THREE.Group();
    group.add(pointCloud);
    group.add(keypointsMesh);

    // 调整组的旋转,使其在显示时朝上
    group.rotation.set(Math.PI, 0, 0);

    // 计算组的包围盒
    const boundingBox = new THREE.Box3();
    boundingBox.setFromObject(group);

    // 获取包围盒中心
    const center = new THREE.Vector3();
    boundingBox.getCenter(center);

    // 计算平移向量,使组居中
    const translation = new THREE.Vector3();
    translation.subVectors(new THREE.Vector3(0, 0, 0), center);
    group.position.add(translation);

    // 将组添加到场景中
    scene.add(group);

    ...
    // 在GUI中添加关键点大小的调整
    folder.add(keypointsMaterial, 'size', 0.03, 0.1).name('关键点大小');
...
}
2.2.3 PCLCutter.js
实现点云最小切割操作
大致内容与 PCLFilter.js 相似,这里只对关键差异之处进行描述
1. 最小切割
- 创建对象中心和前景点云: 创建一个表示对象中心的
PCL.PointXYZ实例,并创建一个前景点云foregroundPoints,将对象中心添加到其中。 - 创建 MinCutSegmentation 分割器: 使用
PCL.MinCutSegmentation创建点云分割器。 - 设置分割器参数: 设置分割器的参数,包括前景点云、输入点云、半径、标准差、源权重和邻居数量等。
- 执行分割: 执行分割操作。
- 获取着色的点云: 使用
getColoredCloud方法获取切割部分着色的点云数据,并保存到cloudFilteredData中。
async function main() {
    const cloudBuffer = await fetch("./images/point_cloud.pcd").then((res) =>
        res.arrayBuffer()
    );

    await PCL.init({
        url: `https://cdn.jsdelivr.net/npm/pcl.js/dist/pcl-core.wasm`
    });

    cloud = PCL.loadPCDData(cloudBuffer, PCL.PointXYZ);

    const objectCenter = new PCL.PointXYZ(2, 0, 0);
    const foregroundPoints = new PCL.PointCloud();
    foregroundPoints.addPoint(objectCenter);

    const seg = new PCL.MinCutSegmentation();
    seg.setForegroundPoints(foregroundPoints);
    seg.setInputCloud(cloud);
    seg.setRadius(3.0433856);
    seg.setSigma(0.1);
    seg.setSourceWeight(0.8);
    seg.setNumberOfNeighbours(14);
    seg.extract();
    const coloredCloud = seg.getColoredCloud();

    cloudFilteredData = PCL.savePCDDataASCII(coloredCloud);
    cloudOriginalData = PCL.savePCDDataASCII(cloud);

    bindEvent();
}
2. 最小切割显示
在 showPointCloud 函数中通过设置是否显示点云的顶点颜色来显示切割部分
let showVertColor = false;
// 当前是切割后的点云就显示点云颜色
if (currentPointCloud != cloudOriginalData) {
    showVertColor = true;
}

// 创建点云材质
const material = new THREE.PointsMaterial({ color: 0xffffff, size: 0.02, vertexColors: showVertColor });
3 源码
源码见 Github : 图像与动画实验