hue的安装和hadoop集群整合
一、 Hue概述
HUE(Hadoop User Experience)是一个开源的Apache Hadoop UI系统,由Cloudera Desktop演化而来,最后Cloudera公司将其贡献给Apache基金会的Hadoop社区,它是基于Python Web框架Django实现的。
通过使用Hue我们可以在浏览器端的Web控制台上与Hadoop集群进行交互来分析处理数据,例如操作HDFS上的数据,运行MapReduce Job,执行Hive的SQL语句,浏览HBase数据库等等。
二、 环境准备
Jdk1.8
Root用户启动hdfs、yarn
正常连接外网
hue源码包
下载地址:http://archive.cloudera.com/cdh5/cdh/5/hue-3.9.0-cdh5.5.4.tar.gz
maven环境
https://archive.apache.org/dist/maven/maven-3/3.3.9/binaries/
下载apache-maven-3.3.9-bin.tar.gz
三、maven安装
(1) 上传到software并解压
[root@hadoop003 software]# tar -zxvf apache-maven-3.3.9-bin.tar.gz -C /opt/module/
(2) 配置环境变量
[root@hadoop003 apache-maven-3.3.9]# vi /etc/profile
在最后一行添加
#MAVEN_HOME
export MAVEN_HOME=/opt/module/apache-maven-3.3.9/
export PATH=$PATH:$MAVEN_HOME/bin
(3) 验证安装成功
重新加载环境变量,并验证maven是否安装成功
[root@hadoop003 apache-maven-3.3.9]# source /etc/profile
[root@hadoop003 apache-maven-3.3.9]# mvn -version
(4) 修改maven的本地仓库位置
root@hadoop003 apache-maven-3.3.9]# mkdir repo
[root@hadoop003 apache-maven-3.3.9]# cd repo/
[root@hadoop003 repo]# pwd
/opt/module/apache-maven-3.3.9/repo
[root@hadoop003 apache-maven-3.3.9]# vim conf/settings.xml
修改前:

修改后:

(5) 添加国内镜像下载点,加快下载速度,
在mirrors标签里添加
<mirror>
        <id>nexus-aliyun</id>
        <mirrorOf>*</mirrorOf>
        <name>Nexus aliyun</name>
        <url>http://maven.aliyun.com/nexus/content/groups/public</url>
</mirror>
四、 安装hue
1、 上传并解压hue
[root@hadoop003 software]# tar -zxvf hue-3.9.0-cdh5.5.4.tar.gz -C /opt/module/
2、 安装编译hue用到的依赖
yum install -y gcc gcc-c++ libxml2-devel libxslt-devel cyrus-sasl-devel cyrus-sasl-gssapi python-devel python-setuptools python-simplejson sqlite-devel ant libsasl2-dev libsasl2-modules-gssapi-mit libkrb5-dev libtidy-0.99-0 openldap-devel libldap2-dev openldap-devel krb5-devel gmp-devel openssl-devel
在此过程中,会安装过时的jdk,后续在编译完成hue之后,需要我们手动将这些jdk卸载掉
因为之前安装过mysql,其版本是5.6.24。直接采用yum安装的的mysql-devel的版本不符,因此,单独安装。
单独上传安装mysql-devel,MySQL-shared
[root@hadoop003 hue-3.9.0-cdh5.5.4]# rpm -ivh /opt/software/MySQL-devel-5.6.24-1.el6.x86_64.rpm
[root@hadoop003 hue-3.9.0-cdh5.5.4]# rpm -ivh /opt/software/MySQL-shared-5.6.24-1.el6.x86_64.rpm
3、 添加hue用户
因为hue的默认用户不是使用root用户,所以需要增加hue用户,用hue用户来编译和运行
useradd hue
passwd hue 密码统一设置为hadoop
[root@hadoop003 module]# chown -R hue:hue hue-3.9.0-cdh5.5.4/
切换为hue用户
[root@hadoop003 module]# su - hue
4、 编译hue
[hue@hadoop003 hue-3.9.0-cdh5.5.4]# make apps

四、 Hue基本配置和集成
注意hue的配置全部采用hue用户来完成。
1、 Hue的基本配置
- 配置hue.ini
[hue@hadoop003 hue-3.9.0-cdh5.5.4]# pwd
/opt/module/hue-3.9.0-cdh5.5.4
[hue@hadoop003 hue-3.9.0-cdh5.5.4]# vim desktop/conf/hue.ini
# Set this to a random string, the longer the better.
# This is used for secure hashing in the session store.
secret_key=jFE93j;2[290-eiw.KEiwN2s3['d;/.q[eIW^y#e=+Iei*@Mn
# Execute this script to produce the Django secret key. This will be used when
# secret_key is not set.
## secret_key_script=
# Webserver listens on this address and port
http_host=hadoop003
http_port=8888
# Time zone name
time_zone=Asia/Shanghai
-
修改权限和启动服务
请检查desktop目录下的desktop.db文件和desktop/conf目录下的hue.ini文件是否为hue用户组的hue用户,如果不是,请修改。
用root用户执行 chown hue:hue /opt/module/hue-3.9.0-cdh5.5.4/desktop/desktop.db
用root用户执行 chown hue:hue /opt/module/hue-3.9.0-cdh5.5.4/desktop/conf/hue.ini
#修改desktop目录下的desktop.pb目录的权限
用root用户执行 chmod o+w /opt/module/hue-3.9.0-cdh5.5.4/desktop/desktop.db
#在build目录下启动hue服务
用hue用户启动 build/env/bin/supervisor -
查看Hue的WEB界面
访问地址:http://hadoop003:8888
第一次访问,会让创建一个用户,这个用户是hue软件的超级用户,拥有的权限比较多 创建一个hue用户密码是hadoop。
登录成功后即可进入hue主页面:


2、 Hue和HDFS集成
- 修改HDFS的2个配置文件
切换到root用户,用root用户身份修改
修改core-site.xml配置文件
该配置文件路径:/opt/module/hadoop-2.7.2/etc/hadoop
在该文件中添加如下内容:
<!--开启添加hue用户和用户组的信息-->
<property>
  <name>hadoop.proxyuser.hue.hosts</name>
  <value>*</value>
</property>
<property>
  <name>hadoop.proxyuser.hue.groups</name>
  <value>*</value>
</property>
修改hdfs-site.xml配置文件
该配置文件路径:/opt/module/hadoop-2.7.2/etc/hadoop
在该文件中添加如下内容:
<!--开启webhdfs-->
<property>
    <name>dfs.webhdfs.enabled</name>
<value>true</value>
</property>
将修改的配置文件分发到其他节点
[root@hadoop003 module]# scp /opt/module/hadoop-2.7.2/etc/hadoop/core-site.xml hadoop004:/opt/module/hadoop-2.7.2/etc/hadoop/
[root@hadoop003 module]# scp /opt/module/hadoop-2.7.2/etc/hadoop/core-site.xml hadoop005:/opt/module/hadoop-2.7.2/etc/hadoop/
[root@hadoop003 module]# scp /opt/module/hadoop-2.7.2/etc/hadoop/hdfs-site.xml hadoop004:/opt/module/hadoop-2.7.2/etc/hadoop/
[root@hadoop003 module]# scp /opt/module/hadoop-2.7.2/etc/hadoop/hdfs-site.xml hadoop005:/opt/module/hadoop-2.7.2/etc/hadoop/
重启hdfs和yarn
[root@hadoop003 hadoop-2.7.2]# sbin/stop-dfs.sh
[root@hadoop003 hadoop-2.7.2]# sbin/start-dfs.sh
[root@hadoop004 hadoop-2.7.2]# sbin/stop-yarn.sh
[root@hadoop004 hadoop-2.7.2]# sbin/start-yarn.sh
2) 配置hue.ini
cd /opt/module/hue-3.9.0-cdh5.5.4/desktop/conf
切换到hue用户
在[[hdfs_clusters]]标签下进行hdfs的配置:
[[hdfs_clusters]]
# HA support by using HttpFs
[[[default]]]
# Enter the filesystem uri
fs_defaultfs=hdfs://hadoop003:9000
# NameNode logical name.
## logical_name=
# Use WebHdfs/HttpFs as the communication mechanism.
# Domain should be the NameNode or HttpFs host.
# Default port is 14000 for HttpFs.
## webhdfs_url=http://localhost:50070/webhdfs/v1
webhdfs_url=http://hadoop003:50070/webhdfs/v1
# Change this if your HDFS cluster is Kerberos-secured
## security_enabled=false
# In secure mode (HTTPS), if SSL certificates from YARN Rest APIs
# have to be verified against certificate authority
## ssl_cert_ca_verify=True
# Directory of the Hadoop configuration
## hadoop_conf_dir=$HADOOP_CONF_DIR when set or ‘/etc/hadoop/conf’
hadoop_conf_dir=/opt/module/hadoop-2.7.2/etc/hadoop hadoop_hdfs_home=/opt/module/hadoop-2.7.2 hadoop_bin=/opt/module/hadoop-2.7.2/bin
[hue@hadoop003 hue-3.9.0-cdh5.5.4]$ vim /opt/module/hue-3.9.0-cdh5.5.4/desktop/libs/hadoop/src/hadoop/fs/webhdfs.py
将此处改为root

- 重启hue并验证
注意:如果所在路径下无法创建文件

切换root用户,给该目录加可写权限
hadoop fs -chmod o+w 目录
接下来,再进行创建,发现创建成功。
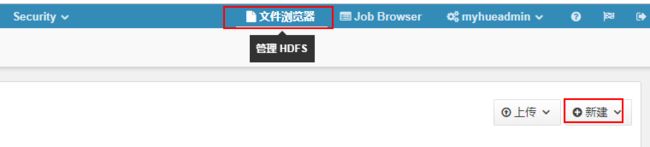
在hue的web界面管理HDFS
在该界面里可以正常查看HDFS的文件夹和文件。
3、 Hue和YARN集成
-
配置hue.ini
在[[yarn_clusters]]标签下进行yarn的配置:
[[yarn_clusters]][[[default]]]
# Enter the host on which you are running the ResourceManager
resourcemanager_host=hadoop004# The port where the ResourceManager IPC listens on
resourcemanager_port=8032# Whether to submit jobs to this cluster
submit_to=True# Resource Manager logical name (required for HA)
## logical_name=# Change this if your YARN cluster is Kerberos-secured
## security_enabled=false# URL of the ResourceManager API
resourcemanager_api_url=http://hadoop004:8088# URL of the ProxyServer API
proxy_api_url=http://hadoop004:8088# URL of the HistoryServer API
history_server_api_url=http://hadoop005:19888 -
重启hue并验证
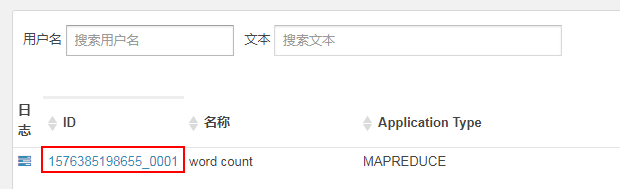
执行wordcount案例
[root@hadoop003 hadoop-2.7.2]# hadoop jar share/hadoop/mapreduce/hadoop-mapreduce-examples-2.7.2.jar wordcount /test/wcinput /test/wcoutput
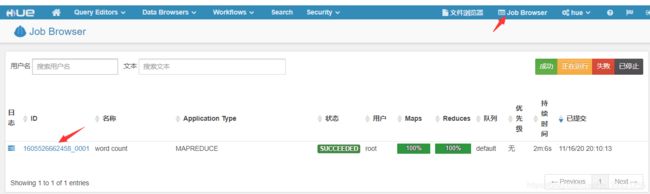
查看日志,若无法查看,需要配置日志服务器,再重新执行mr程序
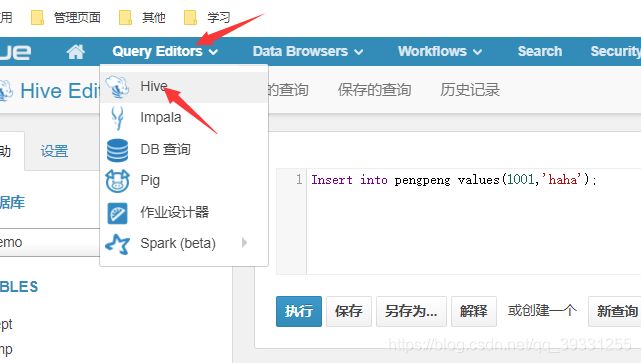
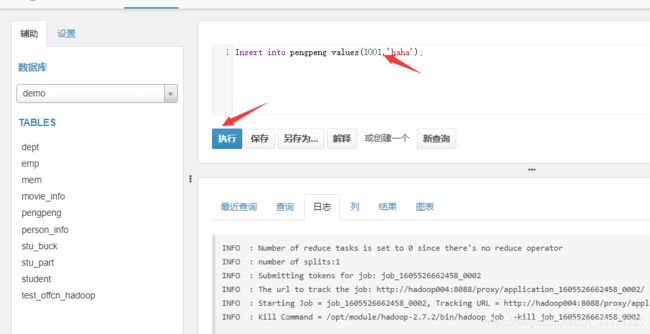
4、 Hue和Hive集成
- 配置hue.ini
在[beeswax]标签下进行Hive的配置:
[beeswax]
# Host where HiveServer2 is running.
# If Kerberos security is enabled, use fully-qualified domain name (FQDN).
hive_server_host=hadoop003
# Port where HiveServer2 Thrift server runs on.
hive_server_port=10000
# Hive configuration directory, where hive-site.xml is located
hive_conf_dir=/opt/module/hive/conf
hive_home_dir=/opt/module/hive
# Timeout in seconds for thrift calls to Hive service
- 修改tmp权限
因为hive服务的根文件保存在hdfs的/tmp目录下,而该目录只有root的执行权限,但hue是使用hue用户启动的,使用需要将/tmp目录修改成hue用户可以执行的权限。
hdfs dfs -chmod -R 777 /tmp - 启动hive服务
因为hive依赖mysql,注意也要开启mysql - 重启hue并验证
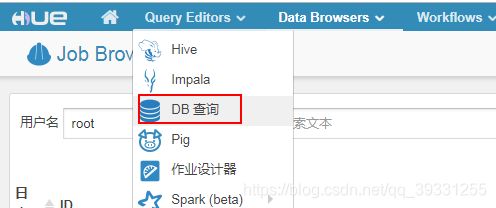
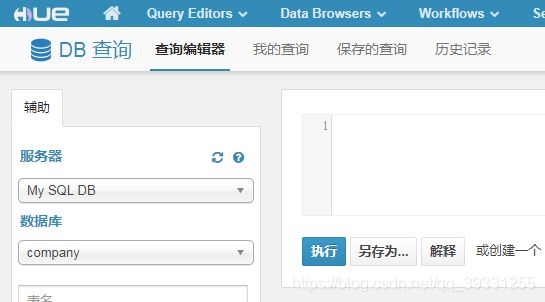
5、 Hue和MySQL集成
-
配置hue.ini
在hue.ini配置文件的[[databases]]标签下修改MySQL的配置
# mysql, oracle, or postgresql configuration.
[[[mysql]]]
# Name to show in the UI.
nice_name="My SQL DB"# For MySQL and PostgreSQL, name is the name of the database.
# For Oracle, Name is instance of the Oracle server. For express edition
# this is ‘xe’ by default.
## name=mysql# Database backend to use. This can be:
# 1. mysql
# 2. postgresql
# 3. oracle
engine=mysql# IP or hostname of the database to connect to.
host=hadoop003# Port the database server is listening to. Defaults are:
# 1. MySQL: 3306
# 2. PostgreSQL: 5432
# 3. Oracle Express Edition: 1521
port=3306
# Username to authenticate with when connecting to the database.
user=root
# Password matching the username to authenticate with when
# connecting to the database.
password=000000 -
重启hue并验证
重新启动hue,即可在hue的web界面进行MySQL数据库的操作。
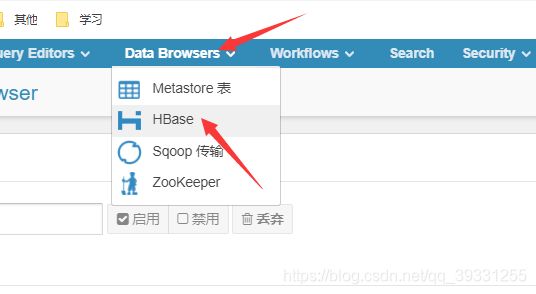
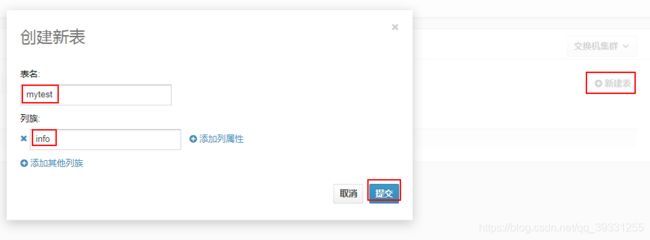
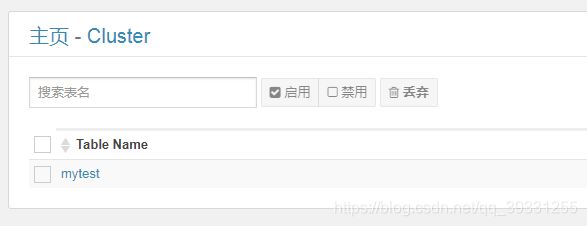
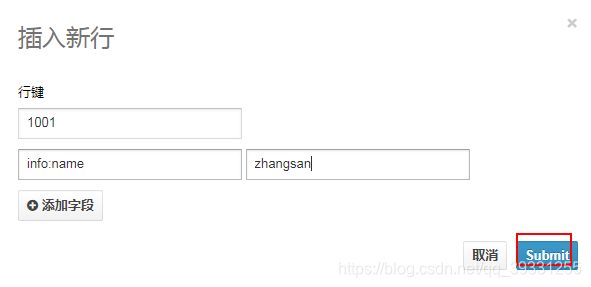
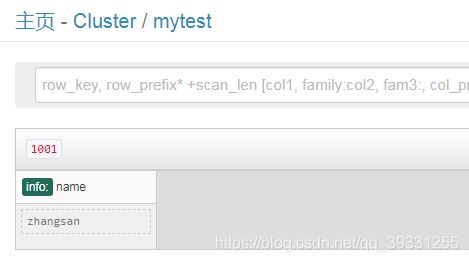
6、 Hue和HBase集成
- 配置hue.ini
在hue.ini配置文件的[[hbase]]标签下修改。
[hbase]
# Comma-separated list of HBase Thrift servers for clusters in the format of ‘(name|host:port)’.
# Use full hostname with security.
# If using Kerberos we assume GSSAPI SASL, not PLAIN.
hbase_clusters=(Cluster|hadoop003:9090)
# HBase configuration directory, where hbase-site.xml is located.
hbase_conf_dir=/opt/module/hbase-1.3.1/conf
-
启动HBase的thriftserver服务
在hadoop003机器启动
bin/hbase-daemon.sh start thrift
启动hbase服务
bin/start-hbase.sh -
重启hue并验证
7、 Hue与oozie集成
- 配置hue.ini
[liboozie]
# The URL where the Oozie service runs on. This is required in order for
# users to submit jobs. Empty value disables the config check.
oozie_url=http://hadoop003:11000/oozie
# Requires FQDN in oozie_url if enabled
## security_enabled=false
# Location on HDFS where the workflows/coordinator are deployed when submitted.
remote_deployement_dir=/user/oozie/oozie-apps
###########################################################################
# Settings to configure the Oozie app
###########################################################################
[oozie]
# Location on local FS where the examples are stored.
## local_data_dir=…/examples
local_data_dir=/opt/module/oozie-4.0.0/examples
# Location on local FS where the data for the examples is stored.
sample_data_dir=/opt/module/oozie-4.0.0/examples
# Location on HDFS where the oozie examples and workflows are stored.
remote_data_dir=/user/oozie/oozie-apps
# Maximum of Oozie workflows or coodinators to retrieve in one API call.
## oozie_jobs_count=50
# Use Cron format for defining the frequency of a Coordinator instead of the old frequency number/unit.
enable_cron_scheduling=true
2) 重启hue,查看oozie

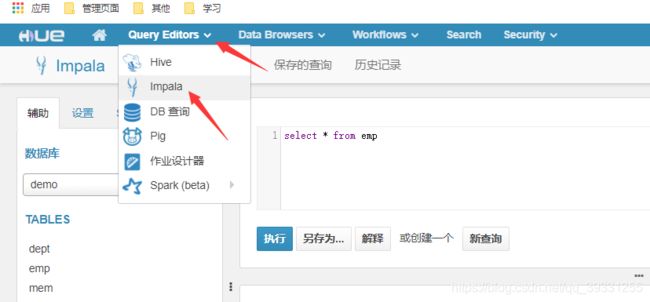
8、 Hue与impala集成
修改 Hue.ini
[impala]
server_host=hadoop004
server_port=21050
impala_conf_dir=/etc/impala/conf
9、 注意 要卸载多余的jdk
[root@hadoop003 module]# rpm -qa|grep java
tzdata-java-2020a-1.el6.noarch
java-1.7.0-openjdk-devel-1.7.0.261-2.6.22.1.el6_10.x86_64
java-1.5.0-gcj-1.5.0.0-29.1.el6.x86_64
java-1.7.0-openjdk-1.7.0.261-2.6.22.1.el6_10.x86_64
java_cup-0.10k-5.el6.x86_64
[root@hadoop003 module]# rpm -e --nodeps tzdata-java-2020a-1.el6.noarch
[root@hadoop003 module]#
[root@hadoop003 module]# rpm -e --nodeps java-1.7.0-openjdk-devel-1.7.0.261-2.6.22.1.el6_10.x86_64
[root@hadoop003 module]#
[root@hadoop003 module]#
[root@hadoop003 module]# rpm -e --nodeps java-1.5.0-gcj-1.5.0.0-29.1.el6.x86_64
[root@hadoop003 module]#
[root@hadoop003 module]# rpm -e --nodeps java-1.7.0-openjdk-1.7.0.261-2.6.22.1.el6_10.x86_64
[root@hadoop003 module]#
[root@hadoop003 module]# rpm -e --nodeps java_cup-0.10k-5.el6.x86_64
[root@hadoop003 module]# java -version
-bash: /usr/bin/java: 没有那个文件或目录
[root@hadoop003 module]#
[root@hadoop003 module]# source /etc/profile
[root@hadoop003 module]#
[root@hadoop003 module]#
[root@hadoop003 module]# java -version
java version “1.8.0_144”
Java™ SE Runtime Environment (build 1.8.0_144-b01)
Java HotSpot™ 64-Bit Server VM (build 25.144-b01, mixed mode)