SpringBoot Starter机制(自定义Start案例,实际开发场景中的短信模拟,AOP实现日志打印)

前言:
在我们上一篇博客中,实现Freemarke的增删改查,今天分享的是关于SpringBoot Starter机制--
1.SpringBoot Starter
1.1.什么是SpringBoot Starter
SpringBoot中的starter是一种非常重要的机制(自动化配置),能够抛弃以前繁杂的配置,将其统一集成进starter,应用者只需要在maven中引入starter依赖,SpringBoot就能自动扫描到要加载的信息并启动相应的默认配置。starter让我们摆脱了各种依赖库的处理,需要配置各种信息的困扰。
SpringBoot会自动通过classpath路径下的类发现需要的Bean,并注册进IOC容器。SpringBoot提供了针对日常企业应用研发各种场景的spring-boot-starter依赖模块。
所有这些依赖模块都遵循着约定成俗的默认配置,并允许我们调整这些配置,即遵循“约定大于配置”的理念。
1.2.为什么要使用SpringBoot Starter
在我们的日常开发工作中,经常会有一些独立于业务之外的配置模块,我们经常将其放到一个特定的包下,然后如果另一个工程需要复用这块功能的时候,需要将代码硬拷贝到另一个工程,重新集成一遍,麻烦至极。如果我们将这些可独立于业务代码之外的功能配置模块封装成一个个starter,复用的时候只需要将其在pom中引用依赖即可, SpringBoot为我们完成自动装配,简直不要太爽。
1.3.应用场景
在我们的日常开发工作中,可能会需要开发一个通用模块,以供其它工程复用。SpringBoot就为我们提供这样的功能机制,我们可以把我们的通用模块封装成一个个starter,这样其它工程复用的时候只需要在pom中引用依赖即可,由SpringBoot为我们完成自动装配。
常见应用场景:
(1)通用模块-短信发送模块(今天案例就以模拟短信发送模块)
(2)基于AOP技术实现日志切面
(3)分布式雪花ID,Long转String,解决精度问题
(4)微服务项目的数据库连接池配置
(5)微服务项目的每个模块都要访问redis数据库,每个模块都要配置redisTemplate
2.综合案例(短信发送模块)

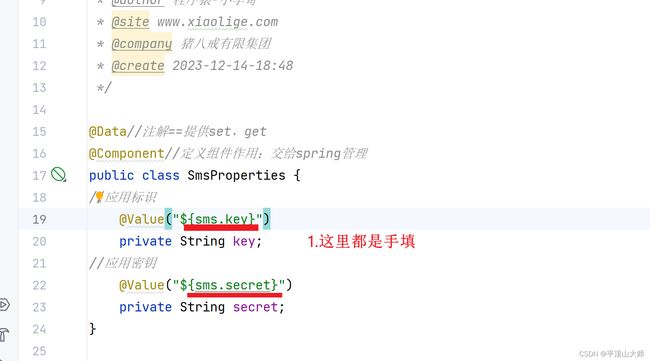
步骤1:通过注解获取到yml定义的值
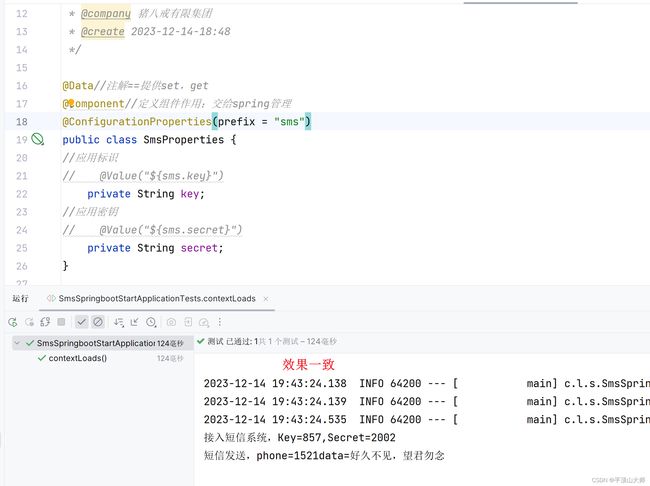
SmsProperties
package com.lya.smsspringbootstart;

import lombok.Data;
import org.springframework.beans.factory.annotation.Value;
import org.springframework.stereotype.Component;

/**
 * 类:名称,密钥实体
 * @author 程序猿-小李哥
 * @site www.xiaolige.com
 * @company 猪八戒有限集团
 * @create 2023-12-14-18:48
 */

@Data//注解==提供set,get
@Component//定义组件作用:交给spring管理
public class SmsProperties{
//应用标识
    @Value("${sms.key}")
    private String key;
//应用密钥
    @Value("${sms.secret}")
    private String secret;
}
步骤2:通过接口方式引入
ISmsService
package service;

public interface ISmsService {

    /**
     * 发送短信
     *
     * @param phone        要发送的手机号
     * @param data         要发送的内容
     */
    void send(String phone, String data);

}
SmsServiceImpl
package service;


import com.lya.smsspringbootstart.SmsProperties;

public class SmsServiceImpl implements ISmsService {

    private SmsProperties smsProperties; //null

    public SmsServiceImpl(SmsProperties smsProperties) {
        this.smsProperties=smsProperties;
    }

    @Override
    public void send(String phone, String data) {
        String key = smsProperties.getKey();
        String secret = smsProperties.getSecret();
        System.out.println("接入短信系统,Key=" + key + ",Secret=" + secret);
        System.out.println("短信发送,phone=" + phone + "data=" + data);
    }

}
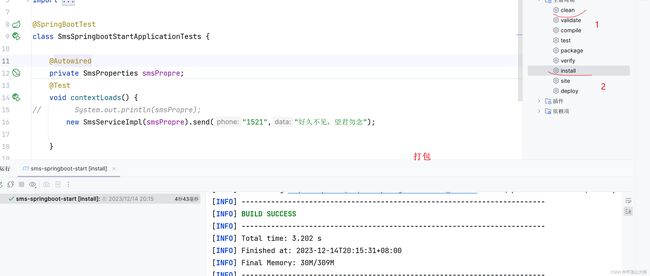
SmsSpringbootStartApplicationTests
package com.lya.smsspringbootstart;

import org.junit.jupiter.api.Test;
import org.springframework.beans.factory.annotation.Autowired;
import org.springframework.boot.test.context.SpringBootTest;
import service.SmsServiceImpl;

@SpringBootTest
class SmsSpringbootStartApplicationTests {

    @Autowired
    private SmsProperties smsPropre;
    @Test
    void contextLoads() {
//        System.out.println(smsPropre);
        new SmsServiceImpl(smsPropre).send("1521","好久不见,望君勿念");

    }

}

好了,到这里效果已经实现了,但是有许多的地方也麻烦!很多的地方要自己手填。针对性做了优化!
配置注解
@ConfigurationProperties(prefix = "sms")
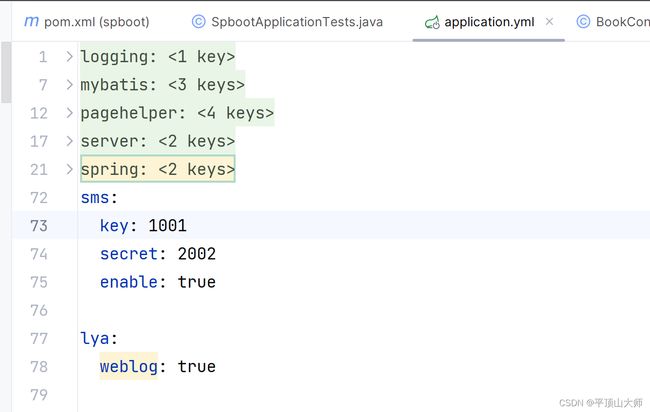
将写好的配置进行打包!(把application.yml中定义的sms,key,secret,enable给注掉)
2.1其他项目引入步骤:
-
引入依赖
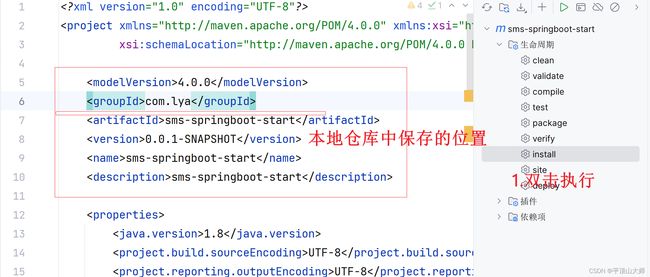
            com.zking
            sms-spring-boot-start
            0.0.1-SNAPSHOT
这里的groupId 要与启动类中的一致
-
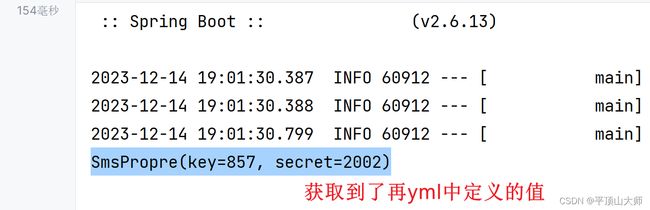
配置application.yml
#短信服务
sms:
  key: 1001
  secret: 2002
enable: true-
创建Junit测试
package com.zking.spboot;

import com.zking.smsspringbootstart.SmsSpringBootStartApplication;
import com.zking.smsspringbootstart.service.ISmsService;
import org.junit.jupiter.api.Test;
import org.springframework.beans.factory.annotation.Autowired;
import org.springframework.boot.test.context.SpringBootTest;

@SpringBootTest(classes = SmsSpringBootStartApplication.class)
class SpbootApplicationTests {

    @Autowired
    private ISmsService smsService;

    @Test
    public void send() {
        smsService.send("13199864","好久不见了");
    }

}
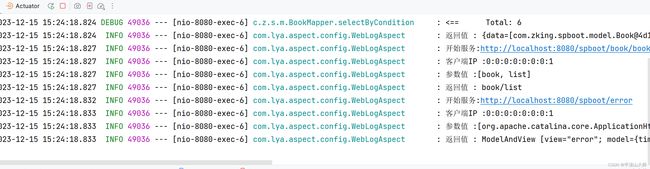
模拟效果:

3.综合案例(基于AOP技术实现日志切面模块)
3.1准备工作
重新创建一个项目,准备步骤与上面类似
3.2 导入pom依赖
    org.springframework.boot
    spring-boot-configuration-processor
    true
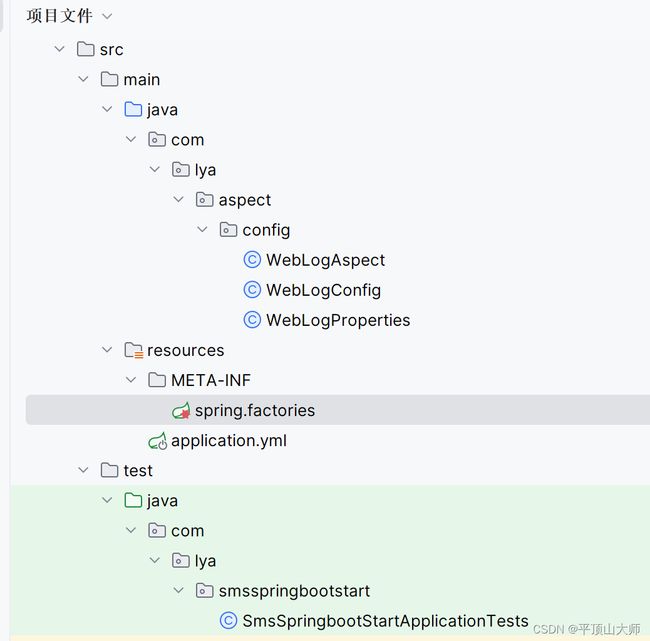
3.3创建切面配置类Properties
WebLogProperties.java
package com.lya.aspect.config;

import org.springframework.boot.context.properties.ConfigurationProperties;

/**
 * AOP日志配置类
 */
@ConfigurationProperties(prefix ="scloud.weblog")
public class WebLogProperties {

    private boolean enabled;

    //TODO
}
3.4 实现基于AOP技术的日志切面功能
WebLogAspect.java
package com.lya.aspect.config;

import lombok.extern.slf4j.Slf4j;
import org.aspectj.lang.JoinPoint;
import org.aspectj.lang.annotation.AfterReturning;
import org.aspectj.lang.annotation.Aspect;
import org.aspectj.lang.annotation.Before;
import org.aspectj.lang.annotation.Pointcut;
import org.springframework.stereotype.Component;
import org.springframework.web.context.request.RequestContextHolder;
import org.springframework.web.context.request.ServletRequestAttributes;

import javax.servlet.http.HttpServletRequest;
import java.util.Arrays;

@Aspect
@Component
@Slf4j
public class WebLogAspect {
    @Pointcut("execution(* *..*Controller.*(..))")
    public void webLog(){}

    @Before("webLog()")
    public void doBefore(JoinPoint joinPoint) throws Throwable {
        // 接收到请求,记录请求内容
        ServletRequestAttributes attributes = (ServletRequestAttributes) RequestContextHolder.getRequestAttributes();
        HttpServletRequest request = attributes.getRequest();

        // 记录下请求内容
        log.info("开始服务:{}", request.getRequestURL().toString());
        log.info("客户端IP :{}" , request.getRemoteAddr());
        log.info("参数值 :{}", Arrays.toString(joinPoint.getArgs()));
    }

    @AfterReturning(returning = "ret", pointcut = "webLog()")
    public void doAfterReturning(Object ret) throws Throwable {
        // 处理完请求,返回内容
        log.info("返回值 : {}" , ret);
    }

}
3.5 创建自动配置类
WebLogConfig.java
package com.lya.aspect.config;

import org.springframework.boot.autoconfigure.condition.ConditionalOnMissingBean;
import org.springframework.boot.autoconfigure.condition.ConditionalOnProperty;
import org.springframework.boot.context.properties.EnableConfigurationProperties;
import org.springframework.context.annotation.Bean;
import org.springframework.context.annotation.Configuration;

/**
 * @ConditionalOnProperty
 * 配置属性a:
 * 1:不配置a        matchifmissing=false 不满足      matchifmissing=true 满足
 * 2:配置a=false    matchifmissing=false 不满足      matchifmissing=true 不满足
 * 3:配置a=true     matchifmissing=false 满足        matchifmissing=true 满足
 */
@Configuration
@EnableConfigurationProperties({WebLogProperties.class})
@ConditionalOnProperty(prefix = "lya.weblog",
        value = "enabled",matchIfMissing = true)
public class WebLogConfig {

    @Bean
    @ConditionalOnMissingBean
    public WebLogAspect webLogAspect(){
        return new WebLogAspect();
    }
}
编写spring.factories文件
org.springframework.boot.autoconfigure.EnableAutoConfiguration=\
  com.lya.aspect.config.WebLogAspect,\
  com.lya.aspect.config.WebLogConfig
配置application.yml
路径仅供参考,实际路径根据自身的项目路径为主
案例目录:
效果: