Vue学习笔记01-基础部分
文章目录
- VUE笔记-01基础
-
- 1、简介
-
- mvvm
- ES6补充
-
- js高阶函数
- let/var
- const
- 增强字面量写法
- 2、基础
-
- 2.1、引入
- 2.2、第一个Vue程序
-
- el挂载点
- data数据对象
- methods
- Vue的生命周期(补)
- 2.3、Vue指令
-
- **Mustache: 胡子/胡须.**
- **v-once** 不经常
- **v-pre**
- cloak(了解)
- v-html
- v-text
- v-on绑定事件
- v-on
-
- v-on修饰符
- v-on参数问题
- 综合案例计数器和跑马灯
- couputed的计算属性用法
-
- 计算属性的getter和setter
- methods和computed的比较
- v-show
- 数组的响应方法
- v-if
- v-bind
-
- class属性绑定
- style属性绑定
- v-for
- v-model
-
-
- v-model修饰符
-
- 过滤器filters
- 监听属性watch
- vue指令综合练习,todolist
- 综合案例-购物车
- 2.4 网络应用axios
-
-
- 引入js库导包
- 基本使用
- 结合vue
- 综合案例天气预报
- 综合案例音乐播放器
-
VUE笔记-01基础
1、简介
是一套用于构建用户界面的渐进式框架。与其它大型框架不同的是,Vue 被设计为可以自底向上逐层应用。Vue 的核心库只关注视图层,不仅易于上手,还便于与第三方库或既有项目整合。另一方面,当与现代化的工具链以及各种支持类库结合使用时,Vue 也完全能够为复杂的单页应用提供驱动。
集合了react(虚拟dom)和angular(mvc)的特点
官网:https://cn.vuejs.org/
特点:
- 解耦视图和数据
- 可复用的组件
- 前端路由技术
- 状态管理
- 虚拟DOM
基础:html+css+JavaScript技术要熟悉
mvvm
MVVM(Model–view–viewmodel)是一种软件架构模式。
MVVM有助于将图形用户界面的开发与业务逻辑或后端逻辑(数据模型)的开发分离开来,这是通过置标语言或GUI代码实现的。MVVM的视图模型是一个值转换器,[1] 这意味着视图模型负责从模型中暴露(转换)数据对象,以便轻松管理和呈现对象。在这方面,视图模型比视图做得更多,并且处理大部分视图的显示逻辑。[1] 视图模型可以实现中介者模式,组织对视图所支持的用例集的后端逻辑的访问。
vue的mvvm

View层:
Ø视图层
Ø在我们前端开发中,通常就是DOM层。
Ø主要的作用是给用户展示各种信息。
Model层:
Ø数据层
Ø数据可能是我们固定的死数据,更多的是来自我们服务器,从网络上请求下来的数据。
Ø在我们计数器的案例中,就是后面抽取出来的obj,当然,里面的数据可能没有这么简单。
VueModel层:
Ø视图模型层
Ø视图模型层是View和Model沟通的桥梁。
Ø一方面它实现了Data Binding,也就是数据绑定,将Model的改变实时的反应到View中
Ø另一方面它实现了DOM Listener,也就是DOM监听,当DOM发生一些事件(点击、滚动、touch等)时,可以监听到,并在需要的情况下改变对应的Data。
ES6补充
js高阶函数
编程范式:命令式编程、声明式编程
编程范式:面向对象编程(对象为核心)/函数式编程(函数为核心)
// 编程范式: 命令式编程/声明式编程
// 编程范式: 面向对象编程(第一公民:对象)/函数式编程(第一公民:函数)
// filter/map/reduce
// filter中的回调函数有一个要求: 必须返回一个boolean值
// true: 当返回true时, 函数内部会自动将这次回调的n加入到新的数组中
// false: 当返回false时, 函数内部会过滤掉这次的n
const nums = [10, 20, 111, 222, 444, 40, 50]

// let total = nums.filter(n => n < 100).map(n => n * 2).reduce((pre, n) => pre + n);
// console.log(total);

let total = nums.filter(function (n) {
  return n < 100
}).map(function (n) {
  return n * 2
}).reduce(function (prevValue, n) {
  return prevValue + n
}, 0)
console.log(total);

// 1.filter函数的使用
// // 10, 20, 40, 50
// let newNums = nums.filter(function (n) {
//   return n < 100
// })
// // console.log(newNums);
//
// // 2.map函数的使用
// // 20, 40, 80, 100
// let new2Nums = newNums.map(function (n) { // 20
//   return n * 2
// })
// console.log(new2Nums);
//
// // 3.reduce函数的使用
// // reduce作用对数组中所有的内容进行汇总
// let total = new2Nums.reduce(function (preValue, n) {
//   return preValue + n
// }, 0)
// console.log(total);

// 第一次: preValue 0 n 20
// 第二次: preValue 20 n 40
// 第二次: preValue 60 n 80
// 第二次: preValue 140 n 100
// 240

// // 1.需求: 取出所有小于100的数字
// let newNums = []
// for (let n of nums) {
//   if (n < 100) {
//     newNums.push(n)
//   }
// }
//
// // 2.需求:将所有小于100的数字进行转化: 全部*2
// let new2Nums = []
// for (let n of newNums) {
//   new2Nums.push(n * 2)
// }
//
// console.log(new2Nums);
//
//
// // 3.需求:将所有new2Nums数字相加,得到最终的记过
// let total = 0
// for (let n of new2Nums) {
//   total += n
// }
//
// console.log(total);
let/var
事实上,var的设计是看成JavaScript是语言设计的上的错误。但是这种错误多半不能修复和移除。为了需要向后兼容。
十年前,Brendan Eich决定修复 ,于是添加了一个新的关键字,可以将let看成完美的var
- 块级作用域
- js中var来声明一个变量,变量的作用域只有function有概念
- ES6中,加入了let, let它是有if和for的块级作用域.
DOCTYPE html>
<html lang="en">
<head>
  <meta charset="UTF-8">
  <title>Titletitle>
head>
<body>

<button>按钮1button>
<button>按钮2button>
<button>按钮3button>
<button>按钮4button>
<button>按钮5button>

<script>
  // ES5中的var是没有块级作用域的(if/for)
  // ES6中的let是由块级作用的(if/for)

  // ES5之前因为if和for都没有块级作用域的概念, 所以在很多时候, 我们都必须借助于function的作用域来解决应用外面变量的问题.
  // ES6中,加入了let, let它是有if和for的块级作用域.
  // 1.变量作用域: 变量在什么范围内是可用.
  // {
  //   var name = 'why';
  //   console.log(name);
  // }
  // console.log(name);
这样变量无论在{}里面还是外面都是可以用的,这样随意会出现问题
  // 2.没有块级作用域引起的问题: if的块级
  // var func;
  // if (true) {
  //   var name = 'why';
  //   func = function () {
  //     console.log(name);
  //   }
  //   func()
  // }

  // name = '  kobe'
  // func()
  // // console.log(name);
//这样我本来打印是why但是被修改为了kobe,这样达不到需求
{}没有作用域,但是函数有作用域,
  var name = 'why'
  function abc(bbb) { // bbb = 'why'
    console.log(bbb);
  }
  name = 'kobe'
  abc(name)  打印的还是why

  // 3.没有块级作用域引起的问题: for的块级,每次打印都只会打印最后一个元素吗,在点击之前for循环已经遍历到最后一个值,所以点击的时候都是最后一个。es5的解决方法,闭包。
  // 为什么闭包可以解决问题: 函数是一个作用域.
  // var btns = document.getElementsByTagName('button');
  // for (var i=0; i
  //   (function (num) { // 0
  //     btns[i].addEventListener('click', function () {
  //       console.log('第' + num + '个按钮被点击');
  //     })
  //   })(i)
  // }

  const btns = document.getElementsByTagName('button')
  for (let i = 0; i < btns.length; i++) {
    btns[i].addEventListener('click', function () {
      console.log('第' + i + '个按钮被点击');
    })
  }


script>

body>
html>
const
建议开发中只要不是变量建议优先使用const
DOCTYPE html>
<html lang="en">
<head>
  <meta charset="UTF-8">
  <title>Titletitle>
head>
<body>

<script>
  // 1.注意一: 一旦给const修饰的标识符被赋值之后, 不能修改
  // const name = 'why';
  // name = 'abc';

  // 2.注意二: 在使用const定义标识符,必须进行赋值
  // const name;

  // 3.注意三: 常量的含义是指向的对象不能修改, 但是可以改变对象内部的属性.
  const obj = {
    name: 'why',
    age: 18,
    height: 1.88
  }
  // obj = {}
  console.log(obj);

  obj.name = 'kobe';
  obj.age = 40;
  obj.height = 1.87;

  console.log(obj);
script>

body>
html>
增强字面量写法
函数和变量的写法:
DOCTYPE html>
<html lang="en">
<head>
  <meta charset="UTF-8">
  <title>Titletitle>
head>
<body>

<script>
  // const obj = new Object()

  // const obj = {
  //   name: 'why',
  //   age: 18,
  //   run: function () {
  //     console.log('在奔跑');
  //   },
  //   eat: function () {
  //     console.log('在次东西');
  //   }
  // }

  // 1.属性的增强写法
  const name = 'why';
  const age = 18;
  const height = 1.88

  // ES5的写法
  // const obj = {
  //   name: name,
  //   age: age,
  //   height: height
  // }

  // const obj = {
  //   name,
  //   age,
  //   height,
  // }
  //
  // console.log(obj);


  // 2.函数的增强写法
  // ES5的写法
  // const obj = {
  //   run: function () {
  //
  //   },
  //   eat: function () {
  //
  //   }
  // }
  const obj = {
    run() {

    },
    eat() {

    }
  }
script>

body>
html>
2、基础
2.1、引入
<script src="https://cdn.jsdelivr.net/npm/vue/dist/vue.js">script>

<script src="https://cdn.jsdelivr.net/npm/vue">script>
开发环境版本下载:https://vuejs.org/js/vue.js
生产环境版本:https://vuejs.org/js/vue.min.js
2.2、第一个Vue程序
Vue实例的作用范围是什么呢?
Vue会管理el选项命中的元素及其内部的后代元素
是否可以使用其他的选择器?是否可以设置其他的dom元素呢?
可以使用其他的选择器,但是建议使用ID选择器可以使用其他的双标签,不能使用HTML和BODY
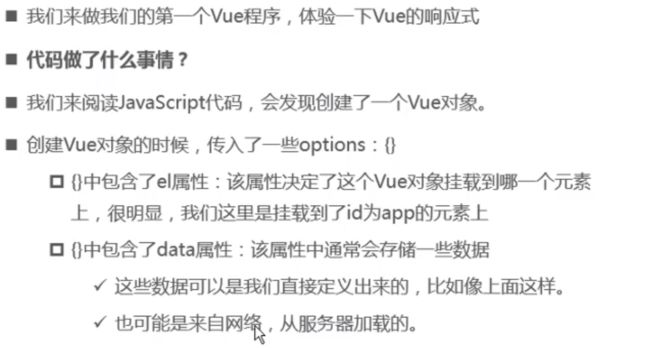
我们在创建Vue实例的时候,传入了一个对象options。就是new Vue({})中的{}
{}就是options,options可以传那些值:
https://cn.vuejs.org/v2/api/#%E9%80%89%E9%A1%B9-%E6%95%B0%E6%8D%AE
el挂载点
类型:string | HTMLElement
作用:决定之后Vue实例会管理哪一个DOM。
Vue会管理el选项命中的元素及其内部的后代元素
可以使用其他的选择器,但是建议使用ID选择器
可以使用其他的双标签,不能使用HTML和BODY
el是用来设置Vue实例挂载(管理)的
data数据对象
data中可以写复杂类型的数据
渲染复杂类型数据时,遵守js的语法即可
Vue中用到的数据定义在data中data:数据
<div id="app">{{ message }}   </div>
// 传入的是对象vue对象中的,es6中定义变量一般用let(变量)/const(常量)
var app = new Vue({
 el:"#app",
data:{
message:"Hello,Vue!!!",
array:[],
obj:{},
}
 })
        DOCTYPE html>
<html lang="en">

<head>
    <meta charset="UTF-8">
    <meta name="viewport" content="width=device-width, initial-scale=1.0">
    <meta http-equiv="X-UA-Compatible" content="ie=edge">
    <title>data:数据对象title>
head>

<body>
    <div id="app">
        {{ message }}
        <h2> {{ school.name }} {{ school.mobile }}h2>
        <ul>
            <li>{{ campus[0] }}li>
            <li>{{ campus[3] }}li>
        ul>
    div>

    <script src="https://cdn.jsdelivr.net/npm/vue/dist/vue.js">script>
    <script>
        // 编程范式:声明式编程
        var app = new Vue({
            el:"#app",
            data:{
                message:"你好 小黑!",
                school:{
                    name:"新东方",
                    mobile:"85440"
                },
                campus:["北京校区","上海校区","广州校区","深圳校区"]
            }
        })
    script>
    // 元素js的做法(编程范式: 命令式编程)
    // 1.创建div元素,设置id属性

    // 2.定义一个变量叫message

    // 3.将message变量放在前面的div元素中显示

    // 4.修改message的数据: 今天天气不错!

    // 5.将修改后的数据再次替换到div元素
body>

html>
methods
类型:{ [key: string]: Function }
作用:定义属于Vue的一些方法,可以在其他地方调用,也可以在指令中使用
在类里面的一般都叫方法,在文件里一般都是交函数
Vue的生命周期(补)
生命周期:一个事务从诞生到死亡的过程

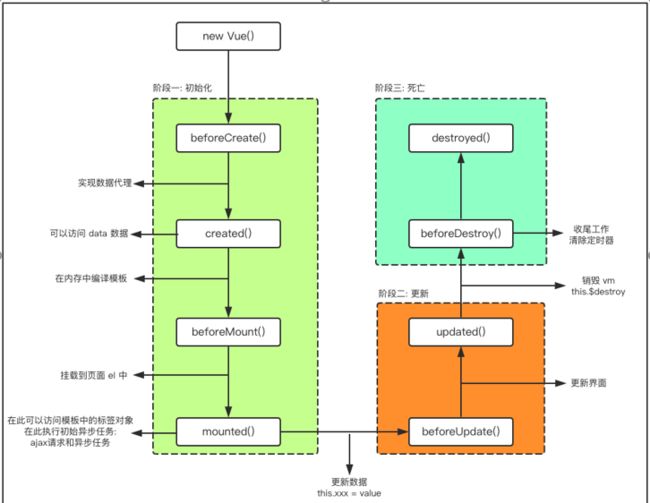
开发中用的比较多的一般是created和mounted,created一般都是用于网络请求
2.3、Vue指令
如何将data中的文本数据,插入到HTML中呢?
我们已经学习过了,可以通过Mustache语法(也就是双大括号)。
Mustache: 胡子/胡须.

v-once 不经常
有时候我们可能不希望界面随意的跟随改变,这个时候,我们就可以使用一个Vue的指令
p该指令后面不需要跟任何表达式
p该指令表示元素和组件(组件后面才会学习)只渲染一次,不会随着数据的改变而改变。

v-pre
用于跳过这个元素和它子元素的编译过程,用于显示原本的Mustache语法。
比如下面的代码:
p第一个h2元素中的内容会被编译解析出来对应的内容
p第二个h2元素中会直接显示{{message}}

Hello World!
{{message}}
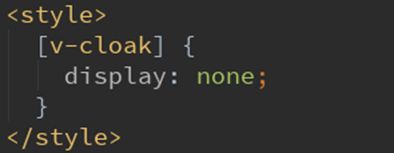
cloak(了解)
在某些情况下,我们浏览器可能会直接显然出未编译的Mustache标签。
还没显示时屏蔽掉代码,但以后的开发都是虚拟dom,模块都会转化为函数
cloak: 斗篷

v-html
某些情况下,我们从服务器请求到的数据本身就是一个HTML代码
如果我们直接通过{{}}来输出,会将HTML代码也一起输出。
但是我们可能希望的是按照HTML格式进行解析,并且显示对应的内容。
如果我们希望解析出HTML展示
p可以使用v-html指令
Ø该指令后面往往会跟上一个string类型
Ø会将string的html解析出来并且进行渲染

v-text
可以吧数据直接关联到标签内部,只需要v-text与数据绑定即可,并且可以在内部用+号拼接字符串
缺点不够灵活会覆盖
案例
DOCTYPE html>
<html lang="en">

<head>
    <meta charset="UTF-8">
    <meta name="viewport" content="width=device-width, initial-scale=1.0">
    <meta http-equiv="X-UA-Compatible" content="ie=edge">
    <title>v-text指令title>
head>

<body>
    <div id="app">
        <h2 v-text="message+'!'">深圳h2>
        <h2 v-text="info+'!'">深圳h2>
        <h2>{{ message +'!'}}深圳h2>
    div>

    <script src="https://cdn.jsdelivr.net/npm/vue/dist/vue.js">script>
    <script>
        var app = new Vue({
            el:"#app",
            data:{
                message:"黑马程序员!!!",
                info:"前端与移动教研部"
            }
        })
    script>
body>

html>
v-on绑定事件
DOCTYPE html>
<html lang="en">

<head>
    <meta charset="UTF-8">
    <meta name="viewport" content="width=device-width, initial-scale=1.0">
    <meta http-equiv="X-UA-Compatible" content="ie=edge">
    <title>v-on补充title>
head>

<body>
    <div id="app">
        <input type="button" value="点击" v-on:click="doIt(4444,'冲啊')">

        <input type="button" value="点击" @click="doIt(666,'老铁')">
        <input type="text" @keyup.enter="sayHi">
    div>

    <script src="https://cdn.jsdelivr.net/npm/vue/dist/vue.js">script>
    <script>
        var app = new Vue({
            el:"#app",
            methods: {
                doIt:function(p1,p2){
                    console.log("做it");
                    console.log(p1);
                    console.log(p2);
                },
                sayHi:function(){
                    alert("吃了没");
                }
            },
        })
    script>
body>

html>
v-on
当通过methods中定义方法,以供@click调用时,需要注意参数问题:
- 情况一:如果该方法不需要额外参数,那么方法后的()可以不添加。
但是注意:如果方法本身中有一个参数,那么会默认将原生事件event参数传递进去
- 情况二:如果需要同时传入某个参数,同时需要event时,可以通过$event传入事件。
DOCTYPE html>
<html lang="en">
<head>
  <meta charset="UTF-8">
  <title>Titletitle>
head>
<body>

<div id="app">

  <button @click="btn1Click()">按钮1button>
  <button @click="btn1Click">按钮1button>


  <button @click="btn2Click">按钮2button>


  <button @click="btn3Click(abc, $event)">按钮3button>
div>

<script src="../js/vue.js">script>
<script>
  const app = new Vue({
    el: '#app',
    data: {
      message: '你好啊',
      abc: 123
    },
    methods: {
      btn1Click() {
        console.log("btn1Click");
      },
      btn2Click(event) {
        console.log('--------', event);
      },
      btn3Click(abc, event) {
        console.log('++++++++', abc, event);
      }
    }
  })

  // 如果函数需要参数,但是没有传入, 那么函数的形参为undefined
  // function abc(name) {
  //   console.log(name);
  // }
  //
  // abc()
script>

body>
html>
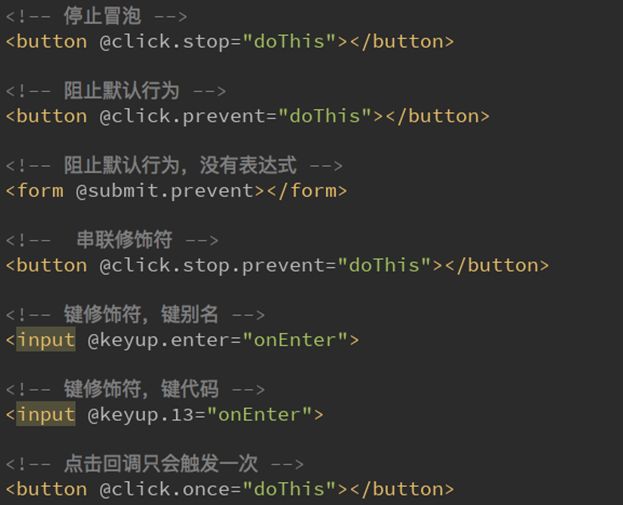
v-on修饰符
在某些情况下,我们拿到event的目的可能是进行一些事件处理。
Vue提供了修饰符来帮助我们方便的处理一些事件:
.stop - 调用 event.stopPropagation()。
.prevent - 调用 event.preventDefault()。
.{keyCode | keyAlias} - 只当事件是从特定键触发时才触发回调。
.native - 监听组件根元素的原生事件。
.once - 只触发一次回调。
DOCTYPE html>
<html lang="en">
<head>
  <meta charset="UTF-8">
  <title>Titletitle>
head>
<body>

<div id="app">

  <div @click="divClick">
    aaaaaaa
    <button @click.stop="btnClick">按钮button>
  div>


  <br>
  <form action="baidu">
    <input type="submit" value="提交" @click.prevent="submitClick">
  form>


  <input type="text" @keyup.enter="keyUp">


  <button @click.once="btn2Click">按钮2button>
div>

<script src="../js/vue.js">script>
<script>
  const app = new Vue({
    el: '#app',
    data: {
      message: '你好啊'
    },
    methods: {
      btnClick() {
        console.log("btnClick");
      },
      divClick() {
        console.log("divClick");
      },
      submitClick() {
        console.log('submitClick');
      },
      keyUp() {
        console.log('keyUp');
      },
      btn2Click() {
        console.log('btn2Click');
      }
    }
  })
script>

body>
html>
v-on参数问题
当通过methods中定义方法,以供@click调用时,需要注意参数问题:
-
情况一:如果该方法不需要额外参数,那么方法后的()可以不添加。
- 但是注意:如果方法本身中有一个参数,那么会默认将原生事件event参数传递进去
-
情况二:如果需要同时传入某个参数,同时需要event时,可以通过$event传入事件。

综合案例计数器和跑马灯

DOCTYPE html>
<html lang="en">
  <head>
    <meta charset="UTF-8" />
    <meta name="viewport" content="width=device-width, initial-scale=1.0" />
    <meta http-equiv="X-UA-Compatible" content="ie=edge" />
    <title>计数器title>
   <style>

body{
  background-color: #f5f5f5;
}
#app {
  width: 480px;
  height: 80px;
  margin: 200px auto;
}
.input-num {
  margin-top:20px;
  height: 100%;
  display: flex;
  border-radius: 10px;
  overflow: hidden;
  box-shadow: 4px 4px 4px #adadad;
  border: 1px solid #c7c7c7;
  background-color: #c7c7c7;
}
.input-num button {
  width: 150px;
  height: 100%;
  font-size: 40px;
  color: #ad2a27;
  cursor: pointer;
  border: none;
  outline: none;
  background-color:rgba(0, 0, 0, 0);
}
.input-num span {
  height: 100%;
  font-size: 40px;
  flex: 1;
  text-align: center;
  line-height: 80px;
  font-family:auto;
  background-color: white;
}
img{
  float: right;
  margin-top: 50px;
}

   style>
  head>
  <body>
    <div id="app">

      <div class="input-num">
        <button @click="sub">
          -
        button>
        <span>{{ num }}span>
        <button @click="add">
          +
        button>
      div>
    div>
  body>
html>

<script src="https://cdn.jsdelivr.net/npm/vue/dist/vue.js">script>

<script>
  // 创建Vue实例
  var app = new Vue({
    el: "#app",
    data: {
      num: 1,
      min: 0,
      max: 10
    },
    methods: {
      sub() {
        if (this.num > this.min) {
          this.num--;
        } else {
          alert("别点啦,到底啦");
        }
      },
      add() {
        if (this.num < this.max) {
          this.num++;
        } else {
          alert("别点啦,到头啦");
        }
      }
    }
  });
script>
跑马灯
DOCTYPE html>
<html lang="en">

<head>
    <meta charset="UTF-8">
    <meta http-equiv="X-UA-Compatible" content="IE=edge">
    <meta name="viewport" content="width=device-width, initial-scale=1.0">
    <title>Documenttitle>
head>

<body>
    <div id="app">
        <button @click="run()">浪起来button>
        <button @click="stop()">低调button>
        <p>{{msg}}p>
    div>
    <script src="vue.js">script>
    <script>
        var vm = new Vue({
            el: "#app",
            data: {
                msg: "今天是个好日子!",
                timer:null
            },
            methods: {
                run: function () {
                    timer = window.setInterval(function () {
                        vm.msg = vm.msg.substr(1) + vm.msg.substr(0, 1);
                    }, 100);
                },
                stop: function () {
            window.clearInterval(timer);
            }
            }
        })
    script>
body>

html>
couputed的计算属性用法
计算属性相对于普通的方法,在计算方面有缓存,效率更高
我们知道,在模板中可以直接通过插值语法显示一些data中的数据。
但是在某些情况,我们可能需要对数据进行一些转化后再显示,或者需要将多个数据结合起来进行显示
比如我们有firstName和last Name两个变量,我们需要显示完整的名称。
但是如果多个地方都需要显示完整的名称,我们就需要写多个{{firstName}} {{last Name}}
我们可以将上面的代码换成计算属性:
我们发现计算属性是写在实例的computed选项中的

-------------------------------
DOCTYPE html>
<html lang="en">
<head>
  <meta charset="UTF-8">
  <title>Titletitle>
head>
<body>

<div id="app">
  <h2>{{firstName + ' ' + lastName}}h2>
  <h2>{{firstName}} {{lastName}}h2>

  <h2>{{getFullName()}}h2>

  <h2>{{fullName}}h2>
div>

<script src="../js/vue.js">script>
<script>
  const app = new Vue({
    el: '#app',
    data: {
      firstName: 'Lebron',
      lastName: 'James'
    },
    // computed: 计算属性(),起名字最好是用属性名
    computed: {
      fullName: function () {
        return this.firstName + ' ' + this.lastName
      }
    },
    methods: {
      getFullName() {
        return this.firstName + ' ' + this.lastName
      }
    }
  })
script>

body>
html>
----------------
DOCTYPE html>
<html lang="en">
<head>
    <meta charset="UTF-8">
    <meta http-equiv="X-UA-Compatible" content="IE=edge">
    <meta name="viewport" content="width=device-width, initial-scale=1.0">
    <title>Documenttitle>
head>
<body>
    <div id = "app">
        <p>总价格:{{totalPrice}}p>
        <p>单价:{{price}}p>
        <p>数量:{{num}}p>
        <div>
            <button v-on:click="num==0?0:num--">减少数量button>
            <button @click ="num++">增加数量button>
        div>
    div>
  <script src="https://cdn.jsdelivr.net/npm/vue/dist/vue.js">script>
    <script>
        var vm = new Vue({
            el:"#app",
            data:{
                price:20,
                num:0
            },
            computed:{
                //总价格totalPrice
                totalPrice(){
                    return this.price*this.num
                }
            }
        })
    script>
body>
html>
--------------------------
DOCTYPE html>
<html lang="en">
<head>
  <meta charset="UTF-8">
  <title>Titletitle>
head>
<body>

<div id="app">
  <h2>总价格: {{totalPrice}}h2>
div>

<script src="../js/vue.js">script>
<script>
  const app = new Vue({
    el: '#app',
    data: {
      books: [
        {id: 110, name: 'Unix编程艺术', price: 119},
        {id: 111, name: '代码大全', price: 105},
        {id: 112, name: '深入理解计算机原理', price: 98},
        {id: 113, name: '现代操作系统', price: 87},
      ]
    },
    computed: {
      totalPrice: function () {
        let result = 0
        for (let i=0; i < this.books.length; i++) {
          result += this.books[i].price
        }
        return result

        // for (let i in this.books) {
        //   this.books[i]
        // }
        //
        // for (let book of this.books) {
        //
        // }
      }
    }
  })
script>

body>
html>
计算属性的getter和setter
本质上是个属性,只是把set和get省略了,本质上覆盖了get,所以调用的时候并不用加()
DOCTYPE html>
<html lang="en">
<head>
  <meta charset="UTF-8">
  <title>Titletitle>
head>
<body>

<div id="app">
  <h2>{{fullName}}h2>
div>

<script src="../js/vue.js">script>
<script>
  const app = new Vue({
    el: '#app',
    data: {
      firstName: 'Kobe',
      lastName: 'Bryant'
    },
    computed: {
      // fullName: function () {
      //   return this.firstName + ' ' + this.lastName
      // }
      // name: 'coderwhy'
      // 计算属性一般是没有set方法, 只读属性.
      fullName: {
        set: function(newValue) {
          // console.log('-----', newValue);
          const names = newValue.split(' ');
          this.firstName = names[0];
          this.lastName = names[1];
        },
        get: function () {
          return this.firstName + ' ' + this.lastName
        }
      },

      // fullName: function () {
      //   return this.firstName + ' ' + this.lastName
      // }
    }
  })
script>

body>
html>
methods和computed的比较
methods每次都会调用。computed只会调用一次。效率更高
v-show
v-if和v-show都可以决定一个元素是否渲染,那么开发中我们如何选择呢?
-
v-if当条件为false时,压根不会有对应的元素在DOM中。
-
v-show当条件为false时,仅仅是将元素的display属性设置为none而已。
开发中如何选择呢?
-
当需要在显示与隐藏之间切片很频繁时,使用v-show
-
当只有一次切换时,通过使用v-if
根据表达式的真假,切换元素的显示和隐藏
DOCTYPE html>
<html lang="en">
  <head>
    <meta charset="UTF-8" />
    <meta name="viewport" content="width=device-width, initial-scale=1.0" />
    <meta http-equiv="X-UA-Compatible" content="ie=edge" />
    <title>v-show指令title>
  head>
  <body>
    <div id="app">
      <input type="button" value="切换显示状态" @click="changeIsShow">
      <input type="button" value="累加年龄" @click="addAge">
      <img v-show="isShow" src="./img/monkey.gif" alt="">
      <img v-show="age>=18" src="./img/monkey.gif" alt="">
    div>

    <script src="https://cdn.jsdelivr.net/npm/vue/dist/vue.js">script>
    <script>
      var app = new Vue({
        el:"#app",
        data:{
          isShow:false,
          age:17
        },
        methods: {
          changeIsShow:function(){
            this.isShow = !this.isShow;
          },
          addAge:function(){
            this.age++;
          }
        },
      })
    script>
  body>
html>
数组的响应方法
因为Vue是响应式的,所以当数据发生变化时,Vue会自动检测数据变化,视图会发生对应的更新。
Vue中包含了一组观察数组编译的方法,使用它们改变数组也会触发视图的更新。
通过索引值来修改元素的值不是响应式的
DOCTYPE html>
<html lang="en">
<head>
  <meta charset="UTF-8">
  <title>Titletitle>
head>
<body>

<div id="app">
  <ul>
    <li v-for="item in letters">{{item}}li>
  ul>
  <button @click="btnClick">按钮button>
div>

<script src="../js/vue.js">script>
<script>
  const app = new Vue({
    el: '#app',
    data: {
      letters: ['a', 'b', 'c', 'd']
    },
    methods: {
      btnClick() {
        // 1.push方法
        // this.letters.push('aaa')
        // this.letters.push('aaaa', 'bbbb', 'cccc')

        // 2.pop(): 删除数组中的最后一个元素
        // this.letters.pop();

        // 3.shift(): 删除数组中的第一个元素
        // this.letters.shift();

        // 4.unshift(): 在数组最前面添加元素
        // this.letters.unshift()
        // this.letters.unshift('aaa', 'bbb', 'ccc')

        // 5.splice作用: 删除元素/插入元素/替换元素
        // 删除元素: 第二个参数传入你要删除几个元素(如果没有传,就删除后面所有的元素)
        // 替换元素: 第二个参数, 表示我们要替换几个元素, 后面是用于替换前面的元素
        // 插入元素: 第二个参数, 传入0, 并且后面跟上要插入的元素
        // splice(start)
        // splice(start):
        this.letters.splice(1, 3, 'm', 'n', 'l', 'x')
        // this.letters.splice(1, 0, 'x', 'y', 'z')

        // 5.sort()
        // this.letters.sort()

        // 6.reverse()
        // this.letters.reverse()

        // 注意: 通过索引值修改数组中的元素
        // this.letters[0] = 'bbbbbb';
        // this.letters.splice(0, 1, 'bbbbbb')
        // set(要修改的对象, 索引值, 修改后的值)
        // Vue.set(this.letters, 0, 'bbbbbb')
      }
    }
  })


  // function sum(num1, num2) {
  //   return num1 + num2
  // }
  //
  // function sum(num1, num2, num3) {
  //   return num1 + num2 + num3
  // }
  // function sum(...num) {
  //   console.log(num);
  // }
  //
  // sum(20, 30, 40, 50, 601, 111, 122, 33)

script>

body>
html>
v-if
判断语句 v-else指令,v-else-if基本相同
•v-show的元素一直存在于页面中,只是控制显示与隐藏。V-if为真的时元素在页面中,否则不在页面中。
•如果元素需要频繁切换,用v-show较好。如果运行条件很少改变,用v-if较好。
DOCTYPE html>
<html lang="en">

<head>
    <meta charset="UTF-8">
    <meta name="viewport" content="width=device-width, initial-scale=1.0">
    <meta http-equiv="X-UA-Compatible" content="ie=edge">
    <title>v-if指令title>
head>
<body>
    <div id="app">
        <input type="button" value="切换显示" @click="toggleIsShow">
        <p v-if="isShow">黑马程序员p>
        <p v-show="isShow">黑马程序员 - v-show修饰
            <p v-text="'温度:'+temperature">p><button @click="add">+button>
        p>

        <h2 v-if="temperature>=30" >热死啦h2>
    div>

    <script src="https://cdn.jsdelivr.net/npm/vue/dist/vue.js">script>
    <script>
        var app = new Vue({
            el:"#app",
            data:{
                isShow:false,
                temperature:20
            },
            methods: {
                toggleIsShow:function(){
                    this.isShow = !this.isShow;
                },
                add:function(){
                    this.temperature++;
                }
            },
        })
    script>
body>

html>
v-bind
设置元素的属性如src,title,class,style
DOCTYPE html>
<html lang="en">

<head>
    <meta charset="UTF-8">
    <meta name="viewport" content="width=device-width, initial-scale=1.0">
    <meta http-equiv="X-UA-Compatible" content="ie=edge">
    <title>v-bind指令title>
    <style>
        .active{
            border: 1px solid red;
        }
    style>
head>

<body>
    <div id="app">
        <img v-bind:src="imgSrc" alt="">
        <br>
        <img :src="imgSrc" alt="" :title="imgTitle+'!!!'" :class="isActive?'active':''" @click="toggleActive">
        <br>
        <img :src="imgSrc" alt="" :title="imgTitle+'!!!'" :class="{active:isActive}" @click="toggleActive">
    div>

    <script src="https://cdn.jsdelivr.net/npm/vue/dist/vue.js">script>
    <script>
        var app = new Vue({
            el:"#app",
            data:{
                imgSrc:"http://www.itheima.com/images/logo.png",
                imgTitle:"黑马程序员",
                isActive:false
            },
            methods: {
                toggleActive:function(){
                    this.isActive = !this.isActive;
                }
            },
        })
    script>
body>

html>
class属性绑定

若样式多,可以用数组或队形的形式绑定区别就是[]和{}

案例
DOCTYPE html>
<html lang="en">
<head>
  <meta charset="UTF-8">
  <title>Titletitle>

  <style>
    .active {
      color: red;
    }
  style>
head>
<body>

<div id="app">


  <h2 class="title" v-bind:class="{active: isActive, line: isLine}">{{message}}h2>
  <h2 class="title" v-bind:class="getClasses()">{{message}}h2>
  <button v-on:click="btnClick">按钮button>
div>

<script src="../js/vue.js">script>
<script>
  const app = new Vue({
    el: '#app',
    data: {
      message: '你好啊',
      isActive: true,
      isLine: true
    },
    methods: {
      btnClick: function () {
        this.isActive = !this.isActive
      },
      getClasses: function () {
        return {active: this.isActive, line: this.isLine}
      }
    }
  })
script>

body>
html>
    script>
    --------非内连绑定--------
    <div id="box">
    <div class="default" v-bind:class="classObject">Vue.js样式绑定div>
div>
<script type="text/javascript">
    var vm = new Vue({
        el : '#box',
        data : {
            classObject : {
                size : true,
                color : true
            }
        }
    });
script>
--------------计算属性对象绑定--------
    <div id="box">
    <div class="default" v-bind:class="show">Vue.js样式绑定div>
div>
<script type="text/javascript">
    var vm = new Vue({
        el : '#box',
        data : { isSize : true, isColor : true },
        computed : {
            show : function(){
                return {
                    size : this.isSize,
                    color : this.isColor
                }
            }
        }
    });
script>


body>
html>
-----------------------------------数组绑定---------------------
DOCTYPE html>

<html lang="en">

<head>

    <meta charset="UTF-8">

    <meta http-equiv="X-UA-Compatible" content="IE=edge">

    <meta name="viewport" content="width=device-width, initial-scale=1.0">

    <title>Documenttitle>

    <style>
        .a{
            color: red;
            font-style: italic;
        }

    style>

head>

<body>
    <script src="https://cdn.jsdelivr.net/npm/vue/dist/vue.js">script>
    <div id="app">

        <h1 v-bind:class="[isShow?'a':'']">{{message}}h1>

        <button @click="isShow=!isShow">添加样式button>

    div>
    <script>

        var vm=new Vue({
            el:'#app',
            data:{

              message:"Vue.js样式绑定",

              isShow:true

            }

        })

    script>

body>

html>
style属性绑定

----------内连绑定---------------
<div id="box">
    fontWeight是类名
    <div v-bind:style="{fontWeight : weight, 'font-size' : fontSize + 'px'}">Vue.js样式绑定div>
div>
<script type="text/javascript">
    var vm = new Vue({
        el : '#box',
        data : {
            weight : 'bold',
            fontSize : 30
        }
    });
script>
--------非内连绑定------------
<div id="box">
    <div v-bind:style="styleObject">Vue.js样式绑定div>
div>
<script type="text/javascript">
    var vm = new Vue({
        el : '#box',
        data : {
            styleObject : {
                fontWeight : 'bold',
                'font-size' : '30px'
            }
        }
    });
script>
---------计算属性绑定----
<div id="box">
    <div v-bind:style="show">Vue.js样式绑定div>
div>
<script type="text/javascript">
    var vm = new Vue({
        el : '#box',
        data : {weight : 'bold',fontSize : 30},
        computed : {
            show : function(){
                return {
                    fontWeight : this.weight,
                    'font-size' : this.fontSize + 'px'
                }
            }
        }
    });
script>
---------数组语法--------
<div id="box">
    <div v-bind:style="[size,weight,decoration]">Vue.js样式绑定div>
div>
<script type="text/javascript">
    var vm = new Vue({
        el : '#box',
        data : {
            size : {fontSize : '24px'},
            weight : {'font-weight' : 'bold'},
            decoration : {'text-decoration' : 'underline'}
        }
    });
script>

v-for
需要记住v-for遍历对象时的遍历的默认是value要遍历key指定即可
官方推荐我们在使用v-for时,给对应的元素或组件添加上一个:key属性。
key不能乱指定,要指定 一一对应关系的
为什么需要这个key属性呢(了解)?
这个其实和Vue的虚拟DOM的Diff算法有关系。
当某一层有很多相同的节点时,也就是列表节点时,我们希望插入一个新的节点
- 我们希望可以在B和C之间加一个F,Diff算法默认执行起来是这样的。
即把C更新成F,D更新成C,E更新成D,最后再插入E,是不是很没有效率?
所以我们需要使用key来给每个节点做一个唯一标识
- Diff算法就可以正确的识别此节点

找到正确的位置区插入新的节点。
<div id="app">
  <ul>
    <li v-for="item in letters" :key="item">{{item}}li>
  ul>
div>

<script src="../js/vue.js">script>
<script>
  const app = new Vue({
    el: '#app',
    data: {
      letters: ['A', 'B', 'C', 'D', 'E']
    }
  })
script>
所以一句话,key的作用主要是为了高效的更新虚拟DOM**。**
DOCTYPE html>
<html lang="en">
遍历数组一般都是一个一个取出
<head>
    <meta charset="UTF-8">
    <meta name="viewport" content="width=device-width, initial-scale=1.0">
    <meta http-equiv="X-UA-Compatible" content="ie=edge">
    <title>v-for指令title>
head>

<body>
    <div id="app">
        <input type="button" value="添加数据" @click="add">
        <input type="button" value="移除数据" @click="remove">

        <ul>
            <li v-for="(it,index) in arr">
                {{ index+1 }}黑马程序员校区:{{ it }}
            li>
        ul>
        <h2 v-for="item in vegetables" v-bind:title="item.name">
            {{ item.name }}
        h2>
    div>

    <script src="https://cdn.jsdelivr.net/npm/vue/dist/vue.js">script>
    <script>
        var app = new Vue({
            el:"#app",
            data:{
                arr:["北京","上海","广州","深圳"],
                vegetables:[
                    {name:"西兰花炒蛋"},
                    {name:"蛋炒西蓝花"}
                ]
            },
            methods: {
                add:function(){
                    this.vegetables.push({ name:"花菜炒蛋" });
                },
                remove:function(){
                    this.vegetables.shift();
                }
            },
        })
    script>
body>

html>

----------------------案例2--------------------
DOCTYPE html>
<html lang="en">
<head>
  <meta charset="UTF-8">
  <title>Titletitle>
head>
<body>

<div id="app">

  <ul>
    <li v-for="item in names">{{item}}li>
  ul>


  <ul>
    <li v-for="(item, index) in names">
      {{index+1}}.{{item}}
    li>
  ul>
div>

<script src="../js/vue.js">script>
<script>
  const app = new Vue({
    el: '#app',
    data: {
      names: ['why', 'kobe', 'james', 'curry']
    }
  })
script>

body>
html>
---------------------------------------------------------------------------------
DOCTYPE html>
<html lang="en">
<head>
  <meta charset="UTF-8">
  <title>Titletitle>
head>
<body>

<div id="app">

  <ul>
    <li v-for="item in info">{{item}}li>
  ul>


  <ul>
    <li v-for="(value, key) in info">{{value}}-{{key}}li>
  ul>


  <ul>
    <li v-for="(value, key, index) in info">{{value}}-{{key}}-{{index}}li>
  ul>
div>

<script src="../js/vue.js">script>
<script>
  const app = new Vue({
    el: '#app',
    data: {
      info: {
        name: 'why',
        age: 18,
        height: 1.88
      }
    }
  })
script>

body>
html>
v-model
表单控件在实际开发中是非常常见的。特别是对于用户信息的提交,需要大量的表单。
Vue中使用v-model指令来实现表单元素和数据的双向绑定。
原理
nv-model其实是一个语法糖,它的背后本质上是包含两个操作:
-
1.v-bind绑定一个value属性
-
2.v-on指令给当前元素绑定input事件
也就是说下面的代码:等同于下面的代码:
<input type="text" v-model="message">
等同于
<input type="text" v-bind:value="message" v-on:input="message = $event.target.value">
双向绑定数据
DOCTYPE html>
<html lang="en">

<head>
    <meta charset="UTF-8">
    <meta name="viewport" content="width=device-width, initial-scale=1.0">
    <meta http-equiv="X-UA-Compatible" content="ie=edge">
    <title>v-model指令title>
head>

<body>
    <div id="app">
        <input type="button" value="修改message" @click="setM">
        <input type="text" v-model="message" @keyup.enter="getM">
        <h2>{{ message }}h2>
    div>

    <script src="https://cdn.jsdelivr.net/npm/vue/dist/vue.js">script>
    <script>
        var app = new Vue({
            el:"#app",
            data:{
                message:"黑马程序员"
            },
            methods: {
                getM:function(){
                    alert(this.message);
                },
                setM:function(){
                    this.message ="酷丁鱼";
                }
            },
        })
    script>
body>

html>
结合radio使用
DOCTYPE html>
<html lang="en">
<head>
  <meta charset="UTF-8">
  <title>Titletitle>
head>
<body>

<div id="app">
  <label for="male">
    <input type="radio" id="male" value="男" v-model="sex">男
  label>
  <label for="female">
    <input type="radio" id="female" value="女" v-model="sex">女
  label>
  <h2>您选择的性别是: {{sex}}h2>
div>

<script src="../js/vue.js">script>
<script>
  const app = new Vue({
    el: '#app',
    data: {
      message: '你好啊',
      sex: '女'
    }
  })
script>

body>
html>
结合checkbox使用
DOCTYPE html>
<html lang="en">
<head>
  <meta charset="UTF-8">
  <title>Titletitle>
head>
<body>

<div id="app">


  <input type="checkbox" value="篮球" v-model="hobbies">篮球
  <input type="checkbox" value="足球" v-model="hobbies">足球
  <input type="checkbox" value="乒乓球" v-model="hobbies">乒乓球
  <input type="checkbox" value="羽毛球" v-model="hobbies">羽毛球
  <h2>您的爱好是: {{hobbies}}h2>

  <label v-for="item in originHobbies" :for="item">
    <input type="checkbox" :value="item" :id="item" v-model="hobbies">{{item}}
  label>
div>

<script src="../js/vue.js">script>
<script>
  const app = new Vue({
    el: '#app',
    data: {
      message: '你好啊',
      isAgree: false, // 单选框
      hobbies: [], // 多选框,
      originHobbies: ['篮球', '足球', '乒乓球', '羽毛球', '台球', '高尔夫球']
    }
  })
script>

body>
html>
结合select
DOCTYPE html>
<html lang="en">
<head>
  <meta charset="UTF-8">
  <title>Titletitle>
head>
<body>

<div id="app">

  <select name="abc" v-model="fruit">
    <option value="苹果">苹果option>
    <option value="香蕉">香蕉option>
    <option value="榴莲">榴莲option>
    <option value="葡萄">葡萄option>
  select>
  <h2>您选择的水果是: {{fruit}}h2>


  <select name="abc" v-model="fruits" multiple>
    <option value="苹果">苹果option>
    <option value="香蕉">香蕉option>
    <option value="榴莲">榴莲option>
    <option value="葡萄">葡萄option>
  select>
  <h2>您选择的水果是: {{fruits}}h2>
div>

<script src="../js/vue.js">script>
<script>
  const app = new Vue({
    el: '#app',
    data: {
      message: '你好啊',
      fruit: '香蕉',
      fruits: []
    }
  })
script>

body>
html>
v-model修饰符
-
lazy修饰符:
- 默认情况下,v-model默认是在input事件中同步输入框的数据的。
- 也就是说,一旦有数据发生改变对应的data中的数据就会自动发生改变。
- lazy修饰符可以让数据在失去焦点或者回车时才会更新:
-
number修饰符:
- 默认情况下,在输入框中无论我们输入的是字母还是数字,都会被当做字符串类型进行处理。
- 但是如果我们希望处理的是数字类型,那么最好直接将内容当做数字处理。
- number修饰符可以让在输入框中输入的内容自动转成数字类型:
-
trim修饰符:
- 如果输入的内容首尾有很多空格,通常我们希望将其去除
- trim修饰符可以过滤内容左右两边的空格
DOCTYPE html>
<html lang="en">
<head>
  <meta charset="UTF-8">
  <title>Titletitle>
head>
<body>

<div id="app">

  <input type="text" v-model.lazy="message">
  <h2>{{message}}h2>


  <input type="number" v-model.number="age">
  <h2>{{age}}-{{typeof age}}h2>


  <input type="text" v-model.trim="name">
  <h2>您输入的名字:{{name}}h2>
div>

<script src="../js/vue.js">script>
<script>
  const app = new Vue({
    el: '#app',
    data: {
      message: '你好啊',
      age: 0,
      name: ''
    }
  })

  var age = 0
  age = '1111'
  age = '222'
script>

body>
html>
过滤器filters
•过滤器这种成员的作用是:类似方法形式,对数据进行处理,返回处理后的结果。在管道符“|”后面使用。
•使用场景:差值表达式中使用过滤器、v-bind属性绑定中使用过滤器

<div id="box">
    <span>{{str | lowercase | firstUppercase}}span>
div>
<script type="text/javascript">
    var demo = new Vue({
        el : '#box',
        data : {
            str : 'HTML+CSS+JavaScript'
        },
        filters : {
            lowercase : function(value){
                return value.toLowerCase();
            },
            firstUppercase : function(value){
                return value.charAt(0).toUpperCase()+value.substr(1);
            }
        }
    });
script>
--------------------------------------------------------------------------------------------------------
<div id="box">
    <span>{{price | formatPrice("¥")}}span>
div>
<script type="text/javascript">
    var demo = new Vue({
        el : '#box',
        data : {
            price : 199
        },
        filters : {
            formatPrice : function(value,symbol){
                return symbol + value.toFixed(2);
            }
        }
    });
script>
监听属性watch
监听属性是Vue.js提供的一种用来监听和响应Vue实例中的数据变化的方式。
监听属性可以用以下两种情况定义
<script type="text/javascript">
    var vm = new Vue({
        el:'#example',
        data:{
            fullname : '韦小宝'
        },
        watch : {
            fullname : function(newValue,oldValue){
                alert("原值:"+oldValue+" 新值:"+newValue);
            }
        }
    })
    vm.fullname = '宋小宝';
script>
--------------------------------------------------------------------
<script type="text/javascript">
    var vm = new Vue({
        el:'#example',
        data:{
            fullname : '韦小宝'
        }
    })
    vm.$watch('fullname',function(newValue,oldValue){
        alert("原值:"+oldValue+" 新值:"+newValue);
    });
    vm.fullname = '宋小宝';
script>
案例:
DOCTYPE html>
<html lang="en">
<head>
    <meta charset="UTF-8">
    <meta http-equiv="X-UA-Compatible" content="IE=edge">
    <meta name="viewport" content="width=device-width, initial-scale=1.0">
    <title>Documenttitle>
head>
<body>
    <script src="https://cdn.jsdelivr.net/npm/vue/dist/vue.js">script>
    <div id="app">
        ¥<input type="text" v-model="rmb"><br>
        $ <input type="text"v-model="dollar"><br>
        {{rmb|toRevert}}人民币 = {{dollar|toRevert}}美元
    div>
    <script>
        var app = new Vue({
            el:"#app",
            data:{
                rate:6.8,
                rmb:0,
                dollar:0
            },
            watch:{
                rmb:function(val){
                    this.dollar = val/this.rate;
                },
                dollar:function(val){
                    this.rmb = val*this.rate;
                }
            },
            filters:{
                toRevert:function(value){
                    //保留两位小数
                    return value.toFixed(2);
                }
            }


        })
    script>
body>
html>
vue指令综合练习,todolist
<html>

<head>
  <meta http-equiv="content-type" content="text/html; charset=UTF-8" />
  <title>小黑记事本title>
  <meta http-equiv="content-type" content="text/html; charset=UTF-8" />
  <meta name="robots" content="noindex, nofollow" />
  <meta name="googlebot" content="noindex, nofollow" />
  <meta name="viewport" content="width=device-width, initial-scale=1" />
  <link rel="stylesheet" type="text/css" href="./css/index.css" />
head>

<body>

  <section id="todoapp">

    <header class="header">
      <h1>小黑记事本h1>
      <input v-model="inputValue" @keyup.enter="add" autofocus="autofocus" autocomplete="off" placeholder="请输入任务"
        class="new-todo" />
    header>

    <section class="main">
      <ul class="todo-list">
        <li class="todo" v-for="(item,index) in list">
          <div class="view">
            <span class="index">{{ index+1 }}.span>
            <label>{{ item }}label>
            <button class="destroy" @click="remove(index)">button>
          div>
        li>
      ul>
    section>

    <footer class="footer" v-show="list.length!=0">
      <span class="todo-count" v-if="list.length!=0">
        <strong>{{ list.length }}strong> items left
      span>
      <button v-show="list.length!=0" class="clear-completed" @click="clear">
        Clear
      button>
    footer>
  section>

  <footer class="info">
    <p>

    p>
  footer>

  <script src="https://cdn.jsdelivr.net/npm/vue/dist/vue.js">script>
  <script>
    var app = new Vue({
      el: "#todoapp",
      data: {
        list: ["写代码", "吃饭饭", "睡觉觉"],
        inputValue: "好好学习,天天向上"
      },
      methods: {
        add: function () {
          this.list.push(this.inputValue);
        },
        remove: function (index) {
          console.log("删除");
          console.log(index);
          this.list.splice(index, 1);
        },
        clear: function () {
          this.list = [];
        }
      },
    })
  script>
body>

html>
html,
body {
  margin: 0;
  padding: 0;
}
body {
  background: #fff;
}
button {
  margin: 0;
  padding: 0;
  border: 0;
  background: none;
  font-size: 100%;
  vertical-align: baseline;
  font-family: inherit;
  font-weight: inherit;
  color: inherit;
  -webkit-appearance: none;
  appearance: none;
  -webkit-font-smoothing: antialiased;
  -moz-osx-font-smoothing: grayscale;
}

body {
  font: 14px "Helvetica Neue", Helvetica, Arial, sans-serif;
  line-height: 1.4em;
  background: #f5f5f5;
  color: #4d4d4d;
  min-width: 230px;
  max-width: 550px;
  margin: 0 auto;
  -webkit-font-smoothing: antialiased;
  -moz-osx-font-smoothing: grayscale;
  font-weight: 300;
}

:focus {
  outline: 0;
}

.hidden {
  display: none;
}

#todoapp {
  background: #fff;
  margin: 180px 0 40px 0;
  position: relative;
  box-shadow: 0 2px 4px 0 rgba(0, 0, 0, 0.2), 0 25px 50px 0 rgba(0, 0, 0, 0.1);
}

#todoapp input::-webkit-input-placeholder {
  font-style: italic;
  font-weight: 300;
  color: #e6e6e6;
}

#todoapp input::-moz-placeholder {
  font-style: italic;
  font-weight: 300;
  color: #e6e6e6;
}

#todoapp input::input-placeholder {
  font-style: italic;
  font-weight: 300;
  color: gray;
}

#todoapp h1 {
  position: absolute;
  top: -160px;
  width: 100%;
  font-size: 60px;
  font-weight: 100;
  text-align: center;
  color: rgba(175, 47, 47, .8);
  -webkit-text-rendering: optimizeLegibility;
  -moz-text-rendering: optimizeLegibility;
  text-rendering: optimizeLegibility;
}

.new-todo,
.edit {
  position: relative;
  margin: 0;
  width: 100%;
  font-size: 24px;
  font-family: inherit;
  font-weight: inherit;
  line-height: 1.4em;
  border: 0;
  color: inherit;
  padding: 6px;
  border: 1px solid #999;
  box-shadow: inset 0 -1px 5px 0 rgba(0, 0, 0, 0.2);
  box-sizing: border-box;
  -webkit-font-smoothing: antialiased;
  -moz-osx-font-smoothing: grayscale;
}

.new-todo {
  padding: 16px;
  border: none;
  background: rgba(0, 0, 0, 0.003);
  box-shadow: inset 0 -2px 1px rgba(0, 0, 0, 0.03);
}

.main {
  position: relative;
  z-index: 2;
  border-top: 1px solid #e6e6e6;
}

.toggle-all {
  width: 1px;
  height: 1px;
  border: none; /* Mobile Safari */
  opacity: 0;
  position: absolute;
  right: 100%;
  bottom: 100%;
}

.toggle-all + label {
  width: 60px;
  height: 34px;
  font-size: 0;
  position: absolute;
  top: -52px;
  left: -13px;
  -webkit-transform: rotate(90deg);
  transform: rotate(90deg);
}

.toggle-all + label:before {
  content: "❯";
  font-size: 22px;
  color: #e6e6e6;
  padding: 10px 27px 10px 27px;
}

.toggle-all:checked + label:before {
  color: #737373;
}

.todo-list {
  margin: 0;
  padding: 0;
  list-style: none;
  max-height: 420px;
  overflow: auto;
}

.todo-list li {
  position: relative;
  font-size: 24px;
  border-bottom: 1px solid #ededed;
  height: 60px;
  box-sizing: border-box;
}

.todo-list li:last-child {
  border-bottom: none;
}

.todo-list .view .index {
  position: absolute;
  color: gray;
  left: 10px;
  top: 20px;
  font-size: 16px;
}

.todo-list li .toggle {
  text-align: center;
  width: 40px;
  /* auto, since non-WebKit browsers doesn't support input styling */
  height: auto;
  position: absolute;
  top: 0;
  bottom: 0;
  margin: auto 0;
  border: none; /* Mobile Safari */
  -webkit-appearance: none;
  appearance: none;
}

.todo-list li .toggle {
  opacity: 0;
}

.todo-list li .toggle + label {
  /*
		Firefox requires `#` to be escaped - https://bugzilla.mozilla.org/show_bug.cgi?id=922433
		IE and Edge requires *everything* to be escaped to render, so we do that instead of just the `#` - https://developer.microsoft.com/en-us/microsoft-edge/platform/issues/7157459/
	*/
  background-image: url("data:image/svg+xml;utf8,%3Csvg%20xmlns%3D%22http%3A//www.w3.org/2000/svg%22%20width%3D%2240%22%20height%3D%2240%22%20viewBox%3D%22-10%20-18%20100%20135%22%3E%3Ccircle%20cx%3D%2250%22%20cy%3D%2250%22%20r%3D%2250%22%20fill%3D%22none%22%20stroke%3D%22%23ededed%22%20stroke-width%3D%223%22/%3E%3C/svg%3E");
  background-repeat: no-repeat;
  background-position: center left;
}

.todo-list li .toggle:checked + label {
  background-image: url("data:image/svg+xml;utf8,%3Csvg%20xmlns%3D%22http%3A//www.w3.org/2000/svg%22%20width%3D%2240%22%20height%3D%2240%22%20viewBox%3D%22-10%20-18%20100%20135%22%3E%3Ccircle%20cx%3D%2250%22%20cy%3D%2250%22%20r%3D%2250%22%20fill%3D%22none%22%20stroke%3D%22%23bddad5%22%20stroke-width%3D%223%22/%3E%3Cpath%20fill%3D%22%235dc2af%22%20d%3D%22M72%2025L42%2071%2027%2056l-4%204%2020%2020%2034-52z%22/%3E%3C/svg%3E");
}

.todo-list li label {
  word-break: break-all;
  padding: 15px 15px 15px 60px;
  display: block;
  line-height: 1.2;
  transition: color 0.4s;
}

.todo-list li.completed label {
  color: #d9d9d9;
  text-decoration: line-through;
}

.todo-list li .destroy {
  display: none;
  position: absolute;
  top: 0;
  right: 10px;
  bottom: 0;
  width: 40px;
  height: 40px;
  margin: auto 0;
  font-size: 30px;
  color: #cc9a9a;
  margin-bottom: 11px;
  transition: color 0.2s ease-out;
}

.todo-list li .destroy:hover {
  color: #af5b5e;
}

.todo-list li .destroy:after {
  content: "×";
}

.todo-list li:hover .destroy {
  display: block;
}

.todo-list li .edit {
  display: none;
}

.todo-list li.editing:last-child {
  margin-bottom: -1px;
}

.footer {
  color: #777;
  padding: 10px 15px;
  height: 20px;
  text-align: center;
  border-top: 1px solid #e6e6e6;
}

.footer:before {
  content: "";
  position: absolute;
  right: 0;
  bottom: 0;
  left: 0;
  height: 50px;
  overflow: hidden;
  box-shadow: 0 1px 1px rgba(0, 0, 0, 0.2), 0 8px 0 -3px #f6f6f6,
    0 9px 1px -3px rgba(0, 0, 0, 0.2), 0 16px 0 -6px #f6f6f6,
    0 17px 2px -6px rgba(0, 0, 0, 0.2);
}

.todo-count {
  float: left;
  text-align: left;
}

.todo-count strong {
  font-weight: 300;
}

.filters {
  margin: 0;
  padding: 0;
  list-style: none;
  position: absolute;
  right: 0;
  left: 0;
}

.filters li {
  display: inline;
}

.filters li a {
  color: inherit;
  margin: 3px;
  padding: 3px 7px;
  text-decoration: none;
  border: 1px solid transparent;
  border-radius: 3px;
}

.filters li a:hover {
  border-color: rgba(175, 47, 47, 0.1);
}

.filters li a.selected {
  border-color: rgba(175, 47, 47, 0.2);
}

.clear-completed,
html .clear-completed:active {
  float: right;
  position: relative;
  line-height: 20px;
  text-decoration: none;
  cursor: pointer;
}

.clear-completed:hover {
  text-decoration: underline;
}

.info {
  margin: 50px auto 0;
  color: #bfbfbf;
  font-size: 15px;
  text-shadow: 0 1px 0 rgba(255, 255, 255, 0.5);
  text-align: center;
}

.info p {
  line-height: 1;
}

.info a {
  color: inherit;
  text-decoration: none;
  font-weight: 400;
}

.info a:hover {
  text-decoration: underline;
}

/*
	Hack to remove background from Mobile Safari.
	Can't use it globally since it destroys checkboxes in Firefox
*/
@media screen and (-webkit-min-device-pixel-ratio: 0) {
  .toggle-all,
  .todo-list li .toggle {
    background: none;
  }

  .todo-list li .toggle {
    height: 40px;
  }
}

@media (max-width: 430px) {
  .footer {
    height: 50px;
  }

  .filters {
    bottom: 10px;
  }
}
综合案例-购物车
DOCTYPE html>
<html lang="en">
<head>
  <meta charset="UTF-8">
  <title>Titletitle>
  <link rel="stylesheet" href="style.css">
head>
<body>

<div id="app">
  <div v-if="books.length">
    <table>
      <thead>
      <tr>
        <th>th>
        <th>书籍名称th>
        <th>出版日期th>
        <th>价格th>
        <th>购买数量th>
        <th>操作th>
      tr>
      thead>
      <tbody>
      <tr v-for="(item, index) in books">
        <td>{{item.id}}td>
        <td>{{item.name}}td>
        <td>{{item.date}}td>
        <td>{{item.price | showPrice}}td>
        <td>
          <button @click="decrement(index)" v-bind:disabled="item.count <= 1">-button>
          {{item.count}}
          <button @click="increment(index)">+button>
        td>
        <td><button @click="removeHandle(index)">移除button>td>
      tr>
      tbody>
    table>
    <h2>总价格: {{totalPrice | showPrice}}h2>
  div>
  <h2 v-else>购物车为空h2>
div>

<script src="../js/vue.js">script>
<script src="main.js">script>
<script>
script>
body>
html>
table {
  border: 1px solid #e9e9e9;
  border-collapse: collapse;
  border-spacing: 0;
}

th, td {
  padding: 8px 16px;
  border: 1px solid #e9e9e9;
  text-align: left;
}

th {
  background-color: #f7f7f7;
  color: #5c6b77;
  font-weight: 600;
}
const app = new Vue({
  el: '#app',
  data: {
    books: [
      {
        id: 1,
        name: '《算法导论》',
        date: '2006-9',
        price: 85.00,
        count: 1
      },
      {
        id: 2,
        name: '《UNIX编程艺术》',
        date: '2006-2',
        price: 59.00,
        count: 1
      },
      {
        id: 3,
        name: '《编程珠玑》',
        date: '2008-10',
        price: 39.00,
        count: 1
      },
      {
        id: 4,
        name: '《代码大全》',
        date: '2006-3',
        price: 128.00,
        count: 1
      },
    ]
  },
  methods: {
    // getFinalPrice(price) {
    //   return '¥' + price.toFixed(2)
    // }
    increment(index) {
      this.books[index].count++
    },
    decrement(index) {
      this.books[index].count--
    },
    removeHandle(index) {
      this.books.splice(index, 1)
    }
  },
  computed: {
    totalPrice() {
      // 1.普通的for循环
      // let totalPrice = 0
      // for (let i = 0; i < this.books.length; i++) {
      //   totalPrice += this.books[i].price * this.books[i].count
      // }
      // return totalPrice

      // 2.for (let i in this.books)
      // let totalPrice = 0
      // for (let i in this.books) {
      //   const book = this.books[i]
      //   totalPrice += book.price * book.count
      // }
      //
      // return totalPrice

      // 3.for (let i of this.books)
      // let totalPrice = 0
      // for (let item of this.books) {
      //   totalPrice += item.price * item.count
      // }
      // return totalPrice

      return this.books.reduce(function (preValue, book) {
        return preValue + book.price * book.count
      }, 0)
    }
  },
  filters: {
    showPrice(price) {
      return '¥' + price.toFixed(2)
    }
  }
})
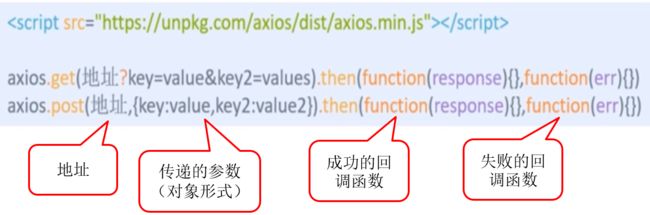
2.4 网络应用axios
axios封装了ajax只有请求功能,体量小,与vue框架结合非常方便。
Axios 是一个基于 promise 的 HTTP 库,可以用在浏览器和 node.js 中。
引入js库导包
联网cdn:
本地官网下载即可
get方式可以查询本地或网络数据


post访问方式,可以改变本地或网络数据
推荐接口
•天行数据:https://www.tianapi.com/
网易云API:https://autumnfish.cn/
基本使用
DOCTYPE html>
<html lang="en">

<head>
    <meta charset="UTF-8" />
    <meta name="viewport" content="width=device-width, initial-scale=1.0" />
    <meta http-equiv="X-UA-Compatible" content="ie=edge" />
    <title>axios基本使用title>
head>

<body>
    <input type="button" value="get请求" class="get">
    <input type="button" value="post请求" class="post">

    <script src="https://unpkg.com/axios/dist/axios.min.js">script>
    <script>
        /*
            接口1:随机笑话
            请求地址:https://autumnfish.cn/api/joke/list
            请求方法:get
            请求参数:num(笑话条数,数字)
            响应内容:随机笑话
        */
        document.querySelector(".get").onclick = function () {
            axios.get("https://autumnfish.cn/api/joke/list?num=6")
            // axios.get("https://autumnfish.cn/api/joke/list1234?num=6")
            .then(function (response) {
                console.log(response);
              },function(err){
                  console.log(err);
              })
        }
        /*
             接口2:用户注册
             请求地址:https://autumnfish.cn/api/user/reg
             请求方法:post
             请求参数:username(用户名,字符串)
             响应内容:注册成功或失败
         */
        document.querySelector(".post").onclick = function () {
            axios.post("https://autumnfish.cn/api/user/reg",{username:"盐焗西兰花"})
            .then(function(response){
                console.log(response);
                console.log(this.skill);
            },function (err) {
                console.log(err);
              })
          }

    script>
body>

html>
结合vue
get
DOCTYPE html>
<html lang="en">

<head>
    <meta charset="UTF-8">
    <meta http-equiv="X-UA-Compatible" content="IE=edge">
    <meta name="viewport" content="width=device-width, initial-scale=1.0">
    <title>Documenttitle>
head>

<body>
    <div id="app">
        <button @click="chaxun">点击button>
        <ol type="1">
            <li v-for="item in lists">{{item}}li>
        ol>

    div>
    <script src="vue.js">script>
    <script src="axios.min.js">script>
    <script>
        new Vue({
            el: "#app",
            data: {
                lists: []
            },
            methods: {
                chaxun: function () {
                    axios.get("https://autumnfish.cn/api/joke/list?num=3").then(response => {
                        console.log(response)
                        this.lists = response.data.jokes
                    }, err => {

                    });
                }
            }
        });
    script>
body>

html>
post
DOCTYPE html>
<html lang="en">

<head>
    <meta charset="UTF-8">
    <meta http-equiv="X-UA-Compatible" content="IE=edge">
    <meta name="viewport" content="width=device-width, initial-scale=1.0">
    <title>Documenttitle>
head>

<body>
    <div id="app">
        <p>用户名:<input type="text" v-model="msg">p>
        <button @click="register">注册button>
    div>
    <script src="vue.js">script>
    <script src="axios.min.js">script>
    <script>
        new Vue({
            el: "#app",
            data: {
                msg: ''
            },
            methods: {
                register: function () {
                    axios.post("https://autumnfish.cn/api/user/reg", { username: this.msg }).then(response => {
                        alert(response.data)
                    }, err => {
                        console.log(err)
                    })
                }

            }
        })
    script>
body>

html>
综合案例天气预报
DOCTYPE html>
<html lang="en">
<head>
    <meta charset="UTF-8">
    <meta http-equiv="X-UA-Compatible" content="IE=edge">
    <meta name="viewport" content="width=device-width, initial-scale=1.0">
    <title>Documenttitle>
    <style>
        button{
            background-color: #1dc9f4;
            text-align: center;
            color: #d0f4fc;
        }
        input{
            width: 800px;
            height: 30px;
        }
        .box1{
            margin-left: 500px;
        }
        ul {
            display: flex;
        }

        li {
            list-style: none;
            flex: 1;
            text-align: center;
            border-right: 1px solid #ccc;
            height: 300px
        }

        li:last-child {
            border-right: none;
        }

        li:first-child {
            background-color: lightyellow;
        }

        h2 {
            color: orange;
            height: 40px
        }

        li p:nth-child(2) {
            color: orange;
            height: 40px
        }
    style>
head>
<body>

    <script src="https://unpkg.com/axios/dist/axios.min.js">script>
    <script src="https://cdn.jsdelivr.net/npm/vue/dist/vue.js">script>
    <div id="app">
        <h2 style="color:#36cdf4;" align="center">天气查询h2>
        <div class="box1">
            <input type="text" placeholder="输入城市" v-model="city"  @keyup.enter="search"><button style="height: 40px;width: 60px;"@click="search">查询button>
        div>
        <p align="center">
        <span @click="select('北京')">北京span> <span @click="select('上海')">上海span>
        <span @click="select('广州')">广州span> <span @click="select('深圳')">深圳span>
        <span @click="select('郑州')">郑州span> <span @click="select('武汉')">武汉span>
        p>
        <h2 style="color: red;" v-model="city">{{city}}h2>
        <ul>
            <li v-for=" item in weathers">
                <h2>{{item.weather}}h2>
                <p>{{item.lowest}}~{{item.highest}}p>
                <p>{{item.date}} {{item.week}}p>
                <p>{{item.tips}}p>
            li>
        ul>
    div>
    <script>
        var app = new Vue({
            el:"#app",
            data:{
             city:"南京",
             weathers:[]
            },
            methods:{
                search:function(){
                    if (this.city != "") {
                    axios.get("http://api.tianapi.com/txapi/tianqi/index?key=f1038a07de3b76e998e22d422dd4fc1a&city="+this.city+"市").then(
                    response=>{
                    this.weathers = response.data.newslist;
                }
                    ,err => {
                                alert(err)
                            })
                    }
                },
                select:function(value){
                    this.city = value;
                    this.search();
                },
            },
            mounted: function () {
                     this.search();
                 }
        })
    script>
body>
html>
综合案例音乐播放器
源码下载:https://gitee.com/xiaoqiang001/vue_material
DOCTYPE html>
<html lang="en">

<head>
  <meta charset="UTF-8" />
  <meta name="viewport" content="width=device-width, initial-scale=1.0" />
  <meta http-equiv="X-UA-Compatible" content="ie=edge" />
  <title>悦听playertitle>

  <link rel="stylesheet" href="./css/index.css">
head>

<body>
  <div class="wrap">

    <div class="play_wrap" id="player">
      <div class="search_bar">
        <img src="images/player_title.png" alt="" />

        <input type="text" autocomplete="off" v-model="query" @keyup.enter="searchMusic" />
      div>
      <div class="center_con">

        <div class='song_wrapper'>
          <ul class="song_list">
            <li v-for="item in musicList">
              <a href="javascript:;" @click="playMusic(item.id)">a>
              <b>{{ item.name }}b>
              <span v-if="item.mvid!=0" @click="playMV(item.mvid)"><i>i>span>
            li>
          ul>
          <img src="images/line.png" class="switch_btn" alt="">
        div>

        <div class="player_con" :class="{playing:isPlaying}">
          <img src="images/player_bar.png" class="play_bar" />

          <img src="images/disc.png" class="disc autoRotate" />
          <img :src="musicCover" class="cover autoRotate" />
        div>

        <div class="comment_wrapper">
          <h5 class='title'>热门留言h5>
          <div class='comment_list'>
            <dl v-for="item in hotComments">
              <dt><img :src="item.user.avatarUrl" alt="">dt>
              <dd class="name">{{ item.nickname}}dd>
              <dd class="detail">
                {{ item.content }}
              dd>
            dl>
          div>
          <img src="images/line.png" class="right_line">
        div>
      div>
      <div class="audio_con">
        <audio ref='audio' @play="play" @pause="pause" :src="musicUrl" controls autoplay loop class="myaudio">audio>
      div>
      <div class="video_con" v-show="isShow" style="display: none;">
        <video :src="mvUrl" controls="controls">video>
        <div class="mask" @click="hide">div>
      div>
    div>
  div>

  <script src="https://cdn.jsdelivr.net/npm/vue/dist/vue.js">script>

  <script src="https://unpkg.com/axios/dist/axios.min.js">script>
  <script src="./js/main.js">script>
body>

html>
vue
/*
  1:歌曲搜索接口
    请求地址:https://autumnfish.cn/search
    请求方法:get
    请求参数:keywords(查询关键字)
    响应内容:歌曲搜索结果

  2:歌曲url获取接口
    请求地址:https://autumnfish.cn/song/url
    请求方法:get
    请求参数:id(歌曲id)
    响应内容:歌曲url地址
  3.歌曲详情获取
    请求地址:https://autumnfish.cn/song/detail
    请求方法:get
    请求参数:ids(歌曲id)
    响应内容:歌曲详情(包括封面信息)
  4.热门评论获取
    请求地址:https://autumnfish.cn/comment/hot?type=0
    请求方法:get
    请求参数:id(歌曲id,地址中的type固定为0)
    响应内容:歌曲的热门评论
  5.mv地址获取
    请求地址:https://autumnfish.cn/mv/url
    请求方法:get
    请求参数:id(mvid,为0表示没有mv)
    响应内容:mv的地址
*/
var app = new Vue({
  el: "#player",
  data: {
    // 查询关键字
    query: "",
    // 歌曲数组
    musicList: [],
    // 歌曲地址
    musicUrl: "",
    // 歌曲封面
    musicCover: "",
    // 歌曲评论
    hotComments: [],
    // 动画播放状态
    isPlaying: false,
    // 遮罩层的显示状态
    isShow: false,
    // mv地址
    mvUrl: ""
  },
  methods: {
    // 歌曲搜索
    searchMusic: function() {
      var that = this;
      axios.get("https://autumnfish.cn/search?keywords=" + this.query).then(
        function(response) {
          // console.log(response);
          that.musicList = response.data.result.songs;
          console.log(response.data.result.songs);
        },
        function(err) {}
      );
    },
    // 歌曲播放
    playMusic: function(musicId) {
      //   console.log(musicId);
      var that = this;
      // 获取歌曲地址
      axios.get("https://autumnfish.cn/song/url?id=" + musicId).then(
        function(response) {
          // console.log(response);
          // console.log(response.data.data[0].url);
          that.musicUrl = response.data.data[0].url;
        },
        function(err) {}
      );

      // 歌曲详情获取
      axios.get("https://autumnfish.cn/song/detail?ids=" + musicId).then(
        function(response) {
          // console.log(response);
          // console.log(response.data.songs[0].al.picUrl);
          that.musicCover = response.data.songs[0].al.picUrl;
        },
        function(err) {}
      );

      // 歌曲评论获取
      axios.get("https://autumnfish.cn/comment/hot?type=0&id=" + musicId).then(
        function(response) {
          // console.log(response);
          // console.log(response.data.hotComments);
          that.hotComments = response.data.hotComments;
        },
        function(err) {}
      );
    },
    // 歌曲播放
    play: function() {
      // console.log("play");
      this.isPlaying = true;
    },
    // 歌曲暂停
    pause: function() {
      // console.log("pause");
      this.isPlaying = false;
    },
    // 播放mv
    playMV: function(mvid) {
      var that = this;
      axios.get("https://autumnfish.cn/mv/url?id=" + mvid).then(
        function(response) {
          // console.log(response);
          console.log(response.data.data.url);
          that.isShow = true;
          that.mvUrl = response.data.data.url;
        },
        function(err) {}
      );
    },
    // 隐藏
    hide: function() {
      this.isShow = false;
    }
  }
});