音视频学习(二十一)——rtmp收流(tcp方式)
前言
本文主要介绍rtmp协议收流流程,在linux上搭建rtmp服务器,通过自研的rtmp收流库发起取流请求,使用ffmpeg+qt实现视频流的解码与播放。
关于rtmp协议基础介绍可查看:https://blog.csdn.net/www_dong/article/details/131026072
环境搭建
nginx-rtmp-module下载
# 下载地址,下载zip包即可
https://github.com/arut/nginx-rtmp-module
nginx编译与安装
- 下载nginx
# 下载地址
http://nginx.org/en/download.html
- 解压,将nginx-rtmp-module拷贝至nginx-1.24.0目录,如下所示:
- 配置nginx编译环境
# 步骤1
yum -y install gcc pcre pcre-devel zlib zlib-devel openssl openssl-devel

# 步骤2
yum -y install libxml2 libxml2-dev
yum -y install libxslt-devel
- 生成Makefile文件
# 在/home/rtmp/nginx-1.24.0下执行如下命令
./configure --add-module=./nginx-rtmp-module-master --with-http_ssl_module --with-http_ssl_module --with-http_xslt_module --with-http_flv_module --with-debug --with-http_gzip_static_module
- 修改nginx.conf文件,进入conf/文件夹下,编译nginx.conf在末尾增加如下内容:
rtmp {
    server {
        listen 1935;               #监听端口,若被占用,可以更改
        chunk_size 4000;           #上传flv文件块儿的大小
        application live {         #创建一个叫live的应用
             live on;              #开启live的应用
             allow publish 192.168.191.100;#192.168.191.100为服务器ip
             allow play all;
        }
    }
}
- 编译、安装
# 在/home/rtmp/nginx-1.24.0下执行如下命令
make
make install
- 启动nginx
# 测试配置文件
cd /usr/local/nginx
./sbin/nginx -t

# 有如下打印说明配置正常
[root@localhost nginx]# ./sbin/nginx  -t
nginx: the configuration file /usr/local/nginx/conf/nginx.conf syntax is ok
nginx: configuration file /usr/local/nginx/conf/nginx.conf test is successful

# 启动nginx
./sbin/nginx

# 查看是否正常启动
ps -aux | grep nginx
- 网页访问,出现如下内容说明启动成功
ffmepg推流
- 安装ffmepg,将视频文件拷贝至安装路径下,如图所示:
- 执行如下命令
ffmpeg -re -stream_loop -1 -i test.h264 -c copy -f flv rtmp://192.168.191.100:1935/live/testrtmp
以上步骤执行完即完成rtmp服务器搭建。
设计
拉流流程
说明:客户端—自研的rtmp收流库,服务器—上述搭建的rtmp服务器
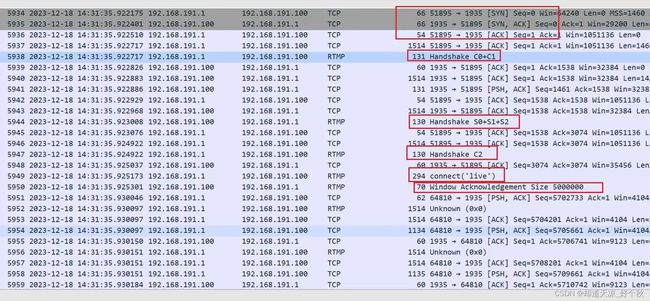
- 客户端发送tcp握手请求,和服务器完成tcp握手和rtmp握手;
- 客户端发送命令消息中的“连接”(connect)到服务器,请求与一个服务应用实例建立连接;
- 客户端发送网络连接命令的“创建流”(createStream)消息到服务端,以创建消息通信的逻辑通道。音频、视频和元数据的发布通过使用createStream命令创建的流通道执行。服务端发送createStream的“应答消息”(_result);
- 客户端发送网络流命令中的“播放”(play)到服务端;
- 服务端发送协议控制消息中的“设置块大小”(Set Chunk Size)到客户端设置chunk大小;
- 服务器发送另一个协议控制消息(用户控制),指定事件“StreamIsRecorded”和该消息中的流ID。消息在前2字节中携带事件类型,在后4字节中携带流ID;
- 服务端发送用户控制消息中的“流开始”(StreamBegin)消息到客户端,通知客户端流成功创建,可用于通信;
- 如果客户端发送的播放命令成功,则服务器发送onStatus命令消息NetStream.Play.Start和NetStream.Play.Reset。仅当客户端发送的播放命令设置了重置标志时,服务器才会发送NetStream.Play.Reset。如果未找到要播放的流,服务器将发送onStatus消息NetStream.Play.StreamNotFound;
- 服务端发送音视频数据到客户端;
代码设计
- 上层url解析
// rtmp://192.168.191.100:1935/live/testrtmp
// appName:"live"
// streamPath: "testrtmp"
// tcurl: "rtmp://192.168.191.100:1935/live"
int CRtmpTcpStreamReceiver::ParseUrl_(std::string& appName, std::string& streamPath, std::string& tcurl)
{
	if (m_rtmpUrl.empty())
		return -1;

	std::string url = m_rtmpUrl;
	std::string::size_type pos_0 = url.rfind("/");
	if (std::string::npos == pos_0)
		return -1;

	// "testrtmp"
	streamPath = url.substr(pos_0+1, url.length());
	// "rtmp://192.168.191.100:1935/live"
	tcurl = url.substr(0, pos_0);

	std::string tmpUrl = tcurl;
	std::string::size_type pos_1 = url.rfind("rtmp://");
	if (std::string::npos == pos_1)
		return -1;

	// ippUrl: "192.168.191.100:1935/live"
	std::string ippUrl = tmpUrl.substr(pos_1+7, tmpUrl.length());
	std::string::size_type pos_2 = ippUrl.rfind("/");
	if (std::string::npos == pos_2)
		return -1;

	// "live"
	appName = ippUrl.substr(pos_2+1, ippUrl.length());

	// "192.168.191.100:1935"
	std::string ipp = ippUrl.substr(0, pos_2);
	std::string::size_type pos_3 = ipp.rfind(":");
	if (std::string::npos == pos_3)
		return -1;

	m_rtmpIP = ipp.substr(0, pos_3);
	m_rtmpPort = atoi(ipp.substr(pos_3+1, ipp.length()).c_str());

	return 0;
}
- 开始tcp握手和rtmp握手
int CRtmpTcpStreamReceiver::InitRtmpSession_()
{
    // rtmp url解析
	std::string appName = "", streamPath = "", turl = "";
	if (0 != ParseUrl_(appName, streamPath, turl))
	{
		return -1;
	}

	do
	{
        // tcp连接
		m_tcpClient = std::make_shared(nullptr, this);
		if (!m_tcpClient.get()
			|| 0 != m_tcpClient->TcpCreate()
			|| 0 != m_tcpClient->TcpConnect(m_rtmpIP.c_str(), m_rtmpPort)
			|| 0 != m_tcpClient->TcpSetNoBlock(false)
			|| 0 != m_tcpClient->TcpRecvTimeout(5))
		{
			break;
		}

        // CRtmpCommand为librtmp库接口封装类
		m_command = std::make_shared(m_tcpClient, m_func, m_user);
		if (!m_command.get())
		{
			break;
		}

        // 创建接收实例
		if (0 != m_command->Create(appName, streamPath, turl)
			|| 0 != m_command->Start(1))
		{
			break;
		}

		return 0;
	} while (0);

	UnInitRtmpSession_();
	return -1;
}
- 启动线程接收数据
void CRtmpTcpStreamReceiver::RtmpWorker()
{
	std::shared_ptr dataPacket(new char[RTMP_STREAM_DATA_SIZE], std::default_delete());
	memset(dataPacket.get(), 0x00, RTMP_STREAM_DATA_SIZE);
	int recvLen = 0;

	while (m_running)
	{
        // tcp数据接收
		recvLen = m_tcpClient->TcpRecv(dataPacket.get(), RTMP_STREAM_DATA_SIZE);
		if (recvLen <= 0)
		{
			continue;
		}

        // 塞数据
		if (0 != m_command->InputData(dataPacket.get(), recvLen))
		{
			break;
		}

		memset(dataPacket.get(), 0x00, RTMP_STREAM_DATA_SIZE);
	}
}


