nginx反向代理
nginx反向代理
正向代理
正向代理代理客户端,正向代理是客户端与目标服务器之间的中间人,代表客户端向服务器发送请求,可以提供匿名访问、访问控制和缓存加速等功能
反向代理
反向代理是目标服务器与客户端之间的中间人,代表目标服务器接受请求并进行转发,可以实现负载均衡、安全保护、缓存加速和SSL加密等功能。
反向代理参数
#官方文档:https://nginx.org/en/docs/http/ngx_http_proxy_module.html
proxy_pass;
#用来设置将客户端请求转发给的后端服务器的主机,可以是主机名(将转发至后端服务做为主机头首部)、IP
地址:端口的方式
#也可以代理到预先设置的主机群组,需要模块ngx_http_upstream_module支持
proxy_hide_header field;
#用于nginx作为反向代理的时候,在返回给客户端http响应时,隐藏后端服务器相应头部的信息,可以设置在http,server或location块
proxy_pass_header field;
#默认nginx在响应报文中不传递后端服务器的首部字段Date, Server, X-Pad, X-Accel等参数,如果要传递的话则要使用 proxy_pass_header field声明将后端服务器返回的值传递给客户端
proxy_pass_header Server;
proxy_pass_header Date;
#透传后端服务器的Server和Date首部给客户端,同时不再响应报中显示前端服务器的Server字段
proxy_pass_request_body on | off;
#是否向后端服务器发送HTTP实体部分,可以设置在http,server或location块,默认即为开启
proxy_pass_request_headers on | off;
#是否将客户端的请求头部转发给后端服务器,可以设置在http,server或location块,默认即为开启

真实服务器192.168.65.102
[root@localhost ~]#cd /usr/share/nginx/html/
[root@localhost html]#vim test.html
[root@localhost html]#cat test.html


this is a page


[root@localhost html]#nginx -s reload

代理服务器192.168.65.104
[root@localhost html]# cd /etc/nginx/conf.d/
[root@localhost conf.d]# vim test.conf
[root@localhost conf.d]# cat test.conf
server {
   listen 80;
   server_name www.test.com;
   root /data/nginx/html/;
   location / {
   proxy_pass http://192.168.65.102;
   }
}
[root@localhost conf.d]# nginx -s reload


实现了代理
[root@localhost ~]# curl -L 192.168.65.102/test.html


this is a page


[root@localhost ~]#
[root@localhost ~]# curl -L 192.168.65.104/test.html


this is a page
指定location实现反向代理
server {
   listen 80;
   server_name www.test.com;
   root /data/nginx/html/;
   location /web {
   proxy_pass http://192.168.65.102:80/;#注意有后面的/, 表示置换,将location后的/webj加到80后
   proxy_pass http://192.168.65.102:80;#后面没有 / , 表示追加
   }
}

location ~* /web {
   proxy_pass http://192.168.65.102:80 #正则表达式不能加/
   }
location实现动静分离
代理服务器192.168.65.104
静态服务器192.168.65.102
动态服务器192.168.65.105

代理
[root@localhost conf.d]# vim test.conf
[root@localhost conf.d]# cat test.conf
server {
   listen 80;
   server_name www.test.com;
   root /data/nginx/html/;
   location /static {
   proxy_pass http://192.168.65.102;
   }
   location /api {
   proxy_pass http://192.168.65.105;
   }
}
[root@localhost conf.d]# nginx -s reload

静态服务器
[root@localhost ~]#cd /usr/share/nginx/html/
[root@localhost html]#mkdir static
[root@localhost html]#echo static >> static/index.html
[root@localhost html]#echo static >> static/index.html
[root@localhost html]#echo static >> static/index.html
[root@localhost html]#cat static/index.html
static
static
static

动态服务器
[root@localhost ~]# yum -y install httpd
[root@localhost ~]# cd /var/www/html
[root@localhost html]# ls
[root@localhost html]# mkdir api
[root@localhost html]# echo api >> api/index.html
[root@localhost html]# echo api >> api/index.html
[root@localhost html]# echo api >> api/index.html
[root@localhost html]# cat api/index.html
api
api
api
[root@localhost html]# systemctl  start httpd.service
反向代理示例:缓存功能
这个功能只能写在http语句中

proxy_cache_path /data/nginx/proyxcache   levels=1:1:1 keys_zone=proxycache:20m inactive=120s max_size=1g;
proxy_cache_path #指明缓存存在哪里
levels=1:2:2 #定义缓存目录结构层次,1:2:2可以生成2^4x2^8x2^8=2^20=1048576个目录
keys_zone=proxycache:20m #指内存中缓存的大小,主要用于存放key和metadata(如:使用次数),一般1M可存放8000个左右的key
inactive=120s  #缓存有效时间
max_size=1g; #最大磁盘占用空间,磁盘存入文件内容的缓存空间最大值

server {
   listen 80;
   proxy_cache proxycache;
   proxy_cache_key $request_uri;#对指定的数据进行MD5的运算做为缓存的key
   proxy_cache_valid 200 302 301 10m;#指定的状态码返回的数据缓存多长时间
   proxy_cache_valid any 5m; #除指定的状态码返回的数据以外的缓存多长时间,必须设置,否则不会缓存
   }
在代理服务器
主配置文件http语句中添加
proxy_cache_path /data/nginx/proyxcache   levels=1:1:1 keys_zone=proxycache:20m inactive=120s max_size=1g;#添加在include语句上面
在子配置文件中添加
server {
   proxy_cache proxycache;
   proxy_cache_key $request_uri;
   proxy_cache_valid 200 302 301 10m;
   proxy_cache_valid any 5m;
   }
添加这个功能后,断开服务器,有缓存也能访问出
实现反向代理客户端IP透传
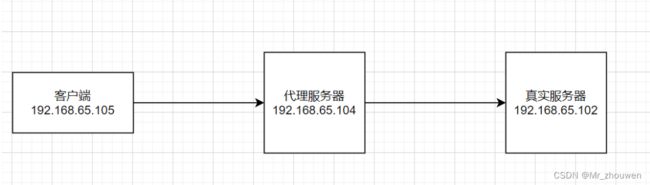
一级代理
真实服务器102
[root@localhost ~]# yum -y install httpd
[root@localhost ~]#cd /var/www/html
[root@localhost html]#echo real server > index.html
[root@localhost html]#ls
index.html
[root@localhost html]#systemctl start httpd
代理服务器104
[root@localhost yum.repos.d]# cd /etc/nginx/conf.d/
[root@localhost conf.d]# ls
default  test.conf
[root@localhost conf.d]# vim test.conf
[root@localhost conf.d]# cat test.conf
server {
   listen 80;
   server_name www.test.com;
   root /data/nginx/html/;
   location / {
   proxy_pass http://192.168.65.102;
   }
}
[root@localhost conf.d]# systemctl start nginx
用客户端访问
[root@localhost ~]# curl 192.168.65.104
real server

查看真实服务器的日志
[root@localhost html]#tail -f /var/log/httpd/access_log
192.168.65.104 - - [26/Sep/2023:17:22:16 +0800] "GET / HTTP/1.0" 200 12 "-" "cu
代理服务器
[root@localhost conf.d]# vim test.conf
[root@localhost conf.d]# nginx -s reload
[root@localhost conf.d]# cat test.conf
server {
   listen 80;
   server_name www.test.com;
   root /data/nginx/html/;
   proxy_set_header test "ni hao";#在日志添加nihao
   location / {
   proxy_pass http://192.168.65.102;
   }
}

真实服务器
[root@localhost conf]#vim httpd.conf
LogLevel warn

    #
    # The following directives define some format nicknames for use with
    # a CustomLog directive (see below).
    #
    LogFormat "%h %l %u %t \"%r\" %>s %b \"%{Referer}i\" \"%{User-Agent}i\" \"%{test}i\"" combined 添加\"%{test}i\"
    LogFormat "%h %l %u %t \"%r\" %>s %b" common


      # You need to enable mod_logio.c to use %I and %O
      LogFormat "%h %l %u %t \"%r\" %>s %b \"%{Referer}i\" \"%{User-Agent}i\" %I %O" combinedio


[root@localhost conf]#systemctl restart httpd
[root@localhost conf]#tail -f /var/log/httpd/access_log
192.168.65.104 - - [26/Sep/2023:17:22:16 +0800] "GET / HTTP/1.0" 200 12 "-" "curl/7.29.0"
192.168.65.104 - - [26/Sep/2023:17:40:22 +0800] "GET / HTTP/1.0" 200 12 "-" "curl/7.29.0" "ni hao"#日志中多了nihao
二级代理
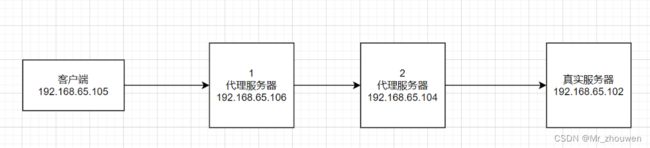
104
[root@localhost nginx]# scp /etc/nginx/conf.d/test.conf  192.168.65.106:/etc/nginx/conf.d/
[email protected]'s password:
test.conf                                               100%  174   154.0KB/s   00:00

106
[root@localhost ~]# yum -y install epel-release
[root@localhost ~]# yum -y install nginx
[root@localhost ~]# cd /etc/nginx/conf.d/
[root@localhost conf.d]# ls
test.conf
[root@localhost conf.d]# vim test.conf
[root@localhost conf.d]# cat test.conf
server {
   listen 80;
   server_name www.test.com;
   root /data/nginx/html/;
   proxy_set_header X-Forwarded-For $proxy_add_x_forwarded_for;
   location / {
   proxy_pass http://192.168.65.104;
   }
}

[root@localhost conf.d]# nginx -s reload

104
[root@localhost conf.d]# vim test.conf
[root@localhost conf.d]# cat test.conf
server {
   listen 80;
   server_name www.test.com;
   root /data/nginx/html/;
   proxy_set_header X-Forwarded-For $proxy_add_x_forwarded_for;
   location / {
   proxy_pass http://192.168.65.102;
   }
}
[root@localhost conf.d]# nginx -s reload

102
[root@localhost conf]#vim httpd.conf
LogFormat "%h %l %u %t \"%r\" %>s %b \"%{Referer}i\" \"%{User-Agent}i\" \"%{X-Forwarded-For}i\"" combined
    LogFormat "%h %l %u %t \"%r\" %>s %b" common
[root@localhost conf]#systemctl restart httpd

105客户端访问
102 查看访问日志
[root@localhost conf]#tail -f /var/log/httpd/access_log
192.168.65.104 - - [26/Sep/2023:17:22:16 +0800] "GET / HTTP/1.0" 200 12 "-" "curl/7.29.0"
192.168.65.104 - - [26/Sep/2023:17:40:22 +0800] "GET / HTTP/1.0" 200 12 "-" "curl/7.29.0" "ni hao"
192.168.65.104 - - [26/Sep/2023:18:27:25 +0800] "GET / HTTP/1.0" 200 12 "-" "curl/7.29.0" "192.168.65.105, 192.168.65.106"
反向代理负载均衡
官方文档: https://nginx.org/en/docs/http/ngx_http_up
格式
upstream name {
 server .....
 ......
}
代理服务器
主配置文件
upstream web {
 server 192.168.65.102:80
 server 192.168.65.102:80
}
子配置文件
server {
   listen 80;
   server_name www.test.com;
   root /data/nginx/html/;
   proxy_set_header X-Forwarded-For $proxy_add_x_forwarded_for;
   location / {
   proxy_pass http://web;
   }
backup  #设置为备份服务器,当所有后端服务器不可用时,才会启用此备用服务器 sorry server   自己不能转自己
max_fails=3  #最大连接3个
down    #标记为down状态

**调度算法**
1、轮询 一人一次
2、加权轮询  加比重,weight=5  服务器之间的概率是1比5
3、最少连接数  对比后端web (真是服务器)谁接待连接数少,优先将新来的连接分配给谁
4、hash
   ip  hash #每个请求按访问IP的hash结果分配,同一个IP客户端固定访问一个后端服务器。可以保证来自同一ip的请求被
打到固定的机器上,可以解决session问题。
   url hash #按访问url的hash结果来分配请求,使每个url定向到同一个后端服务器。一旦缓存住了资源,再次收到请求,就可以从缓存中读取。
5、fair  更智能的调度算法,响应的时间来等待调度,需要编译upstream_fair