基于Servlet+JDBC实现的基础博客系统>>系列3 -- Servlet后端服务器搭建
目录
前言
1. 前期准备
2. Model层
2.1 数据库的设计
2.2 数据库表对应的实体类实现
User类
Blog类
2.3 JDBC 工具类实现
2.4 UserDao 的实现
2.5 BlogDao 的实现
3. Controller 层实现
3.1 博客列表页
3.1.1 约定前后端交互接口
3.1.2 编写后端代码
3.1.3 编写前端代码
3.2 博客详情页
3.2.1 约定前后端交互接口
3.2.2 编写后端代码
3.2.3 编写前端代码
3.3 登录功能
3.3.1 约定前后端交互接口
3.3.2 编写后端代码
3.3.3 编写前端代码
3.4 检查用户登录状态
3.4.1 约定前后端交互接口
3.4.2 编写后端代码
3.4.3 编写前端代码
3.5 显示用户信息
3.5.1 约定前后端交互接口
3.5.2 编写后端代码
3.5.3 编写前端代码
3.6 退出登录功能(注销)
3.7 发布博客功能
3.7.2 编写后端代码
3.7.3 编写前端代码
3.8 删除博客功能
前言
上一篇文章:基于Servlet+JDBC实现的基础博客系统>>系列2 -- 前端基础页面 对整个博客系统进行了简要的构建,接下来将博客系统进行实现前后端的交互. 全文项目的代码链接已经上传到git,欢迎大家访问,也希望得到大家的指点.谢谢.
1. 前期准备
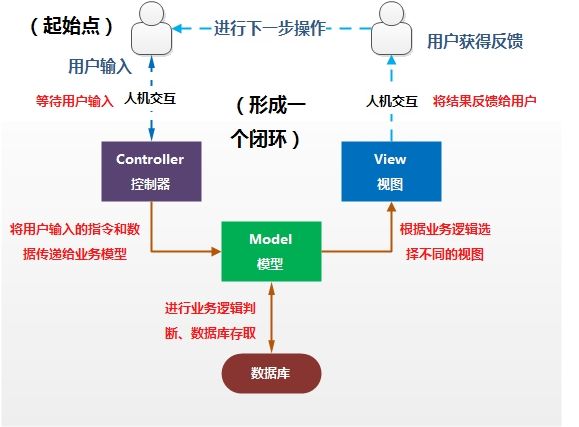
1. 了解MVC模式
MVC(Model View Controller)是一种软件设计的框架模式,它采用模型(Model)-视图(View)-控制器(controller)的方法把业务逻辑、数据与界面显示分离。把众多的业务逻辑聚集到一个部件里面,当然这种比较官方的解释是不能让我们足够清晰的理解什么是MVC的。用通俗的话来讲,MVC的理念就是把数据处理、数据展示(界面)和程序/用户的交互三者分离开的一种编程模式。
2. 创建Maven项目,引入相关依赖
下面是pom.xml的内容,主要是引入了Servlet Jackson MySQL的环境依赖
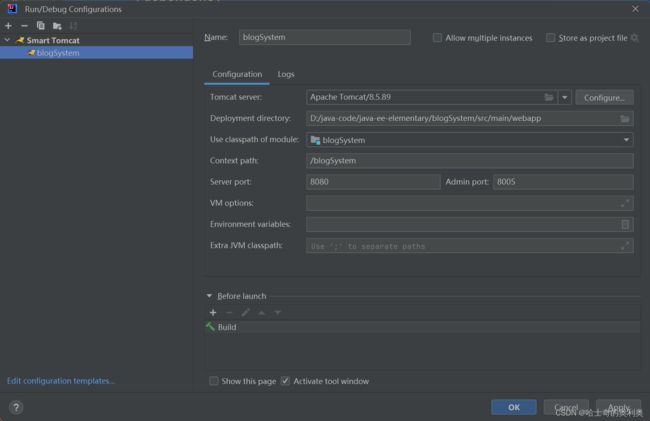
    4.0.0

    org.example
    blogSystem
    1.0-SNAPSHOT


        8
        8
        UTF-8


            javax.servlet
            javax.servlet-api
            3.1.0
            provided


            com.fasterxml.jackson.core
            jackson-databind
            2.15.0


            mysql
            mysql-connector-java
            5.1.49
3. 整个项目使用idea中的插件SmartTomCat ,方便进行调试.
2. Model层
2.1 数据库的设计
在博客系统中,主要包含登录功能、注销功能、发布博客、删除博客、博客展示的功能。涉及到的实体即博客和用户。数据库表设计如下,具体见代码注释:
-- 一般对于建表的 sql 都会单独搞个 .sql 文件来保存.
-- 后续程序可能需要在不同的主机上部署. 部署的时候就需要在对应的主机上把数据库也给创建好.
-- 把建表 sql 保存好, 方便在不同的机器上进行建库建表

-- 1.创建数据数据库
create database if not exists java107_blog_system character set utf8mb4;

use java107_blog_system;

-- 2. 创建各种表
drop table if exists blog;
-- 2.1 blog表
create table blog(
    blogId int primary key auto_increment,
    title varchar(128),
    content varchar(4096),
    userId int,
    postTime datetime
);

drop table if exists user;
-- 2.2 user表
create table user(
    userId int primary key auto_increment,
    username varchar(50) unique,
    password varchar(50)
);

insert into user values(null, '张三', '123'), (null, '李四', '123');

insert into blog values(null, '我的第一篇博客', '这是博客正文', 1, '2023-06-04 12:00:00');
insert into blog values(null, '我的第二篇博客', '这是博客正文', 1, '2023-06-05 12:00:00');
insert into blog values(null, '我的第二篇博客', '如果你想用Java的SimpleDateFormat类来格式化时间,你可以使用以下代码:import java.text.SimpleDateFormat;import java.util.Date;public class Main{public static void main(String[] args){Date date = new Date();String strDateFormat = "yyyy-MM-dd HH:mm:ss";SimpleDateFormat sdf = new SimpleDateFormat(strDateFormat);System.out.println(sdf.format(date));}}', 1, '2023-06-05 12:00:00');
2.2 数据库表对应的实体类实现
User类
每个 user 对象,对应 user 表的一条记录。
package model;

/**
 * Created with IntelliJ IDEA.
 * Description:用户user表的实体
 * User: YAO
 * Date: 2023-06-21
 * Time: 10:47
 */
public class User {
    private int userId;
    private String username;
    private String password;

    public int getUserId() {
        return userId;
    }

    public void setUserId(int userId) {
        this.userId = userId;
    }

    public String getUsername() {
        return username;
    }

    public void setUsername(String username) {
        this.username = username;
    }

    public String getPassword() {
        return password;
    }

    public void setPassword(String password) {
        this.password = password;
    }
}
Blog类
每个 blog 对象,对应 blog 表的一条记录。
package model;

import java.sql.Timestamp;
import java.text.SimpleDateFormat;

/**
 * Created with IntelliJ IDEA.
 * Description:博客blog表的实体
 * 一个blog对象的实例就代表表中的一条记录
 * User: YAO
 * Date: 2023-06-21
 * Time: 10:46
 */
public class Blog {
    private int blogId;
    private String title;
    private String content;
    private int userId;
    private Timestamp postTime;

    public int getBlogId() {
        return blogId;
    }

    public void setBlogId(int blogId) {
        this.blogId = blogId;
    }

    public String getTitle() {
        return title;
    }

    public void setTitle(String title) {
        this.title = title;
    }

    public String getContent() {
        return content;
    }

    public void setContent(String content) {
        this.content = content;
    }

    public int getUserId() {
        return userId;
    }

    public void setUserId(int userId) {
        this.userId = userId;
    }


    public Timestamp getPostTimeStamp() {
        return postTime;
    }
    public String getPostTime() {
        // TimeStamp 返回的是时间戳
        // 这里要将时间戳进行格式化 使用SimpleDataFormat
        String strDateFormat = "yyyy-MM-dd HH:mm:ss";
        SimpleDateFormat sdf = new SimpleDateFormat(strDateFormat);
         return sdf.format(postTime);
    }

    public void setPostTime(Timestamp postTime) {
        this.postTime = postTime;
    }
}
特别关注:针对时间戳在后端进行格式化字符串处理,便于前端的展示。
2.3 JDBC 工具类实现
DBUtil 封装了用于获取数据库连接和关闭数据库连接资源的方法,便于 各个实体的Dao 使用,降低代码冗余度。
package model;

import com.mysql.jdbc.jdbc2.optional.MysqlDataSource;

import javax.sql.DataSource;
import java.sql.Connection;
import java.sql.PreparedStatement;
import java.sql.ResultSet;
import java.sql.SQLException;

/**
 * Created with IntelliJ IDEA.
 * Description:通过封装处理数据库的连接操作
 * User: YAO
 * Date: 2023-06-21
 * Time: 10:29
 */
public class DBUtil {
    // 这个类要提供DataSource
    private static volatile DataSource dataSource = null;

    private static DataSource getDataSource(){
        // 懒汉模式进行创建数据库连接实例
        if (dataSource == null){
            synchronized (DBUtil.class){
                if (dataSource == null){
                    dataSource = new MysqlDataSource();
                    ((MysqlDataSource)dataSource).setUrl("jdbc:mysql://127.0.0.1:3306/java107_blog_system?characterEncoding=utf8&useSSL=false");
                    ((MysqlDataSource)dataSource).setUser("root");
                    ((MysqlDataSource)dataSource).setPassword("111111");
                }


            }
        }
        return dataSource;
    }

    public static Connection getConnection() throws SQLException {
        // 建立数据库连接
        return getDataSource().getConnection();
    }

    public static void close(Connection connection, PreparedStatement statement, ResultSet resultSet) throws SQLException {
        if (resultSet != null){
            resultSet.close();
        }

        if (statement!=null){
            statement.close();
        }
        if (connection!=null){
            connection.close();
        }
    }
}
2.4 UserDao 的实现
DAO: Data Access Object 就是通过这个对象进行访问数据
主要实现方法:
1. selectUserById
2. selectUserById
package model;

import java.sql.Connection;
import java.sql.PreparedStatement;
import java.sql.ResultSet;
import java.sql.SQLException;

/**
 * Created with IntelliJ IDEA.
 * Description:user表的增删改查
 * DAO : Data Access Object  通过这样的对象进行访问数据
 * User: YAO
 * Date: 2023-06-21
 * Time: 10:52
 */
public class UserDao {
    public User selectUserById(int userId) throws SQLException {
        // 根据id查询用户对象
        Connection connection = null;
        PreparedStatement statement = null;
        ResultSet resultSet = null;
        try{
            connection = DBUtil.getConnection();
            String sql = "select * from user where userId= ?";
            statement = connection.prepareStatement(sql);
            statement.setInt(1,userId);
            resultSet = statement.executeQuery();
            if (resultSet.next()){
                User user = new User();
                user.setUserId(resultSet.getInt("userId"));
                user.setUsername(resultSet.getString("username"));
                user.setPassword(resultSet.getString("password"));
                return user;
            }
        } catch (SQLException e) {
            e.printStackTrace();
        }
        finally {
            DBUtil.close(connection,statement,resultSet);
        }
        return null;
    }

    public User selectUserByName(String username) throws SQLException {
        // 根据name查询用户对象
        Connection connection = null;
        PreparedStatement statement = null;
        ResultSet resultSet = null;
        try {
            connection = DBUtil.getConnection();
            String sql = "select * from user where username = ?";
            statement = connection.prepareStatement(sql);
            statement.setString(1,username);
            resultSet = statement.executeQuery();
            if (resultSet.next()){
                User user = new User();
                user.setUserId(resultSet.getInt("userId"));
                user.setUsername(resultSet.getString("username"));
                user.setPassword(resultSet.getString("password"));
                return user;
            }
        } catch (SQLException e) {
            e.printStackTrace();
        }finally {
            DBUtil.close(connection,statement,resultSet);
        }
        return null;
    }
}
2.5 BlogDao 的实现
该类封装了有关 blog 表的操作。包括插入博客,返回博客列表,返回单一一条博客以及删除博客功能。具体见代码与注释:
package model;

import java.sql.Connection;
import java.sql.PreparedStatement;
import java.sql.ResultSet;
import java.sql.SQLException;
import java.util.ArrayList;
import java.util.List;

/**
 * Created with IntelliJ IDEA.
 * Description:blog表的增删改查
 * User: YAO
 * Date: 2023-06-21
 * Time: 10:51
 */
public class BlogDao {
    public void insert(Blog blog) throws SQLException {
        // 将blog对象插入到数据库
        Connection connection = null;
        PreparedStatement statement = null;
        try {
            // 1. 建立连接
            connection = DBUtil.getConnection();
            // 2. 构建sql语句
            String sql = "insert into blog values(null,?,?,?,?)";
            // 3. 使用preparedStatement 填充信息
            statement = connection.prepareStatement(sql);
            statement.setString(1,blog.getTitle());
            statement.setString(2,blog.getContent());
            statement.setInt(3,blog.getUserId());
            statement.setTimestamp(4,blog.getPostTimeStamp());

            // 4. 执行sql
            statement.executeUpdate();
        } catch (SQLException e) {
            e.printStackTrace();
        }finally {
            // 5. 关闭所有的连接
            DBUtil.close(connection,statement,null);
        }
    }

    public List selectAll() throws SQLException {
        // 查询所有的博客记录
        List blogs = new ArrayList<>();
        Connection connection = null;
        PreparedStatement statement = null;
        ResultSet resultSet = null;
        try{
            connection = DBUtil.getConnection();
            String sql = "select * from blog order by postTime desc";
            statement = connection.prepareStatement(sql);
            resultSet = statement.executeQuery();

            while (resultSet.next()){
                Blog blog = new Blog();
                blog.setBlogId(resultSet.getInt("blogId"));
                blog.setTitle(resultSet.getString("title"));
                String content = resultSet.getString("content");
                if(content == null){
                    content = "";
                }
                if (content.length() > 100){
                    content = content.substring(0,100)+"...";
                }
                blog.setContent(content);
                blog.setUserId(resultSet.getInt("userId"));
                blog.setPostTime(resultSet.getTimestamp("postTime"));
                blogs.add(blog);
            }
        } catch (SQLException e) {
            e.printStackTrace();
        }finally {
            DBUtil.close(connection,statement,resultSet);
        }
        return blogs;
    }

    public Blog selectOne(int blogId) throws SQLException {
        // 查询指定博客id的博客
        Connection connection = null;
        PreparedStatement statement = null;
        ResultSet resultSet = null;
        try{
            connection = DBUtil.getConnection();
            String sql = "select * from blog where blogId= ?";
            statement = connection.prepareStatement(sql);
            statement.setInt(1,blogId);
            resultSet = statement.executeQuery();
            if (resultSet.next()){
                Blog blog = new Blog();
                blog.setBlogId(resultSet.getInt("blogId"));
                blog.setTitle(resultSet.getString("title"));
                blog.setContent(resultSet.getString("content"));
                blog.setUserId(resultSet.getInt("userId"));
                blog.setPostTime(resultSet.getTimestamp("postTime"));
                return blog;
            }
        } catch (SQLException e) {
            e.printStackTrace();
        }finally {
            DBUtil.close(connection,statement,resultSet);
        }
        return null;
    }
    public void delete(int blogId) throws SQLException {
        // 指定博客id进行删除
        Connection connection = null;
        PreparedStatement statement = null;
        try {
            connection = DBUtil.getConnection();
            String sql = "delete from blog where blogId= ?";
            statement = connection.prepareStatement(sql);
            statement.setInt(1,blogId);
            statement.executeUpdate();
        } catch (SQLException e) {
            e.printStackTrace();
        }finally {
            DBUtil.close(connection,statement,null);
        }
    }
}
3. Controller 层实现
无论是博客详情页、博客列表页还是登录功能诸如此类,其核心逻辑都是一样的,具体分为如下几个步骤:
- 约定前后端交互的接口;
- 实现服务器代码,分别为controller层的servlet实现的api,以及model层使用jdbc来操作数据库;
- 实现客户端代码:form / ajax / a标签跳转等。
3.1 博客列表页
3.1.1 约定前后端交互接口
该页面用于展示数据库中的博客列表。约定请求:GET/blog,响应为 json 格式。

3.1.2 编写后端代码
主要内容是根据请求中blogId是否为空,进行返回不同的响应,如果请求中包含指定的blogId就返回单条博客信息,为null就返回数据库中所有的博客信息.
创建BlogServlet.java文件:
/*
   获取博客信息
 */
@WebServlet("/blog")
public class BlogServlet extends HttpServlet {

    private ObjectMapper objectMapper = new ObjectMapper();
    // 创建objectMapper对象用来将数据库中博客的信息转换成json格式
    @Override
    protected void doGet(HttpServletRequest req, HttpServletResponse resp) throws ServletException, IOException {
        try {
            BlogDao blogDao = new BlogDao();
            String blogId = req.getParameter("blogId");
            if (blogId == null){
                // 分两种情况:
                // 1.当在请求中查找blogId的为空的时候,默认为查找所有的博客
                List blogs = blogDao.selectAll();
                // 将查询到的信息转换成json格式
                String respString = objectMapper.writeValueAsString(blogs);

                // 设置响应内容的格式以及字符集
                resp.setContentType("application/json; charset=utf8");
                resp.getWriter().write(respString);
            }else {
                // 2.请求中blogId不为空的时候,进行查找相应id的博客
                Blog blog = blogDao.selectOne(Integer.parseInt(blogId));
                String respString = objectMapper.writeValueAsString(blog);
                resp.setContentType("application/json; charset=utf8");
                resp.getWriter().write(respString);
            }
        } catch (SQLException e) {
            e.printStackTrace();
        }
    }
3.1.3 编写前端代码
使用Ajax进行构造请求
列表页需要向后端请求的内容有:
- 1. 所有的博客内容(右侧栏信息)
- 2. 用户的登录状态(左侧栏信息)
1. 所有的博客内容(右侧栏信息)
2. 用户的登录状态(左侧栏信息)
3.2 博客详情页
3.2.1 约定前后端交互接口
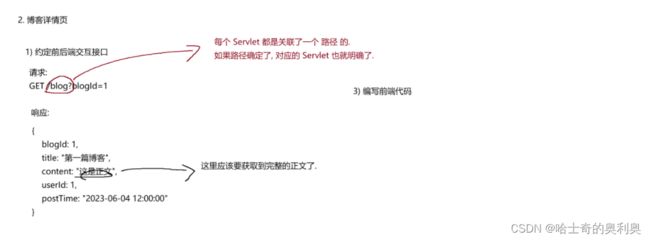
博客列表中有查看全文的按钮,点击查看全文就可以直接跳转到指定的博客详情页,此时查询的路径中拼接了查询字符串,其中包含blogId属性
3.2.2 编写后端代码
在BlogServlet.java文件中
3.2.3 编写前端代码
分别设置标题 时间 以及内容(使用editor.md自带的方法,将内容改成渲染之后的样式显示在HTML页面中)
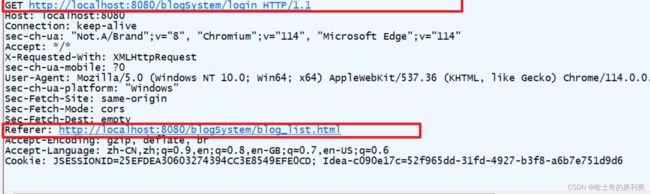
3.3 登录功能
登录功能就相对简单了,约定前后端接口,请求Post/login,响应为 Http/1.1 302,当用户登录成功后跳转到博客列表页。登录失败,则提示相应的信息。需要注意的是,当用户登录成功后需要创建一个会话 session,用于保存必要的用户信息,便于其他页面使用。例如:验证获取登录状态,展示用户信息等。
3.3.1 约定前后端交互接口

3.3.2 编写后端代码
package api;
import com.fasterxml.jackson.databind.ObjectMapper;
import model.User;
import model.UserDao;
import javax.servlet.ServletException;
import javax.servlet.annotation.WebServlet;
import javax.servlet.http.HttpServlet;
import javax.servlet.http.HttpServletRequest;
import javax.servlet.http.HttpServletResponse;
import javax.servlet.http.HttpSession;
import java.io.IOException;
import java.sql.SQLException;
/**
* Created with IntelliJ IDEA.
* Description:
* User: YAO
* Date: 2023-06-23
* Time: 16:32
*/
@WebServlet("/login")
public class LoginServlet extends HttpServlet {
// 用来将数据转换成json的数据格式
private ObjectMapper objectMapper = new ObjectMapper();
@Override
protected void doPost(HttpServletRequest req, HttpServletResponse resp) throws ServletException, IOException {
// 设置请求的编码. 告诉 servlet 按照啥格式来理解请求
req.setCharacterEncoding("utf8");
// 设置响应的编码. 告诉 servlet 按照啥格式来构造响应
// resp.setCharacterEncoding("utf8");
resp.setContentType("text/html;charset=utf8");
// 1. 读取参数中的用户名和密码
// 注意!! 如果用户名密码包含中文, 此处的读取可能会乱码.
String username = req.getParameter("username");
String password = req.getParameter("password");
if (username == null || "".equals(username) || password == null || "".equals(password)) {
// 登录失败!!
String html = "登录失败! 缺少 username 或者 password 字段
";
resp.getWriter().write(html);
return;
}
// 2. 读数据库, 看看用户名是否存在, 并且密码是否匹配
UserDao userDao = new UserDao();
User user = null;
try {
user = userDao.selectUserByName(username);
} catch (SQLException e) {
throw new RuntimeException(e);
}
if (user == null) {
// 用户不存在.
String html = "登录失败! 用户名或密码错误
";
resp.getWriter().write(html);
return;
}
if (!password.equals(user.getPassword())) {
// 密码不对
String html = "登录失败! 用户名或密码错误
";
resp.getWriter().write(html);
return;
}
// 3. 用户名密码验证通过, 登录成功, 接下来就创建会话. 使用该会话保存用户信息.
HttpSession session = req.getSession(true);
session.setAttribute("user", user);
// 4. 进行重定向. 跳转到博客列表页
resp.sendRedirect("blog_list.html");
}
}
3.3.3 编写前端代码
使用form表单进行构造POST请求
3.4 检查用户登录状态
当用户处于博客列表页和详情页的时候,需要检查用户的登录状态。如果用户未登录,则给用户弹窗提示,并返回到登录页面。
3.4.1 约定前后端交互接口
请求
响应(返回的是一个user对象包含User的所有信息)

3.4.2 编写后端代码
在loginServlet.java文件中重写doPost方法
1. 获取当前Session会话对象 ,检查Session对象是否为空,如果不为空也要检查是否存在用户对象.
@Override
    protected void doGet(HttpServletRequest req, HttpServletResponse resp) throws ServletException, IOException {
        resp.setContentType("application/json");
        // 用来回去用登录的状态

        // 如果用户处于未登录的状态,就不会拿到会话
        HttpSession session = req.getSession(false);
        if (session == null){
            // 未登录
            User user = new User();
            String respJson = objectMapper.writeValueAsString(user);
            resp.getWriter().write(respJson);
            return;
        }
        User user = (User) session.getAttribute("user");
        if (user == null) {
            user = new User();
            String respJson = objectMapper.writeValueAsString(user);
            resp.getWriter().write(respJson);
            return;
        }
        // 确实成功取出了 user 对象, 就直接返回即可.
        String respJson = objectMapper.writeValueAsString(user);
        resp.getWriter().write(respJson);
    }
3.4.3 编写前端代码
将下述代码分别点加到blog_list.html blog_detail.html blog_edit.html 中.执行强制登录,才能访问.
3.5 显示用户信息
对于博客列表页,我们希望展示的是当前登录用户的信息;对于博客详情页,我们希望展示的是文章的作者信息。约定前后端交互接口,请求:get/authorInfo,响应依然为json格式。
因此,我们对登录状态检查的函数进行改动,添加一个参数,用于区分当前页是博客列表页还是博客详情页。
- 对于博客列表页,我们正常展示用户信息即可;
- 对于博客详情页,我们只需要判断当前用户和作者是否为同一人,如果不是,则更改当前页用户信息为作者信息即可
3.5.1 约定前后端交互接口
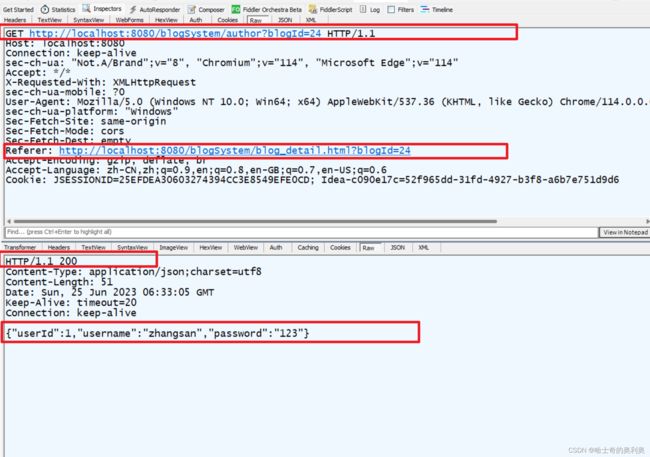
3.5.2 编写后端代码
package api;

import com.fasterxml.jackson.databind.ObjectMapper;
import model.Blog;
import model.BlogDao;
import model.User;
import model.UserDao;

import javax.servlet.ServletException;
import javax.servlet.annotation.WebServlet;
import javax.servlet.http.HttpServlet;
import javax.servlet.http.HttpServletRequest;
import javax.servlet.http.HttpServletResponse;
import java.io.IOException;
import java.sql.SQLException;

@WebServlet("/author")
public class authorServlet extends HttpServlet {
    private ObjectMapper objectMapper = new ObjectMapper();

    @Override
    protected void doGet(HttpServletRequest req, HttpServletResponse resp) throws ServletException, IOException {
        String blogId = req.getParameter("blogId");
        if (blogId == null) {
            resp.setContentType("text/html; charset=utf8");
            resp.getWriter().write("参数非法, 缺少 blogId");
            return;
        }
        // 根据 blogId 查询 Blog 对象
        BlogDao blogDao = new BlogDao();
        Blog blog = null;
        try {
            blog = blogDao.selectOne(Integer.parseInt(blogId));
        } catch (SQLException e) {
            throw new RuntimeException(e);
        }
        if (blog == null) {
            // 博客不存在.
            resp.setContentType("text/html; charset=utf8");
            resp.getWriter().write("没有找到指定博客: blogId = " + blogId);
            return;
        }
        // 根据 blog 中的 userId 找到对应的用户信息
        UserDao userDao = new UserDao();
        User author = null;
        try {
            author = userDao.selectUserById(blog.getUserId());
        } catch (SQLException e) {
            throw new RuntimeException(e);
        }
        String respJson = objectMapper.writeValueAsString(author);
        resp.setContentType("application/json; charset=utf8");
        resp.getWriter().write(respJson);
    }
}
3.5.3 编写前端代码
3.6 退出登录功能(注销)
注销功能非常简单,定义前后端交互接口,请求:get/logout,响应302跳转到登录页面。请求只需要在用户登录的时候添加一个 a 标签到导航栏即可。
怎样才算登录呢?
- session 会话存在;
- session 中包含 user 属性。
因此,实现注销,只需要将 user 属性从 session 中删除即可。
![]()
package api;

import javax.servlet.ServletException;
import javax.servlet.annotation.WebServlet;
import javax.servlet.http.HttpServlet;
import javax.servlet.http.HttpServletRequest;
import javax.servlet.http.HttpServletResponse;
import javax.servlet.http.HttpSession;
import java.io.IOException;

/**
 * Created with IntelliJ IDEA.
 * Description:
 * User: YAO
 * Date: 2023-06-24
 * Time: 18:55
 */
@WebServlet("/logout")
public class LogoutServlet extends HttpServlet {
    @Override
    protected void doGet(HttpServletRequest req, HttpServletResponse resp) throws ServletException, IOException {
        HttpSession session = req.getSession(false);
        if (session == null){
            resp.setContentType("txt/html; charset=utf-8");
            resp.getWriter().write("用户未登录");
        }
        // 将当前User对象进行删除
        session.removeAttribute("user");
        resp.sendRedirect("login.html");
    }
}
3.7 发布博客功能
同样,先约定前后端交互接口。请求:POST/blog,以form表单的形式将title和content正文传给服务器。响应:HTTP/1.1 302 发布成功后跳转到博客详情页。
3.7.1 约定前后端交互接口
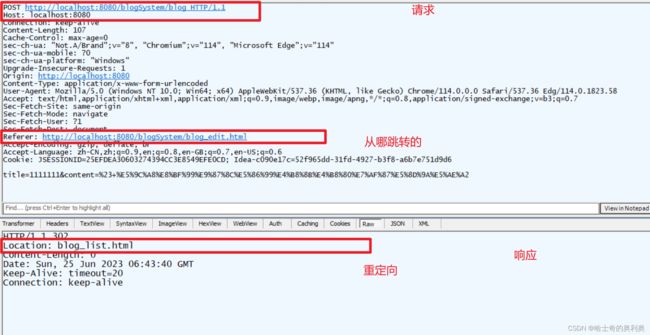
3.7.2 编写后端代码
在BlogServlet.java中重写doPost方法
@Override
    protected void doPost(HttpServletRequest req, HttpServletResponse resp) throws ServletException, IOException {
        // 发布博客
        // 读取请求, 构造 Blog 对象, 插入数据库中即可!!
        HttpSession httpSession = req.getSession(false);
        if (httpSession == null) {
            resp.setContentType("text/html; charset=utf8");
            resp.getWriter().write("当前未登录, 无法发布博客!");
            return;
        }
        User user = (User) httpSession.getAttribute("user");
        if (user == null) {
            resp.setContentType("text/html; charset=utf8");
            resp.getWriter().write("当前未登录, 无法发布博客!");
            return;
        }
        // 确保登录之后, 就可以把作者给拿到了.

        // 获取博客标题和正文
        req.setCharacterEncoding("utf8");
        String title = req.getParameter("title");
        String content = req.getParameter("content");
        if (title == null || "".equals(title) || content == null || "".equals(content)) {
            resp.setContentType("text/html; charset=utf8");
            resp.getWriter().write("当前提交数据有误! 标题或者正文为空!");
            return;
        }

        // 构造 Blog 对象
        Blog blog = new Blog();
        blog.setTitle(title);
        blog.setContent(content);
        blog.setUserId(user.getUserId());
        // 发布时间, 在 java 中生成 / 数据库中生成 都行
        blog.setPostTime(new Timestamp(System.currentTimeMillis()));
        // 插入数据库
        BlogDao blogDao = new BlogDao();
        try {
            blogDao.insert(blog);
        } catch (SQLException e) {
            throw new RuntimeException(e);
        }

        // 跳转到博客列表页
        resp.sendRedirect("blog_list.html");
    }
3.7.3 编写前端代码
3.8 删除博客功能
只有作者本人才能删除博客,因此,在进入博客详情页的时候,进行判断。如果是作者本人,则添加删除按钮
我们可以在博客详情页中检查用户的登录信息的同时,检测到如果登陆用户与博客作者相同的时候,添加删除按钮,并且在点击删除按钮之后进行弹窗确认之后在进行执行.
后端代码
package api;
import model.Blog;
import model.BlogDao;
import model.User;

import javax.servlet.ServletException;
import javax.servlet.annotation.WebServlet;
import javax.servlet.http.HttpServlet;
import javax.servlet.http.HttpServletRequest;
import javax.servlet.http.HttpServletResponse;
import javax.servlet.http.HttpSession;
import java.io.IOException;
import java.sql.SQLException;

/**
 * Created with IntelliJ IDEA.
 * Description:
 * User: YAO
 * Date: 2023-06-24
 * Time: 20:25
 */
@WebServlet("/blogDelete")
//@SuppressWarnings({"all"})
public class BlogDeleteServlet extends HttpServlet {

    @Override
    protected void doGet(HttpServletRequest req, HttpServletResponse resp) throws ServletException, IOException {
        // 1. 检验用户是否登录
        HttpSession session = req.getSession(false);
        if (session == null) {
            resp.setContentType("text/html; charset=utf8");
            resp.getWriter().write("当前未登录");
            return;
        }
        User user = (User) session.getAttribute("user");
        if (user == null) {
            resp.setContentType("text/html; charset=utf8");
            resp.getWriter().write("当前未登录");
            return;
        }
        // 2. 获取要删除的博客的 blogId
        String blogId = req.getParameter("blogId");
        if (blogId == null || "".equals(blogId)) {
            resp.setContentType("text/html; charset=utf8");
            resp.getWriter().write("参数不正确!");
            return;
        }
        // 3. 获取要删除的博客信息
        BlogDao blogDao = new BlogDao();
        Blog blog = null;
        try {
            blog = blogDao.selectOne(Integer.parseInt(blogId));
        } catch (SQLException e) {
            throw new RuntimeException(e);
        }
        if (blog == null) {
            resp.setContentType("text/html; charset=utf8");
            resp.getWriter().write("当前博客不存在");
            return;
        }
        // 4. 再次校验用户是否为博客的作者
        if (blog.getUserId() != user.getUserId()) {
            resp.setContentType("text/html; charset=utf8");
            resp.getWriter().write("不是您的博客, 无法删除!");
            return;
        }
        // 5. 删除并跳转
        try {
            blogDao.delete(Integer.parseInt(blogId));
        } catch (SQLException e) {
            throw new RuntimeException(e);
        }
        resp.sendRedirect("blog_list.html");
    }
}
前端代码
以上就是博客系统的所有功能了.还有其他的细节可以进行完善.
完整的博客系统的代码可以在下方链接进行访问欢迎参考和指正.''
博客系统代码(前端+后端)
https://gitee.com/yao-fa/java-ee-elementary/tree/master/blogSystem谢谢!