SpringBoot+thymeleaf+antd vue 学习记录(二)
通过请求后台来获取列表和操作,需要引入axios包
一、获取列表
1、引入axios包
<script type="text/javascript" th:src="@{/js/vue/axios.min.js}">script>
2、设置请求路径
const queryData = params => {
    return axios.get('http://127.0.0.1:9081/wangr/vue/list', { params: params });
};
3、设置分页
将data初始化为[],等请求之后再赋值
   data() {
        return {
            columns : columns,
            data : [],
            pagination : {
                current: 1,
                pageSize: 30, //默认每页30条数据
                showSizeChanger: true,
                total: this.total,
                pageSizeOptions: ['5', '10', '20', '30', '40', '100'],
                onShowSizeChange: this.pageSizeChange, //每页数量变化后重新请求列表
                onChange: this.pageChange //页码改变时重新请求列表
            },
            collapsed : false,
            addShow: false,
        }
    }
4、增加查询方法
methods: {
        ...
        pageSizeChange(val, pageNum) {
            this.loading = true
            this.pagination.pageSize = pageNum
            this.pagination.current = 1
            var params = {
               rows: this.pagination.pageSize,
               page: this.pagination.current,
            }
            this.fetch(params) //获取列表数据
        },
        pageChange(page, val) {
            this.loading = true
            this.pagination.current = page
            var params = {
                rows: this.pagination.pageSize,
                page: this.pagination.current,
            }
            this.fetch(params) //获取列表数据

        },
        fetch(params = {}) {
            this.loading = true;
            queryData({
                ...params,
            }).then(({ data }) => {
              const pagination = { ...this.pagination };
              this.loading = false;
              // 根据自己的数据格式进行调整
              var result = data.data;
              pagination.total = result.total;
              this.total = result.total;
              this.data = result.rows;
              this.pagination = pagination;
            });
          },
    },
    mounted() {
        this.fetch();
    }
5、格式化显示字段
 var columns = [ {
        customRender: (text, record, index) => index + 1,//序号
        width : 20,
  },{
      key : 'province',
      dataIndex: 'province',
      title : '省市区',
      width : 200,
      customRender: (text, row, index) => {  //可以直接在这里写标签、样式等
          return row.province + " " + row.city + row.county;
      }
  },  {
      title : 'Action',
      key : 'action',
      width : 130,
      fixed : 'right',
      scopedSlots : { //可以用template来写需要的样式和标签
          customRender : 'action',
      },
  } ];
6、页面如图:
二、添加
1、form表单代码
之前用的随便找的示例,这次调整了一下
  <template id="vue-add">
   <a-modal :width="modalWidth" title="新增字典" :confimLoading="loading" v-model="show" @ok="handleOk"
           @cancel="handleCancel">
    <a-form :form="form" :label-col="{ span: 5 }" :wrapper-col="{ span: 12 }" >
       <a-form-item label="项目编号">
           <a-input v-decorator="['projectNo', { rules: [{ required: true, message: '项目编号不能为空!' }] }]" />
       a-form-item>
       <a-form-item label="项目名称">
           <a-input v-decorator="['projectName', { rules: [{ required: true, message: '项目名称不能为空!' }] }]" />
       a-form-item>
       <a-form-item label="状态">
           <a-select v-decorator="['state',{ rules: [{ required: true, message: '请选择项目状态!' }] },]" >
             <a-select-option value="0"> 开始 a-select-option>
             <a-select-option value="1"> 暂停 a-select-option>
             <a-select-option value="2"> 结束 a-select-option>
             <a-select-option value="3"> 其他 a-select-option>
           a-select>
       a-form-item>
    a-form-item>
    a-form>
    a-modal>
  template>
2、设置请求url
const addDict = params => {
      return axios.post('http://127.0.0.1:9081/wangr/vue/create', params);
};
3、提交表单
这里重新写一下handleOk方法就可以了
handleOk() {
    //这行代码是因为我下面直接用this.$message.success()和this.$message.error的时候,只有上面一个生效,下面就会报错
    //暂时没找到原因,有知道的小伙伴可以告诉我一下,感谢
    const that = this;
    this.form.validateFields(err => {
        if (!err) {
            this.loading = true;
             addDict(this.form.getFieldsValue()).then(res => {
                  // 这里按照自己的返回格式来写
                  that.$message.success(res.data.msg);
                   this.closeModal(false);
                   // 应该要刷新一下列表,暂时还没做,后续更新
              }).catch(function (err) {
                   // 这里可以打印一下看看是什么格式,按你自己的格式来
                   that.$message.error(err.response.data.msg);
              }).finally(() => {
                   this.loading = false;
              });
         }
     });
     setTimeout(() => {
         this.$nextTick(() => {
              this.loading = false;
          })
      }, 1000);
 }
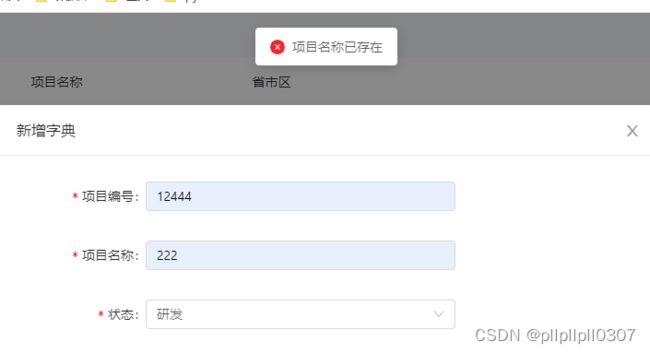
4、结果截图
三、删除
1、设置请求url
const deleteRow = params => {
    return axios.post('http://127.0.0.1:9081/wangr/vue/delete', {id: params});
};
2、传参
我是打算用每行的id作为参数来删除,所以调整一下删除按钮
<a-button type="danger" icon="delete" @click="handleDel(record.id)">a-button>
3、提交删除
同样的,改一下handleDel方法就可以了
handleDel(id) {
    //这里跟添加的问题一样,原因未知
    const that = this;
    this.$confirm({
        title: '确定要删除这条数据吗?',
        okText: 'Yes',
        okType: 'danger',
        cancelText: 'No',
        onOk() {
            deleteRow(id).then(res => {
                if (res.status == 200) {
                    that.$message.success('删除成功');
                    // 刷新列表功能后续再加
                } else {
                    that.$message.error(res.data.msg);
                }
            }).catch(function (err) {
                this.$message.error(err.response.data.msg);
            }).finally(() => {
                this.loading = false;
            });
         },
         onCancel() {
             console.log('Cancel');
         },
     });
}
==============
暂时先到这里,未完待续…

