nwjs 版本更新 node-webkit-updater 方案
切记,严格按照以下步骤来
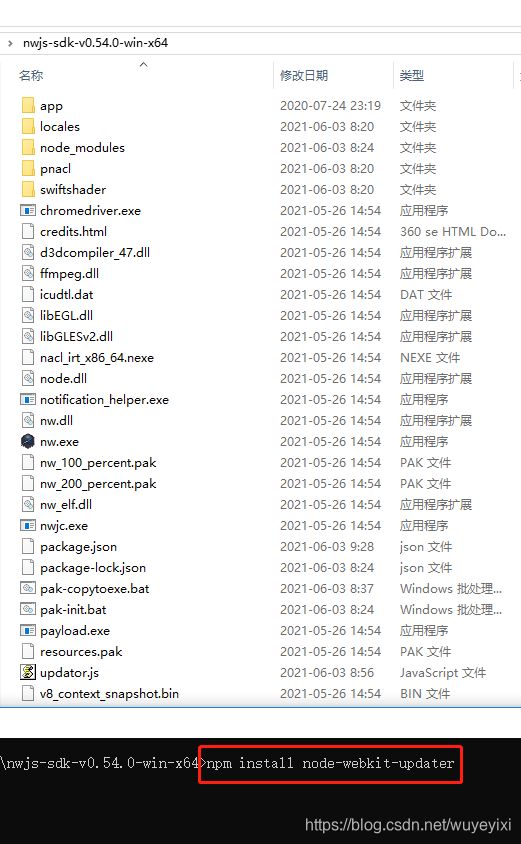
1. 在项目工程目录中 执行 命令
npm install node-webkit-updater2.编辑你的起动html文件,如本工程中为app/index.html文件,加入下面的代码
(1)更新脚本代码
注意下面一段代码非常容易出问题,由于window权限的问题,默认下载安装包的位置很可能没有写入权限,所以要更改目录,至于要更改到什么位置,代码可自行实现。切记,不要用默认的,一定要手动更改。
var upd = new updater(pkg, {
temporaryDirectory: 'C:\\Users\\Administrator',
});
var gui = require('nw.gui');
var pkg = require('../package.json'); // Insert your app's manifest here
var updater = require('node-webkit-updater');
var upd = new updater(pkg, {
	temporaryDirectory: 'C:\\Users\\Administrator',
});
var copyPath, execPath;

// Args passed when new app is launched from temp dir during update
if(gui.App.argv.length) {
    // ------------- Step 5 -------------
    copyPath = gui.App.argv[0];
    execPath = gui.App.argv[1];

    // Replace old app, Run updated app from original location and close temp instance
    upd.install(copyPath, function(err) {
        if(!err) {

            // ------------- Step 6 -------------
            upd.run(execPath, null);
            gui.App.quit();
        }
    });
}
else { // if no arguments were passed to the app

    // ------------- Step 1 -------------
    upd.checkNewVersion(function(error, newVersionExists, manifest) {
		console.log("checkNewVersion");
		console.log(error);
		console.log(newVersionExists);
		console.log(manifest);
        if (!error && newVersionExists) {

            // ------------- Step 2 -------------
            upd.download(function(error, filename) {
						console.log("checkdownload");
						console.log(error);
						console.log(filename);
                if (!error) {

                    // ------------- Step 3 -------------
                    upd.unpack(filename, function(error, newAppPath) {
                        if (!error) {

                            // ------------- Step 4 -------------
                            upd.runInstaller(newAppPath, [upd.getAppPath(), upd.getAppExec()],{});
                            gui.App.quit();
                        }
                    }, manifest);
                }
            }, manifest);
        }
    });
}
(2)index.html完整示例
3. 假设最新版本为 12.0.0,旧版本为10.0.0
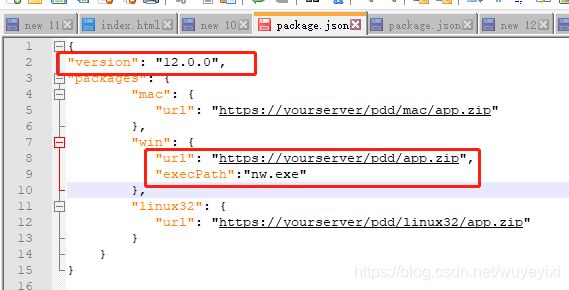
4.假设当前工程为最新版本,编辑工程中的 package.json 中的version字段为最新版本号 12.0.0,
manifestUrl 为 检查版本更新的 文件地址,在下面第4步的时候创建。
5. 创建第4步中的manifestUrl字段对应的版本配置文件内容,该package.json文件内容如下,
version:为最新版本号
url:为对应平台压缩包的下载地址
execPath: 为url对应压缩包中的起动文件(注意:请改为你程序自己的启动exe名称)
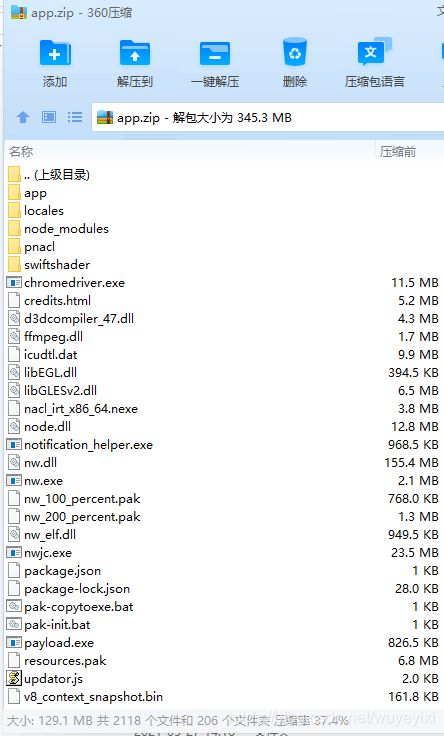
url 对应的app.zip对应的压缩包制作方式如下:
(1)很简单,应是把 当前最新版本的工程,即第1、2、4步配置好的最新工程直接压缩为zip(非学常重要,不要看网上别的地方讲的,就按我说的来)
(2)注意,压缩包中只有一层目录,不要来第二层。双击压缩包,直接效果如下图所示(非常重要)
(3)把本压缩包上传到 “url:为对应平台压缩包的下载地址”所示的网络位置
(4)把本步骤中创建的package.json(注意不是工程中的,就是本步骤创建的)文件上传到 工程中的package.json(注意,这个才是工程中的package.json文件,即第4步中的文件)中manifestUrl所示的网络文件中,即下图所示
6. 大功搞成。当然旧版本也是这么个打包过程,可以将旧版运行起来试试。


