postman基础-使用postman做接口及接口自动化测试
postman基础-使用postman做接口及接口自动化测试
- postman-一个简洁方便的接口自动化工具
-
- 下载安装
- 新增环境变量
- 新建一个项目及接口测试具体操作
- 将返回值的某个数据设置为环境变量(例如token)
- 断言
- 上传/导入文档
- 下载/导出文档
- random的使用(参数化)
- 批量运行
- 生成日志
- 生成测试报告
- 生成接口文档与发布接口文档
- 测试过程中遇到的一个小问题:文件上传至阿里云报错
postman-一个简洁方便的接口自动化工具
本文主要介绍通过postman做接口及接口自动化,其中包括下载安装,新增环境变量,新建一个项目及接口测试具体操作,将返回值的某个数据设置为环境变量(例如token),上传导入文档,下载导出文档,断言,random的使用(参数化),批量运行,生成日志,生成测试报告,生成接口文档,
下载安装
下载地址:https://www.postman.com/downloads/

新增环境变量
可采用全局变量也可自己添加并选择环境变量

新建一个项目及接口测试具体操作
- New Collection

- 在该项目下新建一个文件夹(Add Folder),并在该文件夹下新建request请求

- Fidder或F12抓取接口后,请求信息填入新增的request请求里,点击"send"后即可查看运行结果
参数填写:
请求头:get/post
请求url:http:...
请求类型:Content-Type
请求体:{"account":"root","password":"123456"}

6. 不断抓取所需要的接口,对这些接口进行测试
将返回值的某个数据设置为环境变量(例如token)
在这里,以token为例,说明有2种方式可将token设置为环境变量
第一种:手动在新增的环境中添加
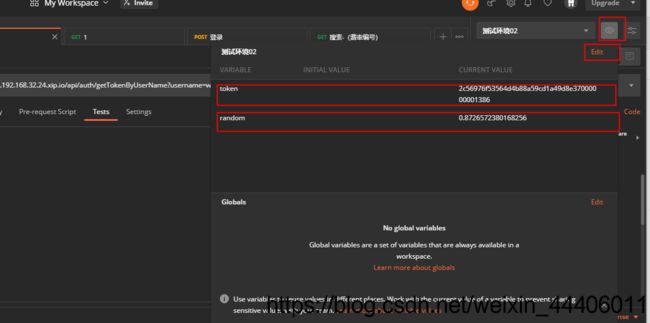
第二种:在“Tests”下代码增加

var acquiretoken = JSON.parse(responseBody);
pm.environment.set("token", acquiretoken.data.token);  //将返回值的某个数据设置为环境变量,这里是token做环境变量,其他接口里token以{{token}}形式展示
断言
断言全部放在Tests下,下面为总结的各类断言形式

tests["Status code is 200"] = responseCode.code === 200;  //断言状态码
tests["返回的字段"] = responseBody.has("message")       //断言返回的字段

pm.test("Status code is 200",function(){
    pm.response.to.have.status(200);               //断言状态码
})

pm.test("Status code name has string",function(){
    pm.response.to.have.status("OK");            //断言响应状态消息包含ok
})

pm.test("Content-Type is present",function(){
   pm.response.to.have.header("Content-Type")    //断言响应头response headers中包含Content-type
})

pm.test("Body matches string",function(){
    pm.expect(pm.response.text()).to.include("string_you_want_to_search");});
pm.expect(pm.response.text()).to.include("string")          //断言响应体中包含字符串:string

pm.test("Body is correct",function(){
    pm.response.to.have.body("response_body_string");
});
pm.response.to.have.body("response_body_string")       //断言响应体等于response_body_string

pm.test("Your test name",function(){
    var jsonData = pm.response.json();
    pm.expect(jsonData.value).to.eql(100);
});
var jsonData = pm.response.json()  //获取响应体,以json显示,赋值给jsonData,该响应体返回的必须是json,否则会报错
pm.expect(jsonData.value).to.eql(100)  //获取jsonData中键名为value的值,然后和100进行比较

pm.test("response time is less than 200ms",function(){
   pm.expect(pm.response.responseTime).to.be.below(200);     //响应断言时间小于200ms
});

tests["Response time 小于200毫秒"] = responseTime < 200;
tests["Response time 大于200毫秒"] = responseTime > 200;
//一般用于性能测试


//查看返回状态码
//pm.test("Status code is 200", function () {
//    pm.response.to.have.status(200);
//});
//查看返回的boby
//pm.test("respon boby include 成功", function () {
//    var jsonData = pm.response.json();
//    pm.expect(jsonData.msg).to.eql("成功");
//    pm.environment.set("token", jsonData.data.token);
// });
//如果success是false的,停止执行后面的用例
//var jsonData = pm.response.json();
//if(jsonData.success!=true)
//{
//    postman.setNextRequest("null");
//}
//获取token值
//设置成环境变量
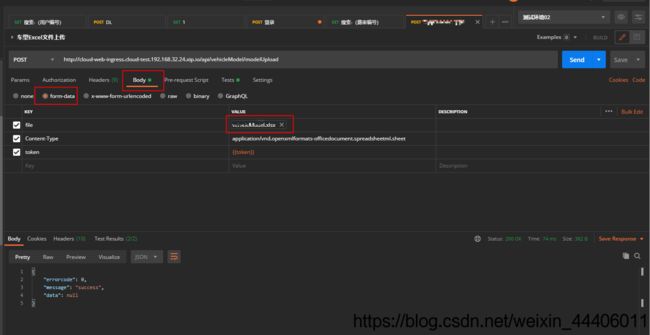
上传/导入文档
抓取接口后,将上传文件信息填到body的from-data里:
一般为:
File:选择本地文件
/Content-Type
/token
…
下载/导出文档
抓包后将数据信息填入request请求里,点击“send and download”运行,自动弹出下载框选择下载位置后成功下载

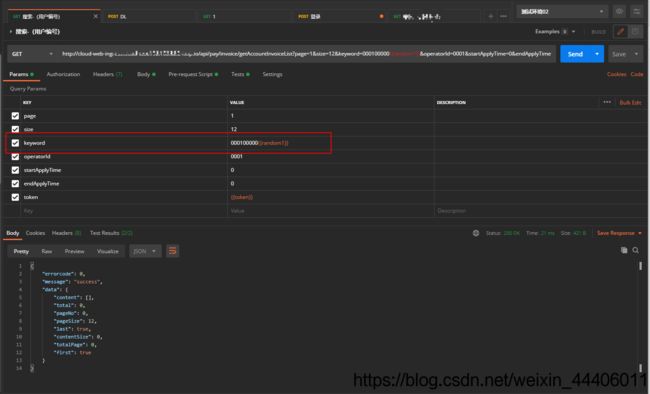
random的使用(参数化)
Pre-request Script
- Pre-request Script是集合中请求发送之前需要执行的代码片段
- 请求参数中包含一个随机数或者请求header中包括一个时间戳,或者你的请求参数需要加密
一:生成各类随机数
//生成0-1间的随机数,包括0不包括1
var random1 = Math.random()
console.log("随机数",random1)
pm.environment.set("random1",random1)

var random1 = Math.random();
console.log("随机数:",random1);

//获取最小值到最大值之间的整数随机数(重要且通用)
function random(Min,Max){
    var Range = Max - Min ;
    var Rand  = Math.random();
    return(Min+Math.round(Rand * Range));
}
var random1 = random(001,999);
console.log("随机数",random1)

二:设置随机时间-时间戳
//设置随机时间-时间戳
var myDate=new Date();
var year = myDate.getFullYear();
var month = myDate.getMonth() + 1;
var date = myDate.getDate();
var hours = myDate.getHours() + 1;
var min = myDate.getMinutes();
var seconds = myDate.getSeconds();
hours = hours < 10 ? "0" + hours : hours;
min = min < 10 ? "0" + min : min;
seconds = seconds < 10 ? "0" + seconds : seconds;
var date = year + "" + month + date + hours + min + seconds;
console.log("时间戳",date);

三:请求参数需要加密
批量运行


运行结果:

生成日志
//日志调试
console.log("hello,postman")

//获取返回响应体中的数据
var jsonData = pm.response.json();
console.log("jsonData:",jsonData)


生成日志“console.log()”
生成的日志在View-Show Postman Console中查看


生成测试报告
- postman生成测试报告需要一个插件:newman ,并且这个插件需要先安装
- Nodejs:Newman下载地址:http://nodejs.cn/download/
- 安装成功后需要验证:在cmd窗口中输入node -v,如果输出node的版本信息,则证明安装成功。
cmd中:
node -v  //验证nodejs安装成功
npm install -g newman   //安装newman
newman -v  //验证newman安装成功
npm install -g newman-reporter-html  //安装该插件指定报告的路径及名称
npm list -g --depth 0   //验证是否安装成功


//安装插件:newman-reporter-htmlextra
//打开cmd窗口,输入命令:
npm install -g newman-reporter-htmlextra
//验证安装:
npm list -g --depth 0

newman run APITest.postman_collection.json -r htmlextra --reporter-html-export htmlReport.html


生成接口文档与发布接口文档
一:生成接口文档
有2中形式可生成接口文档
-
运行处-View in web

-
File-New-API Documentation
二:发布接口文档


测试过程中遇到的一个小问题:文件上传至阿里云报错
上传文件到阿里云报错解决方案
formData.append(‘file’, file) // 必须放最后拼接,不然OSS会报 The bucket POST must contain the specified ‘key’. If it is specified, please check the order of the fields
