webpack高级应用篇(二):devServer
DevServer
-
- 基础使用:
- 添加响应头
- hot
- open
- proxy 开启代理
-
- 重写路径
- 不代理所有内容
- 将多个特定路径代理到同一目标
- changeOrigin
- changeOrigin、pathRewrite 不生效?
- client
-
- logging
- overlay
- progress
开发环境下,我们往往需要启动一个web服务,方便我们模拟一个用户从浏览器中访问我们的web服务,读取我们的打包产物,以观测我们的代码在客户端的表现。webpack5内置了这样的功能,我们只需要简单的配置就可以开启它。在此之前,我们需要安装它
npm i -D webpack-dev-server
基础使用:
webpack.config.js
const path = require('path');

module.exports = {
  //...
  devServer: {
    static: { // 默认是把/dist目录当作web服务的根目录
      directory: path.join(__dirname, 'public'),
    },
    compress: true, // 可选择开启gzip压缩功能,对应静态资源请求的响应头里的,默认开启
    port: 9000, // 端口号
  },
};
当服务(server)启动后,在解析模块列表之前输出一条消息:


这里将会给出服务启动位置以及内容的一些基本信息。
添加响应头
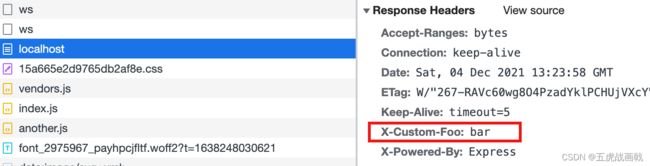
有些场景需求下,我们需要为所有响应添加headers,来对资源的请求和响应打入标志,以便做一些安全防范,或者方便发生异常后做请求
的链路追踪。比如:
webpack.config.js
module.exports = {
  //...
  devServer: {
    headers: {
      'X-Custom-Foo': 'bar',
    },
  },
};
你也可以传递一个数组:
webpack.config.js
module.exports = {
  //...
  devServer: {
    headers: [
      {
        key: 'X-Custom',
        value: 'foo',
      },
      {
        key: 'Y-Custom',
        value: 'bar',
      },
    ],
  },
};
你也可以传递一个函数:
module.exports = {
  //...
  devServer: {
    headers: () => {
      return { 'X-Bar': ['key1=value1', 'key2=value2'] };
    },
  },
};
hot
'only' boolean = true
启用 webpack 的 热模块替换 特性:
webpack.config.js
module.exports = {
  //...
  devServer: {
    hot: true,
  },
};
Tip
从 webpack-dev-server v4 开始,devServer.hot 是默认启用的。它会自动应用
webpack.HotModuleReplacementPlugin
open
boolean string [string] object [object]
告诉 dev-server 在服务器已经启动后打开浏览器。设置其为 true 以打开你的默认浏览器。
webpack.config.js
module.exports = {
  //...
  devServer: {
    open: true,
  },
};
proxy 开启代理
当后端在 localhost:3000 上,客户端在localhost:9000,可以使用它来启用代理解决跨域:
webpack.config.js
module.exports = {
  //...
  devServer: {
    proxy: {
      '/api': 'http://localhost:3000',
    },
  },
};
现在,对 /api/users 的请求会将请求代理到 http://localhost:3000/api/users。
重写路径
如果不希望传递/api,则需要重写路径:
webpack.config.js
module.exports = {
  //...
  devServer: {
    proxy: {
      '/api': {
        target: 'http://localhost:3000',
        pathRewrite: { '^/api': '' },
      },
    },
  },
};
不代理所有内容
可以基于函数的返回值绕过代理。
在该功能中,可以访问请求,响应和代理选项。
- 返回
null或undefined以继续使用代理处理请求。 - 返回
false会为请求产生 404 错误。 - 返回提供服务的路径,而不是继续代理请求。
例如。 对于浏览器请求,想要提供 HTML 页面,但是对于 API 请求,想要代理它。 可以执行以下操作:
webpack.config.js
module.exports = {
  //...
  devServer: {
    proxy: {
      '/api': {
        target: 'http://localhost:3000',
        bypass: function (req, res, proxyOptions) {
          if (req.headers.accept.indexOf('html') !== -1) {
            console.log('Skipping proxy for browser request.');
            return '/index.html';
          }
        },
      },
    },
  },
};
将多个特定路径代理到同一目标
可以使用一个或多个带有 context 属性的对象的数组:
webpack.config.js
module.exports = {
  //...
  devServer: {
    proxy: [
      {
        context: ['/auth', '/api'],
        target: 'http://localhost:3000',
      },
    ],
  },
};
changeOrigin
默认情况下,代理时会保留主机头的来源,可以将 changeOrigin 设置为 true 以覆盖此行为。 在某些情况下,例如使用 name-based virtual hosted sites,它很有用。
webpack.config.js
module.exports = {
  //...
  devServer: {
    proxy: {
      '/api': {
        target: 'http://localhost:3000',
        changeOrigin: true,
      },
    },
  },
};
如果设置成true:发送请求头中host会设置成target
changeOrigin、pathRewrite 不生效?
有些人可能会通过浏览器 F12 查看 request Header 的 Host,发现它无论怎么修改 changeOrigin,它均为前端服务器地址(http://localhost:8080)。于是就认为 changeOrigin: true 无效。其实不然。而且,设置已经生效了,只是浏览器不会直观地显示给你。
你需要通过后端进行 request.getHeader("Host") 打印,你就能发现区别了。
当不设置 changeOrigin 的时候,后端输出 http://localhost:8080
当设置 changeOrigin: true 的时候,后端输出 http://localhost:3000
这大约是因为,浏览器只是将第一层请求显示给你,也就是发给代理服务器的请求,而修改 Host 的工作是代理服务器做的,浏览器当然不会显示 Host 已经被修改的状态!
同理 pathRewrite 也是这个道理
client
logging
'log' | 'info' | 'warn' | 'error' | 'none' | 'verbose'
允许在浏览器中设置日志级别,例如在重载之前,在一个错误之前或者 热模块替换 启用时。
webpack.config.js
module.exports = {
  //...
  devServer: {
    client: {
      logging: 'info',
    },
  },
};
overlay
boolean = true object: { errors boolean = true, warnings boolean = true }
当出现编译错误或警告时,在浏览器中显示全屏覆盖。
webpack.config.js
module.exports = {
  //...
  devServer: {
    client: {
      overlay: true,
    },
  },
};
如果你只想显示错误信息:
webpack.config.js
module.exports = {
  //...
  devServer: {
    client: {
      overlay: {
        errors: true,
        warnings: false,
      },
    },
  },
};
progress
boolean
在浏览器中以百分比显示编译进度。
webpack.config.js
module.exports = {
  //...
  devServer: {
    client: {
      progress: true,
    },
  },
};