整合篇:零基础学习与使用ElasticSearch
目录
- 1、ES的概述
- 2、ES的安装
- 3、ES的命令
- 4、手把手快速入门
-
- 4.1、一切为了搜索
- 4.2、索引员工文档
- 4.3、检索员工文档
- 4.4、轻量搜索数据
- 4.5、含表达式搜索
- 4.6、更复杂的搜索
- 4.7、根据全文检索
- 4.8、使用短语搜索
- 4.9、高亮搜索结果
- 4.10、生成分析结果
- 4.11、空搜索及属性
- 4.12、多索引多类型
- 4.13、分页展示数据
- 4.14、常见数据类型
- 5、添加中文分词器
- 6、配置安全账户
- 7、配置图形界面
-
- 7.1、Kibana是干什么的
- 7.2、Kibana的快速安装
- 7.3、Kibana的常用界面
- 7.4、Kibana的快速上手
- 8、手写代码访问
-
- 8.1、创建工程
- 8.2、添加一条数据
- 8.3、查询一条数据
- 8.4、修改一条数据
- 8.5、删除一条数据
- 8.6、导入全部数据
- 8.7、分页查询数据
- 8.8、条件查询数据
- 8.9、排序查询数据
- 8.10、高亮查询数据
配套资料,免费下载
链接:https://pan.baidu.com/s/1jA217UgqXpONi_fV-aOzqw
提取码:bm2g
复制这段内容后打开百度网盘手机App,操作更方便哦
1、ES的概述
介绍
Elasticsearch是一个建立在全文搜索引擎 Apache Lucene™ 基础上的搜索引擎,可以说 Lucene 是当今最先进,最高效的全功能开源搜索引擎框架。它由Shay Banon开发并于2010年发布,现在是由Elasticsearch BV负责维护。Elasticsearch是一个实时分布式和开源的全文搜索和分析引擎。 它可以从RESTful Web服务接口访问,并使用JSON文档来存储数据。它是基于Java编程语言,这使Elasticsearch能够在不同的平台上运行。使用户能够以非常快的速度来搜索非常大的数据量。
优点
- Elasticsearch是基于Java开发的,这使得它在几乎每个平台上都兼容。
- Elasticsearch是实时的,换句话说,一秒钟后,添加的文档可以在这个引擎中搜索得到。
- Elasticsearch是分布式的,这使得它易于在任何大型组织中扩展和集成。
- 通过使用Elasticsearch中的网关概念,创建完整备份很容易。
- 与Apache Solr相比,在Elasticsearch中处理多租户非常容易。
- Elasticsearch使用JSON对象作为响应,这使得可以使用不同的编程语言调用Elasticsearch服务器。
- Elasticsearch支持几乎大部分文档类型,但不支持文本呈现的文档类型。
缺点
- Elasticsearch在处理请求和响应数据方面没有多语言和数据格式支持(仅在JSON中可用),与Apache Solr不同,Elasticsearch不可以使用CSV,XML等格式。
- Elasticsearch也有一些伤脑的问题发生,虽然在极少数情况下才会发生。
比较
| Elasticsearch | 关系数据库 |
|---|---|
| 索引(index) | 数据库 |
| 类型(type) | 表 |
| 映射(mapping) | 表结构 |
| 属性(field) | 字段 |
| 一个文档(document) | 一条记录 |
2、ES的安装
下载地址:https://www.elastic.co/cn/downloads/elasticsearch
解压Solr:我这里解压到桌面上
启动ElasticSearch:双击运行
在浏览器中输入loclahost:9200检测是否运行成功
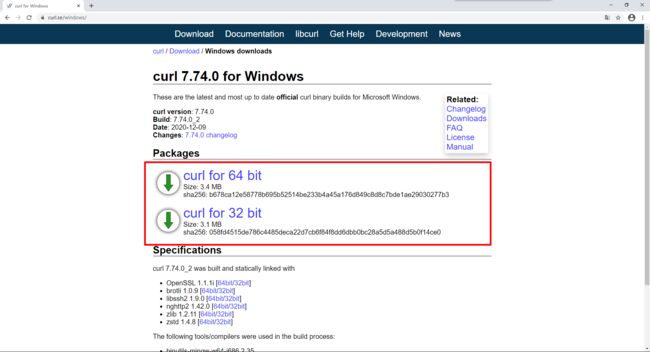
我们接下来下载 curl,可以使用 curl来发送请求,下载地址:https://curl.se/windows/,如果不想用curl也可以使用postman,我个人推荐postman
下载完成以后,我们解压到自己的常用软件开发目录,比如像我这样:
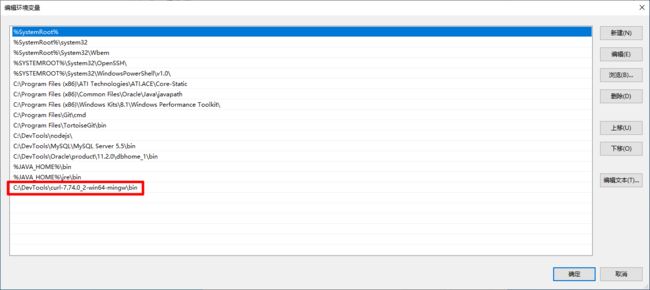
把软件的 bin 添加到环境变量中,这样方便咱们随时使用 curl
环境变量配置完成以后,我们测试是否安装成功
3、ES的命令
_cat系列 ,你也可以后面加一个?v,让输出内容表格显示表头,curl在windows下我觉得不是那么好用,如果你也用不惯请使用postman
curl -XGET http://localhost:9200/_cat/allocation
curl -XGET http://localhost:9200/_cat/shards
curl -XGET http://localhost:9200/_cat/shards/{index}
curl -XGET http://localhost:9200/_cat/master
curl -XGET http://localhost:9200/_cat/nodes
curl -XGET http://localhost:9200/_cat/tasks
curl -XGET http://localhost:9200/_cat/indices
curl -XGET http://localhost:9200/_cat/indices/{index}
curl -XGET http://localhost:9200/_cat/segments
curl -XGET http://localhost:9200/_cat/segments/{index}
curl -XGET http://localhost:9200/_cat/count
curl -XGET http://localhost:9200/_cat/count/{index}
curl -XGET http://localhost:9200/_cat/recovery
curl -XGET http://localhost:9200/_cat/recovery/{index}
curl -XGET http://localhost:9200/_cat/health
curl -XGET http://localhost:9200/_cat/pending_tasks
curl -XGET http://localhost:9200/_cat/aliases
curl -XGET http://localhost:9200/_cat/aliases/{alias}
curl -XGET http://localhost:9200/_cat/thread_pool
curl -XGET http://localhost:9200/_cat/thread_pool/{thread_pools}
curl -XGET http://localhost:9200/_cat/plugins
curl -XGET http://localhost:9200/_cat/fielddata
curl -XGET http://localhost:9200/_cat/fielddata/{fields}
curl -XGET http://localhost:9200/_cat/nodeattrs
curl -XGET http://localhost:9200/_cat/repositories
curl -XGET http://localhost:9200/_cat/snapshots/{repository}
curl -XGET http://localhost:9200/_cat/templates
curl -XGET http://localhost:9200/_cat/ml/anomaly_detectors
curl -XGET http://localhost:9200/_cat/ml/anomaly_detectors/{job_id}
curl -XGET http://localhost:9200/_cat/ml/trained_models
curl -XGET http://localhost:9200/_cat/ml/trained_models/{model_id}
curl -XGET http://localhost:9200/_cat/ml/datafeeds
curl -XGET http://localhost:9200/_cat/ml/datafeeds/{datafeed_id}
curl -XGET http://localhost:9200/_cat/ml/data_frame/analytics
curl -XGET http://localhost:9200/_cat/ml/data_frame/analytics/{id}
curl -XGET http://localhost:9200/_cat/transforms
curl -XGET http://localhost:9200/_cat/transforms/{transform_id}
索引操作
(1)创建指定索引
curl -XPUT http://localhost:9200/{index}
(2)查看所有索引
curl -XGET http://localhost:9200/_cat/indices?v
(3)删除指定索引
curl -XDELETE http://localhost:9200/{index}
(4)保存指定文档
curl -XPOST http://localhost:9200/{index}/{type}/{id} -H 'Content-Type:application/json' -d '{"a":"avalue","b":"bvalue"}'
(5)获取指定文档
curl -XGET http://localhost:9200/{index}/{type}/{id}
(6)删除指定文档
curl -XDELETE http://localhost:9200/{index}/{type}/{id}
(7)清空索引数据
curl -XPOST http://localhost:9200/{index}/_delete_by_query -H 'Content-Type:application/json' -d '{"query":{"match_all":{}}}'
4、手把手快速入门
4.1、一切为了搜索
Elasticsearch 是一个开源的搜索引擎,建立在一个全文搜索引擎库 Apache Lucene™ 基础之上。 Lucene 可以说是当下最先进、高性能、全功能的搜索引擎库—无论是开源还是私有。
但是 Lucene 仅仅只是一个库。为了充分发挥其功能,你需要使用 Java 并将 Lucene 直接集成到应用程序中。 更糟糕的是,您可能需要获得信息检索学位才能了解其工作原理。Lucene 非常 复杂。
Elasticsearch 也是使用 Java 编写的,它的内部使用 Lucene 做索引与搜索,但是它的目的是使全文检索变得简单, 通过隐藏 Lucene 的复杂性,取而代之的提供一套简单一致的 RESTful API。
然而,Elasticsearch 不仅仅是 Lucene,并且也不仅仅只是一个全文搜索引擎。 它可以被下面这样准确的形容:
- 一个分布式的实时文档存储,每个字段 可以被索引与搜索
- 一个分布式实时分析搜索引擎
- 能胜任上百个服务节点的扩展,并支持 PB 级别的结构化或者非结构化数据
Elasticsearch 将所有的功能打包成一个单独的服务,这样你可以通过程序与它提供的简单的 RESTful API 进行通信, 可以使用自己喜欢的编程语言充当 web 客户端,甚至可以使用命令行(去充当这个客户端)。
就 Elasticsearch 而言,起步很简单。对于初学者来说,它预设了一些适当的默认值,并隐藏了复杂的搜索理论知识。 它 开箱即用 。只需最少的理解,你很快就能具有生产力。
随着你知识的积累,你可以利用 Elasticsearch 更多的高级特性,它的整个引擎是可配置并且灵活的。 从众多高级特性中,挑选恰当去修饰的 Elasticsearch,使它能解决你本地遇到的问题。
许多年前,一个刚结婚的名叫 Shay Banon 的失业开发者,跟着他的妻子去了伦敦,他的妻子在那里学习厨师。 在寻找一个赚钱的工作的时候,为了给他的妻子做一个食谱搜索引擎,他开始使用 Lucene 的一个早期版本。
直接使用 Lucene 是很难的,因此 Shay 开始做一个抽象层,Java 开发者使用它可以很简单的给他们的程序添加搜索功能。 他发布了他的第一个开源项目 Compass。
后来 Shay 获得了一份工作,主要是高性能,分布式环境下的内存数据网格。这个对于高性能,实时,分布式搜索引擎的需求尤为突出, 他决定重写 Compass,把它变为一个独立的服务并取名 Elasticsearch。
第一个公开版本在2010年2月发布,从此以后,Elasticsearch 已经成为了 Github 上最活跃的项目之一,他拥有超过300名 contributors(目前736名 contributors )。 一家公司已经开始围绕 Elasticsearch 提供商业服务,并开发新的特性,但是,Elasticsearch 将永远开源并对所有人可用。
据说,Shay 的妻子还在等着她的食谱搜索引擎…
4.2、索引员工文档
为了让大家对 Elasticsearch 能实现什么及其上手难易程度有一个基本印象,让我们从一个简单的教程开始并介绍索引、搜索及聚合等基础概念。
我们将一并介绍一些新的技术术语,即使无法立即全部理解它们也无妨,因为在后续内容中,我们将继续深入介绍这里提到的所有概念。
第一个业务需求是存储员工数据。 这将会以 员工文档 的形式存储:一个文档代表一个员工。存储数据到 Elasticsearch 的行为叫做 索引 ,但在索引一个文档之前,需要确定将文档存储在哪里。
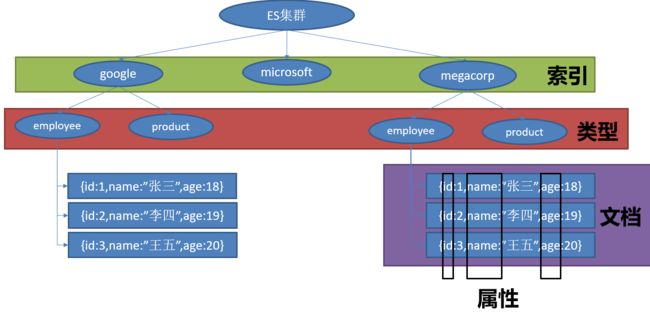
一个 Elasticsearch 集群可以包含多个 索引 ,相应的每个索引可以包含多个 类型 。 这些不同的类型存储着多个 文档 ,每个文档又有 多个 属性 。
对于员工来说,我们将做如下操作:
- 每个员工索引一个文档,文档包含该员工的所有信息。
- 每个文档都将是
employee类型 。 - 该类型位于 索引
megacorp内。 - 该索引保存在我们的 Elasticsearch 集群中。
实践中这非常简单(尽管看起来有很多步骤),我们可以通过一条命令完成所有这些动作:
注意:
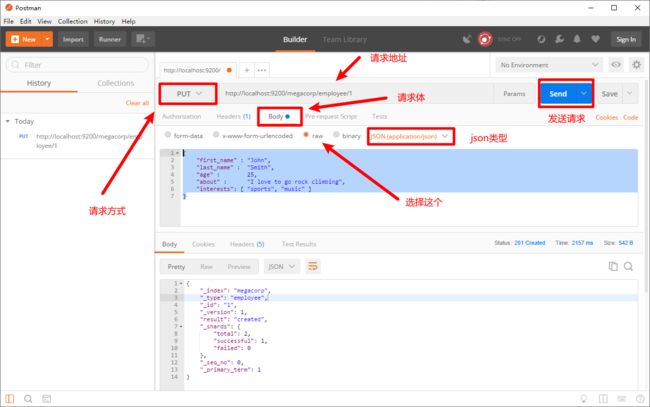
curl不会使用的,请用postman发送请求,为了更加方便和直观,接下来演示一次postman,之后使用什么个人就随意了
PUT /megacorp/employee/1
{
    "first_name" : "John",
    "last_name" :  "Smith",
    "age" :        25,
    "about" :      "I love to go rock climbing",
    "interests": [ "sports", "music" ]
}
注意,路径 /megacorp/employee/1 包含了三部分的信息:
-
megacorp索引名称
-
employee类型名称
-
1特定雇员的ID
请求体 —— JSON 文档 —— 包含了这位员工的所有详细信息,他的名字叫 John Smith ,今年 25 岁,喜欢攀岩。
很简单!无需进行执行管理任务,如创建一个索引或指定每个属性的数据类型之类的,可以直接只索引一个文档。Elasticsearch 默认地完成其他一切,因此所有必需的管理任务都在后台使用默认设置完成。
进行下一步前,让我们增加更多的员工信息到目录中:
PUT /megacorp/employee/2
{
    "first_name" :  "Jane",
    "last_name" :   "Smith",
    "age" :         32,
    "about" :       "I like to collect rock albums",
    "interests":  [ "music" ]
}

PUT /megacorp/employee/3
{
    "first_name" :  "Douglas",
    "last_name" :   "Fir",
    "age" :         35,
    "about":        "I like to build cabinets",
    "interests":  [ "forestry" ]
}
4.3、检索员工文档
目前我们已经在 Elasticsearch 中存储了一些数据, 接下来就能专注于实现应用的业务需求了。第一个需求是可以检索到单个雇员的数据。
这在 Elasticsearch 中很简单。简单地执行 一个 HTTP GET 请求并指定文档的地址——索引库、类型和ID。 使用这三个信息可以返回原始的 JSON 文档:
GET /megacorp/employee/1
返回结果包含了文档的一些元数据,以及 _source 属性,内容是 John Smith 雇员的原始 JSON 文档:
{
  "_index" :   "megacorp",
  "_type" :    "employee",
  "_id" :      "1",
  "_version" : 1,
  "found" :    true,
  "_source" :  {
      "first_name" :  "John",
      "last_name" :   "Smith",
      "age" :         25,
      "about" :       "I love to go rock climbing",
      "interests":  [ "sports", "music" ]
  }
}
将 HTTP 命令由 PUT 改为 GET 可以用来检索文档,同样的,可以使用 DELETE 命令来删除文档,以及使用 HEAD 指令来检查文档是否存在。
如果想更新已存在的文档,只需再次 PUT 。
4.4、轻量搜索数据
一个 GET 是相当简单的,可以直接得到指定的文档。 现在尝试点儿稍微高级的功能,比如一个简单的搜索!
第一个尝试的几乎是最简单的搜索了。我们使用下列请求来搜索所有雇员:
GET /megacorp/employee/_search
可以看到,我们仍然使用索引库 megacorp 以及类型 employee,但与指定一个文档 ID 不同,这次使用 _search 。返回结果包括了所有三个文档,放在数组 hits 中。一个搜索默认返回十条结果。
{
   "took":      6,
   "timed_out": false,
   "_shards": { ... },
   "hits": {
      "total":      3,
      "max_score":  1,
      "hits": [
         {
            "_index":         "megacorp",
            "_type":          "employee",
            "_id":            "3",
            "_score":         1,
            "_source": {
               "first_name":  "Douglas",
               "last_name":   "Fir",
               "age":         35,
               "about":       "I like to build cabinets",
               "interests": [ "forestry" ]
            }
         },
         {
            "_index":         "megacorp",
            "_type":          "employee",
            "_id":            "1",
            "_score":         1,
            "_source": {
               "first_name":  "John",
               "last_name":   "Smith",
               "age":         25,
               "about":       "I love to go rock climbing",
               "interests": [ "sports", "music" ]
            }
         },
         {
            "_index":         "megacorp",
            "_type":          "employee",
            "_id":            "2",
            "_score":         1,
            "_source": {
               "first_name":  "Jane",
               "last_name":   "Smith",
               "age":         32,
               "about":       "I like to collect rock albums",
               "interests": [ "music" ]
            }
         }
      ]
   }
}
注意:返回结果不仅告知匹配了哪些文档,还包含了整个文档本身:显示搜索结果给最终用户所需的全部信息。
接下来,尝试下搜索姓氏为 Smith 的雇员。为此,我们将使用一个 高亮 搜索,很容易通过命令行完成。这个方法一般涉及到一个 查询字符串 (query-string) 搜索,因为我们通过一个URL参数来传递查询信息给搜索接口:
GET /megacorp/employee/_search?q=last_name:Smith
我们仍然在请求路径中使用 _search 端点,并将查询本身赋值给参数 q= 。返回结果给出了所有的 Smith:
{
   ...
   "hits": {
      "total":      2,
      "max_score":  0.30685282,
      "hits": [
         {
            ...
            "_source": {
               "first_name":  "John",
               "last_name":   "Smith",
               "age":         25,
               "about":       "I love to go rock climbing",
               "interests": [ "sports", "music" ]
            }
         },
         {
            ...
            "_source": {
               "first_name":  "Jane",
               "last_name":   "Smith",
               "age":         32,
               "about":       "I like to collect rock albums",
               "interests": [ "music" ]
            }
         }
      ]
   }
}
4.5、含表达式搜索
Query-string 搜索通过命令非常方便地进行临时性的即席搜索 ,但它有自身的局限性。Elasticsearch 提供一个丰富灵活的查询语言叫做 查询表达式 , 它支持构建更加复杂和健壮的查询。领域特定语言 (DSL), 使用 JSON 构造了一个请求。我们可以像这样重写之前的查询所有名为 Smith 的搜索 :
POST /megacorp/employee/_search
{
    "query" : {
        "match" : {
            "last_name" : "Smith"
        }
    }
}
返回结果与之前的查询一样,但还是可以看到有一些变化。其中之一是,不再使用 query-string 参数,而是一个请求体替代。这个请求使用 JSON 构造,并使用了一个 match 查询(属于查询类型之一,后面将继续介绍)。
4.6、更复杂的搜索
现在尝试下更复杂的搜索。 同样搜索姓氏为 Smith 的员工,但这次我们只需要年龄大于 30 的。查询需要稍作调整,使用过滤器 filter ,它支持高效地执行一个结构化查询。
POST /megacorp/employee/_search
{
    "query" : {
        "bool": {
            "must": {
                "match" : {
                    "last_name" : "smith"
                }
            },
            "filter": {
                "range" : {
                    "age" : { "gt" : 30 }
                }
            }
        }
    }
}
这部分使用了一个 range 过滤器 , 它能找到年龄大于 30 的文档,其中 gt 表示_大于_(great than)。
目前无需太多担心语法问题,后续会更详细地介绍。只需明确我们添加了一个 过滤器 用于执行一个范围查询,并复用之前的 match 查询。现在结果只返回了一名员工,叫 Jane Smith,32 岁。
{
   ...
   "hits": {
      "total":      1,
      "max_score":  0.30685282,
      "hits": [
         {
            ...
            "_source": {
               "first_name":  "Jane",
               "last_name":   "Smith",
               "age":         32,
               "about":       "I like to collect rock albums",
               "interests": [ "music" ]
            }
         }
      ]
   }
}
4.7、根据全文检索
截止目前的搜索相对都很简单:单个姓名,通过年龄过滤。现在尝试下稍微高级点儿的全文搜索——一项 传统数据库确实很难搞定的任务。
搜索下所有喜欢攀岩(rock climbing)的员工:
POST /megacorp/employee/_search
{
    "query" : {
        "match" : {
            "about" : "rock climbing"
        }
    }
}
显然我们依旧使用之前的 match 查询在about 属性上搜索 “rock climbing” 。得到两个匹配的文档:
{
   ...
   "hits": {
      "total":      2,
      "max_score":  0.16273327,
      "hits": [
         {
            ...
            "_score":         0.16273327,
            "_source": {
               "first_name":  "John",
               "last_name":   "Smith",
               "age":         25,
               "about":       "I love to go rock climbing",
               "interests": [ "sports", "music" ]
            }
         },
         {
            ...
            "_score":         0.016878016,
            "_source": {
               "first_name":  "Jane",
               "last_name":   "Smith",
               "age":         32,
               "about":       "I like to collect rock albums",
               "interests": [ "music" ]
            }
         }
      ]
   }
}
注意:"_score"代表相关性得分
Elasticsearch 默认按照相关性得分排序,即每个文档跟查询的匹配程度。第一个最高得分的结果很明显:John Smith 的 about 属性清楚地写着 “rock climbing” 。
但为什么 Jane Smith 也作为结果返回了呢?原因是她的 about 属性里提到了 “rock” 。因为只有 “rock” 而没有 “climbing” ,所以她的相关性得分低于 John 的。
这是一个很好的案例,阐明了 Elasticsearch 如何 在 全文属性上搜索并返回相关性最强的结果。Elasticsearch中的 相关性 概念非常重要,也是完全区别于传统关系型数据库的一个概念,数据库中的一条记录要么匹配要么不匹配。
4.8、使用短语搜索
找出一个属性中的独立单词是没有问题的,但有时候想要精确匹配一系列单词或者_短语_ 。 比如, 我们想执行这样一个查询,仅匹配同时包含 “rock” 和 “climbing” ,并且 二者以短语 “rock climbing” 的形式紧挨着的雇员记录。
为此对 match 查询稍作调整,使用一个叫做 match_phrase 的查询:
POST /megacorp/employee/_search
{
    "query" : {
        "match_phrase" : {
            "about" : "rock climbing"
        }
    }
}
毫无悬念,返回结果仅有 John Smith 的文档。
{
   ...
   "hits": {
      "total":      1,
      "max_score":  0.23013961,
      "hits": [
         {
            ...
            "_score":         0.23013961,
            "_source": {
               "first_name":  "John",
               "last_name":   "Smith",
               "age":         25,
               "about":       "I love to go rock climbing",
               "interests": [ "sports", "music" ]
            }
         }
      ]
   }
}
4.9、高亮搜索结果
许多应用都倾向于在每个搜索结果中 高亮 部分文本片段,以便让用户知道为何该文档符合查询条件。在 Elasticsearch 中检索出高亮片段也很容易。
再次执行前面的查询,并增加一个新的 highlight 参数:
POST /megacorp/employee/_search
{
    "query" : {
        "match_phrase" : {
            "about" : "rock climbing"
        }
    },
    "highlight": {
        "fields" : {
            "about" : {}
        }
    }
}
当执行该查询时,返回结果与之前一样,与此同时结果中还多了一个叫做 highlight 的部分。这个部分包含了 about 属性匹配的文本片段,并以 HTML 标签 封装:
{
   ...
   "hits": {
      "total":      1,
      "max_score":  0.23013961,
      "hits": [
         {
            ...
            "_score":         0.23013961,
            "_source": {
               "first_name":  "John",
               "last_name":   "Smith",
               "age":         25,
               "about":       "I love to go rock climbing",
               "interests": [ "sports", "music" ]
            },
            "highlight": {
               "about": [
                  "I love to go rock climbing"
               ]
            }
         }
      ]
   }
}
4.10、生成分析结果
终于到了最后一个业务需求:支持管理者对员工目录做分析。 Elasticsearch 有一个功能叫聚合(aggregations),允许我们基于数据生成一些精细的分析结果。聚合与 SQL 中的 GROUP BY 类似但更强大。
举个例子,挖掘出员工中最受欢迎的兴趣爱好:
POST /megacorp/employee/_search
{
  "aggs": {
    "all_interests": {
      "terms": { "field": "interests" }
    }
  }
}
暂时忽略掉语法,直接看看结果:
{
   ...
   "hits": { ... },
   "aggregations": {
      "all_interests": {
         "buckets": [
            {
               "key":       "music",
               "doc_count": 2
            },
            {
               "key":       "forestry",
               "doc_count": 1
            },
            {
               "key":       "sports",
               "doc_count": 1
            }
         ]
      }
   }
}
可以看到,两位员工对音乐感兴趣,一位对林业感兴趣,一位对运动感兴趣。这些聚合的结果数据并非预先统计,而是根据匹配当前查询的文档即时生成的。如果想知道叫 Smith 的员工中最受欢迎的兴趣爱好,可以直接构造一个组合查询:
POST /megacorp/employee/_search
{
  "query": {
    "match": {
      "last_name": "smith"
    }
  },
  "aggs": {
    "all_interests": {
      "terms": {
        "field": "interests"
      }
    }
  }
}
all_interests 聚合已经变为只包含匹配查询的文档:
  ...
  "all_interests": {
     "buckets": [
        {
           "key": "music",
           "doc_count": 2
        },
        {
           "key": "sports",
           "doc_count": 1
        }
     ]
  }
聚合还支持分级汇总 。比如,查询特定兴趣爱好员工的平均年龄:
POST /megacorp/employee/_search
{
    "aggs" : {
        "all_interests" : {
            "terms" : { "field" : "interests" },
            "aggs" : {
                "avg_age" : {
                    "avg" : { "field" : "age" }
                }
            }
        }
    }
}
得到的聚合结果有点儿复杂,但理解起来还是很简单的:
 ...
  "all_interests": {
     "buckets": [
        {
           "key": "music",
           "doc_count": 2,
           "avg_age": {
              "value": 28.5
           }
        },
        {
           "key": "forestry",
           "doc_count": 1,
           "avg_age": {
              "value": 35
           }
        },
        {
           "key": "sports",
           "doc_count": 1,
           "avg_age": {
              "value": 25
           }
        }
     ]
  }
输出基本是第一次聚合的加强版。依然有一个兴趣及数量的列表,只不过每个兴趣都有了一个附加的 avg_age 属性,代表有这个兴趣爱好的所有员工的平均年龄。
即使现在不太理解这些语法也没有关系,依然很容易了解到复杂聚合及分组通过 Elasticsearch 特性实现得很完美,能够提取的数据类型也没有任何限制。
4.11、空搜索及属性
搜索API的最基础的形式是没有指定任何查询的空搜索,它简单地返回集群中所有索引下的所有文档:
GET /_search
返回的结果(为了界面简洁编辑过的)像这样:
{
   "hits" : {
      "total" :       14,
      "hits" : [
        {
          "_index":   "us",
          "_type":    "tweet",
          "_id":      "7",
          "_score":   1,
          "_source": {
             "date":    "2014-09-17",
             "name":    "John Smith",
             "tweet":   "The Query DSL is really powerful and flexible",
             "user_id": 2
          }
       },
        ... 9 RESULTS REMOVED ...
      ],
      "max_score" :   1
   },
   "took" :           4,
   "_shards" : {
      "failed" :      0,
      "successful" :  10,
      "total" :       10
   },
   "timed_out" :      false
}
hits
返回结果中最重要的部分是 hits ,它包含 total 字段来表示匹配到的文档总数,并且一个 hits 数组包含所查询结果的前十个文档。
在 hits 数组中每个结果包含文档的 _index 、 _type 、 _id ,加上 _source 字段。这意味着我们可以直接从返回的搜索结果中使用整个文档。这不像其他的搜索引擎,仅仅返回文档的ID,需要你单独去获取文档。
每个结果还有一个 _score ,它衡量了文档与查询的匹配程度。默认情况下,首先返回最相关的文档结果,就是说,返回的文档是按照 _score 降序排列的。在这个例子中,我们没有指定任何查询,故所有的文档具有相同的相关性,因此对所有的结果而言 1 是中性的 _score 。
max_score 值是与查询所匹配文档的 _score 的最大值。
took
took 值告诉我们执行整个搜索请求耗费了多少毫秒。
shards
_shards 部分告诉我们在查询中参与分片的总数,以及这些分片成功了多少个失败了多少个。正常情况下我们不希望分片失败,但是分片失败是可能发生的。如果我们遭遇到一种灾难级别的故障,在这个故障中丢失了相同分片的原始数据和副本,那么对这个分片将没有可用副本来对搜索请求作出响应。假若这样,Elasticsearch 将报告这个分片是失败的,但是会继续返回剩余分片的结果。
timeout
timed_out 值告诉我们查询是否超时。默认情况下,搜索请求不会超时。如果低响应时间比完成结果更重要,你可以指定 timeout 为 10 或者 10ms(10毫秒),或者 1s(1秒):
GET /_search?timeout=10ms
在请求超时之前,Elasticsearch 将会返回已经成功从每个分片获取的结果。
应当注意的是 timeout 不是停止执行查询,它仅仅是告知正在协调的节点返回到目前为止收集的结果并且关闭连接。在后台,其他的分片可能仍在执行查询即使是结果已经被发送了。使用超时是因为 SLA(服务等级协议)对你是很重要的,而不是因为想去中止长时间运行的查询。
4.12、多索引多类型
你有没有注意到之前的 空搜索 的结果,不同类型的文档— user 和 tweet 来自不同的索引— us 和 gb ?
如果不对某一特殊的索引或者类型做限制,就会搜索集群中的所有文档。Elasticsearch 转发搜索请求到每一个主分片或者副本分片,汇集查询出的前10个结果,并且返回给我们。
然而,经常的情况下,你想在一个或多个特殊的索引并且在一个或者多个特殊的类型中进行搜索。我们可以通过在URL中指定特殊的索引和类型达到这种效果,如下所示:
-
/_search在所有的索引中搜索所有的类型
-
/gb/_search在
gb索引中搜索所有的类型 -
/gb,us/_search在
gb和us索引中搜索所有的文档 -
/g\*,u\*/_search在任何以
g或者u开头的索引中搜索所有的类型 -
/gb/user/_search在
gb索引中搜索user类型 -
/gb,us/user,tweet/_search在
gb和us索引中搜索user和tweet类型 -
/_all/user,tweet/_search在所有的索引中搜索
user和tweet类型
当在单一的索引下进行搜索的时候,Elasticsearch 转发请求到索引的每个分片中,可以是主分片也可以是副本分片,然后从每个分片中收集结果。多索引搜索恰好也是用相同的方式工作的—只是会涉及到更多的分片。搜索一个索引有五个主分片和搜索五个索引各有一个分片准确来所说是等价的。
4.13、分页展示数据
在之前的 空搜索 中说明了集群中有 14 个文档匹配了(empty)query 。 但是在 hits 数组中只有 10 个文档。如何才能看到其他的文档?
和 SQL 使用 LIMIT 关键字返回单个 page 结果的方法相同,Elasticsearch 接受 from 和 size 参数:
-
size显示应该返回的结果数量,默认是
10 -
from显示应该跳过的初始结果数量,默认是
0
如果每页展示 5 条结果,可以用下面方式请求得到 1 到 3 页的结果:
GET /_search?size=5
GET /_search?size=5&from=5
GET /_search?size=5&from=10
考虑到分页过深以及一次请求太多结果的情况,结果集在返回之前先进行排序。 但请记住一个请求经常跨越多个分片,每个分片都产生自己的排序结果,这些结果需要进行集中排序以保证整体顺序是正确的。
4.14、常见数据类型
ES常用的数据类型可分为3大类:
- 核⼼数据类型
- 复杂数据类型
- 专⽤数据类型
核心数据类型
(1)字符串
text:⽤于全⽂索引,搜索时会自动使用分词器进⾏分词再匹配
keyword:不分词,搜索时需要匹配完整的值
(2)数值型
整型:byte,short,integer,long
浮点型:float, half_float, scaled_float,double
(3)日期类型
date
json没有date类型,插入|更新文档|字段时怎么表示date类型?
#mapping,将字段类型设置为date
"type" : "date"

#插入|更新此字段的值时,有3种表示方式:

#使用固定格式的字符串
"2020-04-18"、"2020/04/18 09:00:00"

#值使用长整型的时间戳,1970-01-01 00:00:00,s
1610350870

#值使用长整型的时间戳,1970-01-01 00:00:00,ms
1641886870000
(4)范围型
integer_range, long_range, float_range,double_range,date_range
比如招聘要求年龄在[20, 40]上,mapping:
age_limit :{
 "type" : "integer_range"
}
插入|更新文档|字段时,值写成json对象的形式:
"age_limit" : {
 "gte" : 20,
 "lte" : 40
}
gt是大于,lt是小于,e是equals等于。
按此字段搜索时,值写常量,age_limit的区间包含了此值的文档都算是匹配。
"term" : {
 "age_limit" : 30
}
(5)布尔
#true、false
boolean
(6)⼆进制
binary 会把值当做经过 base64 编码的字符串,默认不存储,且不可搜索
复杂数据类型
(1)对象
object
#定义mapping
"user" : {
    "type":"object"
}

#插入|更新字段的值,值写成json对象的形式
"user" : {
    "name":"chy",
    "age":12
}

#搜索时,字段名使用点号连接
"match":{
     "user.name":"chy"
}
一个对象中可以嵌套对象。
(2)数组
#ES没有专门的数组类型,定义mapping,写成元素的类型
"arr" : {
    "type":"integer"
}

#插入|更新字段的值。元素可以是各种类型,但元素的类型要相同
"arr" : [1,3,4]
专用数据类型
ip
#定义mapping
"ip_address" : {
    "type":"ip"
}

#插入|更新字段的值,值写成字符串形式
"ip" : "192.168.1.1"

#搜索
"match":{
     "ip_address":"192.168.1.1"
 }

#ip在192.168.0.0 ~ 192.168.255.255上的文档都匹配
"match":{
     "ip_address":"192.168.0.0/16"
}
5、添加中文分词器
为什么要在elasticsearch中要使用ik这样的中文分词呢,那是因为es提供的分词是英文分词,对于中文的分词就做的非常不好了,因此我们需要一个中文分词器来用于搜索和使用。今天我们就尝试安装下ik分词,ik有两种分词模式,ik_max_word,和ik_smart模式。
ik_max_word 和 ik_smart 什么区别?
- ik_max_word: 会将文本做最细粒度的拆分,比如会将“中华人民共和国国歌”拆分为“中华人民共和国,中华人民,中华,华人,人民共和国,人民,人,民,共和国,共和,和,国国,国歌”,会穷尽各种可能的组合;
- k_smart: 会做最粗粒度的拆分,比如会将“中华人民共和国国歌”拆分为“中华人民共和国,国歌”。
注意:索引时,为了提供索引的覆盖范围,通常会采用ik_max_word分析器,会以最细粒度分词索引,搜索时为了提高搜索准确度,会采用ik_smart分析器,会以粗粒度分词
(1)去github 下载对应的分词插件,根据不同版本下载不同的分词插件
插件下载地址:https://github.com/medcl/elasticsearch-analysis-ik/releases
各个版本对照:https://github.com/medcl/elasticsearch-analysis-ik#versions
(2)通过es的命令进行安装,es版本需要大于5.5.1
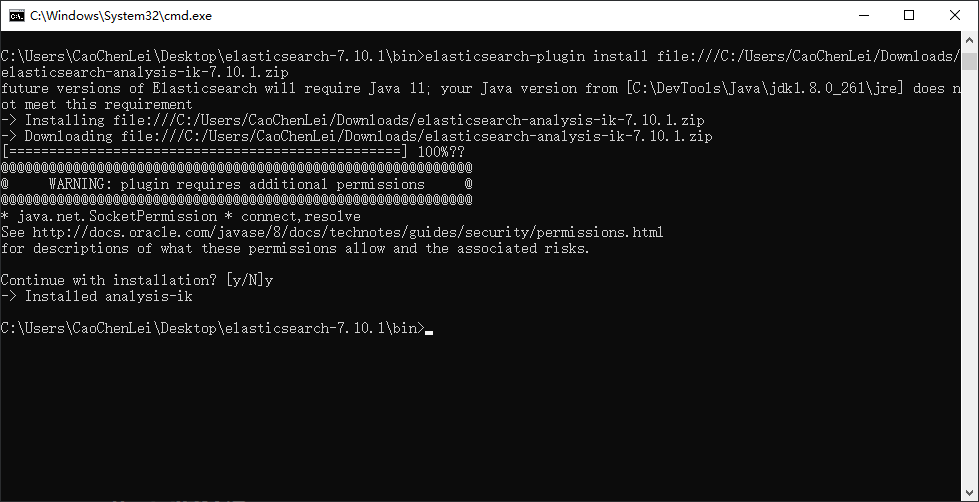
elasticsearch-plugin install file:///C:/Users/CaoChenLei/Downloads/elasticsearch-analysis-ik-7.10.1.zip
(3)安装好后重启es,会看到加载了ik分词了
(4)创建索引
curl -XPUT http://localhost:9200/index
(5)创建映射
curl -XPUT http://localhost:9200/index/_mapping -H 'Content-Type:application/json' -d '{
	"properties": {
		"content": {
			"type": "text",
			"analyzer": "ik_max_word",
			"search_analyzer": "ik_smart"
		}
	}
}'
(6)添加数据
curl -XPOST http://localhost:9200/index/_doc/1 -H 'Content-Type:application/json' -d'{"content":"美国留给伊拉克的是个烂摊子吗我觉得是烂摊子"}'
curl -XPOST http://localhost:9200/index/_doc/2 -H 'Content-Type:application/json' -d'{"content":"中韩渔警冲突调查韩警平均每天扣一艘中国渔船"}'
curl -XPOST http://localhost:9200/index/_doc/3 -H 'Content-Type:application/json' -d'{"content":"中国驻洛杉矶领事馆遭亚裔男子枪击嫌犯已自首"}'
(7)高亮查询
curl -XPOST http://localhost:9200/index/_search -H 'Content-Type:application/json' -d'{
"query": {
"match": {
"content": "中国"
}
},
"highlight": {
"pre_tags": ["", ""],
"post_tags": [" ", ""],
"fields": {
"content": {}
}
}
}'
(8)注意事项
从7.0开始将移除映射类别,为了与未来的规划匹配,现在将这个唯一的映射类别名定义为“_doc”,因为索引的请求地址将规范为:
GET/PUT/POST/DELETE {index}/_doc/{id}
6、配置安全账户
(1)修改配置文件(elasticsearch-7.10.1\config\elasticsearch.yml),修改完毕请保存退出,然后重启ElasticSearch
http.cors.enabled: true
http.cors.allow-origin: "*"
http.cors.allow-headers: Authorization
xpack.security.enabled: true
xpack.security.transport.ssl.enabled: true
xpack.security.dls_fls.enabled: true
xpack.license.self_generated.type: basic
(2)初始化密码(由于版本不一样,初始化的密码个数可能会有差异),在bin目录打开cmd输入elasticsearch-setup-passwords interactive,密码建议一样
C:\Users\CaoChenLei\Desktop\elasticsearch-7.10.1\bin>elasticsearch-setup-passwords interactive
future versions of Elasticsearch will require Java 11; your Java version from [C:\DevTools\Java\jdk1.8.0_261\jre] does not meet this requirement
Initiating the setup of passwords for reserved users elastic,apm_system,kibana,kibana_system,logstash_system,beats_system,remote_monitoring_user.
You will be prompted to enter passwords as the process progresses.
Please confirm that you would like to continue [y/N]y


Enter password for [elastic]:
Reenter password for [elastic]:
Enter password for [apm_system]:
Reenter password for [apm_system]:
Enter password for [kibana_system]:
Reenter password for [kibana_system]:
Enter password for [logstash_system]:
Reenter password for [logstash_system]:
Enter password for [beats_system]:
Reenter password for [beats_system]:
Enter password for [remote_monitoring_user]:
Reenter password for [remote_monitoring_user]:
Changed password for user [apm_system]
Changed password for user [kibana_system]
Changed password for user [kibana]
Changed password for user [logstash_system]
Changed password for user [beats_system]
Changed password for user [remote_monitoring_user]
Changed password for user [elastic]

C:\Users\CaoChenLei\Desktop\elasticsearch-7.10.1\bin>
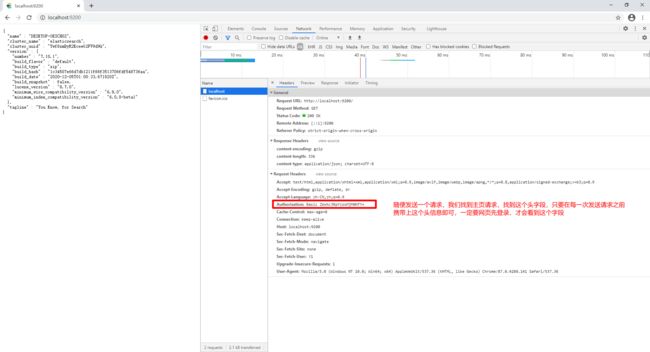
(3)重启ElasticSearch,然后打开首页,输入密码,如下图:
(4)我们这里记住几个常用的关于用户和角色的命令
查看用户:
curl -XGET -u elastic:123456 "http://localhost:9200/_security/user"
查看角色:
curl -XGET -u elastic:123456 "http://localhost:9200/_security/role"
添加用户:
curl -XPOST -u elastic:123456 "http://localhost:9200/_security/user/caochenlei" -H 'Content-Type:application/json' -d '{
	"password": "123456",
	"roles": ["superuser"],
	"full_name": "caochenlei",
	"email": "[email protected]",
	"metadata": {
		"age": 21,
		"sex": "男"
	}
}'
修改用户:和新增API一样,但是不能修改用户名和密码
curl -XPUT -u elastic:123456 "http://localhost:9200/_security/user/caochenlei" -H 'Content-Type:application/json' -d '{
	"roles": ["superuser"],
	"full_name": "caochenlei",
	"email": "[email protected]",
	"metadata": {
		"age": 21,
		"sex": "男"
	}
}'
修改密码:返回 { } 空json代表成功
curl -XPUT -u elastic:123456 "http://localhost:9200/_security/user/caochenlei/_password" -H 'Content-Type:application/json' -d '{
	"password": "456789"
}'
删除用户:
curl -XDELETE -u elastic:123456 "http://localhost:9200/_security/user/caochenlei"
激活用户:返回 { } 空json代表成功
curl -XPUT -u elastic:123456 "http://localhost:9200/_security/user/caochenlei/_enable"
禁用用户:返回 { } 空json代表成功
curl -XPUT -u elastic:123456 "http://localhost:9200/_security/user/caochenlei/_disable"
添加只读权限角色:
curl -XPOST -u elastic:123456 "http://localhost:9200/_security/role/test1_role" -H 'Content-Type:application/json' -d '{
	"indices": [{
		"names": ["test-*"],
		"privileges": ["read"]
	}]
}'
控制列/字段可见性:
curl -XPOST -u elastic:123456 "http://localhost:9200/_security/role/test2_role" -H 'Content-Type:application/json' -d '{
	"indices": [{
		"names": ["test-*"],
		"privileges": ["read", "write"],
		"field_security": {
			"grant": ["name", "age", "email"]
		}
	}]
}'
控制文档对象可见性:
curl -XPOST -u elastic:123456 "http://localhost:9200/_security/role/test3_role" -H 'Content-Type:application/json' -d '{
	"indices": [{
		"names": ["test-*"],
		"privileges": ["read", "write"],
		"query": "{\"match\": {\"category\": \"click\"}}"
	}]
}'
控制文档和列可见性:不设置文档级和字段级权限控制时,默认可以看到所有文档和所有字段。
注意:文档级和字段级的权限是OR的关系,如:
- test_role2有字段级的限制,没有文档级限制
- test_role3有文档级限制,没有字段级限制
- 当用户同时有test_role2和test_role3两个角色时,反而能看到所有的文档和字段
- 文档级和字段级的权限只对"读"操作有效,对于"写"操作无效,即仍然可以修改看不到的字段
curl -XPOST -u elastic:123456 "http://localhost:9200/_security/role/test4_role" -H 'Content-Type:application/json' -d '{
	"indices": [{
		"names": ["test-*"],
		"privileges": ["read", "write"],
		"field_security": {
			"grant": ["name", "age", "email"]
		},
		"query": "{\"match\": {\"category\": \"click\"}}"
	}]
}'
给用户赋予指定角色:
curl -XPUT -u elastic:123456 "http://localhost:9200/_security/user/caochenlei" -H 'Content-Type:application/json' -d '{
	"roles": ["test1_role"]
}'
那么,问题来了,使用curl可以发送含有登录信息的请求,postman该如何发送这样的请求呢?
7、配置图形界面
7.1、Kibana是干什么的
Kibana 是一个设计出来用于和 Elasticsearch 一起使用的开源的分析与可视化平台,可以用 kibana 搜索、查看、交互存放在Elasticsearch 索引里的数据,使用各种不同的图表、表格、地图等展示高级数据分析与可视化,基于浏览器的接口使你能快速创建和分享实时展现Elasticsearch查询变化的动态仪表盘,让大量数据变得简单,容易理解。
7.2、Kibana的快速安装
注意:要想使用Kibana,操作系统必须保证JDK是1.8及以上版本,还必须要有Node.js环境,如何安装Node.js,请参考:学习NPM这一篇就够了
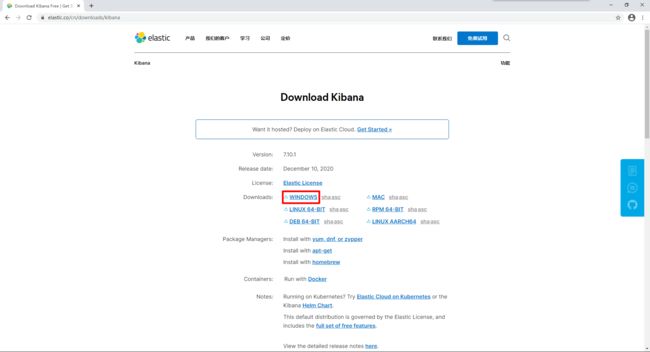
打开Kibana的下载地址:https://www.elastic.co/cn/downloads/kibana
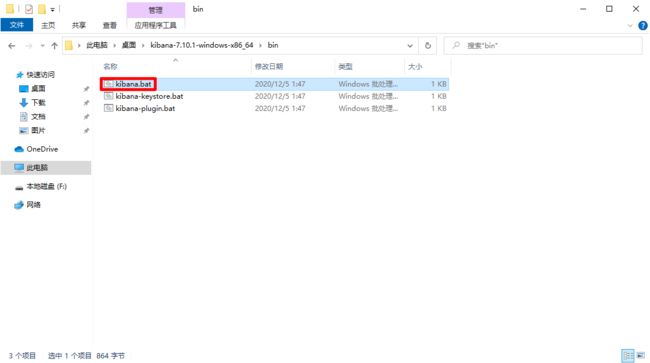
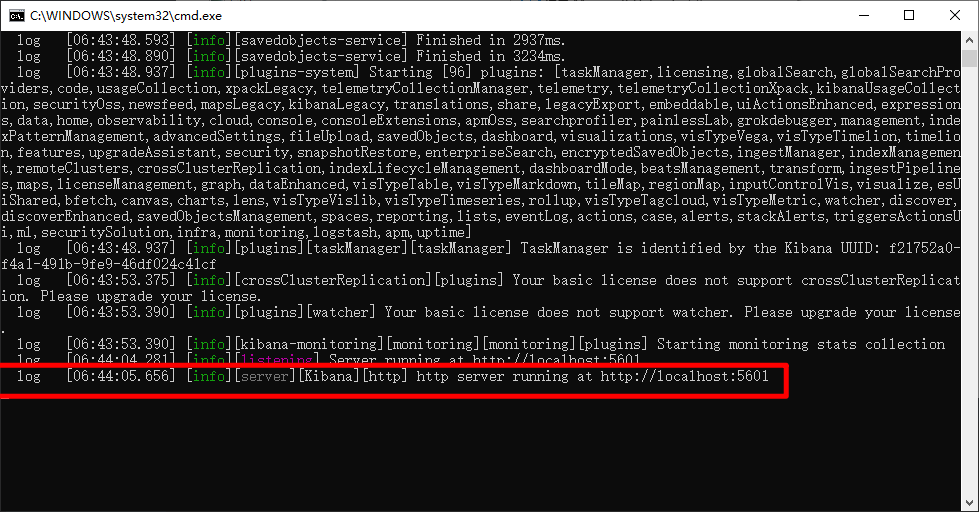
解压下载好的文件到你想要存放的位置,在启动之前,请确保你已经正常启动好了ElasticSearch,双击启动即可,但是你先别点,如下图所示:
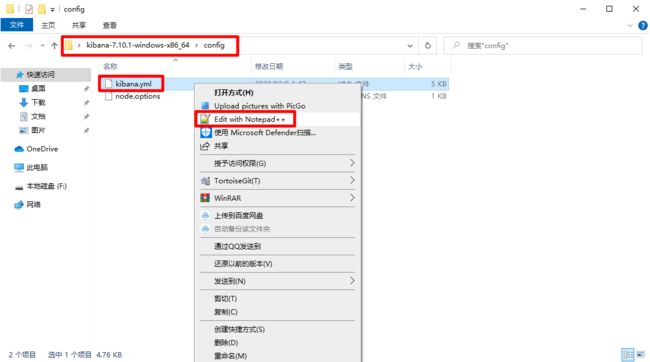
因为我们现在要连接的ElasticSearch是有密码保护的,Kibana肯定是连接不上的,你得告诉Kibana他要连接的ElasticSearch的用户名和密码,找如下文件:
#配置kibana为中文简体
i18n.locale: "zh-CN"
#配置kibana连接es账户
elasticsearch.username: "kibana"
elasticsearch.password: "123456"
当你为kibana配置好账户密码以后,我们点击启动,然后访问kibana指定登录地址:http://localhost:5601
7.3、Kibana的常用界面
索引管理:http://localhost:5601/app/management/data/index_management/indices
用户管理:http://localhost:5601/app/management/security/users
角色管理:http://localhost:5601/app/management/security/roles
开发工具:http://localhost:5601/app/dev_tools#/console
7.4、Kibana的快速上手
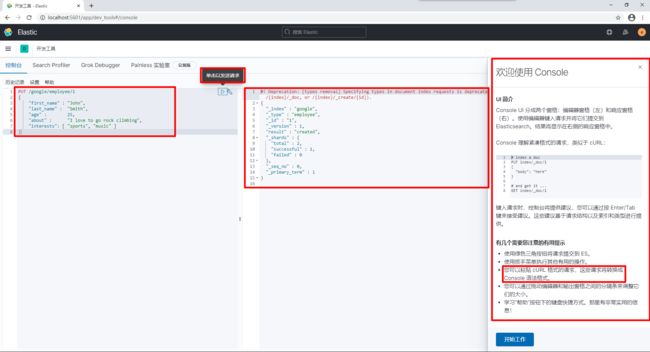
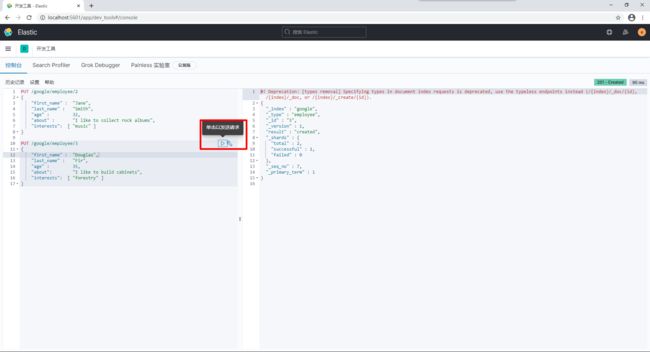
首先我们先来创建索引一个数据,请打开开发工具,直接拷贝以下代码,运行:
PUT /megacorp/employee/1
{
    "first_name" : "John",
    "last_name" :  "Smith",
    "age" :        25,
    "about" :      "I love to go rock climbing",
    "interests": [ "sports", "music" ]
}
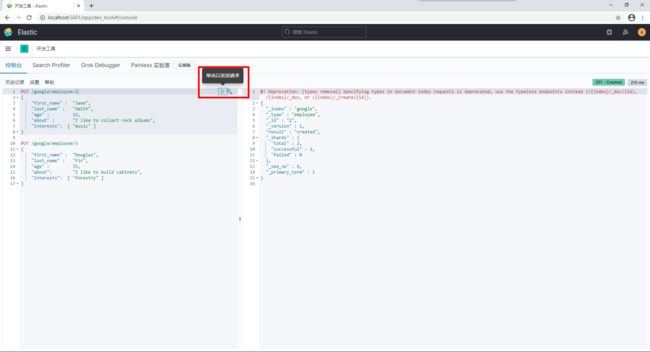
接下来,我们来添加更多的数据:
PUT /google/employee/2
{
    "first_name" :  "Jane",
    "last_name" :   "Smith",
    "age" :         32,
    "about" :       "I like to collect rock albums",
    "interests":  [ "music" ]
}

PUT /google/employee/3
{
    "first_name" :  "Douglas",
    "last_name" :   "Fir",
    "age" :         35,
    "about":        "I like to build cabinets",
    "interests":  [ "forestry" ]
}
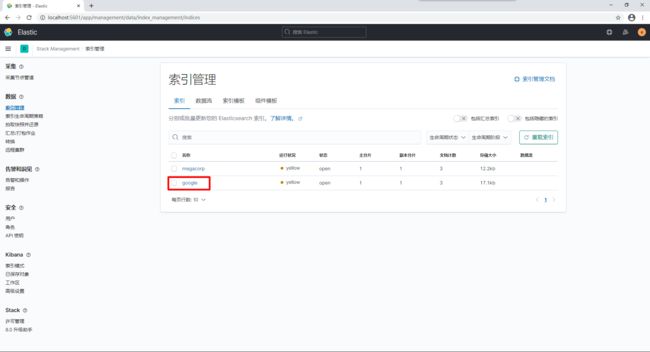
我们打开索引管理(http://localhost:5601/app/management/data/index_management/indices),对索引进行查看:
8、手写代码访问
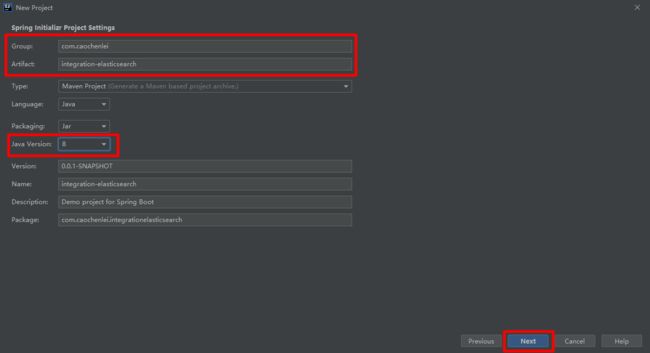
8.1、创建工程
创建索引
PUT /item
创建映射
PUT /item/_mapping
{
	"properties": {
		"id": {
			"type": "long"
		},
		"item_title": {
			"type": "text",
			"analyzer": "ik_max_word",
			"search_analyzer": "ik_smart"
		},
		"item_price": {
			"type": "double"
		},
		"item_image": {
			"type": "text"
		},
		"item_spec": {
			"type": "object"
		},
		"item_brand": {
			"type": "text",
			"analyzer": "ik_max_word",
			"search_analyzer": "ik_smart"
		},
		"item_category": {
			"type": "text",
			"analyzer": "ik_max_word",
			"search_analyzer": "ik_smart"
		},
		"item_seller": {
			"type": "text",
			"analyzer": "ik_max_word",
			"search_analyzer": "ik_smart"
		},
		"item_goods_id": {
			"type": "long"
		},
		"item_is_deleted": {
			"type": "integer"
		},
		"item_last_modified": {
			"type": "date"
		}
	}
}
准备数据
DROP DATABASE IF EXISTS `test` ;

CREATE DATABASE `test` ;

USE `test` ;

DROP TABLE IF EXISTS `item` ;

CREATE TABLE `item` (
  `id` BIGINT (20) NOT NULL COMMENT '商品SKUID',
  `title` VARCHAR (64) NOT NULL COMMENT '商品标题',
  `price` DOUBLE NOT NULL COMMENT '商品价格',
  `image` VARCHAR (255) NOT NULL COMMENT '商品图片',
  `spec` VARCHAR (255) NOT NULL COMMENT '商品规格',
  `brand` VARCHAR (32) NOT NULL COMMENT '商品品牌',
  `category` VARCHAR (32) NOT NULL COMMENT '商品分类',
  `seller` VARCHAR (32) NOT NULL COMMENT '商品卖家',
  `goods_id` BIGINT (20) NOT NULL COMMENT '商品SPUID',
  `is_deleted` INT (11) NOT NULL DEFAULT '0' COMMENT '是否删除(0:不删除,1:已删除)',
  `last_modified` TIMESTAMP NOT NULL DEFAULT CURRENT_TIMESTAMP COMMENT '修改时间(最后一次数据修改时间)',
  PRIMARY KEY (`id`)
) ENGINE = INNODB DEFAULT CHARSET = utf8 COMMENT = '商品明细表' ;

INSERT INTO `item` (
  `id`,
  `title`,
  `price`,
  `image`,
  `spec`,
  `brand`,
  `category`,
  `seller`,
  `goods_id`,
  `is_deleted`,
  `last_modified`
)
VALUES
  (
    10000,
    '【新品热卖中】Redmi Note 0 Pro',
    100,
    'https://img.alicdn.com/imgextra/i2/1714128138/O1CN01YOG4Ue29zFpwZ5cdD_!!1714128138.png_430x430q90.jpg',
    '{\"机身内存\":\"16G\",\"网络\":\"联通2G\"}',
    '小米',
    '手机',
    '小米官方旗舰店',
    1,
    0,
    '2021-01-10 13:50:45'
  ),
  (
    10001,
    '【新品热卖中】Redmi Note 1 Pro',
    201,
    'https://img.alicdn.com/imgextra/i2/1714128138/O1CN01YOG4Ue29zFpwZ5cdD_!!1714128138.png_430x430q90.jpg',
    '{\"机身内存\":\"32G\",\"网络\":\"联通3G\"}',
    '小米',
    '手机',
    '小米官方旗舰店',
    1,
    0,
    '2021-01-10 13:50:49'
  ),
  (
    10002,
    '【新品热卖中】Redmi Note 2 Pro',
    302,
    'https://img.alicdn.com/imgextra/i2/1714128138/O1CN01YOG4Ue29zFpwZ5cdD_!!1714128138.png_430x430q90.jpg',
    '{\"机身内存\":\"64G\",\"网络\":\"联通4G\"}',
    '小米',
    '手机',
    '小米官方旗舰店',
    1,
    0,
    '2021-01-10 13:50:51'
  ),
  (
    10003,
    '【新品热卖中】Redmi Note 3 Pro',
    403,
    'https://img.alicdn.com/imgextra/i2/1714128138/O1CN01YOG4Ue29zFpwZ5cdD_!!1714128138.png_430x430q90.jpg',
    '{\"机身内存\":\"16G\",\"网络\":\"联通5G\"}',
    '小米',
    '手机',
    '小米官方旗舰店',
    1,
    0,
    '2021-01-10 13:50:53'
  ),
  (
    10004,
    '【新品热卖中】Redmi Note 4 Pro',
    504,
    'https://img.alicdn.com/imgextra/i2/1714128138/O1CN01YOG4Ue29zFpwZ5cdD_!!1714128138.png_430x430q90.jpg',
    '{\"机身内存\":\"32G\",\"网络\":\"联通2G\"}',
    '小米',
    '手机',
    '小米官方旗舰店',
    1,
    0,
    '2021-01-10 13:50:55'
  ),
  (
    10005,
    '【新品热卖中】Redmi Note 5 Pro',
    605,
    'https://img.alicdn.com/imgextra/i2/1714128138/O1CN01YOG4Ue29zFpwZ5cdD_!!1714128138.png_430x430q90.jpg',
    '{\"机身内存\":\"64G\",\"网络\":\"联通3G\"}',
    '小米',
    '手机',
    '小米官方旗舰店',
    1,
    0,
    '2021-01-10 13:50:57'
  ),
  (
    10006,
    '【新品热卖中】Redmi Note 6 Pro',
    706,
    'https://img.alicdn.com/imgextra/i2/1714128138/O1CN01YOG4Ue29zFpwZ5cdD_!!1714128138.png_430x430q90.jpg',
    '{\"机身内存\":\"16G\",\"网络\":\"联通4G\"}',
    '小米',
    '手机',
    '小米官方旗舰店',
    1,
    0,
    '2021-01-10 13:51:00'
  ),
  (
    10007,
    '【新品热卖中】Redmi Note 7 Pro',
    807,
    'https://img.alicdn.com/imgextra/i2/1714128138/O1CN01YOG4Ue29zFpwZ5cdD_!!1714128138.png_430x430q90.jpg',
    '{\"机身内存\":\"32G\",\"网络\":\"联通5G\"}',
    '小米',
    '手机',
    '小米官方旗舰店',
    1,
    0,
    '2021-01-10 13:51:01'
  ),
  (
    10008,
    '【新品热卖中】Redmi Note 8 Pro',
    908,
    'https://img.alicdn.com/imgextra/i2/1714128138/O1CN01YOG4Ue29zFpwZ5cdD_!!1714128138.png_430x430q90.jpg',
    '{\"机身内存\":\"64G\",\"网络\":\"联通3G\"}',
    '小米',
    '手机',
    '小米官方旗舰店',
    1,
    0,
    '2021-01-10 13:51:03'
  ),
  (
    10009,
    '【新品热卖中】Redmi Note 9 Pro',
    999,
    'https://img.alicdn.com/imgextra/i2/1714128138/O1CN01YOG4Ue29zFpwZ5cdD_!!1714128138.png_430x430q90.jpg',
    '{\"机身内存\":\"16G\",\"网络\":\"联通3G\"}',
    '小米',
    '手机',
    '小米官方旗舰店',
    1,
    0,
    '2021-01-10 13:51:05'
  ),
  (
    20000,
    '【回馈老用户】Mate 40 pro+',
    10499,
    'https://img.alicdn.com/imgextra/i4/2215302589/O1CN01HvJj3E1Uzo2riFgSG_!!0-item_pic.jpg_430x430q90.jpg',
    '{\"机身内存\":\"64G\",\"网络\":\"移动5G\"}',
    '华为',
    '手机',
    '华为官方旗舰店',
    2,
    0,
    '2021-01-10 13:51:07'
  ),
  (
    20001,
    '【回馈老用户】Mate 41 pro+',
    11499,
    'https://img.alicdn.com/imgextra/i4/2215302589/O1CN01HvJj3E1Uzo2riFgSG_!!0-item_pic.jpg_430x430q90.jpg',
    '{\"机身内存\":\"64G\",\"网络\":\"移动5G\"}',
    '华为',
    '手机',
    '华为官方旗舰店',
    2,
    0,
    '2021-01-10 13:51:08'
  ),
  (
    20002,
    '【回馈老用户】Mate 42 pro+',
    12499,
    'https://img.alicdn.com/imgextra/i4/2215302589/O1CN01HvJj3E1Uzo2riFgSG_!!0-item_pic.jpg_430x430q90.jpg',
    '{\"机身内存\":\"64G\",\"网络\":\"移动5G\"}',
    '华为',
    '手机',
    '华为官方旗舰店',
    2,
    0,
    '2021-01-10 13:51:11'
  ),
  (
    20003,
    '【回馈老用户】Mate 43 pro+',
    13499,
    'https://img.alicdn.com/imgextra/i4/2215302589/O1CN01HvJj3E1Uzo2riFgSG_!!0-item_pic.jpg_430x430q90.jpg',
    '{\"机身内存\":\"64G\",\"网络\":\"移动5G\"}',
    '华为',
    '手机',
    '华为官方旗舰店',
    2,
    0,
    '2021-01-10 13:51:13'
  ),
  (
    20004,
    '【回馈老用户】Mate 44 pro+',
    14499,
    'https://img.alicdn.com/imgextra/i4/2215302589/O1CN01HvJj3E1Uzo2riFgSG_!!0-item_pic.jpg_430x430q90.jpg',
    '{\"机身内存\":\"64G\",\"网络\":\"移动5G\"}',
    '华为',
    '手机',
    '华为官方旗舰店',
    2,
    0,
    '2021-01-10 13:51:14'
  ),
  (
    20005,
    '【回馈老用户】Mate 45 pro+',
    15499,
    'https://img.alicdn.com/imgextra/i4/2215302589/O1CN01HvJj3E1Uzo2riFgSG_!!0-item_pic.jpg_430x430q90.jpg',
    '{\"机身内存\":\"16G\",\"网络\":\"移动5G\"}',
    '华为',
    '手机',
    '华为官方旗舰店',
    2,
    0,
    '2021-01-10 13:51:16'
  ),
  (
    20006,
    '【回馈老用户】Mate 46 pro+',
    16499,
    'https://img.alicdn.com/imgextra/i4/2215302589/O1CN01HvJj3E1Uzo2riFgSG_!!0-item_pic.jpg_430x430q90.jpg',
    '{\"机身内存\":\"16G\",\"网络\":\"移动5G\"}',
    '华为',
    '手机',
    '华为官方旗舰店',
    2,
    0,
    '2021-01-10 13:51:17'
  ),
  (
    20007,
    '【回馈老用户】Mate 47 pro+',
    17499,
    'https://img.alicdn.com/imgextra/i4/2215302589/O1CN01HvJj3E1Uzo2riFgSG_!!0-item_pic.jpg_430x430q90.jpg',
    '{\"机身内存\":\"16G\",\"网络\":\"移动5G\"}',
    '华为',
    '手机',
    '华为官方旗舰店',
    2,
    0,
    '2021-01-10 13:51:19'
  ),
  (
    20008,
    '【回馈老用户】Mate 48 pro+',
    18499,
    'https://img.alicdn.com/imgextra/i4/2215302589/O1CN01HvJj3E1Uzo2riFgSG_!!0-item_pic.jpg_430x430q90.jpg',
    '{\"机身内存\":\"16G\",\"网络\":\"移动5G\"}',
    '华为',
    '手机',
    '华为官方旗舰店',
    2,
    0,
    '2021-01-10 13:51:21'
  ),
  (
    20009,
    '【回馈老用户】Mate 49 pro+',
    19499,
    'https://img.alicdn.com/imgextra/i4/2215302589/O1CN01HvJj3E1Uzo2riFgSG_!!0-item_pic.jpg_430x430q90.jpg',
    '{\"机身内存\":\"16G\",\"网络\":\"移动5G\"}',
    '华为',
    '手机',
    '华为官方旗舰店',
    2,
    0,
    '2021-01-10 13:51:22'
  ),
  (
    30000,
    '【高端精品机】液晶彩色电视机 50寸',
    5990,
    'https://img.alicdn.com/imgextra/i2/2616970884/O1CN01bzBHDl1IOulmPgSgp_!!2616970884.jpg_430x430q90.jpg',
    '{\"电视屏幕尺寸\":\"50英寸\"}',
    '三星',
    '电视',
    '三星官方旗舰店',
    3,
    0,
    '2021-01-10 13:51:24'
  ),
  (
    30001,
    '【高端精品机】液晶彩色电视机 51寸',
    5991,
    'https://img.alicdn.com/imgextra/i2/2616970884/O1CN01bzBHDl1IOulmPgSgp_!!2616970884.jpg_430x430q90.jpg',
    '{\"电视屏幕尺寸\":\"51英寸\"}',
    '三星',
    '电视',
    '三星官方旗舰店',
    3,
    0,
    '2021-01-10 13:51:26'
  ),
  (
    30002,
    '【高端精品机】液晶彩色电视机 52寸',
    5992,
    'https://img.alicdn.com/imgextra/i2/2616970884/O1CN01bzBHDl1IOulmPgSgp_!!2616970884.jpg_430x430q90.jpg',
    '{\"电视屏幕尺寸\":\"52英寸\"}',
    '三星',
    '电视',
    '三星官方旗舰店',
    3,
    0,
    '2021-01-10 13:51:27'
  ),
  (
    30003,
    '【高端精品机】液晶彩色电视机 53寸',
    5993,
    'https://img.alicdn.com/imgextra/i2/2616970884/O1CN01bzBHDl1IOulmPgSgp_!!2616970884.jpg_430x430q90.jpg',
    '{\"电视屏幕尺寸\":\"53英寸\"}',
    '三星',
    '电视',
    '三星官方旗舰店',
    3,
    0,
    '2021-01-10 13:51:29'
  ),
  (
    30004,
    '【高端精品机】液晶彩色电视机 54寸',
    5994,
    'https://img.alicdn.com/imgextra/i2/2616970884/O1CN01bzBHDl1IOulmPgSgp_!!2616970884.jpg_430x430q90.jpg',
    '{\"电视屏幕尺寸\":\"54英寸\"}',
    '三星',
    '电视',
    '三星官方旗舰店',
    3,
    0,
    '2021-01-10 13:51:31'
  ),
  (
    30005,
    '【高端精品机】液晶彩色电视机 55寸',
    5999,
    'https://img.alicdn.com/imgextra/i2/2616970884/O1CN01bzBHDl1IOulmPgSgp_!!2616970884.jpg_430x430q90.jpg',
    '{\"电视屏幕尺寸\":\"55英寸\"}',
    '三星',
    '电视',
    '三星官方旗舰店',
    3,
    0,
    '2021-01-10 13:51:33'
  ),
  (
    30006,
    '【高端精品机】液晶彩色电视机 56寸',
    5999,
    'https://img.alicdn.com/imgextra/i2/2616970884/O1CN01bzBHDl1IOulmPgSgp_!!2616970884.jpg_430x430q90.jpg',
    '{\"电视屏幕尺寸\":\"56英寸\"}',
    '三星',
    '电视',
    '三星官方旗舰店',
    3,
    0,
    '2021-01-10 13:51:34'
  ),
  (
    30007,
    '【高端精品机】液晶彩色电视机 57寸',
    5999,
    'https://img.alicdn.com/imgextra/i2/2616970884/O1CN01bzBHDl1IOulmPgSgp_!!2616970884.jpg_430x430q90.jpg',
    '{\"电视屏幕尺寸\":\"57英寸\"}',
    '三星',
    '电视',
    '三星官方旗舰店',
    3,
    0,
    '2021-01-10 13:51:37'
  ),
  (
    30008,
    '【高端精品机】液晶彩色电视机 58寸',
    5999,
    'https://img.alicdn.com/imgextra/i2/2616970884/O1CN01bzBHDl1IOulmPgSgp_!!2616970884.jpg_430x430q90.jpg',
    '{\"电视屏幕尺寸\":\"58英寸\"}',
    '三星',
    '电视',
    '三星官方旗舰店',
    3,
    0,
    '2021-01-10 13:51:38'
  ),
  (
    30009,
    '【高端精品机】液晶彩色电视机 59寸',
    5999,
    'https://img.alicdn.com/imgextra/i2/2616970884/O1CN01bzBHDl1IOulmPgSgp_!!2616970884.jpg_430x430q90.jpg',
    '{\"电视屏幕尺寸\":\"59英寸\"}',
    '三星',
    '电视',
    '三星官方旗舰店',
    3,
    0,
    '2021-01-10 13:51:40'
  ) ;
创建工程
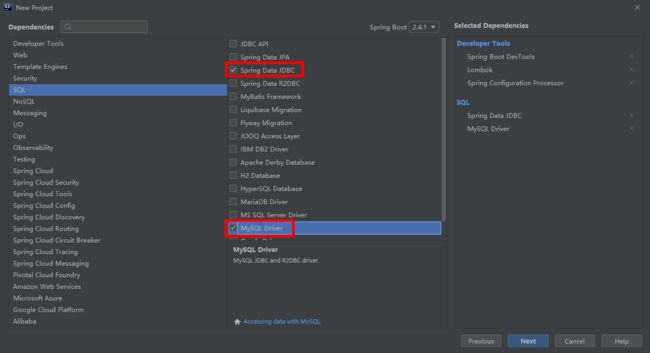
(1)添加相关依赖
<properties>
    <java.version>1.8java.version>
    <mysql.version>5.1.49mysql.version>
properties>

...

<dependency>
    <groupId>com.alibabagroupId>
    <artifactId>fastjsonartifactId>
    <version>1.2.75version>
dependency>
(2)添加相关配置
spring:
  elasticsearch:
    rest:
      uris: http://localhost:9200
      username: elastic
      password: 123456
  datasource:
    driver-class-name: com.mysql.jdbc.Driver
    url: jdbc:mysql://localhost:3306/test
    username: root
    password: root
(3)配置实体对象(es与实体之间的关系)
com.caochenlei.integrationelasticsearch.entity.Item
@Data
@Document(indexName = "item")
public class Item implements Serializable {
    @Id
    @Field("id")
    private Long id;
    @Field("item_title")
    private String title;
    @Field("item_price")
    private Double price;
    @Field("item_image")
    private String image;
    @Field("item_spec")
    private Map<String, String> spec;
    @Field("item_brand")
    private String brand;
    @Field("item_category")
    private String category;
    @Field("item_seller")
    private String seller;
    @Field("item_goods_id")
    private Long goodsId;
    @Field("item_is_deleted")
    private Integer isDeleted;
    @Field(value = "item_last_modified")
    private Date lastModified;
}
(4)注入模板对象
com.caochenlei.integrationelasticsearch.IntegrationElasticsearchApplicationTests
@SpringBootTest
class IntegrationElasticsearchApplicationTests {
    @Autowired
    private ElasticsearchRestTemplate elasticsearchRestTemplate;

    @Autowired
    private JdbcTemplate jdbcTemplate;
}
8.2、添加一条数据
@Test
void testAdd() {
    Map<String, String> spec = new HashMap<String, String>();
    spec.put("屏幕尺寸", "19寸");
    spec.put("内存大小", "16G");

    Item item = new Item();
    item.setId(50001L);
    item.setTitle("外星人笔记本");
    item.setPrice(19999.00);
    item.setImage("alien.jpg");
    item.setSpec(spec);
    item.setBrand("外星人");
    item.setCategory("笔记本");
    item.setSeller("外星人官方旗舰店");
    item.setGoodsId(5L);
    item.setIsDeleted(0);
    item.setLastModified(new Date());

    elasticsearchRestTemplate.save(item);
}
8.3、查询一条数据
@Test
void testGetById() {
    Item item = elasticsearchRestTemplate.get("50001", Item.class);
    System.out.println(item.getId());
    System.out.println(item.getTitle());
    System.out.println(item.getPrice());
    System.out.println(item.getImage());

    Map<String, String> spec = item.getSpec();
    Set<Map.Entry<String, String>> specEntries = spec.entrySet();
    for (Map.Entry<String, String> specEntry : specEntries) {
        String specName = specEntry.getKey();
        String specValue = specEntry.getValue();
        System.out.println(specName + ":" + specValue);
    }

    System.out.println(item.getBrand());
    System.out.println(item.getCategory());
    System.out.println(item.getSeller());
    System.out.println(item.getGoodsId());
    System.out.println(item.getIsDeleted());
    System.out.println(item.getLastModified());
}
8.4、修改一条数据
@Test
void testUpdate() {
    Map<String, String> spec = new HashMap<String, String>();
    spec.put("屏幕尺寸", "19寸");
    spec.put("内存大小", "16G");

    Item item = new Item();
    item.setId(50001L);
    item.setTitle("外星人电视机");
    item.setPrice(19999.00);
    item.setImage("alien.jpg");
    item.setSpec(spec);
    item.setBrand("电视机");
    item.setCategory("电视机");
    item.setSeller("外星人官方旗舰店");
    item.setGoodsId(5L);
    item.setIsDeleted(0);
    item.setLastModified(new Date());

    elasticsearchRestTemplate.save(item);
}
8.5、删除一条数据
@Test
void testDeleteById() {
    elasticsearchRestTemplate.delete("50001", Item.class);
}
8.6、导入全部数据
@Test
void testImportAll() {
    //查询出所有数据
    String sql = "select * from item where is_deleted = 0";
    List<Item> items = jdbcTemplate.query(sql, new RowMapper<Item>() {
        @Override
        public Item mapRow(ResultSet resultSet, int i) {
            Item item = new Item();
            try {
                item.setId(resultSet.getLong("id"));
                item.setTitle(resultSet.getString("title"));
                item.setPrice(resultSet.getDouble("price"));
                item.setImage(resultSet.getString("image"));

                Map<String, String> spec = new HashMap<String, String>();
                String specJSON = resultSet.getString("spec");
                Map specMap = JSON.parseObject(specJSON);
                Set<Map.Entry<String, String>> specEntries = specMap.entrySet();
                for (Map.Entry<String, String> specEntry : specEntries) {
                    String specName = specEntry.getKey();
                    String specValue = specEntry.getValue();
                    spec.put(specName, specValue);
                }
                item.setSpec(spec);

                item.setBrand(resultSet.getString("brand"));
                item.setCategory(resultSet.getString("category"));
                item.setSeller(resultSet.getString("seller"));
                item.setGoodsId(resultSet.getLong("goods_id"));
                item.setIsDeleted(resultSet.getInt("is_deleted"));
                item.setLastModified(resultSet.getDate("last_modified"));
            } catch (Exception e) { e.printStackTrace(); }
            return item;
        }
    });

    //导入所有数据
    elasticsearchRestTemplate.save(items);
}
8.7、分页查询数据
@Test
void testGetByPage() {
    int pageCurr = 1;
    int pageSize = 15;

    //分页条件
    PageRequest pageRequest = PageRequest.of((pageCurr - 1) * pageSize, pageSize);

    //组装条件
    NativeSearchQuery searchQuery = new NativeSearchQueryBuilder()
        .withPageable(pageRequest)
        .build();
    //开始查询
    SearchHits<Item> itemSearchHits = elasticsearchRestTemplate.search(searchQuery, Item.class);

    //输出结果
    System.out.println("总记录:" + itemSearchHits.getTotalHits());
    for (SearchHit<Item> itemSearchHit : itemSearchHits) {
        Item item = itemSearchHit.getContent();
        System.out.println(item);
    }
}
8.8、条件查询数据
@Test
void testGetByCriteria() {
    int pageCurr = 1;
    int pageSize = 15;

    //分页条件
    PageRequest pageRequest = PageRequest.of((pageCurr - 1) * pageSize, pageSize);

    //构建查询
    /**
     *  must 和 should 和 mustNot 分别对应sql语句里面的 and 和 or 和 not
     *  filter:类似sql语句里面的 where
     */
    /**
     * QueryBuilders.matchAllQuery:匹配所有
     * QueryBuilders.termQuery:精准匹配单个字段,大小写敏感
     * QueryBuilders.termsQuery:精准匹配单个字段,可多值查询
     * QueryBuilders.rangeQuery:范围匹配,可数值判断
     * QueryBuilders.matchPhraseQuery:对中文精确匹配
     * QueryBuilders.matchQuery:匹配单个字段,字段不支持通配符,前缀具高级特性
     * QueryBuilders.multiMatchQuery:匹配多个字段,字段支持通配符
     * QueryBuilders.existsQuery:查询字段不为null的文档
     * QueryBuilders.wildcardQuery:通配符查询,支持:*任意字符串、?任意一个字符
     * QueryBuilders.regexpQuery:正则表达式查询
     */
    BoolQueryBuilder boolQueryBuilder = QueryBuilders.boolQuery();
    boolQueryBuilder
            .must(QueryBuilders.termQuery("item_category", "手机"))
            .filter(QueryBuilders.matchQuery("item_title", "老用户"))
            .filter(QueryBuilders.rangeQuery("item_price").gt(15000).includeLower(true));

    //组装条件
    NativeSearchQuery searchQuery = new NativeSearchQueryBuilder()
            .withPageable(pageRequest)
            .withQuery(boolQueryBuilder)
            .build();

    //开始查询
    SearchHits<Item> itemSearchHits = elasticsearchRestTemplate.search(searchQuery, Item.class);

    //输出结果
    System.out.println("总记录:" + itemSearchHits.getTotalHits());
    for (SearchHit<Item> itemSearchHit : itemSearchHits) {
        Item item = itemSearchHit.getContent();
        System.out.println(item);
    }
}
8.9、排序查询数据
@Test
void testGetBySort() {
    int pageCurr = 1;
    int pageSize = 15;

    //分页条件
    PageRequest pageRequest = PageRequest.of((pageCurr - 1) * pageSize, pageSize);

    //构建查询
    BoolQueryBuilder boolQueryBuilder = QueryBuilders.boolQuery();
    boolQueryBuilder
            .must(QueryBuilders.termQuery("item_category", "手机"))
            .filter(QueryBuilders.matchQuery("item_title", "老用户"))
            .filter(QueryBuilders.rangeQuery("item_price").gt(15000).includeLower(true));

    //排序条件
    FieldSortBuilder fieldSortBuilder = SortBuilders.fieldSort("item_price").order(SortOrder.DESC);

    //组装条件
    NativeSearchQuery searchQuery = new NativeSearchQueryBuilder()
            .withPageable(pageRequest)
            .withQuery(boolQueryBuilder)
            .withSort(fieldSortBuilder)
            .build();

    //开始查询
    SearchHits<Item> itemSearchHits = elasticsearchRestTemplate.search(searchQuery, Item.class);

    //输出结果
    System.out.println("总记录:" + itemSearchHits.getTotalHits());
    for (SearchHit<Item> itemSearchHit : itemSearchHits) {
        Item item = itemSearchHit.getContent();
        System.out.println(item);
    }
}
8.10、高亮查询数据
@Test
void testGetByHighlight() {
    int pageCurr = 1;
    int pageSize = 15;

    //分页条件
    PageRequest pageRequest = PageRequest.of((pageCurr - 1) * pageSize, pageSize);

    //构建查询
    BoolQueryBuilder boolQueryBuilder = QueryBuilders.boolQuery();
    boolQueryBuilder
        .filter(QueryBuilders.matchQuery("item_title", "老用户"))
        .filter(QueryBuilders.matchQuery("item_brand", "华为"))
        .filter(QueryBuilders.matchQuery("item_category", "手机"))
        .filter(QueryBuilders.matchQuery("item_seller", "华为"));

    //排序条件
    FieldSortBuilder fieldSortBuilder = SortBuilders.fieldSort("item_price").order(SortOrder.DESC);

    //高亮条件
    HighlightBuilder highlightBuilder = getHighlightBuilder("item_title", "item_brand", "item_category", "item_seller");

    //组装条件
    NativeSearchQuery searchQuery = new NativeSearchQueryBuilder()
        .withPageable(pageRequest)
        .withQuery(boolQueryBuilder)
        .withSort(fieldSortBuilder)
        .withHighlightBuilder(highlightBuilder)
        .build();

    //开始查询
    SearchHits<Item> itemSearchHits = elasticsearchRestTemplate.search(searchQuery, Item.class);

    //输出结果
    System.out.println("总记录:" + itemSearchHits.getTotalHits());
    for (SearchHit<Item> itemSearchHit : itemSearchHits) {
        //获取原来对象
        Item item = itemSearchHit.getContent();
        //设置高亮字段
        Map<String, List<String>> highlightFields = itemSearchHit.getHighlightFields();
        for (String highlightField : highlightFields.keySet()) {
            /**
                 * 注意:这里他会默认把前缀 item_ 去掉,判断和取值的时候请注意一下
                 */
            if ("title".equals(highlightField)) {
                item.setTitle(highlightFields.get("title").get(0));
            }
            if ("brand".equals(highlightField)) {
                item.setBrand(highlightFields.get("brand").get(0));
            }
            if ("category".equals(highlightField)) {
                item.setCategory(highlightFields.get("category").get(0));
            }
            if ("seller".equals(highlightField)) {
                item.setSeller(highlightFields.get("seller").get(0));
            }
        }
        //高亮之后对象
        System.out.println(item);
    }
}

//获取高亮查询器
private HighlightBuilder getHighlightBuilder(String... fields) {
    // 构建高亮条件
    HighlightBuilder highlightBuilder = new HighlightBuilder();//生成高亮查询器
    for (String field : fields) {
        highlightBuilder.field(field);//设置高亮查询字段
    }
    highlightBuilder.requireFieldMatch(false);//如果要多个字段高亮,这项要为false
    highlightBuilder.preTags("");//高亮设置前缀
    highlightBuilder.postTags("");//高亮设置后缀
    //下面这两项,如果你要高亮如文字内容等有很多字的字段,必须配置,不然会导致高亮不全,文章内容缺失等
    highlightBuilder.fragmentSize(800000);//最大高亮分片数
    highlightBuilder.numOfFragments(0);//从第一个分片获取高亮片段
    //返回高亮查询器
    return highlightBuilder;
}
