Jetpack Compose中使用Notification
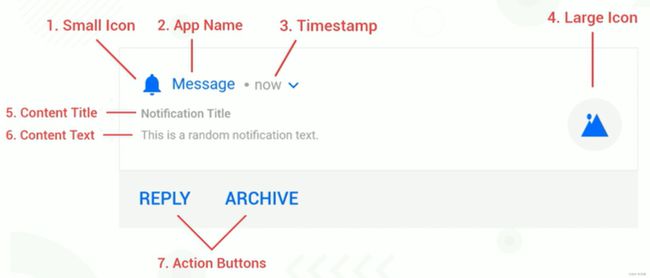
发送通知相关的主要有两个关键的类 NotificationCompat.Builder 和 NotificationManagerCompat
为方便使用,首先定义一个扩展工具类来管理通知
const val MAIN_CHANNEL_ID = "MainChannel ID"
const val MAIN_CHANNEL = "MainChannel"

fun Context.buildNotification(
    id: Int,
    title: String,
    message: String,
    action: String? = null,
    actionMessage: String? = null,
    visibility: Int = VISIBILITY_PUBLIC,
    activityIntent: Intent? = null,
    isDeepLink: Boolean = false
): Notification {
    val notification = Notification(id, title, message, action, actionMessage,
        visibility, activityIntent,isDeepLink)
    notification.builder = notification.builder(this)
    notification.manager = getNotificationManager()
   return notification
}

data class Notification(
    val id: Int,
    var title: String,
    var message: String,
    var action: String? = null,
    var actionMessage: String? = null,
    var visibility: Int = VISIBILITY_PUBLIC,
    var activityIntent: Intent? = null,
    val isDeepLink: Boolean = false,
    var builder: Builder? = null,
    var manager: NotificationManagerCompat? = null
)

fun Notification.show(): Notification {
    builder?.let { manager?.notify(id, it.build()) }
    return this
}

fun Notification.update(
    context: Context,
    titleNew: String? = null,
    messageNew: String? = null,
    action1: String? = null,
    visibleType: Int = VISIBILITY_PUBLIC
): Notification  {
    titleNew?.let { title = titleNew }
    messageNew?.let { message = messageNew}
    action1?.let { action = action1  }
    if (visibleType != visibility) visibility = visibleType
    manager?.notify(id, builder(context).build())
    return this
}

fun Notification.builder(context: Context): Builder {
    val builder = Builder(context, MAIN_CHANNEL_ID)
        .setContentTitle(title)
        .setContentText(message)
        .setSmallIcon(R.mipmap.ic_launcher)
        .setLargeIcon(context.bitmap(R.drawable.ic_head3,200, 200))
        .setPriority(PRIORITY_DEFAULT)
        .setVisibility(visibility)
        .setAutoCancel(true)
    if (visibility == VISIBILITY_PRIVATE) {
        builder.setPublicVersion(
            Builder(context, MAIN_CHANNEL_ID)
                .setContentTitle("收到一条新的消息")
                .setContentText("请解锁屏幕后查看!")
                .build()
        )
    }
    val flg = if(Build.VERSION.SDK_INT >= Build.VERSION_CODES.M) PendingIntent.FLAG_IMMUTABLE else 0
    action?.let {
        val intent = Intent(context, NotificationReceiver::class.java).apply {
            putExtra(KEY_MESSAGE, actionMessage)
            putExtra(KEY_NOTIFICATION_ID, id)
        }
        PendingIntent.getBroadcast(context, 0, intent, flg)
    }?.let { builder.addAction(0, action, it) }

    if (isDeepLink) {
        activityIntent?.let {
            TaskStackBuilder.create(context).run {
                addNextIntentWithParentStack(it)
                getPendingIntent(1, flg)
            }
        }?.let { builder.setContentIntent(it) }
    } else {
        activityIntent?.let { PendingIntent.getActivity(context, 1, it, flg) }
            ?.let { builder.setContentIntent(it) }
    }
    return builder
}

fun Context.getNotificationManager(): NotificationManagerCompat {
    val notificationManager = NotificationManagerCompat.from(applicationContext)
    // API 26 Android 8.0开始必须为每个通知指定一个channel才会显示
    if (Build.VERSION.SDK_INT >= Build.VERSION_CODES.O) {
        val channel = NotificationChannel(MAIN_CHANNEL_ID, MAIN_CHANNEL,
            NotificationManager.IMPORTANCE_DEFAULT
        )
        notificationManager.createNotificationChannel(channel)
    }
    return notificationManager
}

fun Context.cancelNotification(id: Int) = getNotificationManager().cancel(id)
然后定义一个ViewModel,在其中负责具体的发送通知业务
class NotificationTestViewModel: ViewModel() {
    var notification: Notification? = null

    private fun buildNotification(context: Context, title: String, message: String) {
        val clickIntent = Intent(context, NotificationTestActivity::class.java)
        notification = context.buildNotification(
            id = 1,
            title = title,
            message = message,
            action = "Action按钮",
            actionMessage = "点击了按钮",
            visibility = VISIBILITY_PUBLIC,
            activityIntent = clickIntent,
        )
    }

    fun showNotification(context: Context, title: String, message: String) {
        buildNotification(context, title, message)
        notification?.show()
    }

    fun updateNotification(context: Context, titleNew: String, messageNew: String) {
        notification?.update(context, titleNew, messageNew)
    }
}
最后在Composable中调用viewmodel的方法发送通知:
@Composable
fun NotificationTest(viewModel: NotificationTestViewModel = viewModel()) {
    val context = LocalContext.current
    Column(
        modifier = Modifier.fillMaxSize(),
        horizontalAlignment = Alignment.CenterHorizontally
    ) {
        Button(onClick = {
            viewModel.showNotification(context,"外卖提醒", "您好,您的外卖到了!")
        }) {
            Text(text = "创建一个新通知")
        }
        Button(onClick = {
            viewModel.updateNotification(context,"订单提醒", "您有一条新的外卖订单,请及时接单!")
        }) {
            Text(text = "更新通知")
        }
    }
}
更新通知
发送通知后通过NotificationManagerCompat.notify(id, notification)对相同的通知id进行再次调用,就会更新通知中对应的属性
通知的可见性
通知有三种可见性规则,分别是:
NotificationCompat.VISIBILITY_PUBLIC: 默认所有屏幕可见NotificationCompat.VISIBILITY_SECRET: 锁屏下不可见NotificationCompat.VISIBILITY_PRIVATE:锁屏可见,但是隐藏敏感或私人信息
VISIBILITY_PUBLIC的效果:
VISIBILITY_SECRET的效果:
VISIBILITY_PRIVATE的效果:
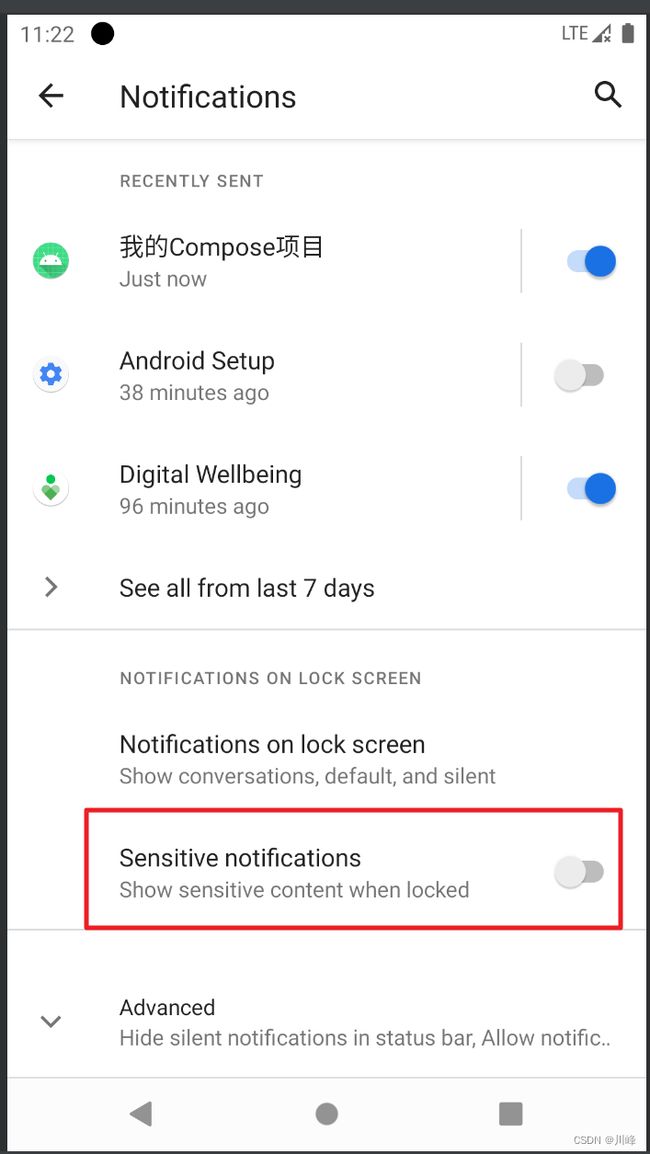
要测试 VISIBILITY_PRIVATE的效果需要先将系统设置中通知管理里的锁屏显示敏感信息的选项关闭:
然后在创建 NotificationCompat.Builder 时,需要通过 setPublicVersion 设置在锁屏界面时展示的信息:
  if (visibility == VISIBILITY_PRIVATE) {
        builder.setPublicVersion(
            Builder(context, MAIN_CHANNEL_ID)
                .setContentTitle("收到一条新的消息")
                .setContentText("请解锁屏幕后查看!")
                .build()
        )
    }
通知中的Action
通知中最多可以添加三个Action按钮,点击时,可以执行对应的pendingIntent,比如在前面的代码中,构建 NotificationCompat.Builder 时判断如果 Action 按钮的文字不为空,就为builder设置一个action选项:
    val flg = if(Build.VERSION.SDK_INT >= Build.VERSION_CODES.M) PendingIntent.FLAG_IMMUTABLE else 0
    action?.let {
        val intent = Intent(context, NotificationReceiver::class.java).apply {
            putExtra(KEY_MESSAGE, actionMessage)
            putExtra(KEY_NOTIFICATION_ID, id)
        }
        PendingIntent.getBroadcast(context, 0, intent, flg)
    }?.let { builder.addAction(0, action, it) }
这里使用PendingIntent.getBroadcast构建了一个用于触发广播的PendingIntent,builder.addAction的第一个参数还可以设置一个图标的资源id。
当用户点击通知中的action按钮时,就会发送广播,然后在NotificationReceiver中从intent查询信息进行显示即可:
const val KEY_MESSAGE = "Notification_Message"
const val KEY_NOTIFICATION_ID = "Notification_Id"

class NotificationReceiver: BroadcastReceiver() {
    override fun onReceive(context: Context?, intent: Intent?) {
        intent?.run {
            val msg = getStringExtra(KEY_MESSAGE)
            msg?.let { context?.showToast(msg) }
            val id = getIntExtra(KEY_NOTIFICATION_ID, 0)
            context?.cancelNotification(id) // 根据需求决定要不要取消
        }
    }
}
这里收到通知后在广播接收器中弹出一个toast提示同时取消了通知,实际业务中可以根据需求决定要不要关闭通知(可能是需要后台常驻的就不要取消)
点击通知跳转具体页面
很简单,就是在构建 NotificationCompat.Builder 时,设置一个Activity类型的PendingIntent即可
val activityIntent= Intent(context, NotificationTestActivity::class.java)
...
activityIntent?.let { PendingIntent.getActivity(context, 1, it, flg) }
            ?.let { builder.setContentIntent(it) }
点击通知后就会跳转的具体的Activity页面
触发DeepLink页面
可以配合Compose导航路由的DeepLink,在点击通知时,跳转到某个导航图中的某个子路由页面中
首先需要配置Compose导航路由的DeepLink,这里使用开源库 compose-destinations 进行配置路由:
// NotificationTest.kt
@Composable
fun NotificationNavHostScreen() {
    Box(modifier = Modifier.fillMaxSize()) {
        DestinationsNavHost(navGraph = NavGraphs.root)
    }
}

@RootNavGraph(start = true)
@Destination
@Composable
fun NotificationTest(navigator: DestinationsNavigator,
                     viewModel: NotificationTestViewModel = viewModel()) {
    ...
}
// DetailScreen.kt
const val APP_URI ="http://my.app.com/detail/"

@Destination(deepLinks = [DeepLink(uriPattern = "$APP_URI/{message}")])
@Composable
fun DetailScreen(message: String) {
 ...
}
在Activity中使用DestinationsNavHost作为根布局显示
class NotificationMainActivity: ComponentActivity() {
    override fun onCreate(savedInstanceState: Bundle?) {
        super.onCreate(savedInstanceState)
        setContent {
            MyComposeApplicationTheme {
                Surface(Modifier.fillMaxSize(),
                    color=MaterialTheme.colorScheme.background) {
                    NotificationNavHostScreen()
                }
            }
        }
    }
}
然后在构建 NotificationCompat.Builder 时,通过TaskStackBuilder来构建pendingIntent
	if (isDeepLink) {
        activityIntent?.let {
            TaskStackBuilder.create(context).run {
                addNextIntentWithParentStack(it)
                getPendingIntent(1, flg)
            }
        }?.let { builder.setContentIntent(it) }
    }
在NotificationTestViewModel中添加一个专门用于构建Deeplink的方法:
    private fun buildDeepLinkNotification(context: Context, title: String, message: String) {
        val clickIntentDeepLink = Intent(
            Intent.ACTION_VIEW,
            "$APP_URI/message from NotificationTest".toUri(),
            context, NotificationMainActivity::class.java
        )
        notification = context.buildNotification(
            id = 1,
            title = title,
            message = message,
            action = "Action按钮",
            actionMessage = "点击了按钮",
            visibility = VISIBILITY_PUBLIC,
            activityIntent = clickIntentDeepLink,
            isDeepLink = true
        )
    }

    fun showNotification(context: Context, title: String, message: String) {
        buildDeepLinkNotification(context, title, message)
        notification?.show()
    }
这样就可以了,Manifest中无需为Activity标签配置任何额外的属性
效果如下
在通知中显示进度条
首先在构建NotificationManagerCompat时,需要再添加一个channel2, 并且将其importance参数设置为NotificationManager.IMPORTANCE_LOW(这是因为我们不想在每次更新进度条时都会发出系统提示音)
fun Context.getNotificationManager(): NotificationManagerCompat {
    val notificationManager = NotificationManagerCompat.from(applicationContext)
    // API 26 Android 8.0开始必须为每个通知指定一个channel才会显示
    if (Build.VERSION.SDK_INT >= Build.VERSION_CODES.O) {
        val channel = NotificationChannel(MAIN_CHANNEL_ID, MAIN_CHANNEL,
            NotificationManager.IMPORTANCE_DEFAULT
        )
        val channel2 = NotificationChannel(SECOND_CHANNEL_ID, SECOND_CHANNEL,
            NotificationManager.IMPORTANCE_LOW
        )
        notificationManager.createNotificationChannel(channel)
        notificationManager.createNotificationChannel(channel2)
    }
    return notificationManager
}
然后也需要单独为这个channel创建Builder:
fun Notification.secondChannelBuilder(context: Context): Builder {
    return Builder(context, SECOND_CHANNEL_ID) // 这里要使用SECOND_CHANNEL_ID
        .setContentTitle("下载中")
        .setContentText("${progress}/${max}")
        .setSmallIcon(R.mipmap.ic_launcher)
        .setProgress(max, progress, false)
        .setPriority(PRIORITY_LOW) // 设置低优先级
        .setOngoing(true) // 不允许用户取消
}
fun Notification.updateProgress(
    context: Context,
    progress: Int,
    max: Int,
): Notification  {
    this.progress = progress
    this.max = max
    manager?.notify(id, secondChannelBuilder(context).build())
    return this
}
fun Notification.showFinished(context: Context): Notification  {
    this.title = "下载完成!"
    this.message = ""
    // 下载完后使用MAIN_CHANNEL的builder构建更新通知
    manager?.notify(id, builder(context).apply {
        setContentIntent(null)
        clearActions()
        setProgress(0, 0, false)
    }.build())
    return this
}
在NotificationTestViewModel中添加一个showProgress方法:
fun showProgress(context: Context) {
        val max = 10
        var progress = 0
        viewModelScope.launch {
            while (progress != max) {
                delay(1000) // 最多允许每秒发送一次通知
                progress++
                notification?.updateProgress(context, progress, max)
            }
            notification?.showFinished(context)
        }
    }
注意,这里更新通知的进度值使用的是SecondChannel的Builder进行构建的,而在进度完成以后使用MainChannel进行构建完成通知的。
接着在NotificationTest Composable中添加一个按钮,点击调用上面viewModel的showProgress方法:
@Composable
fun NotificationTest(viewModel: NotificationTestViewModel = viewModel()) {
    val context = LocalContext.current
    Column() {
        ...
        Button(onClick = { viewModel.showProgress(context) }) {
            Text(text = "showProgress")
        }
    }
}
这里也可以在完成时再设置一个PendingIntent点击启动系统的安装页面。
DirectReply
DirectReply是指可以直接在通知栏中回复消息,效果如下:

同样,先搞一个扩展工具类
data class DirectReply(
    val id: Int,
    var name: String,
    var message: String,
)
const val RESULT_KEY = "Result_Key"

fun DirectReply.directReplyBuilder(context: Context): Builder {
    val replyIntent = Intent(context, NotificationReplyReceiver::class.java).apply {
        putExtra(KEY_NOTIFICATION_ID, id)
    }
    // 这个flg一定要使用FLAG_MUTABLE否则广播中将无法获取到RemoteInput中的值
    val flg = if(Build.VERSION.SDK_INT >= Build.VERSION_CODES.S) PendingIntent.FLAG_MUTABLE else 0
    val pendingIntent = PendingIntent.getBroadcast(context, 2, replyIntent, flg)
    val remoteInput = RemoteInput.Builder(RESULT_KEY).setLabel("请输入").build()
    val replayAction = Action.Builder(0, "Reply", pendingIntent)
        .addRemoteInput(remoteInput).build()
    val person = Person.Builder().setName(name).build()
    val notificationStyle = MessagingStyle(person)
        .addMessage(message, System.currentTimeMillis(), person)
    return Builder(context, MAIN_CHANNEL_ID)
        .setSmallIcon(R.mipmap.ic_launcher)
        .setPriority(PRIORITY_DEFAULT)
        .setOnlyAlertOnce(true)
        .setStyle(notificationStyle)
        .addAction(replayAction)
}

fun DirectReply.show(context: Context): DirectReply {
    context.getNotificationManager().notify(id, directReplyBuilder(context).build())
    return this
}
注意上面代码中有一个Person类,这个类是系统自带的,不是自定义的实体类,它是androidx.core.app.Person 类
然后定义 NotificationReplyReceiver 在其中接受到消息后,读取RemoteInput输入的文本再发送更新通知即可:
class NotificationReplyReceiver: BroadcastReceiver() {
    override fun onReceive(context: Context?, intent: Intent?) {
        intent?.run {
            val result = RemoteInput.getResultsFromIntent(this)
            val text = result?.getCharSequence(RESULT_KEY).toString() // 获取通知中输入的文本
            val person = Person.Builder().setName("Me").build()
            val notificationStyle = NotificationCompat.MessagingStyle(person)
                .addMessage(text, System.currentTimeMillis(), person)
            val id = getIntExtra(KEY_NOTIFICATION_ID, 0)
            context?.run {
                val builder = DirectReply(id,"Me", text).directReplyBuilder(this)
                    .setStyle(notificationStyle)
                    //.setContentTitle("Sent!")
                    //.setStyle(null)
                getNotificationManager().notify(id, builder.build())
            }
        }
    }
}
在ViewModel中添加一个方法,来模拟业务调用方法:
    fun showDirectReply(context: Context) {
        DirectReply(3,"Tom", "Hello, guy!").show(context)
    }
最后在Composable中添加一个按钮来测试:
@Composable
fun NotificationTest(viewModel: NotificationTestViewModel = viewModel()) {
    val context = LocalContext.current
    Column() {
        ....
        Button(onClick = { viewModel.showDirectReply(context) }) {
            Text(text = "showDirectReply")
        }
    }
}
这里需要注意的有两点:
- 创建
PendingIntent的flg参数在API 31以上必须使用PendingIntent.FLAG_MUTABLE在API 31以下可以传0,否则广播中将无法获取到RemoteInput中的值,即if(Build.VERSION.SDK_INT >= Build.VERSION_CODES.S) PendingIntent.FLAG_MUTABLE else 0这一句代码很重要 RemoteInput创建时使用的Key和广播中读取时RemoteInput.getResultsFromIntent(intent)?.getCharSequence(RESULT_KEY)必须保持一致
另外在广播中接受到消息后必须发送一个更新通知,否则在通知栏中回复后会显示bug(要么一直转圈圈要么会显示对方的名字)
如果是比较注重隐私的app,不想输入文本后在通知栏显示自己回复的内容,则可以在接受广播中进行如下配置:
class NotificationReplyReceiver: BroadcastReceiver() {
    override fun onReceive(context: Context?, intent: Intent?) {
        intent?.run {
            val result = RemoteInput.getResultsFromIntent(this)
            val text = result?.getCharSequence(RESULT_KEY).toString() // 获取通知中输入的文本
            // 根据text请求后台接口进行业务处理
            val id = getIntExtra(KEY_NOTIFICATION_ID, 0)
            context?.run {
                val builder = DirectReply(id,"Me", text).directReplyBuilder(this)
                    .setContentTitle("已发送!") // 这样写通知栏不会显示发送的内容
                    .setStyle(null) // 这样写通知栏不会显示发送的内容
                getNotificationManager().notify(id, builder.build())
            }
        }
    }
}

使用Hilt为ViewModel注入ApplicationContext
前面的代码中ViewModel里发送和更新通知的方法都要携带一个context对象,这是因为通知相关的API需要使用到context对象,因此在Composable中通过LocalContext.current 获取当前的context对象然后传递给ViewModel调用的方法。
这里其实我们可以简化一下,借助官方提供的Hilt组件库,对ViewModel对象注入一个Application类型的Context对象。
Hilt接入可以参考官方文档:使用 Hilt 实现依赖项注入
在添加依赖之后,将Application、使用到的Activity、ViewModel全部使用Hilt注解进行标注:
@HiltAndroidApp
class MyApp: Application() {
  ...
}
@AndroidEntryPoint
class NotificationMainActivity: ComponentActivity() {
    override fun onCreate(savedInstanceState: Bundle?) {
        super.onCreate(savedInstanceState)
        setContent {
            MyComposeApplicationTheme {
                Surface(Modifier.fillMaxSize(),
                    color=MaterialTheme.colorScheme.background) {
                    NotificationNavHostScreen()
                }
            }
        }
    }
}
@HiltViewModel
class NotificationTestViewModel @Inject constructor(): ViewModel() {

    @SuppressLint("StaticFieldLeak")
    @Inject
    @ApplicationContext
    lateinit var appContext: Context
	...
}
这里会有一个编译器黄色提醒内存泄漏,由于我们注入的context是全局Application对象,因此不会有内存泄漏问题,所以这里可以忽略掉。
最后一步就是将Composable中使用的ViewModel参数也使用Hilt提供的方法替换掉:
@RootNavGraph(start = true)
@Destination
@Composable
fun NotificationTest(navigator: DestinationsNavigator,
                     viewModel: NotificationTestViewModel = hiltViewModel()) {
    ....
}
注意这里之前使用的默认参数值是小写的viewModel() 它是lifecycle-viewmodel-compose提供的一个函数,现在换成hiltViewModel()就可以了。(如果该Composable不使用导航路由那么不需要更换)
一切就绪后,就可以将NotificationTestViewModel中所有使用context的地方将context参数移除,内部使用注入的appContext作为参数传递,NotificationTest在访问NotificationTestViewModel中的方法时也不需要提供context了。