SpringBoot+SpringSecurity+MybatisPlus+Vue3小项目摘录(七)
文章目录
-
- 路由处理(路由守卫)
-
-
- 在router目录下新建一个permission.js文件
-
- 需要在main.js中引用即可
- 动态路由的实现
-
-
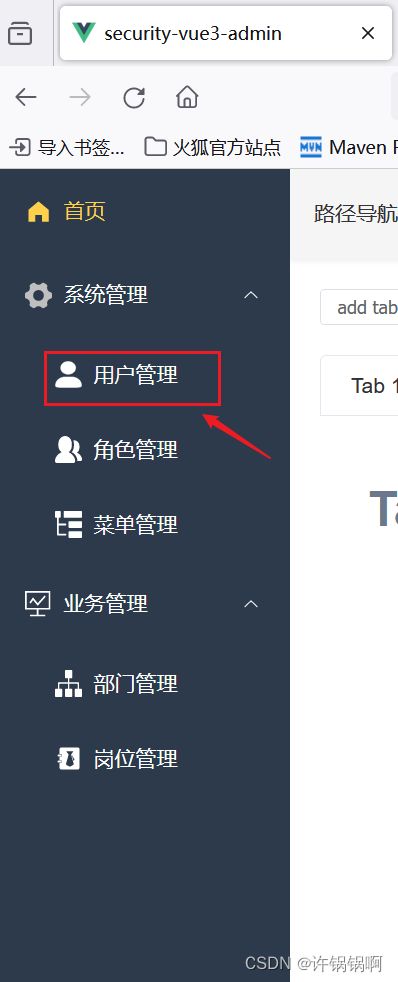
- 如下图所示:
-
- 实现步骤:
-
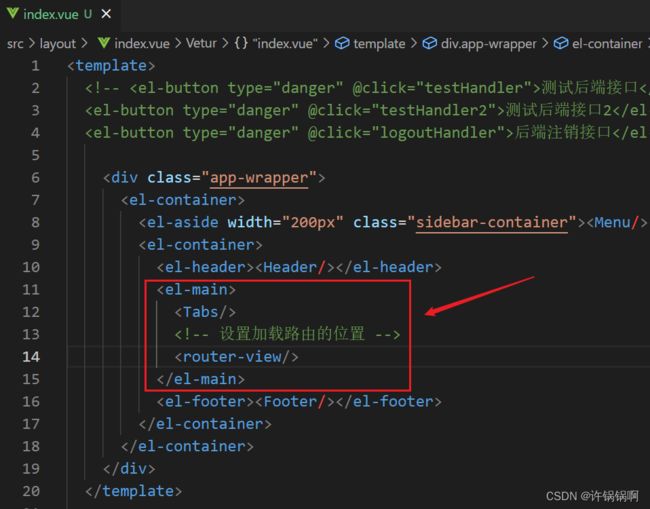
- 在layout/index.vue中添加路由显示
- 并在store/index.js文件中进行单页处理
- 查看菜单表sys_menu的数据
- 在view目录下新建对应的路径以及组件
-
- 修改router/permission.js文件内容
- 最后在router/index.js中修改之前的路由【添加children】
- 修改后的代码如下:
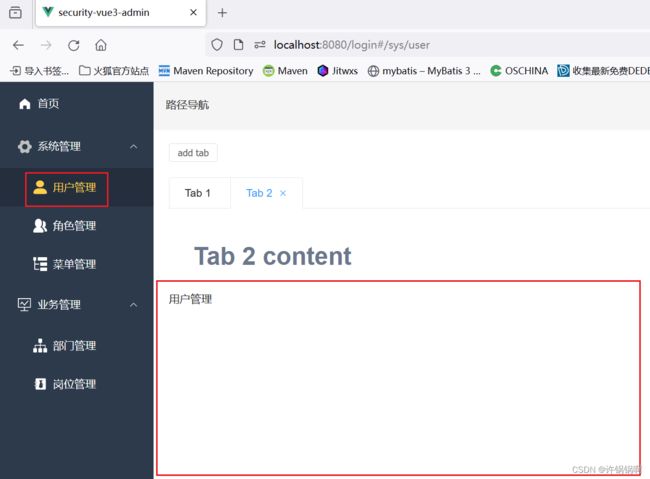
- 重启项目【查看结果】
- 在layout/index.vue中添加路由显示
-
- 动态标签页的实现
-
-
-
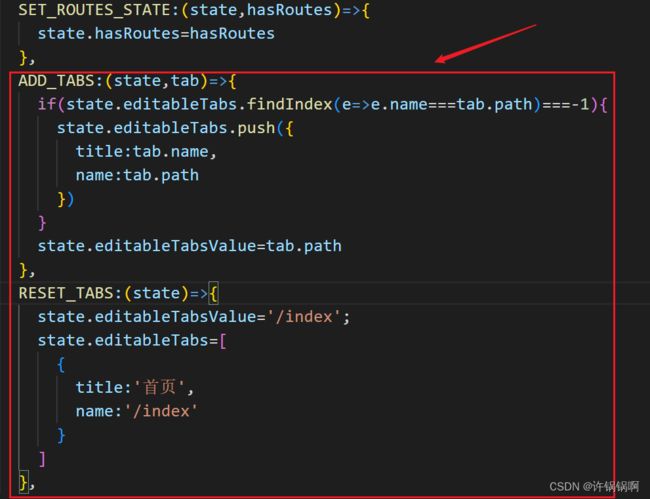
- 在stroe/index.js文件中声明:
-
- 编写两个方法:添加选项卡和重置选项卡
- 在avatar.vue中的注销函数中处理:
- 在menu/index.vue中编写菜单的点击事件绑定处理
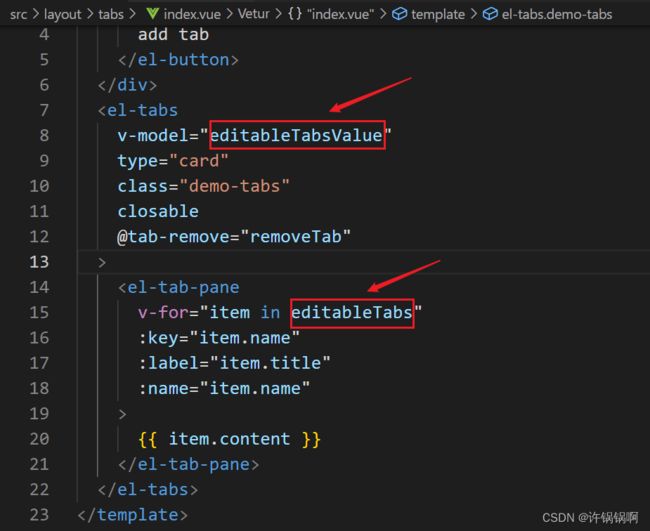
- 修改tabs/index.vue文件
- 修改js中的动态操作内容:
-
- 重新访问首页,点击左侧的导航栏,右边动态的创建新的选项卡
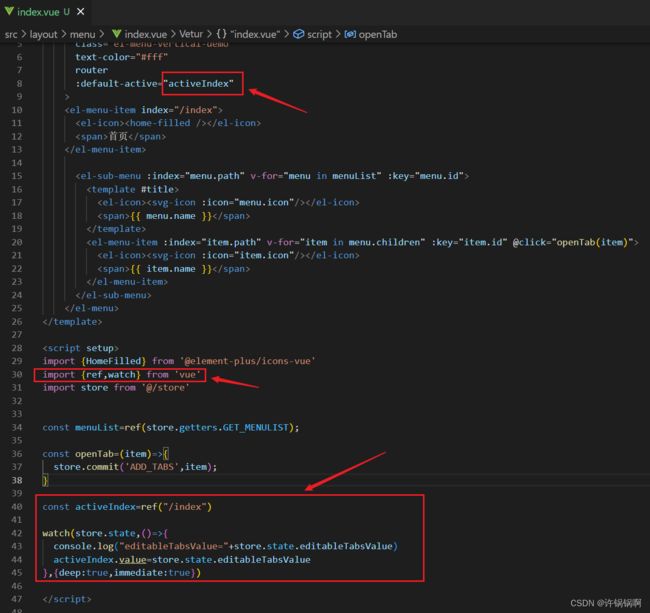
- 但是存在一个问题,并没有默认选中,tabs的value值也没有修改,需要用到watch监听实现
- 为了凸显选中的内容,修改css样式处理:
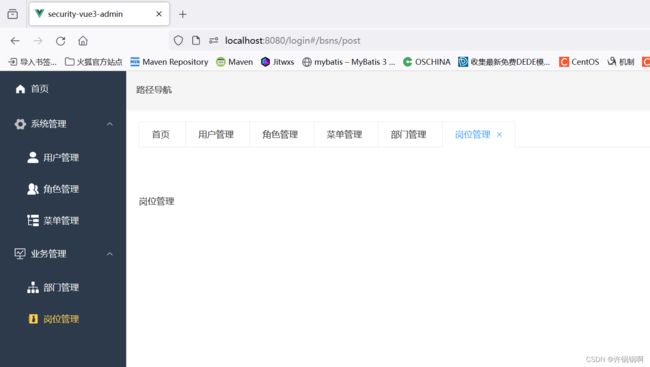
- 修改完后的效果如下:
- 切换选项卡之后,并没有实时的变化,需要处理路由
-
-
- 绑定事件编写js
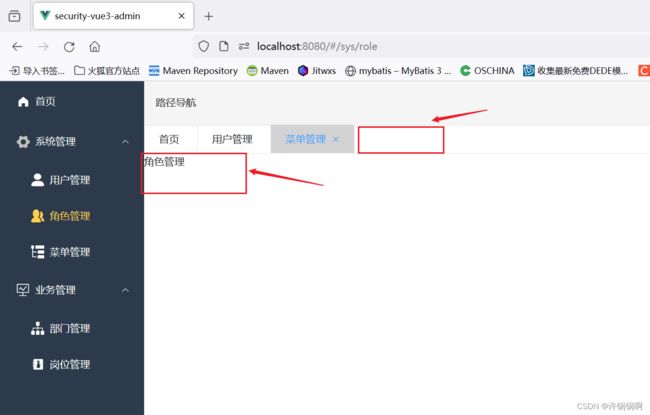
- 此时如果移除角色管理这个选项卡,里面的内容还是存在的
- 修改removeTab函数处理:
- 为了让大家少走弯路整个tabs/index.vue的代码如下:
-
-
-
- 动态的路径导航处理
-
-
-
-
- 修改header/componentsbreadcrumb.vue文件
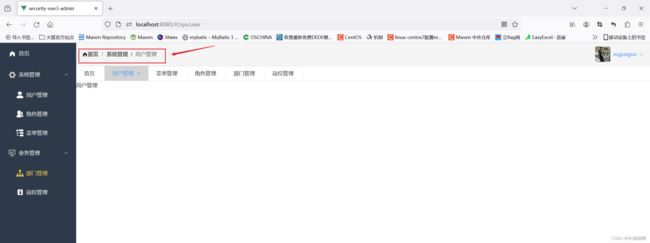
- 预览效果如下:
- 此时顺便把首页处理一下【自行修饰】!!!
-
- 修改views/index/index.vue文件内容:
-
-
-
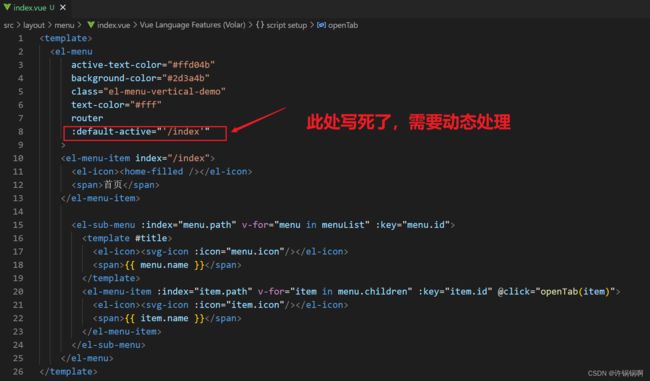
- 路由与导航动态绑定处理实现:
-
-
- 修改App.vue添加监听route,动态的添加标签
-
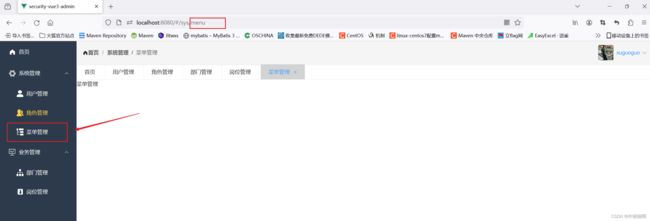
- 当你在地址栏输入请求路径的时候不能动态的切换:
- 右上角的个人中心需要添加链接进行跳转
-
- 查看router/index.js文件
- 修改header/components/avatar.vue通过router-link实现跳转
-
- 小结
路由处理(路由守卫)
提示:前端页面的跳转需要加路由来进一步处理!!!
前端如果没有登录过,就不会产生token,则自动的跳转到登录页面,这个就是路由守卫【类似于后端的过滤器、拦截器】
通过router.beforeEach((to,from,next)=>{  })实现
在router目录下新建一个permission.js文件
import router from "@/router/index"
import store from "@/store"


router.beforeEach((to,from,next)=>{
  const whiteList=['/login'] // 白名单
  let token=store.getters.GET_TOKEN;
  if(token){
      next();
  }else{
      if(whiteList.includes(to.path)){
          next();
      }else{
          next("/login")
      }
  }
})
需要在main.js中引用即可
动态路由的实现
以往我们的路由都是写在router/index.js文件中写死了,通过硬编码处理
如下图所示:
实现步骤:
我们vue中的路由信息,需要通过后端查询的menuList,动态设置到router里面去;
在layout/index.vue中添加路由显示
并在store/index.js文件中进行单页处理
查看菜单表sys_menu的数据
在view目录下新建对应的路径以及组件
修改router/permission.js文件内容
import router from "@/router/index"
import store from "@/store"


router.beforeEach((to,from,next)=>{
    const whiteList=['/login'] // 白名单
    let token=store.getters.GET_TOKEN;
    let hasRoutes=store.state.hasRoutes;
    let menuList=store.getters.GET_MENULIST;
    if(token){
        if(!hasRoutes){
            bindRoute(menuList);
            store.commit("SET_ROUTES_STATE",true);
        }
        next();
    }else{
        if(whiteList.includes(to.path)){
            next();
        }else{
            next("/login")
        }
    }
})

// 动态绑定路由
const bindRoute=(menuList)=>{
    let newRoutes=router.options.routes;
    menuList.forEach(menu=>{
        if(menu.children){
           menu.children.forEach(m=>{
               let route=menuToRoute(m,menu.name);
               if(route){
                   newRoutes[0].children.push(route);
               }
           })
        }
    })
    // 重新添加到路由
    newRoutes.forEach(route=>{
        router.addRoute(route)
    })
}

// 菜单对象转成路由对象
const menuToRoute=(menu,parentName)=>{
    if(!menu.component){
        return null;
    }else{
        let route={
            name:menu.name,
            path:menu.path,
            meta:{
                parentName:parentName
            }
        }
        route.component=()=>import('@/views/'+menu.component+'.vue');
        return route;
    }
}
最后在router/index.js中修改之前的路由【添加children】
修改后的代码如下:
import { createRouter, createWebHashHistory } from 'vue-router'


const routes = [
  {
    path: '/',
    name: '首页',
    component: () => import('../layout'),
    redirect:'/index',
    children:[
      {
        path: '/index',
        name: '首页',
        component: () => import('../views/index/index')
      },
      {
        path: '/userCenter',
        name: '个人中心',
        component: () => import('../views/userCenter/index')
      },
    ]
  },
  {
    path: '/login',
    name: 'login',
    component: () => import('../views/Login.vue')
  }
]

const router = createRouter({
  history: createWebHashHistory(),
  routes
})

export default router
重启项目【查看结果】
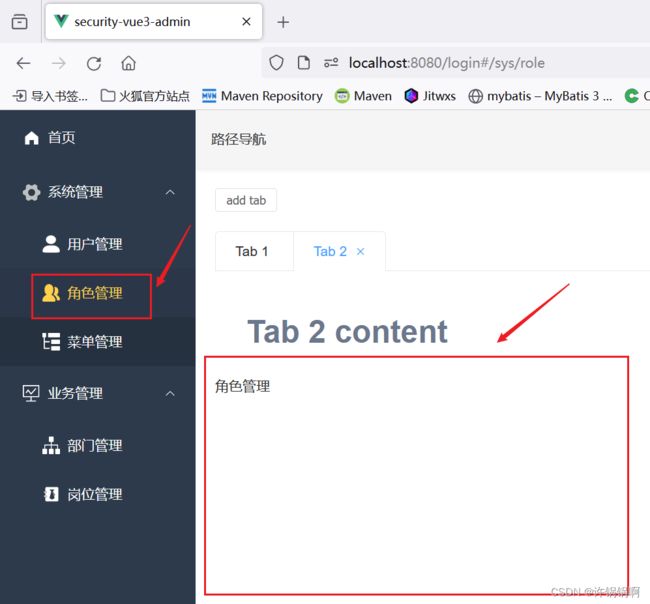
实现点击左边导航栏之后可以查看到视图渲染的位置有对应的变化即可!!
动态标签页的实现
需求:通过点击左侧的导航栏在中间部分动态的创建选项卡,在注销登录的时候重置
在stroe/index.js文件中声明:
state: {
    hasRoutes:false,
    editableTabsValue:'/index',
    editableTabs:[
      {
        title:'首页',
        name:'/index'
      }
    ]
  },
编写两个方法:添加选项卡和重置选项卡
ADD_TABS:(state,tab)=>{
      if(state.editableTabs.findIndex(e=>e.name===tab.path)===-1){
        state.editableTabs.push({
          title:tab.name,
          name:tab.path
        })
      }
      state.editableTabsValue=tab.path
    },
    RESET_TABS:(state)=>{
      state.editableTabsValue='/index';
      state.editableTabs=[
        {
          title:'首页',
          name:'/index'
        }
      ]
    },
在avatar.vue中的注销函数中处理:
在menu/index.vue中编写菜单的点击事件绑定处理
修改tabs/index.vue文件
修改js中的动态操作内容:
<script  setup>
import { ref } from 'vue'

import  store from '@/store'

const editableTabsValue = ref(store.state.editableTabsValue)
const editableTabs = ref(store.state.editableTabs)


const removeTab = (targetName) => {
  const tabs = editableTabs.value
  let activeName = editableTabsValue.value
  if (activeName === targetName) {
    tabs.forEach((tab, index) => {
      if (tab.name === targetName) {
        const nextTab = tabs[index + 1] || tabs[index - 1]
        if (nextTab) {
          activeName = nextTab.name
        }
      }
    })
  }

  editableTabsValue.value = activeName
  editableTabs.value = tabs.filter((tab) => tab.name !== targetName)
}
</script>
重新访问首页,点击左侧的导航栏,右边动态的创建新的选项卡
但是存在一个问题,并没有默认选中,tabs的value值也没有修改,需要用到watch监听实现
为了凸显选中的内容,修改css样式处理:
修改完后的效果如下:
切换选项卡之后,并没有实时的变化,需要处理路由
绑定事件编写js
import {useRouter} from 'vue-router'
const router=useRouter();

const clickTab=(target)=>{
  console.log("target.props.label="+target.props.label)
  router.push({name:target.props.label})
}
此时如果移除角色管理这个选项卡,里面的内容还是存在的
修改removeTab函数处理:
const removeTab = (targetName) => {
  const tabs = editableTabs.value
  let activeName = editableTabsValue.value

  if(activeName==='/index'){
    return
  }

  if (activeName === targetName) {
    tabs.forEach((tab, index) => {
      if (tab.name === targetName) {
        const nextTab = tabs[index + 1] || tabs[index - 1]
        if (nextTab) {
          activeName = nextTab.name
        }
      }
    })
  }

  editableTabsValue.value = activeName
  editableTabs.value = tabs.filter((tab) => tab.name !== targetName)

  store.state.editableTabsValue=editableTabsValue.value;
  store.state.editableTabs=editableTabs.value;

  router.push({path:activeName})
}
为了让大家少走弯路整个tabs/index.vue的代码如下:
<template>
  <el-tabs
    v-model="editableTabsValue"
    type="card"
    class="demo-tabs"
    closable
    @tab-remove="removeTab"
    @tab-click="clickTab"
  >
    <el-tab-pane
      v-for="item in editableTabs"
      :key="item.name"
      :label="item.title"
      :name="item.name"
    >
      {{ item.content }}
    el-tab-pane>
  el-tabs>
template>
<script  setup>
import { ref,watch } from 'vue'

import  store from '@/store'

import {useRouter} from 'vue-router'
const router=useRouter();

const clickTab=(target)=>{
  console.log("target.props.label="+target.props.label)
  router.push({name:target.props.label})
}


const editableTabsValue = ref(store.state.editableTabsValue)
const editableTabs = ref(store.state.editableTabs)

const removeTab = (targetName) => {
  const tabs = editableTabs.value
  let activeName = editableTabsValue.value

  if(activeName==='/index'){
    return
  }

  if (activeName === targetName) {
    tabs.forEach((tab, index) => {
      if (tab.name === targetName) {
        const nextTab = tabs[index + 1] || tabs[index - 1]
        if (nextTab) {
          activeName = nextTab.name
        }
      }
    })
  }

  editableTabsValue.value = activeName
  editableTabs.value = tabs.filter((tab) => tab.name !== targetName)

  store.state.editableTabsValue=editableTabsValue.value;
  store.state.editableTabs=editableTabs.value;

  router.push({path:activeName})
}

//刷新tabs的value值
const refreshTabs=()=>{
  editableTabsValue.value=store.state.editableTabsValue;
  editableTabs.value=store.state.editableTabs;
}
//深度监测
watch(store.state,()=>{
  refreshTabs();
},{deep:true,immediate:true})

script>
<style>
.demo-tabs > .el-tabs__content {
  padding: 32px;
  color: #6b778c;
  font-size: 32px;
  font-weight: 600;
}

.el-main{
  padding:0px;
}


.el-tabs--card>.el-tabs__header .el-tabs__item.is-active{
  background-color: lightgray;
}

.el-tabs{
  height:45px
}
style>
动态的路径导航处理
直接参考官网操作即可https://element-plus.gitee.io/zh-CN/component/breadcrumb.html
修改header/componentsbreadcrumb.vue文件
<template>
<el-icon><HomeFilled /></el-icon>
<el-breadcrumb separator="/">
<el-breadcrumb-item v-for="(item,index) in breadcrumbList">
<span class="root" v-if="parentName && index>0">{{parentName}} / </span>
<span v-if="index==breadcrumbList.length-1">{{item.name}}</span>
<span class="root" v-else>{{item.name}}</span>
</el-breadcrumb-item>
</el-breadcrumb>
</template>
<script setup>
import {HomeFilled} from '@element-plus/icons-vue'
import {useRoute} from 'vue-router'
import { ref ,watch} from 'vue'
import store from "@/store";
const route=useRoute();
const breadcrumbList=ref([])
const parentName=ref("")
const initBreadcrumbList=()=>{
breadcrumbList.value=route.matched;
parentName.value=route.meta.parentName;
}
watch(route,()=>{
initBreadcrumbList();
},{deep:true,immediate:true})
</script>
<style lang="scss" scoped>
.root{
color:#666;
font-weight:600;
}
</style>
预览效果如下:
此时顺便把首页处理一下【自行修饰】!!!
修改views/index/index.vue文件内容:
<template>
  <div className="home">
    欢迎使用,锅锅通用权限系统 !
  div>

template>

<script>
export default {
  name: "index"
};
script>

<style lang="scss" scoped>
.home{
  padding: 40px;
  font-size: 30px;
  font-weight: bold;
}
style>
路由与导航动态绑定处理实现:
为了确保之后的路由与导航不出问题需要进行进一步的处理
修改App.vue添加监听route,动态的添加标签
import store from '@/store'
import { ref ,watch} from 'vue'
import { useRoute,useRouter } from 'vue-router'
const route=useRoute();
const router=useRouter();
const whitePath=['/login','/index','/']


watch(route,(to,from)=>{
  console.log("to"+to.name)
  console.log(to.path)

  if (whitePath.indexOf(to.path)===-1) {
    console.log("to.path="+to.path)
    let obj = {
      name: to.name,
      path: to.path
    }

    store.commit("ADD_TABS", obj)
  }

},{deep:true,immediate:true})
当你在地址栏输入请求路径的时候不能动态的切换:
右上角的个人中心需要添加链接进行跳转
查看router/index.js文件
修改header/components/avatar.vue通过router-link实现跳转
可能有很多同学不知道为什么添加一个router-link就可以实现新增一个选项卡, 是因为在App.vue中我们进行了判断处理哦!!!
小结
提示:本小结处理的是左侧动态导航栏中的动态创建选项卡的实现、细节的处理路由跳转以及延伸到个人中心等的路由跳转处理等!!!
本章的第七小节完毕,敬请期待后续更新(可留言需要学习哪方面的内容哈)!如果需要源码或者工具的朋友们可关注微信公众号"锅锅编程生活"或者扫描二维码关注回复关键字/后台留言获取即可!


