uniApp集成aar
uniApp集成aar
-
客户要求,由于要使用uniapp开发, 集成我们现有的aar功能,所以进行了三天的调试,终于把demo整理出来了,整理下集成流程,留以备用.
-
要集成uniapp的aar, 首先要对aar的集成生成和androidstudio集成了解,
https://nativesupport.dcloud.net.cn/AppDocs/README 这是官方文档, 需要的工具在这有连接
首先uniapp集成aar,不能直接调用aar, 需要有个中间量,需要创建个安卓项目, 创建个库, 用这个库来引用aar调用, 最后再将这个库打成aar, 依赖到HBuilder中引用, 这样就可以显示aar的调用了, 个人是安卓原生开发, 没有使用过uniapp开发, 在集成中也是摸索的进行, 发现不能直接调用, 官方文档中没看到介绍,这点不太友好,对于没使用HBuilder 的开发者有点难度.
创建好项目后,需要申请appid
Appkey申请: https://nativesupport.dcloud.net.cn/AppDocs/usesdk/appkey
AppID: __UNI__XXXXXX, 会拿到这个id,
这个id需要放到项目的app-main-assets-apps下改为__UNI__XXXXXX一样的id,
data-dcloud_control.xml app_id改为相同__UNI__XXXXXX, 这id保持一致,
离线打包Key管理
包名.
sha1 获取: keytool -list -v -keystore debug.jks
取到 Android:
572bb886a810eaccd47dfaf71c34ddd9 , 取到后放到android studio中
这个链接很有帮助,推荐看下
https://blog.csdn.net/u010274449/article/details/123930550
接下里是demo说明
app-build.gradle 中
//使用uniapp时,需复制下面代码
    /*代码开始*/
    aaptOptions {
        additionalParameters '--auto-add-overlay'
        //noCompress 'foo', 'bar'
        ignoreAssetsPattern "!.svn:!.git:.*:!CVS:!thumbs.db:!picasa.ini:!*.scc:*~"
    }
    /*代码结束*/
dependencies {
    implementation fileTree(dir: 'libs', include: ['*.jar'])
    implementation fileTree(dir: 'libs', include: ['*.aar'])

    implementation 'androidx.legacy:legacy-support-v4:1.0.0'
    implementation 'androidx.appcompat:appcompat:1.0.0'

    /*uniapp所需库-----------------------开始*/
    implementation 'androidx.recyclerview:recyclerview:1.0.0'
    implementation 'com.facebook.fresco:fresco:1.13.0'
    implementation "com.facebook.fresco:animated-gif:1.13.0"
    /*uniapp所需库-----------------------结束*/

    // 基座需要,必须添加
//    implementation 'com.github.bumptech.glide:glide:4.9.0'
    implementation 'com.alibaba:fastjson:1.1.46.android'

    implementation 'com.google.android.material:material:1.2.1'
    implementation 'androidx.constraintlayout:constraintlayout:2.0.1'
    implementation 'com.github.bumptech.glide:glide:4.9.0'
    implementation 'com.github.bumptech.glide:okhttp3-integration:4.9.0'
    annotationProcessor 'com.github.bumptech.glide:compiler:4.9.0'
    implementation 'com.google.android.exoplayer:exoplayer:2.12.2'
    implementation 'com.google.android.exoplayer:extension-rtmp:2.12.2'
    implementation 'com.android.support:multidex:1.0.3'

    // 添加uni-app插件
    implementation project(':uniplugin_module')

}
混淆需要的话自行添加,
将aar放到项目libs下, 在uniplugin_moudle 库中需要依赖
在uniplugin_moudle 中, 不能有资源存在, 需要创建中间量
Rds_AppProxy 实现 UniAppHookProxy 进行初始化设置
public class Rds_AppProxy implements UniAppHookProxy {
    public String TAG = "Rds_AppProxy";

    @Override
    public void onCreate(Application application) {
        //可写初始化触发逻辑

    }

    @Override
    public void onSubProcessCreate(Application application) {
        //子进程初始化回调
    }
}
集成UniModule
public class TestModule extends UniModule{

    //run ui thread
    @UniJSMethod(uiThread = true)
    public void testAsyncFunc(JSONObject options, UniJSCallback callback) {
        Log.e(TAG, "testAsyncFunc--" + options);
        if (callback != null) {
            JSONObject data = new JSONObject();
            data.put("code", "success");
            callback.invoke(data);
            //callback.invokeAndKeepAlive(data);
        }
    }

	//run JS thread
    @UniJSMethod(uiThread = false)
    public JSONObject doRdsLogin(JSONObject jsonObject) {
        Log.e(TAG, "doRdsLogin: " + jsonObject.toString());
        String account = jsonObject.getString("account");
        String passWord = jsonObject.getString("passWord");
        String ipPort = jsonObject.getString("ipPort");
        Log.e(TAG, "rdsdoLogin: account:"+account+",passWord:"+passWord+",ipPort:"+ipPort );
        doLogin(account, passWord, ipPort);

        JSONObject data = new JSONObject();
        data.put("code", "success");
        return data;
    }
	//调用方法
 @UniJSMethod(uiThread = true)
    public void openRdsConfig() {
        if (mUniSDKInstance != null && mUniSDKInstance.getContext() instanceof Activity) {
            Intent intent = new Intent(mUniSDKInstance.getContext(), ConfigActivity.class);
            ((Activity) mUniSDKInstance.getContext()).startActivity(intent);

        }
    }

}
以下是uniplugin_moudle 的build.gradle
apply plugin: 'com.android.library'

android {
    compileSdkVersion 29
    defaultConfig {
        minSdkVersion 21
        targetSdkVersion 28
        versionCode 1
        versionName "1.0"
        testInstrumentationRunner 'androidx.test.runner.AndroidJUnitRunner'
        ndk {
            abiFilters 'armeabi-v7a'
        }
    }

    buildTypes {
        release {
            minifyEnabled false
            proguardFiles getDefaultProguardFile('proguard-android.txt'), 'proguard-rules.pro'
        }
    }

    sourceSets {
        main {
            jniLibs.srcDirs = ['src/main/jniLibs']
        }
    }
    compileOptions {
        sourceCompatibility JavaVersion.VERSION_1_8
        targetCompatibility JavaVersion.VERSION_1_8
    }
}
repositories {
    flatDir {
        dirs 'libs'
    }
}

dependencies {
    implementation fileTree(dir: 'libs', include: ['*.jar'])
//    compileOnly
    **compileOnly fileTree(dir: '../app/libs', include: ['uniapp-v8-release.aar','Client-uniApp-.aar'])**

    implementation 'androidx.recyclerview:recyclerview:1.0.0'
    implementation 'androidx.legacy:legacy-support-v4:1.0.0'
    implementation 'androidx.appcompat:appcompat:1.0.0'
    implementation 'com.alibaba:fastjson:1.1.46.android'
    implementation 'com.facebook.fresco:fresco:1.13.0'
    implementation 'com.google.android.material:material:1.2.1'
    implementation 'androidx.constraintlayout:constraintlayout:2.0.1'
    implementation 'com.github.bumptech.glide:glide:4.9.0'
    implementation 'com.github.bumptech.glide:okhttp3-integration:4.9.0'
    annotationProcessor 'com.github.bumptech.glide:compiler:4.9.0'
    implementation 'com.google.android.exoplayer:exoplayer:2.12.2'
    implementation 'com.google.android.exoplayer:extension-rtmp:2.12.2'
    implementation 'com.android.support:multidex:1.0.3'
}
这样就可以引用到需要集成的aar了
接下来就是HBuilder 的集成和使用
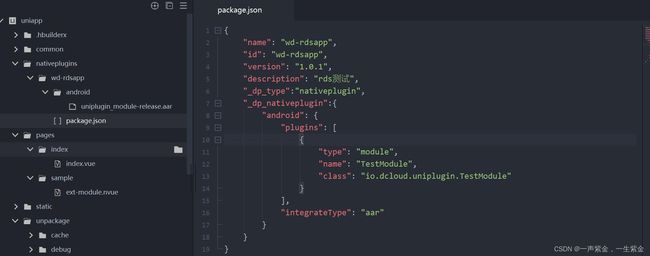
需要再HBuilder项目目录下创建就nativeplugins (固定目录名) ; 在nativeplugins下创建wd-rdsapp (可自定义目录名); 在wd-rdsapp下创建android(固定名) 在该目录下创建package.json 用于存在aar的目录, aar放到android目录下, 之后运行项目会出现方法名调动异常, 需要制作自定义基座, 运行选择自定义基座, 就可以正常运行成功了.