Pipeline 声明式和脚本式的主要区别
什么是 Pipeline
在进一步讨论 Pipeline 两种语法模型的区别前先来了解下什么是 pipeline,为什么要到它。
Pipeline 是 Jenkins 中的一套自动化流程框架,代表一系列工作流或活动流,作用是允许将单个Jenkins节点或者多个节点的任务组合连接起来,从而实现单个任务难以完成的复杂构建工作。
它有以下优点:
- Code(代码): Pipeline 的任务是通过代码来实现的,可以通过git来进行版本化控制,团队成员可以编辑迭代Pipeline 代码
- Durable(持久化): 无论 Jenkins master 是在计划内或者非计划内重启,pipeline 任务都不会收到影响
- Pausable(可暂定性) pipeline基于groovy可以实现job的暂停和等待用户的输入或批准然后继续执行。
- Versatile(多功能) 支持fork/join、循环执行,并行执行任务
- Extensible(可扩展性) 支持其DSL的自定义扩展 ,以及与其他插件集成的多个选项
Pipeline 语法
Pipeline 包括声明式语法和脚本式语法
声明式
pipeline {
    agent any //
    stages {
        stage('Build') {
            steps {
                //
            }
        }
        stage('Test') {
            steps {
                //
            }
        }
        stage('Deploy') {
            steps {
                //
            }
        }
    }
}
- agent any: 任意可用的agent都可以执行
- stages:代表整个流水线的所有执行阶段。通常stages只有1个,里面包含多个stage
- stage:代表流水线中的某个阶段,可能出现n个。一般分为拉取代码,编译构建,部署等阶段。
- steps:代表一个阶段内需要执行的逻辑。steps里面是shell脚本,git拉取代码,ssh远程发布等任意内容。
脚本式
node {
    stage('Build') {
        //
    }
    stage('Test') {
        //
    }
    stage('Deploy') {
        //
    }
}
- node:节点,一个 Node 就是一个 Jenkins 节点,Master 或者 Agent,是执行 Step 的具体运行环境
- Stage:阶段,一个 Pipeline 可以划分为若干个 Stage,每个 Stage 代表一组操作,比如:Build、Test、Deploy,Stage 是一个逻辑分组的概念。
声明式和脚本式的主要区别
1. Pipeline 代码校验
声明式 Pipeline 会在执行前就会校验 Pipeline 语法是否正确,而脚本式不会。
观察下面声明式例子,stage Test 里面的 ‘echo 1’ 有语法错误,echo 只可以接受字符串,尝试执行该 pipeline时,会立即报错
pipeline {
    agent any

    stages {
        stage("Build") {
            steps {
                echo "Some code compilation here..."
            }
        }

        stage("Test") {
            steps {
                echo "Some tests execution here..."
                echo 1
            }
        }
    }
}

同样脚本式的例子如下,会直到执行到 stage Test 才会报错
node {
    stage("Build") {
        echo "Some code compilation here..."
    }

    stage("Test") {
        echo "Some tests execution here..."
        echo 1
    }
}

想象一下如果有多个 stage,前面的stage 执行都没有问题而最后一个stage 出问题,这将会浪费一定的时间
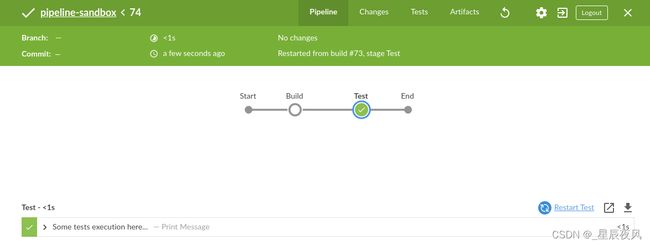
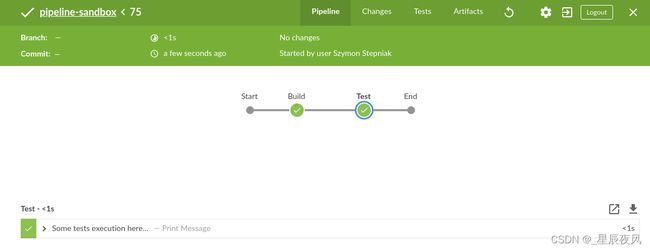
2. 重启 stage
如果某个 stage 执行失败,修复后声明式 Pipeline 可以直接跳到该 stage 重新执行,而脚本式要从头来过。
观察下面两个图,声明式可以 restart stage,脚本式不能
3. Option 指令
option指令用于配置整个jenkins pipeline本身的选项,根据具体的选项不同,可以将其放在pipeline块或者stage块中。
虽然声明式pipeline 和脚本式 pipeline 都支持 options 选项,但声明式 options 和 pipeline 代码逻辑是分开的,而脚本式 options 和代码逻辑是嵌套在一起的,如果有多个options需要设置代码可读性差。观察下面例子:
声明式
pipeline {
    agent any

    options {
        timestamps()
        ansiColor("xterm")
    }

    stages {
        stage("Build") {
            options {
                timeout(time: 1, unit: "MINUTES")
            }
            steps {
                sh 'printf "\\e[31mSome code compilation here...\\e[0m\\n"'
            }
        }

        stage("Test") {
            options {
                timeout(time: 2, unit: "MINUTES")
            }
            steps {
                sh 'printf "\\e[31mSome tests execution here...\\e[0m\\n"'
            }
        }
    }
}
脚本式
node {
    timestamps {
        ansiColor("xterm") {
            stage("Build") {
                timeout(time: 1, unit: "MINUTES") {
                    sh 'printf "\\e[31mSome code compilation here...\\e[0m\\n"'
                }
            }
            stage("Test") {
                timeout(time: 2, unit: "MINUTES") {
                    sh 'printf "\\e[31mSome tests execution here...\\e[0m\\n"'
                }
            }
        }
    }
}
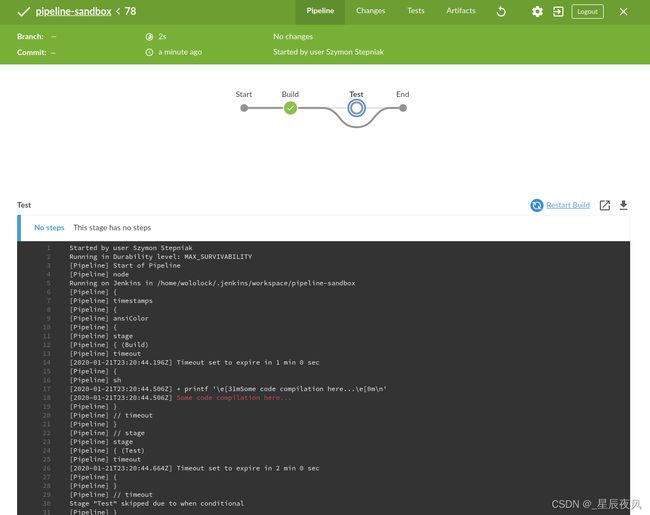
4. 条件执行 stage 的处理方式
观察下面声明式例子,添加条件当 env.FOO 等于 bar 时才执行 test stage
声明式
pipeline {
    agent any

    options {
        timestamps()
        ansiColor("xterm")
    }

    stages {
        stage("Build") {
            options {
                timeout(time: 1, unit: "MINUTES")
            }
            steps {
                sh 'printf "\\e[31mSome code compilation here...\\e[0m\\n"'
            }
        }

        stage("Test") {
            when {
                environment name: "FOO", value: "bar"
            }
            options {
                timeout(time: 2, unit: "MINUTES")
            }
            steps {
                sh 'printf "\\e[31mSome tests execution here...\\e[0m\\n"'
            }
        }
    }
}
脚本式
node {
    timestamps {
        ansiColor("xterm") {
            stage("Build") {
                timeout(time: 1, unit: "MINUTES") {
                    sh 'printf "\\e[31mSome code compilation here...\\e[0m\\n"'
                }
            }
            if (env.FOO == "bar") {
                stage("Test") {
                    timeout(time: 2, unit: "MINUTES") {
                        sh 'printf "\\e[31mSome tests execution here...\\e[0m\\n"'
                    }
                }
            }
        }
    }
}
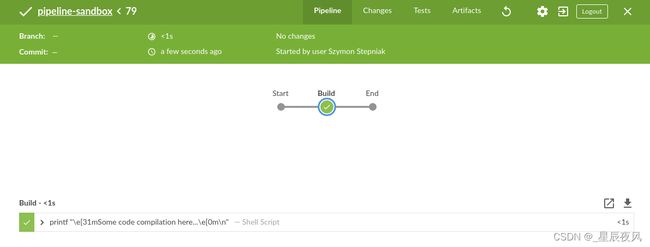
从结果来看,声明式会正常跳过 Test stage,而脚本式需要if 判断才会添加 test stage,所以 test stage 根本没有被渲染出来,这会一定程序上造成困扰。
5. 语法逻辑
声明式支持 stages,steps 更细致的阶段性任务划分,脚本式只支持 stage, 编写逻辑时,声明式要在 script{} 标记里面写,脚本式不用,观察下面例子
声明式
 pipeline {
   agent {
     // executes on an executor with the label 'some-label' or 'docker'
     label "some-label || docker"
   }

   stages {
     stage("foo") {
       steps {
         // variable assignment (other than environment variables) can only be done in a script block
         // complex global variables (with properties or methods) can only be run in a script block
         // env variables can also be set within a script block
         script {
           foo = docker.image('ubuntu')
           env.bar = "${foo.imageName()}"
           echo "foo: ${foo.imageName()}"
         }
       }
     }
     stage("bar") {
       steps{
         echo "bar: ${env.bar}"
         echo "foo: ${foo.imageName()}"
       }
     }
   }
 }
脚本式
 node {

   git url: 'https://github.com/jfrogdev/project-examples.git'

   // Get Artifactory server instance, defined in the Artifactory Plugin administration page.
   def server = Artifactory.server "SERVER_ID"

   // Read the upload spec and upload files to Artifactory.
   def downloadSpec =
           '''{
       "files": [
         {
            "pattern": "libs-snapshot-local/*.zip",
            "target": "dependencies/",
            "props": "p1=v1;p2=v2"
         }
       ]
   }'''

   def buildInfo1 = server.download spec: downloadSpec

   // Read the upload spec which was downloaded from github.
   def uploadSpec =
           '''{
     "files": [
       {
          "pattern": "resources/Kermit.*",
          "target": "libs-snapshot-local",
          "props": "p1=v1;p2=v2"
       },
       {
          "pattern": "resources/Frogger.*",
          "target": "libs-snapshot-local"
       }
      ]
   }'''


   // Upload to Artifactory.
   def buildInfo2 = server.upload spec: uploadSpec

   // Merge the upload and download build-info objects.
   buildInfo1.append buildInfo2

   // Publish the build to Artifactory
   server.publishBuildInfo buildInfo1
}
总结
- 声明式语法是 Jenkins 官方推荐的写法,它的特点是语法简单,无需专业的编程知识也能快速上手,同时语法也更为严谨,有许多限制,失去了一定的灵活性。
- 脚本式语法可以让你灵活的运用代码,就像一张白纸,你可以更灵活地对任务逻辑进行编排,适合有大量特定要求、逻辑复杂的任务。同样灵活的背后是没有形成统一的逻辑结构或流程,可能造成代码的不稳定,难以维护以及可读性差。
参考链接
- Pipeline
- Jenkins Scripted Pipeline vs. Declarative Pipeline - the 4 practical differences
- Declarative vs Scripted Pipeline – Key differences
- Pipeline简介