第一章 后端基础之Spring Framework5专题
Spring Framework5.X专题
1、Spring入门介绍
1.1、Spring概述
轻量级的DI/IoC和AOP容器的框架,支持事务的处理,对框架整合的支持!
- 容器:将每个对象是为Bean(豆子)放在容器(罐子)里面
- 业务场景:⽤户调⽤下单购买视频接⼝,需要判断登录,拦截器是AOP思想的⼀种实现
- 使⽤前:代码写逻辑,每次下单都调⽤⽅法判断,多个⽅法需要判断登录则都需要 登录⽅法 判断
- 使⽤后:根据⼀定的⽅法或者路径规则进⾏判断是否要调⽤,降低代码耦合度
1.2、Spring特性
(1)管理创建和组装对象之间的依赖关系
- 使用前:手工创建
Controller -> Service -> Dao
UserControoler
private UserService userService = new UserService();
- 使用后:Spring创建,自动注入
(2)面向切面编程 - AOP
-
作用:解耦核心业务和边缘业务的关系
-
场景:用户调用下单购买视频接口,需要判断登录,拦截器是AOP思想的一种体现。
-
使用前:代码写逻辑,每次下单都能调用方法判断,多个方法需要判断登录则都需要登陆方法判断。
- 使用后:根据一定的方法或者路径规则进行判断是否需要调用,降低代码耦合度。
(3)包含了大型项目里面常见解决方案,包括Web层、业务层、数据访问层等。
(4)极其便利的整合其他主流技术栈,比如redis、mq、mybaties、jpa等。
1.3、IDEA+Maven+Spring5.x项目创建
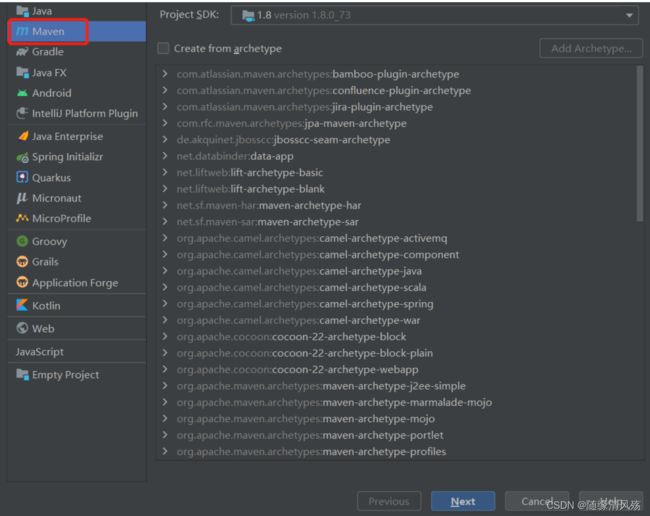
(1)创建Maven项目
(2)添加依赖
<dependency>
    <groupId>org.springframeworkgroupId>
    <artifactId>spring-contextartifactId>
    <version>5.2.5.RELEASEversion>
dependency>

<dependency>
    <groupId>org.springframeworkgroupId>
    <artifactId>spring-coreartifactId>
    <version>5.2.5.RELEASEversion>
dependency>

<dependency>
    <groupId>org.springframeworkgroupId>
    <artifactId>spring-beansartifactId>
    <version>5.2.5.RELEASEversion>
dependency>
(3)添加bean配置文件applicationContext.xml
<beans xmlns="http://www.springframework.org/schema/beans"
       xmlns:xsi="http://www.w3.org/2001/XMLSchema-instance"
       xsi:schemaLocation="http://www.springframework.org/schema/beans
                           https://www.springframework.org/schema/beans/spring-beans.xsd">
    <bean name="video" class="com.dx.ds.domain.Video"
          scope="prototype">
        <property name="name" value="tom"/>
        <property name="id" value="23"/>
    bean>
beans>
- id属性:指定Bean名称,在Bean被别的1类依赖时使用。
- name属性:用于指定Bean的悲鸣,如果没有id,也可以用name。
- class:用于指定Bean的来源,要创建的Bean的Class类,需要全限定名。
(4)创建模块的Video类
package com.dx.ds.domain;

public class Video {
    private int id;
    private String name;

    public int getId() {
        return id;
    }
    public void setId(int id) {
        this.id = id;
    }
    public String getName() {
        return name;
    }
    public void setName(String name) {
        this.name = name;
    }
}
(5)创建APP类获取容器中的Bean
package com.dx.ds;

import com.dx.ds.domain.Video;
import org.springframework.context.ApplicationContext;
import org.springframework.context.support.ClassPathXmlApplicationContext;

public class APP {
    public static void main(String[] args) {
        // 1、配置Beans的xml文件路径
        ApplicationContext applicationContext = new ClassPathXmlApplicationContext("applicationContext.xml");
        // 2、获取Bean
        Video video = (Video) applicationContext.getBean("video");
        // 3、输出Bean的属性
        System.out.println("Bean的ID:"+video.getId()+"Bean的name:"+video.getName());
    }
}
2、IOC理论
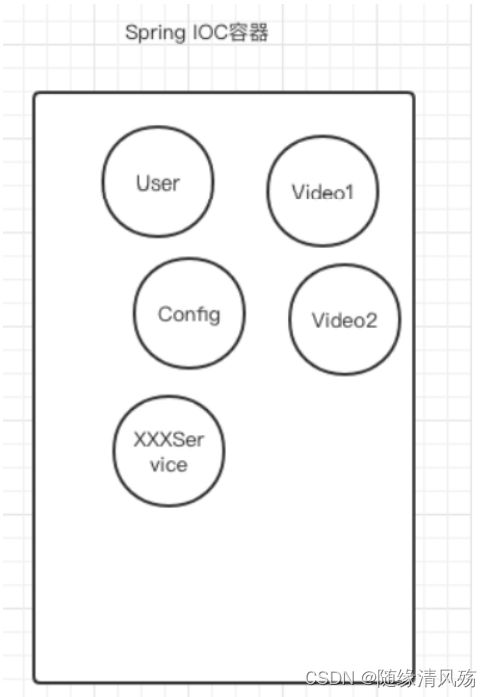
- 控制反转:把spring ioc 当成⼀个容器,⾥⾯存储管理的对象称为Bean,对象创建控制权由用户反转给Spring。
2.1、基本代码实现
(1)业务需求一:获取用户的配置信息
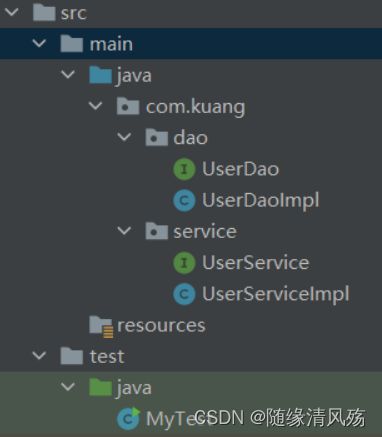
- 代码目录
- Dao层代码
public interface UserDao {
    void getuser();
}


public class UserDaoImpl implements UserDao{
    @Override
    public void getuser() {
        System.out.println("获取用户的配置信息!");
    }
}
- Service层代码
public interface UserService {
    void getUser()
}

public class UserServiceImpl {
    private UserDao userDao = new UserDaoImpl();

    public void  getUser(){
        userDao.getuser();
    }
}
- Test层代码
public class MyTest {
    public static void main(String[] args) {
        // 用户实际上调用的是业务层,DAO层不需要接触。
        UserServiceImpl userService = new UserServiceImpl();
        userService.getUser();
    }
}
- 运行结果
(2)业务需求二:在原有基础上添加业务需求之获取Oracle/mysql中的用户配置信息
- 代码增加
public class UserDaoMysqlImpl implements UserDao{
    @Override
    public void getuser() {
        System.out.println("获取Mysql用户配置信息");
    }
}

public class UserDaoOraclImpl implements UserDao{
    @Override
    public void getuser() {
        System.out.println("获取Oracle的用户配置信息!");
    }
}
- Test代码更改:程序适应不了用户的需求变更,写死了
private UserDao userDao = new UserDaoOraclImpl();
private UserDao userDao = new UserDaoMysqlImpl();
- 运行结果
(4)缺点
用户的需求更改可能会影响我们的源代码,我们需要根据用户需求更改源代码!如果程序代码量十分大,修改一次的成本非常昂贵。
2.2、代码优化之控制反转
- 传统JavaWeb:程序是主动创建对象,对象创建的控制权在程序员手上!
- Set注入:程序不在具有主动性,而是变成了被动的接收对象!
public class UserServiceImpl {
    private UserDao userDao;


    // 利用Set进行动态实现值的注入
    public void setUserDao(){
        this.userDao = userDao;
    }

    public void  getUser(){
        userDao.getuser();
    }
}
- test代码
public class MyTest {
    public static void main(String[] args) {
        // 用户实际上调用的是业务层,DAO层不需要接触。
        UserService userService = new UserServiceImpl();
        ((UserServiceImpl) userService).setUserDao(new UserDaoMysqlImpl());
        userService.getUser();
    }
}
这种思想从本质上解决了问题,程序员不在去管理对象的创建,系统的耦合性大大降低,可以更加专注的在业务的实现上,这就是IOC的原型。
2.3、IOC本质
- 控制反转:**将原本在程序中⼿动创建对象的流 程,交由Spring框架来管理 **
- 核⼼:把创建对象的控制权反转给Spring框架,对象的⽣命周期由 Spring统⼀管理。
(1)早期:业务层创建对象,创建对象的主动权在程序员手里,程序员创建什么才会调用什么。
(2)控制反转:主动权在用户手里,用户选择调用什么程序才会被动的创建对象。
- 重点:Spring容器在初始化时先读取配置文件,根据配置文件或元数据创建与组织对象存入容器中,程序使用时在从IOC容器中取出需要的对象。
(3)代码实战
①创建hello/helloSpring类
public class HelloSpring {
    private String str;

    @Override
    public String toString() {
        return "Hello{" +
                "str='" + str + '\'' +
                '}';
    }

    public String getStr() {
        return str;
    }

    public void setStr(String str) {
        this.str = str;
    }
}

public class Hello {
    private String str;

    @Override
    public String toString() {
        return "Hello{" +
                "str='" + str + '\'' +
                '}';
    }

    public String getStr() {
        return str;
    }

    public void setStr(String str) {
        this.str = str;
    }
}
②配置XML文件 - Spring2.x版本方式
- 在Spring中每个对象都统称为Bean
- bean = 对象,配置文件标签代表new HelloSpring
- id = 变量名
- class = new 对象
- property = 给对象设置一个值。
<beans xmlns="http://www.springframework.org/schema/beans"
       xmlns:xsi="http://www.w3.org/2001/XMLSchema-instance"
       xsi:schemaLocation="http://www.springframework.org/schema/beans
        http://www.springframework.org/schema/beans/spring-beans.xsd">

    <bean id="HelloSpring" class="com.kuang.pojo.HelloSpring">
        <property name="str" value="Spring"/>
    bean>

    <bean id="Hello" class="com.kuang.pojo.Hello">
        <property name="str" value="Spring2"/>
    bean>

beans>
③创建test类测试代码
public class test {
    public static void main(String[] args) {
        // 获取Spring的上下文对象
        ApplicationContext context = new ClassPathXmlApplicationContext("ApplicationContext.xml");
        // 我们的对象现在都在Spring中管理了,我们要使用直接在里面取出来就可以
        HelloSpring helloSpring = (HelloSpring) context.getBean("HelloSpring");
        System.out.println(helloSpring.toString());

        Hello hello = (Hello) context.getBean("Hello");
        System.out.println(hello.toString());
    }
}
- 运行结果

(4)IOC控制反转 - 程序从主动的创建对象变成被动的接收。
-
对象创建:对象由Spring创建
-
对象属性设置:由Spring容器来设置
-
控制:谁来控制对象的创建?
- 传统应用程序对象:由程序本身控制创建。
- Spring:对象由Spring来创建。
-
反转:程序本身不创建对象,而是被动接收对象
-
依赖注入:利用set方法来进行注入。
(5)IOC创建对象方式
配置文件加载的时候,容器中管理的对象就已经初始化了!
<bean id="user" class="com.peach.pojo.User">
    <constructor-arg index="0" value="peach">constructor-arg>
bean>


<bean id="user" class="com.peach.pojo.User">
    <constructor-arg type="java.lang.String" value="peach"/>
bean>


<bean id="user" class="com.peach.pojo.User">
    <constructor-arg name="name" value="peach">constructor-arg>
bean>
2.4、Spring的配置说明
(1)bean元素:使用该元素描述spring容器管理的对象。
(2)id元素:Bean的唯一标识,也就是对象名。
(2)name属性:给被管理的对象起个名字,获得对象是根据名称获得对象,也就是别名。
(3)class属性:被管理对象的完整类名,也就是包名+类名。
(4)import属性:用于团队开发,可以将多个配置文件导入合并为1个。
<import resource="bean1.xml"/>
(5)scope属性:规定Bean的作用域,常见的有以下五种。
3、DI依赖注入
-
依赖注入:在创建对象的同时或之后,如何给对象的属性赋值,即在运行期,由Spring根据配置文件,将其他对象的引用通过组件的提供的setter方法进行设定。
-
依赖:Bean对象创建依赖于容器。
-
注入:Bean对象中的所有属性,由容器来注入。
-
-
Spring中bean有三种装配机制,分别是:
- 在xml中显式配置;
- 在java中显式配置;
- 隐式的bean发现机制和自动装配。
3.1、常用开发注解
(1)Bean的实现
我们之前都是使用 bean 的标签进行bean注入,但是实际开发中,我们一般都会使用注解!
1、配置扫描哪些包下的注解
<!--指定注解扫描包-->
<context:component-scan base-package="com.kuang.pojo"/>
2、在指定包下编写类,增加注解
@Component("user")
// 相当于配置文件中 3、测试
@Test
public void test(){
   ApplicationContext applicationContext =
       new ClassPathXmlApplicationContext("beans.xml");
   User user = (User) applicationContext.getBean("user");
   System.out.println(user.name);
}
(2)属性注入:使用注解注入属性
①可以不用提供set方法,直接在直接名上添加@value(“值”)
@Component("user")
// 相当于配置文件中 ②如果提供了set方法,在set方法上添加@value(“值”);
@Component("user")
public class User {

   public String name;

   @Value("秦疆")
   public void setName(String name) {
       this.name = name;
  }
}
(3)衍生注解
@Component三个衍生注解
为了更好的进行分层,Spring可以使用其它三个注解,功能一样,目前使用哪一个功能都一样。
- @Controller:controller层
- @Service:service层
- @Repository:dao层
写上这些注解,就相当于将这个类交给Spring管理装配了!
(4)自动装配注解
见以上模式。
(5)作用域 @scope
- singleton:默认的,Spring会采用单例模式创建这个对象。关闭工厂 ,所有的对象都会销毁。
- prototype:多例模式。关闭工厂 ,所有的对象不会销毁。内部的垃圾回收机制会回收
@Controller("user")
@Scope("prototype")
public class User {
   @Value("秦疆")
   public String name;
}
(6)小结
XML与注解比较
- XML可以适用任何场景 ,结构清晰,维护方便
- 注解不是自己提供的类使用不了,开发简单方便
xml与注解整合开发 :推荐最佳实践
- xml管理Bean
- 注解完成属性注入
- 使用过程中, 可以不用扫描,扫描是为了类上的注解
<context:annotation-config/>
作用:
- 进行注解驱动注册,从而使注解生效
- 用于激活那些已经在spring容器里注册过的bean上面的注解,也就是显示的向Spring注册
- 如果不扫描包,就需要手动配置bean
- 如果不加注解驱动,则注入的值为null!
3.2、基于Java类进行配置
- 配置文件:JavaConfig 原来是 Spring 的一个子项目,它通过 Java 类的方式提供 Bean 的定义信息,在 Spring4 的版本, JavaConfig 已正式成为 Spring4 的核心功能 ,表现在有单独的config目录文件。
①编写一个实体类,Dog
@Component  //将这个类标注为Spring的一个组件,放到容器中!
public class Dog {
   public String name = "dog";
}
②新建一个config配置包,编写一个MyConfig配置类
@Configuration  //代表这是一个配置类
public class MyConfig {

   @Bean //通过方法注册一个bean,这里的返回值就Bean的类型,方法名就是bean的id!
   public Dog dog(){
       return new Dog();
  }
}
③测试
@Test
public void test2(){
   ApplicationContext applicationContext =
           new AnnotationConfigApplicationContext(MyConfig.class);
   Dog dog = (Dog) applicationContext.getBean("dog");
   System.out.println(dog.name);
}
④成功输出结果
4、Bean详述
4.1、bean的scope作⽤域讲解
- 验证:通过引用内存地址验证是否同一个对象。
| 作用域名 | 描述 |
|---|---|
| singleton | Bean以单例方式存在,在Spring IoC容器仅存在一个Bean实例 |
| prototype | Bean以单例方式存在,每次从容器中调用Bean时,都会返回一个新的实例,频繁创建/销毁对象会造成很大开销 |
(1)单例模式
- 配置文件
<bean name="video" class="com.dx.ds.domain.Video" scope="singleton">
    <property name="name" value="tom"/>
    <property name="id" value="23"/>
bean>
- 验证程序
public class APP {
    public static void main(String[] args) {
        // 1、配置Beans的xml文件路径
        ApplicationContext applicationContext = new ClassPathXmlApplicationContext("applicationContext.xml");
        testScope(applicationContext);
    }

    public static void testScope(ApplicationContext applicationContext) {
        // 2、获取Bean
        Video video1 = (Video) applicationContext.getBean("video");
        Video video2 = (Video) applicationContext.getBean("video");
        // 3、验证内存地址是否先相等
        System.out.println(video1==video2);

    }
}
- 验证结果
(2)多例模式
- 配置文件
<bean name="video" class="com.dx.ds.domain.Video" scope="prototype">
    <property name="name" value="tom"/>
    <property name="id" value="23"/>
bean>
- 验证程序
public class APP {
    public static void main(String[] args) {
        // 1、配置Beans的xml文件路径
        ApplicationContext applicationContext = new ClassPathXmlApplicationContext("applicationContext.xml");
        testScope(applicationContext);
    }

    public static void testScope(ApplicationContext applicationContext) {
        // 2、获取Bean
        Video video1 = (Video) applicationContext.getBean("video");
        Video video2 = (Video) applicationContext.getBean("video");
        // 3、验证内存地址是否先相等
        System.out.println(video1==video2);

    }
}
- 运行结果
4.2、Bean注⼊⽅式
(1)使用属性set方法注入
- Video类
public class Video {
    private int id;
    private String name;

    public int getId() {
        return id;
    }

    public void setId(int id) {
        System.out.println("set注入测试id");
        this.id = id;
    }

    public String getName() {
        return name;
    }

    public void setName(String name) {
        System.out.println("set注入测试name");
        this.name = name;
    }
}
- APP类
public class APP {
    public static void main(String[] args) {
        // 1、配置Beans的xml文件路径
        ApplicationContext applicationContext = new ClassPathXmlApplicationContext("applicationContext.xml");
        testScope(applicationContext);
    }

    public static void testScope(ApplicationContext applicationContext) {
        // 2、获取Bean
        Video video1 = (Video) applicationContext.getBean("video");

        // 3、验证set注入
        System.out.println(video1.getId());

    }
}
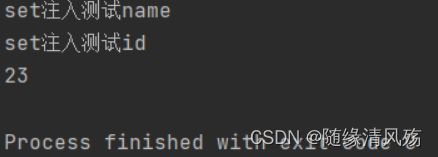
- 验证结果
(2)使用带参构造函数注入
- xml文件配置
- 注意事项:构造函数一定要有才能调用。
<bean name="video" class="com.dx.ds.domain.Video" scope="singleton">
    <constructor-arg name="name" value="⾯试专题课程第⼀季">constructor-arg>
bean>
- Video类
package com.dx.ds.domain;

public class Video {
    private int id;
    private String name;

    public Video(String name) {
        this.name = name;
        System.out.println("带参构造函数被调用!!!");
    }

    public int getId() {
        return id;
    }

    public void setId(int id) {
        this.id = id;
    }

    public String getName() {
        return name;
    }

    public void setName(String name) {
        this.name = name;
    }
}
- APP类
public class APP {
    public static void main(String[] args) {
        // 1、配置Beans的xml文件路径
        ApplicationContext applicationContext = new ClassPathXmlApplicationContext("applicationContext.xml");
        testScope(applicationContext);
    }

    public static void testScope(ApplicationContext applicationContext) {
        // 2、获取Bean
        Video video1 = (Video) applicationContext.getBean("video");

        // 3、验证set注入
        System.out.println(video1.getId());

    }
}
- 验证结果
(3)属性注入
- 应用场景:在pojo类中对Person类加上@Component注解,将其标记为组件,并且使用@Value注解为各属性赋初值
①配置文件
<context:annotation-config />
<context:component-scan base-package="pojo"/>
②类上@Component注解,使用@Value注解为各属性赋初值
@Component
public class Video2 {
    @Value("111")
    private int id;
    @Value("哔哩哔哩")
    private String name;
    private String title;

    public int getId() {
        return id;
    }

    public void setId(int id) {
        this.id = id;
    }

    public String getName() {
        return name;
    }

    public void setName(String name) {
        this.name = name;
    }

    public String getTitle() {
        return title;
    }

    public void setTitle(String title) {
        this.title = title;
    }
}
(4) List & Map类型注⼊
- Bean配置文件:在list、set标签中,需要用value对每个值进行设置,而map标签则需要用entry分别设置键key和值value。
<bean name="video" class="com.dx.ds.domain.Video" scope="singleton">

    <property name="chapterList">
        <list>
            <value>第⼀章SpringBootvalue>
            <value>第⼆章Mybatisvalue>
            <value>第三章Springvalue>
        list>
    property>
    <property name="videoMap">
        <map>
            <entry key="1" value="SpringCloud课程">entry>
            <entry key="2" value="⾯试课程">entry>
            <entry key="3" value="javaweb课程">entry>
        map>
    property>
bean>
- Video类
public class Video {
    private int id;
    private String title;
    private List<String> chapterList;
    private Map<Integer,String> videoMap;

    public int getId() {
        return id;
    }

    public void setId(int id) {
        this.id = id;
    }

    public String getTitle() {
        return title;
    }

    public void setTitle(String title) {
        this.title = title;
    }

    public List<String> getChapterList() {
        return chapterList;
    }

    public void setChapterList(List<String> chapterList) {
        this.chapterList = chapterList;
    }

    public Map<Integer, String> getVideoMap() {
        return videoMap;
    }

    public void setVideoMap(Map<Integer, String> videoMap) {
        this.videoMap = videoMap;
    }
}
- APP类
public class APP {
    public static void main(String[] args) {
        // 1、配置Beans的xml文件路径
        ApplicationContext applicationContext = new ClassPathXmlApplicationContext("applicationContext.xml");
        testScope(applicationContext);
    }

    public static void testScope(ApplicationContext applicationContext) {
        // 2、获取Bean
        Video video1 = (Video) applicationContext.getBean("video");

        // 3、验证set注入
        System.out.println(video1.getChapterList());
        System.out.println(video1.getVideoMap());

    }
}
- 运行结果
4.3、Bean之间的依赖和继承
(1)继承
- 含义:两个类之间⼤多数的属性都相同,避免重复配置,通过bean标签的parent属性重⽤已 有的Bean元素的配置信息**,继承指的是配置信息的复⽤**,和Java类的继承没有关系
①配置文件
<bean name="video" class="com.dx.ds.domain.Video" scope="singleton">
    <property name="id" value="9"/>
    <property name="title" value="Spring 5.X课程" />
bean>
<bean name="video2" class="com.dx.ds.domain.Video2" scope="singleton" parent="video">
    <property name="name" value="课程" >property>
bean>
②Video类文件
public class Video {
    private int id;
    private String title;

    public int getId() {
        return id;
    }

    public void setId(int id) {
        this.id = id;
    }

    public String getTitle() {
        return title;
    }

    public void setTitle(String title) {
        this.title = title;
    }
}
③Video2类文件
public class Video2 {
    private int id;
    private String name;
    private String title;

    public int getId() {
        return id;
    }

    public void setId(int id) {
        this.id = id;
    }

    public String getName() {
        return name;
    }

    public void setName(String name) {
        this.name = name;
    }

    public String getTitle() {
        return title;
    }

    public void setTitle(String title) {
        this.title = title;
    }
}
④APP类
public class APP {
    public static void main(String[] args) {
        // 1、配置Beans的xml文件路径
        ApplicationContext applicationContext = new ClassPathXmlApplicationContext("applicationContext.xml");
        testScope(applicationContext);
    }

    public static void testScope(ApplicationContext applicationContext) {
        // 2、获取Bean

        Video2 video2 = (Video2) applicationContext.getBean("video2");

        // 3、继承
        System.out.println(video2.getName());
        System.out.println(video2.getTitle());
    }
}
- 验证结果
(2)依赖
- 含义:如果类A是作为类B的属性, 想要类A⽐类B先实例化,设置两个Bean的依赖关系。
①配置文件
<bean name="video" class="com.dx.ds.domain.Video" scope="singleton">
    <property name="id" value="9"/>
    <property name="title" value="Spring 5.X课程" />
bean>
<bean name="video2" class="com.dx.ds.domain.Video2" scope="singleton" depends-on="video">
    <property name="name" value="课程" >property>
    <property name="title" value="SpringBoot" />
bean>
②Video、Video2、APP的类同上
- 验证结果
4.4、Bean生命周期
![]()
(1)Spring启动,查找并加载需要被Spring管理的bean,进行Bean的实例化
(2)Bean实例化后对将Bean的引入和值注入到Bean的属性中
(3)如果Bean实现了BeanNameAware接口的话,Spring将Bean的Id传递给setBeanName()方法
(4)如果Bean实现了BeanFactoryAware接口的话,Spring将调用setBeanFactory()方法,将BeanFactory容器实例传入
(5)如果Bean实现了ApplicationContextAware接口的话,Spring将调用Bean的setApplicationContext()方法,将bean所在应用上下文引用传入进来。
(6)如果Bean实现了BeanPostProcessor接口,Spring就将调用他们的postProcessBeforeInitialization()方法。
(7)如果Bean 实现了InitializingBean接口,Spring将调用他们的afterPropertiesSet()方法。类似的,如果bean使用init-method声明了初始化方法,该方法也会被调用
(8)如果Bean 实现了BeanPostProcessor接口,Spring就将调用他们的postProcessAfterInitialization()方法。
(9)此时,Bean已经准备就绪,可以被应用程序使用了。他们将一直驻留在应用上下文中,直到应用上下文被销毁。
(10)如果bean实现了DisposableBean接口,Spring将调用它的destory()接口方法,同样,如果bean使用了destory-method 声明销毁方法,该方法也会被调用。
4.5、Bean后置处理器
- 后置处理器BeanPostProcessor
- 是Spring IOC容器给我们提供的一个扩展接口。
- 在调用初始化方法前后对Bean进行额外加工,ApplicationContext会自动扫描实现了BeanPostProcessor的bean,并注册这些bean为后置处理器。
- 是Bean的统一前置后置处理而不是基于某一个bean
- 执行顺序
①Spring IOC容器化实例Bean;
②调⽤BeanPostProcessor的postProcessBeforeInitialization⽅法 ;
③调⽤bean实例的初始化⽅法 ;
④调⽤BeanPostProcessor的postProcessAfterInitialization⽅法。
- 注意事项:接口重写的两个方法不能返回null,如果返回null那么在后续初始化方法将报空指针异常或者通过getBean()方法获取不到bean实例对象。
- 注意事项:在Spring机制中可以指定后置处理器调用顺序,通过BeanPostProcessor接口实现类实现Ordered接口getOrder方法,该方法返回证书,默认值为0优先级最高,值越大优先级越低。
4.6、bean⾃动装配
- 属性注入方式:
- 手工注入:set方法、带参构造函数
- 自动注入:@autowire注解注入
(1)自动装配概述
①注解方式:本质就是对类中的变量进行自动赋值操作
②使用方式:基于@Autowired的自动装配,默认是根据类型注入,可以用于构造器、字段、方法注入。
③Spring的自动装配需要从两个角度来实现,或者说是两个操作:
- 第一步:组件扫描(component scanning):spring会自动发现应用上下文中所创建的bean;
- 第二步:自动装配(autowiring):spring自动满足bean之间的依赖,也就是我们说的IoC/DI;
④autowire设置值
- no:没有开启;
- byName:根据bean的id名称,注入到对应的属性里面;
- byType:根据bean需要注入的类型,注入到对应的属性里面;
- constructor:通过构造函数注入,需要这个类型的构造函数。
(2)在XML文件中配置ByName
-
注解逻辑:
-
①将查找其类中所有的set方法名,例如setCat,获得将set去掉并且首字母小写的字符串,即cat。
-
②去spring容器中寻找是否有此字符串名称id的对象。
-
③如果有,就取出注入;如果没有,就报空指针异常。
-
<bean id="user" class="com.kuang.pojo.User" autowire="byName">
   <property name="str" value="qinjiang"/>
bean>
(3)实战案例
①将User类中的set方法去掉,使用@Autowired注解
②配置文件内容
5、面向切面编程AOP
5.1、AOP概述
(1)POP概述
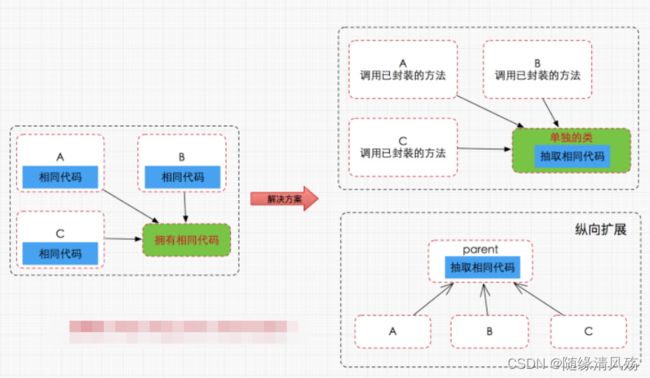
- 主要解决:编程的纵向设计思想,包括重写&重载等设计
(2)AOP概述
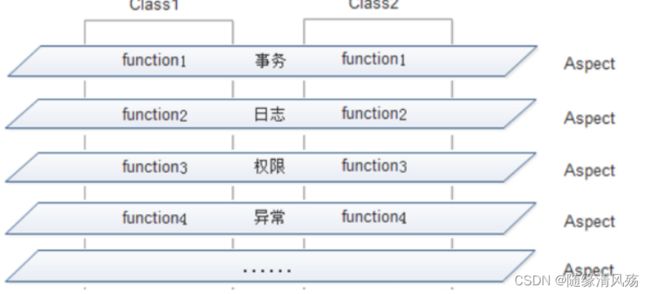
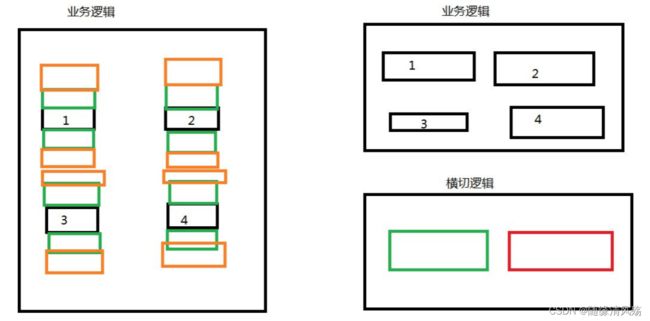
- 主要解决:编程的横向设计思想,主要解决外围业务代码与核心业务代码横向分离,统一处理横切业的问题。
在不改变原有逻辑上增加额外的功能,比如解决系统层面的问题,或者添加新功能。AOP采取横向抽取机制,将分散在各个方法中的重复代码提取出来,然后在程序编译或运行时,再将这些提取出来的代码应用到需要执行的地方。
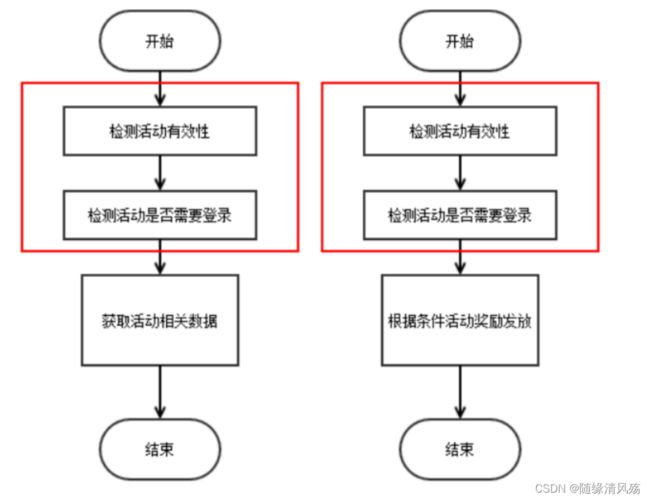
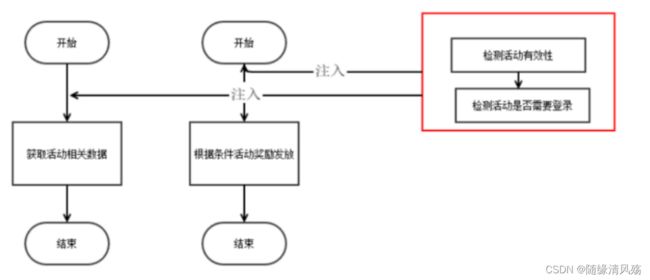
- 横向抽取前
- 横向抽取后:红框就是面向切面编程
(3)应用场景
- 权限控制
- 缓存
- 日志处理
- 事务控制
(4)AOP思想关注点
- 核心关注点-业务逻辑:关注业务的主要功能;
- 横切关注点-横切逻辑:非核心、额外增加的功能;
(5)好处
- 减少代码侵入,解耦
- 可以统一处理横切逻辑
- 方便添加和删除横切逻辑
5.2、AOP核心概念
(1)横切关注点
对哪些⽅法进⾏拦截,拦截后怎么处理,这些就叫横切关注点 ⽐如 权限认证、⽇志、事物
(2)通知 Advice
在特定的切⼊点上执⾏的增强处理,有5种通知,后⾯讲解 做啥? ⽐如你需要记录⽇志,控制事务 ,提前编写好通⽤的模块,需要的地⽅直接调⽤ 。
- @Before前置通知:在执行目标方法之前进行通知
- @After后置通知:在目标方法运行结束之后
- @AfterReturing返回通知:在目标方法正常返回值之后运行
- @AfterThrowing异常通知:在目标方法出现异常后运行
- @Around环绕通知:在目标方法完成前、后做增强处理。环绕通知是最重要的通知类型,像事务、日志都是环绕通知。
(3)连接点 JointPoint
要⽤通知的地⽅,业务流程在运⾏过程中需要插⼊切⾯的具体位置, ⼀般是⽅法的调⽤前后,全部⽅法都可以是连接点 只是概念,没啥特殊
(4)切⼊点 Pointcut
不能全部⽅法都是连接点,通过特定的规则来筛选连接点, 就是Pointcut,选中那⼏个你想要 的⽅法 在程序中主要体现为书写切⼊点表达式(通过通配、正则表达式)过滤出特定的⼀组 JointPoint连接点 过滤出相应的 Advice 将要发⽣的joinpoint地⽅
(5)切⾯ Aspect
通常是⼀个类,⾥⾯定义 切⼊点+通知 , 定义在什么地⽅; 什么时间点、做什么事情 通知 advice指明了时间和做的事情(前置、后置等)
(6)切⼊点 pointcut
指定在什么地⽅⼲这个事情 web接⼝设计中,web层->⽹关层->服务层->数据层,每⼀层之间也是⼀个切⾯,对象和对 象,⽅法和⽅法之间都是⼀个个切⾯
(7)⽬标 target
⽬标类,真正的业务逻辑,可以在⽬标类不知情的条件下,增加新的功能到⽬标类的链路上
(8)织⼊ Weaving
把切⾯(某个类)应⽤到⽬标函数的过程称为织⼊
(9)AOP代理
AOP框架创建的对象,代理就是⽬标对象的加强 Spring中的AOP代理可以使JDK动态代理,也可以是CGLIB代理
5.3、AOP代理
- 代理:为某一个对象创建一个代理对象,程序不直接用原来的对象,而是由创建的代理对象来控制对原对象。
- 好处:通过代理类这中间一层,能有效控制对委托对象的直接访问,也可以很好的隐藏和保护委托对象,同时也为实施不同控制策略预留了空间。
5.3.1、静态代理
(1)静态代理
由程序创建或特定工具自动生成源代码,在程序运行前代理类的.class文件就已经存在
(2)实现方式
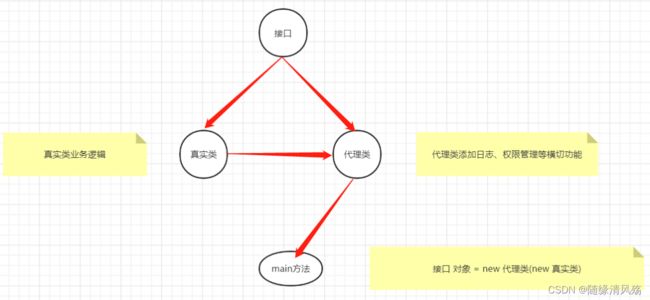
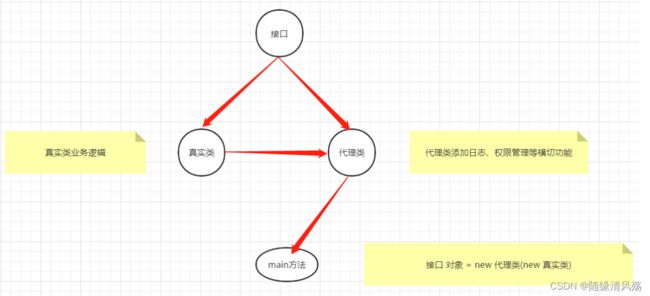
将目标类与代理类实现同一个接口,让代理类持有真实类对象,然后在代理类方法中调用真实类方法,在调用真实类方法的前后添加我们所需要的功能扩展代码来达到增强的目的。
(3)实战案例
- 接口
public interface PayService {
    String callback(String outTradeNo);
    int save(int userId,int productId);
}
- 目标类
public class PayServiceimpl implements PayService{
    public String callback(String outTradeNo) {
        System.out.println("回调方法callback");
        return outTradeNo;

    }
    public int save(int userId, int productId) {
        System.out.println("下单方法Save");
        return productId;
    }
}
- 代理类
public class StaticPayServiceimpl implements PayService {
    // 1、构建PayService类对象
    private PayService payService;
    // 2、构造函数注入
    public StaticPayServiceimpl(PayService payService) {
        this.payService = payService;
    }

    @Override
    public String callback(String outTradeNo) {
        // 3、注入日志功能
        System.out.println("调用payService对象的callback方法前");
        String result = payService.callback(outTradeNo);
        System.out.println("调用payService对象的callback方法后");
        return result;
    }

    @Override
    public int save(int userId, int productId) {
        System.out.println("调用payService对象的save方法前");
        int userid = payService.save(userId,productId);
        System.out.println("调用payService对象的save方法后");
        return userid;
    }
}
- main类
public class ProxyTest {
    public static void main(String[] args) {
        // 将目标类与代理类实现同一个接口,让代理类持有真实类对象
        PayService payService = new StaticPayServiceimpl(new PayServiceimpl());

        payService.save(199,203);
    }
}
- 验证结果
(4)优缺点
- 优点
- 代理使客户端不需要知道实现类是什么,怎么做的,⽽客户端只需知道代理即可
- ⽅便增加功能,拓展业务逻辑
- 缺点
- 代理类中出现⼤量冗余的代码,⾮常不利于扩展和维护
- 如果接⼝增加⼀个⽅法,除了所有实现类需要实现这个⽅法外,所有代理类也需要实现此⽅法,增加了代码维护的复杂度
5.3.2、动态代理
- 动态代理:在程序运行时,运用反射机制动态创建而成,无需手动编写代码
(1)JDK动态代理
- 实现方式:JDK动态代理与静态代理⼀样,⽬标类需要实现⼀个代理接⼝,再通过代理对象调⽤⽬标⽅法‘
①核心对象 - Proxy代理类
- 主要作用:创建对象,创建目标类的代理
// 创建目标类的代理
/**
* 1、类加载器
* 2、目标类实现接口
* 3、方法拦截时执行的InvocationHandler的方法
*/
public static Object newProxyInstance(ClassLoader loader,
                                      Class<?>[] interfaces,
                                      InvocationHandler h)
②核心对象 - InvocationHandler代理类
- 主要作用:执行方法,回调目标类的方法
// 重写invoke方法
/**
* (1)Object proxy:被代理的对象
* (2)Method method:要被调用的方法
* (3)Obeject[] args:方法被调用时所需参数
**/
public interface InvocationHandler{
    public Object invoke(Object proxy,Method method,Object[] args) thows Thowable;
}
- 动态代理步骤
- Ⅰ、创建一个实现接口InvocationHandler的类,必须实现invoke方法;
- Ⅱ、创建被代理的类以及接口
- Ⅲ、通过Proxy的静态方法newProxyInstance(ClassLoaderloader, Class[] interfaces, InvocationHandler h)创建一个代理
- Ⅳ、通过代理调用方法
(2)代码实战
- ①创建实现接口InvocationHandler类
// 1、创建一个实现接口InvocationHandler的类,必须实现invoke方法
public class JdkProxy implements InvocationHandler {
    // 2、创建被代理类的对象
    private Object targetObject;

    // 3、代理类与目标类绑定关系,使代理类能调用目标类的方法
    public Object newProxyInstance(Object targetObject){
        this.targetObject = targetObject;

        return Proxy.newProxyInstance(targetObject.getClass().getClassLoader(),targetObject.getClass().getInterfaces(),this);
    }


    @Override

    public Object invoke(Object proxy, Method method, Object[] args) throws Throwable {
        // 特殊说明必须实现invoke方法
        Object result = null;

        try{
            // AOP逻辑
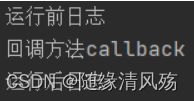
            System.out.println("运行前日志");
            method.invoke(targetObject,args);
            // AOP逻辑
            System.out.println("运行后日志");
        }catch (Exception e){
            e.printStackTrace();
        }
        return result;
    }
}
- ②main类
public class ProxyTest {
    public static void main(String[] args) {
        // 1、创建代理类对象
        JdkProxy jdkProxy = new JdkProxy();
        // 2、获取代理类对象,传入目标类
        PayService payService = (PayService)jdkProxy.newProxyInstance(new PayServiceimpl());

        // 3、调用目标方法
        payService.callback("唯品会");
    }
}
- 运行结果
- 验证结果
(2)CGLIB动态代理
- 实现方式:CgLib动态代理的原理是对指定的业务类⽣成⼀个⼦类,并覆盖其中的业务⽅法来实现代理
- 代码实战
①业务主类
public class HelloService {

    public HelloService() {
        System.out.println("HelloService构造");
    }

    /**
     * 该方法不能被子类覆盖,Cglib是无法代理final修饰的方法的
     */
    final public String sayOthers(String name) {
        System.out.println("HelloService:sayOthers>>"+name);
        return null;
    }

    public void sayHello() {
        System.out.println("HelloService:sayHello");
    }
}
②重写方法拦截在方法前和方法后加入业务逻辑
/**
 * 自定义MethodInterceptor
 */
public class MyMethodInterceptor implements MethodInterceptor {

    /**
     * sub:cglib生成的代理对象
     * method:被代理对象方法
     * objects:方法入参
     * methodProxy: 代理方法
     */
    @Override
    public Object intercept(Object sub, Method method, Object[] objects, MethodProxy methodProxy) throws Throwable {
        System.out.println("======插入前置通知======");
        Object object = methodProxy.invokeSuper(sub, objects);
        System.out.println("======插入后者通知======");
        return object;
    }
}
③main主类
public class ProxyTest {
    public static void main(String[] args) {
        // 代理类class文件存入本地磁盘方便我们反编译查看源码
        System.setProperty(DebuggingClassWriter.DEBUG_LOCATION_PROPERTY, "D:\\code");
        // 通过CGLIB动态代理获取代理对象的过程
        Enhancer enhancer = new Enhancer();
        // 设置enhancer对象的父类
        enhancer.setSuperclass(HelloService.class);
        // 设置enhancer的回调对象
        enhancer.setCallback(new MyMethodInterceptor());
        // 创建代理对象
        HelloService proxy= (HelloService)enhancer.create();
        // 通过代理对象调用目标方法
        proxy.sayHello();

    }
}
- 验证结果
5.3.3、AOP代理默认策略
(1)如果⽬标对象实现了接口,则默认采⽤JDK动态代理
(2)如果⽬标对象没有实现接口,则采⽤CgLib进⾏动态代理
(3)如果⽬标对象实现了接口,程序⾥⾯依旧可以指定使⽤CGlib动态代理
5.3.4、AOP代理实战案例
- 业务场景
在开发过程中,我们经常会需要对方法进行一些简单的监控,例如监控某个方法的执行时间,必要的时候打印入参和返回值,对抛出的异常进行记录。这样的一些监控点虽然很小,但是这些重复的代码散落在各处而且侵入到业务逻辑当中让业务代码显得非常杂乱。
-
三个核心包:
- spring-aop:AOP核心功能,例如代理工厂;
- aspectjweaver:简单理解,支持切入点表达式
- aspectjrt:简单理解,支持aop相关注解
-
项目实战
①定义接口
public interface Video {
    int save(Video video);
    Video findIdBy(int id);
}
②定义目标类
public class VideoServiceImpl implements Video{
    @Override
    public int save(Video video) {
        System.out.println("保存Video");
        return 1;
    }

    @Override
    public Video findIdBy(int id) {
        System.out.println("根据ID找视频");
        return (Video) new Video2();
    }
}

// Video类
public class Video2 {
    @Value("111")
    private int id;
    @Value("哔哩哔哩")
    private String name;
    private String title;

    public int getId() {
        return id;
    }

    public void setId(int id) {
        this.id = id;
    }

    public String getName() {
        return name;
    }

    public void setName(String name) {
        this.name = name;
    }

    public String getTitle() {
        return title;
    }

    public void setTitle(String title) {
        this.title = title;
    }
}
③横切关注点
// 横切关注点
public class TimeHander {
    public void printBefore(){
        System.out.println("pring log_time_start:"+ LocalTime.now().toString());


        System.out.println("pring log_time_end:"+ LocalTime.now().toString());
    }
}
④AOP织入文件配置
<beans xmlns="http://www.springframework.org/schema/beans"
       xmlns:xsi="http://www.w3.org/2001/XMLSchema-instance"
       xmlns:context="http://www.springframework.org/schema/context"
       xsi:schemaLocation="http://www.springframework.org/schema/beans
                           https://www.springframework.org/schema/beans/spring-beans.xsd http://www.springframework.org/schema/context https://www.springframework.org/schema/context/spring-context.xsd     http://www.springframework.org/schema/aop
http://www.springframework.org/schema/aop/spring-aop-4.2.xsd"
       xmlns:aop="http://www.springframework.org/schema/aop">
    <bean name="video" class="com.dx.ds.domain.Video" scope="singleton" autowire="byName">
        <property name="id" value="9"/>
        <property name="title" value="Spring 5.X课程" />
    bean>
    <bean name="video2" class="com.dx.ds.domain.Video2" scope="singleton" autowire="byName">
        <property name="name" value="课程" >property>
        <property name="title" value="SpringBoot" />
    bean>
    <bean id="TimeHander" class="com.dx.ds.proxy.TimeHander"/>
    <bean id="videoService" class="com.dx.ds.proxy.VideoServiceImpl"/>

    <aop:config>

        <aop:aspect id="timeAspect" ref="TimeHander">


            <aop:pointcut id="allMethodLogPointCut" expression="execution(* com.dx.ds.proxy.VideoService.*(..))"/>

            <aop:before method="printBefore" pointcut-ref="allMethodLogPointCut"/>
            <aop:after method="printAfter" pointcut-ref="allMethodLogPointCut"/>
        aop:aspect>
    aop:config>


beans>
⑤main类测试
public class APP {
    public static void main(String[] args) {
        ApplicationContext applicationContext = new ClassPathXmlApplicationContext("applicationContext.xml");
        testAOP(applicationContext);
    }

    public static void testAOP(ApplicationContext context){
        VideoService videoService = (VideoService) context.getBean("videoService");
        videoService.save(new Video());
    }
}
- 运行结果
5.4、AOP注解配置
- 注意事项:注解配置要实现的功能和XML实现的功能都是一样的,只是配置的形式不同。
5.4.1、常用Bean注解
| 注解作用 | 注解名称 | 注解含义 |
|---|---|---|
| bean定义 | @Controller | 用于web层 |
| @Service | 用于service层 | |
| @Repository | 用于dao层 | |
| bean取名 | @Component(“name”) | 用于Bean命名 |
| bean注入 | @Autowired | 自动装配 |
| bean生命周期 | @PostConstruct | Bean初始化 |
| @PreDestroy | Bean销毁 | |
| bean作用范围 | @scope | Bean作用域 |
5.4.2、注解配置入门
(1)@Component注解类
①main类
public class App {
    public static void main(String[] args) {

        AnnotationConfigApplicationContext context = new AnnotationConfigApplicationContext();
        // 1、扫描指定包及子包,将其
        context.scan("net.xdclass");

        // 2、通知Spring进行上下文,完成初始化,即刷新生成Bean
        context.refresh();

        // 4、获取Bean
        VideoService videoService = (VideoService) context.getBean("videoService");

        // 5、调用Bean的findid方法
        videoService.findById(2);
    }
}
②VideoService接口
public interface VideoService {

    int save(Video video);

    Video findById(int id);
}
③VideomServiceImpl实现类
@Component("videoService")
// 3、Spring扫描包时,遇到Compenent时就会把类实力化为Bean.
public class VideoServiceImpl implements VideoService {

    public int save(Video video) {

        System.out.println("保存video");

        return 1;
    }

    public Video findById(int id) {

        System.out.println("根据id找视频");

        return new Video();
    }
}
- 验证结果
- 注意事项:Component注解不指定Bean名称则默认为类名小写。
(2)@Configuration和@Bean注解定义第三方Bean
- 应用场景:部分类没有加注解但是要交给Spring管理
- @Configuration注解:标注在类上,相当于把该类作为Spring的xml配置文件中的。
- @Bean注解:用于告诉方法产生一个Bean对象,然后把这个Bean对象交给Spring管理,Spring将会将这个Bean对象放在自己的IOC容器中。
①AppConfig类
@Configuration
public class AppConfig {
    @Bean
    public VideoOrder videoOrder(){
        return new VideoOrder();
    }
}
②APP类
public class App {
    public static void main(String[] args) {

        AnnotationConfigApplicationContext context = new AnnotationConfigApplicationContext();
        // 1、扫描指定包及子包,将其
        context.scan("net.xdclass");

        // 2、通知Spring进行上下文,完成初始化,即刷新生成Bean
        context.refresh();

        // 4、获取Bean
        VideoOrder videoOrder = (VideoOrder) context.getBean("videoOrder");
    }
}
③Video类
public class Video {

    private int id;

    @Autowired
    private String title;


    public void init(){
        System.out.println("video类 init 方法被调用");
    }


    public void destroy(){
        System.out.println("video类 destroy 方法被调用");
    }


    public Video(){

        //System.out.println("video 空构造函数被调用");

    }

    public Video(String title){
        //System.out.println("video 带参数构造函数被调用");
        this.title = title;
    }


    public int getId() {
        return id;
    }

    public void setId(int id) {
        //System.out.println("Video setId方法被调用");
        this.id = id;
    }

    public String getTitle() {
        return title;
    }


    public void setTitle(String title) {

        //System.out.println("Video setTitle方法被调用");
        this.title = title;
    }
}
- 运行结果
(3)PropertySource和@Value加载配置文件信息
- 业务场景:配置文件映射到实体类
- @PropertySource:指定加载配置文件
- @Value:映射到具体的java属性
①创建config.properties配置文件
server.host=192.168.6.102
server.port=1000
②创建配置文件对应的Config.class类,将配置信息文件注入
@Configuration
@PropertySource(value = {"classpath:config.properties"})
public class Config {
    @Value("${server.host}")
    private String host;
    @Value("${server.port}")
    private int port;

    public String getHost() {
        return host;
    }

    public void setHost(String host) {
        this.host = host;
    }

    public int getPort() {
        return port;
    }

    public void setPort(int port) {
        this.port = port;
    }
}
③生成Bean并自动装配
@Component("videoService")
// 3、Spring扫描包时,遇到Compenent时就会把类实力化为Bean.
public class VideoServiceImpl implements VideoService {

    @Autowired
    private Config config;

    public int save(Video video) {

        System.out.println("保存video");

        return 1;
    }

    public Video findById(int id) {

        System.out.println("根据id找视频");
        System.out.println("打印配置文件信息"+config.getHost()+":"+config.getPort());
        return new Video();
    }
}
④APP类获取Bean
public class App {


    public static void main(String[] args) {

        AnnotationConfigApplicationContext context = new AnnotationConfigApplicationContext();
        // 1、扫描指定包及子包,将其
        context.scan("net.xdclass");

        // 2、通知Spring进行上下文,完成初始化,即刷新生成Bean
        context.refresh();

        // 4、获取Bean
        VideoService videoService = (VideoService) context.getBean("videoService");
        // 5、调用方法
        videoService.findById(1);
    }
}
- 验证结果
5.4.3、AOP注解实战案例
(1)AOP注解入门概述
- AOP专用注解
| 注解名称 | 注解详述 | 备注 |
|---|---|---|
| @Aspect | 告诉Spring这是一个切面类,里面可以定义切入点和通知 | |
| @Pointcut | 切入点,配置切入点相关路径 | |
| @Before | 前置通知 | |
| @After | 后置通知 |
①创建切面类
@Component
//告诉spring,这个一个切面类,里面可以定义切入点和通知
@Aspect
public class LogAdvice {


    //切入点表达式,也可以直接在通知上编写切入点表达式
    @Pointcut("execution(* net.xdclass.sp.service.VideoServiceImpl.*(..))")
    public void aspect(){

    }

    //前置通知
    //@Before("aspect()")

    @Before("execution(* net.xdclass.sp.service.VideoServiceImpl.*(..))")
    public void beforeLog(JoinPoint joinPoint){
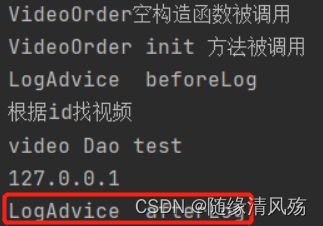
        System.out.println("LogAdvice  beforeLog");
    }


    //后置通知
    @After("aspect()")
    public void afterLog(JoinPoint joinPoint){
        System.out.println("LogAdvice  afterLog");
    }

}
②开启AOP注解配置和扫描
| 注解名称 | 注解详述 | 备注 |
|---|---|---|
| @EnableAspectJAutoProxy | 开启spring对Aspect的支持 | |
| @Pointcut | 切入点,配置切入点相关路径 |
- 创建开启AOP注解配置和扫描类
@Configuration
@ComponentScan("net.xdclass")
@EnableAspectJAutoProxy  //开启了spring对aspect的支持
public class AnnotationAppConfig {
}
③APP类
public class App {

    public static void main(String[] args) {

        AnnotationConfigApplicationContext context = new AnnotationConfigApplicationContext(AnnotationAppConfig.class);

        VideoService videoService = (VideoService) context.getBean("videoService");

        videoService.findById(2);

    }
}
- 验证结果
