《SpringBoot》第05章 配置文件解析
前言
SpringBoot中的application.properties(或application.yaml)文件都是再熟悉不过的了。它是应用的配置文件,我们可以把需要的一些配置信息都写在这个文件里面,需要的时候,我们可以通过@Value注解来直接获取即可,那这个文件是什么时候以及如何被应该加载的呢?那么这里就分析一下
其实作者是在使用Nacos配置中心的时候,感到很困惑,所里这里先研究一下单纯SpringBoot的配置文件,然后再看Nacos
一、原理概述
整个配置文件的加载过程其实就是一个事件监听的机制来实现的,整个过程的主要流程如下:
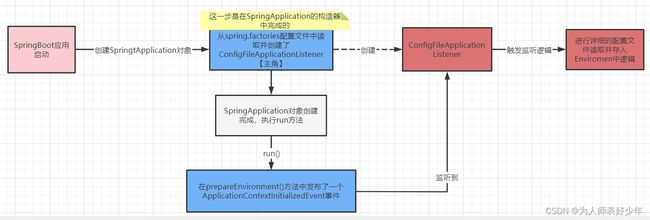
- 触发监听器,来启动配置文件的加载。SpringBoot只是采用的监听器的方式,如果直接代码调用也可以。
- 在
ConfigFileApplicationListener监听器中,遍历解析各个配置文件,将解析到的配置存入Environment中。
二、源码分析
1.触发监听器
在SpringBoot启动的时候,会读取META-INF/spring.factories配置文件中的监听器,其中的ConfigFileApplicationListener监听器,这个就是和读取配置文件相关的一个监听器:

这个监听器负责监听两个事件了:ApplicationEnvironmentPreparedEvent 和 ApplicationPreparedEvent:
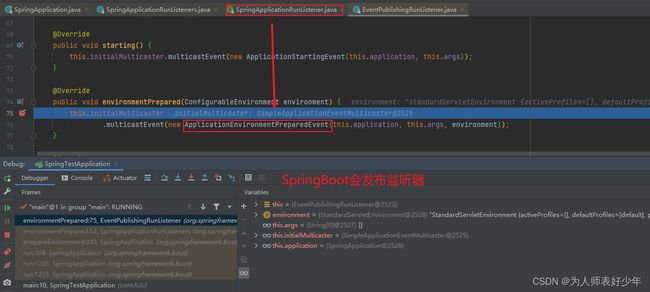
既然监听器有了,那么何时触发监听器呢?在SpringBoot的启动类SpringApplication中:
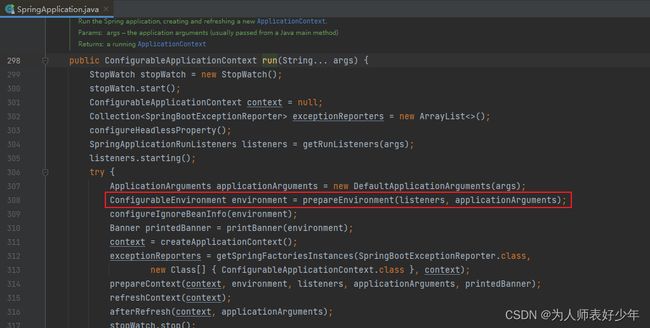
发布事件以后,事件发布器就会遍历全部的监听器,找到匹配的监听器,自然而然就找到了ConfigFileApplicationListener,这些都是监听器的基础知识。
2.监听器执行
读取配置文件的代码主要在ConfigFileApplicationListener的内部类Loader中,这里只解释部分重要代码:
1) 哪些路径下的配置文件会被加载?
在使用过程中,一般通过IEDA创建SpringBoot以后,配置文件会默认在resources下面,那么只能放在这下面吗?肯定不是的
- 首先我们可以通过配置
spring.config.additional-location属性值来指定我们需要去加载的路径,而且这个配置的路径是优先去加载的 - 同样可以通过配置
spring.config.location这个属性值来指定需要加载的路径,只不过这个配置的优先级是低于spring.config.additional-location的优先级的 - 如果我们没有配置
spring.config.location,Spring则会加入默认的4个加载路径:classpath:/,classpath:/config/,file:./,file:./config/,这也是为什么我们开发的时候将配置文件写在类路径下就可以被加载到的原因

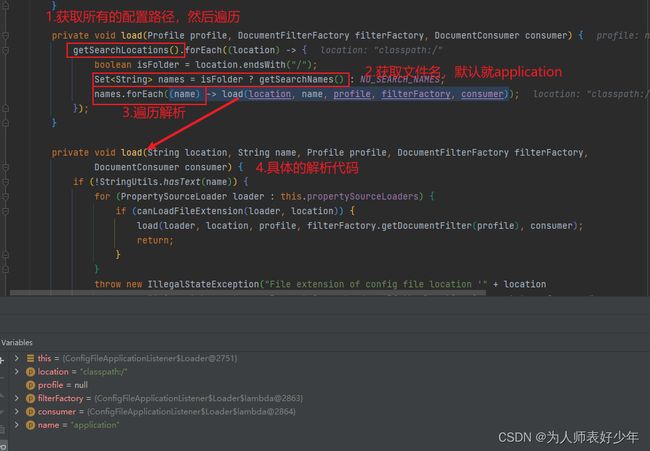
然后思考一下,既然路径有多个,接下来就是遍历解析每个路径:
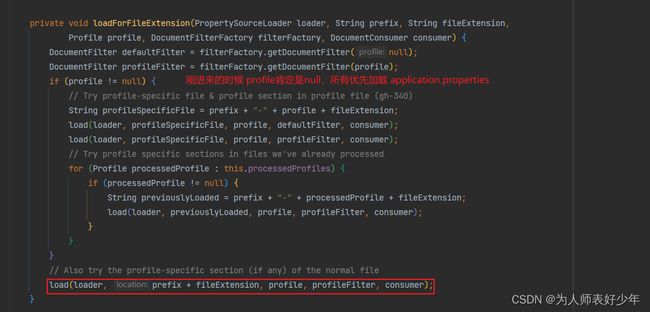
2) 配置文件的名称只能 application 开头吗?
默认的配置文件为application.properties或applicaiton.yml,后缀有两个,那么前缀其前缀application可以通过spring.config.name来修改,但一般就是默认的
// ConfigFileApplicationListener -> Loader.java

public static final String CONFIG_NAME_PROPERTY = "spring.config.name";

private static final String DEFAULT_NAMES = "application";

private Set<String> getSearchNames() {
   // 1.获取配置 spring.config.name
   if (this.environment.containsProperty(CONFIG_NAME_PROPERTY)) {
      String property = this.environment.getProperty(CONFIG_NAME_PROPERTY);
      return asResolvedSet(property, null);
   }
   // 2.没有配置就使用默认的 application
   return asResolvedSet(ConfigFileApplicationListener.this.names, DEFAULT_NAMES);
}
3) 配置文件可以支持哪些后缀?
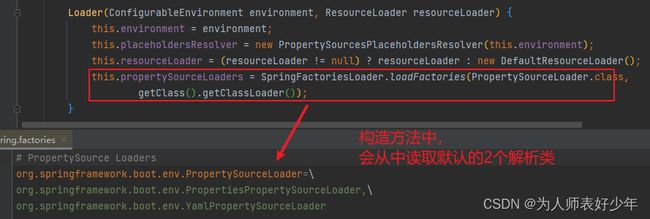
SpringBoot通过不同的加载器来进行不同的后缀进行加载的。在底层构建加载的Loader类的时候,SpringBoot就从spring.factories的配置文件中读取到了两种属性资源加载器并进行了实例化(如下图),即:PropertiesPropertySourceLoader、YamlPropertySourceLoader
在这里配置了允许加载的配置文件后缀类型:
4) 遍历解析配置文件
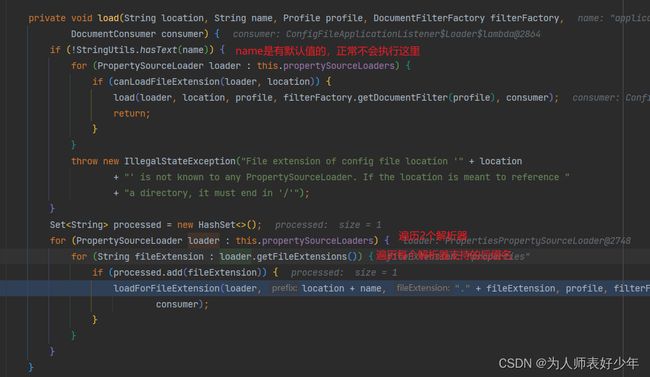
上面介绍了:允许配置的路径共计4个,文件名称默认为application,支持的后缀由解析器返回。余下的解析方式就是很简单的遍历。
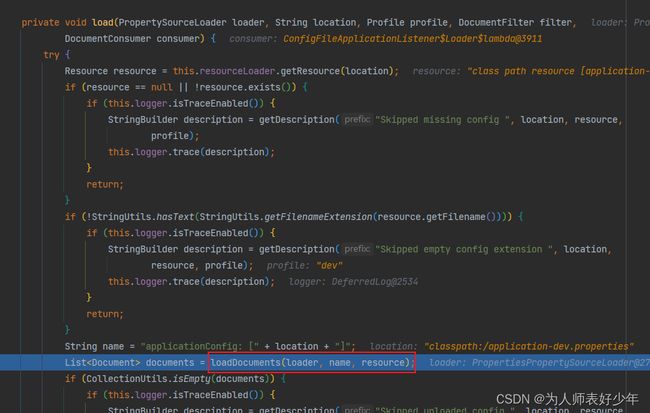
接下来看一下具体如何解析:
具体的解析代码:
private void load(PropertySourceLoader loader, String location, Profile profile, DocumentFilter filter,
      DocumentConsumer consumer) {
   try {
      Resource resource = this.resourceLoader.getResource(location);
      // 1.判断配置文件资源是否存在
      if (resource == null || !resource.exists()) {
         if (this.logger.isTraceEnabled()) {
            StringBuilder description = getDescription("Skipped missing config ", location, resource,
                  profile);
            this.logger.trace(description);
         }
         return;
      }
      // 2.判断文件后缀名不存在
      if (!StringUtils.hasText(StringUtils.getFilenameExtension(resource.getFilename()))) {
         if (this.logger.isTraceEnabled()) {
            StringBuilder description = getDescription("Skipped empty config extension ", location,
                  resource, profile);
            this.logger.trace(description);
         }
         return;
      }
      // 3.将资源配置文件路径拼接成为PropertySourceLoader加载程序name需要的格式
      String name = "applicationConfig: [" + location + "]";
      // 4.调用解析器
      // 返回的结果包含:解析完毕的PropertySource对象、配置profiles、激活配置activeProfiles
      List<Document> documents = loadDocuments(loader, name, resource);

      // 5.判定返回资源配置文件是否为空
      if (CollectionUtils.isEmpty(documents)) {
         if (this.logger.isTraceEnabled()) {
            StringBuilder description = getDescription("Skipped unloaded config ", location, resource,
                  profile);
            this.logger.trace(description);
         }
         return;
      }
      List<Document> loaded = new ArrayList<>();
      // 6.加载配置
      for (Document document : documents) {
         if (filter.match(document)) {
            addActiveProfiles(document.getActiveProfiles());
            addIncludedProfiles(document.getIncludeProfiles());
            loaded.add(document);
         }
      }
      Collections.reverse(loaded);
      // 7.调用消费者回调函数,将加载到的文档存放入loaded属性
      if (!loaded.isEmpty()) {
         loaded.forEach((document) -> consumer.accept(profile, document));
         if (this.logger.isDebugEnabled()) {
            StringBuilder description = getDescription("Loaded config file ", location, resource, profile);
            this.logger.debug(description);
         }
      }
   }
   catch (Exception ex) {
      throw new IllegalStateException("Failed to load property source from location '" + location + "'", ex);
   }
}
5) 哪里负责解析配置文件?
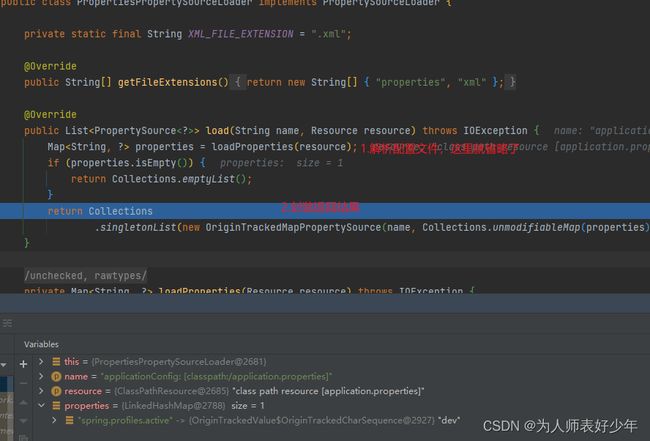
【第2步:解析步骤】
// 解析配置文件
private List<Document> loadDocuments(PropertySourceLoader loader, String name, Resource resource)
      throws IOException {
   // 1.创建用于保存多次加载同一文档的缓存键,  避免重复加载
   DocumentsCacheKey cacheKey = new DocumentsCacheKey(loader, resource);
   // 2.缓存获取
   List<Document> documents = this.loadDocumentsCache.get(cacheKey);
   if (documents == null) {
      // 3.解析配置
      List<PropertySource<?>> loaded = loader.load(name, resource);
      // 4.封装结果
      documents = asDocuments(loaded);
      // 5.存入缓存
      this.loadDocumentsCache.put(cacheKey, documents);
   }
   return documents;
}
【第3步:解析配置文件】
【第4步:封装返回结果】
// 封装返回结果
private List<Document> asDocuments(List<PropertySource<?>> loaded) {
   if (loaded == null) {
      return Collections.emptyList();
   }
   return loaded.stream().map((propertySource) -> {
      Binder binder = new Binder(ConfigurationPropertySources.from(propertySource),
            this.placeholdersResolver);
      return new Document(propertySource, binder.bind("spring.profiles", STRING_ARRAY).orElse(null),
            getProfiles(binder, ACTIVE_PROFILES_PROPERTY), getProfiles(binder, INCLUDE_PROFILES_PROPERTY));
   }).collect(Collectors.toList());
}
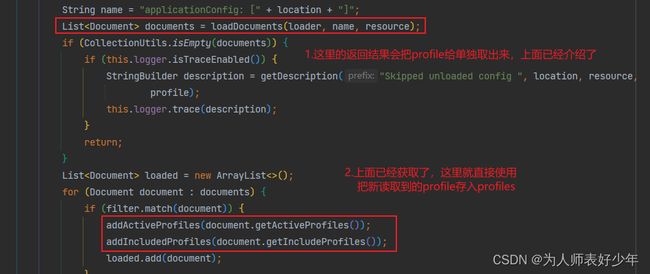
解析后的结果,包含配置、spring.profile.active、sprng.profile.include
6) 如何实现不同环境配置文件的切换的呢?
【第1点:知识回顾】
使用过SpringBoot的都知道,可以通过spring.profiles.active和spring.profiles.include切换不同的环境,首先回忆一下使用:
spring.profiles.active:切换不同环境的配置文件,这个最常用,就不详细介绍了
spring.profiles.include:包含,可以将1个配置文件拆成几部分存储,也是在原来的配置上扩展
那么大体看来,两种好像功能一样,都是扩展原来的配置文件。区别在于:优先级不同,spring.profiles.active更高
配置示例一:
application.properties中,同时配置了spring.profiles.active=dev、spring.profiles.include=dev1,dev2,
那么加载的顺序为dev1,dev2,dev,因为优先级不同
配置示例二:
application.properties中,配置spring.profiles.active=dev,application-dev.properties中,配置spring.profiles.include=dev1,dev2。使用application-dev.properties时自动就激活了dev1、dev2两个文件,不用再次指定。
那么加载的顺序为dev,dev1,dev2,
【第2点:具体实现】
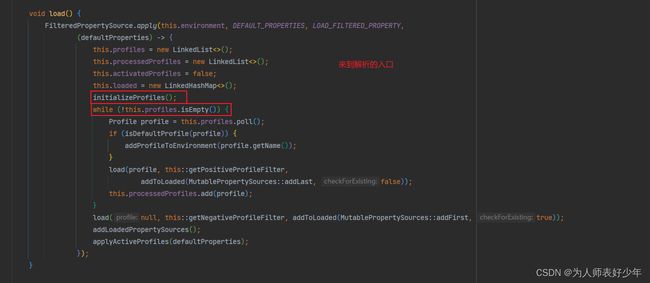
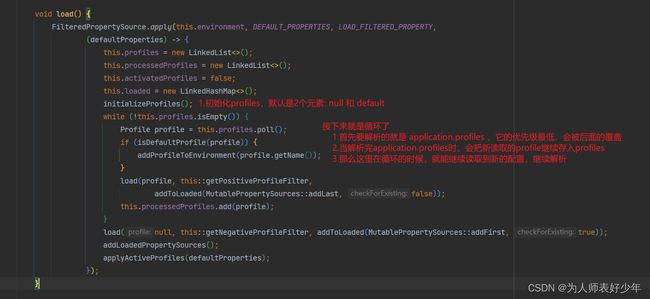
那么如何实现的呢? 首先来到其总入口:
首先看一下initializeProfiles(),方法逻辑如下:
- 首先存入一个
null,代表application.properties要首先被加载 - 获取其它的
profiles。(这里有人可能疑问了?配置文件还没加载呢,咋能有其它profiles呢?我们可以在启动jar包的时候配置上) - 如果没有配置
profiles,那么会存入一个默认的default,代表默认会加载application-default.properties
private void initializeProfiles() {
   // 1.首先存入null,代表application.properties要首先被加载的
   //   这也印证了application.properties是优先级最低的,其它的配置可以覆盖我的
   this.profiles.add(null);
   Set<Profile> activatedViaProperty = getProfilesFromProperty(ACTIVE_PROFILES_PROPERTY);
   Set<Profile> includedViaProperty = getProfilesFromProperty(INCLUDE_PROFILES_PROPERTY);
   List<Profile> otherActiveProfiles = getOtherActiveProfiles(activatedViaProperty, includedViaProperty);
   // 2.存入配置
   this.profiles.addAll(otherActiveProfiles);
   this.profiles.addAll(includedViaProperty);
   addActiveProfiles(activatedViaProperty);
   if (this.profiles.size() == 1) {
      // 3.如果没有激活的配置,则加入一个default,代表没有使用active,则加载application-default.properties
      for (String defaultProfileName : this.environment.getDefaultProfiles()) {
         Profile defaultProfile = new Profile(defaultProfileName, true);
         this.profiles.add(defaultProfile);
      }
   }
}
看完了initializeProfiles(),那么在继续回到上面的方法,就可以解释一切了:
【第3点:profile存入】
解析完配置文件以后,会把最新读取到的profile存入profiles
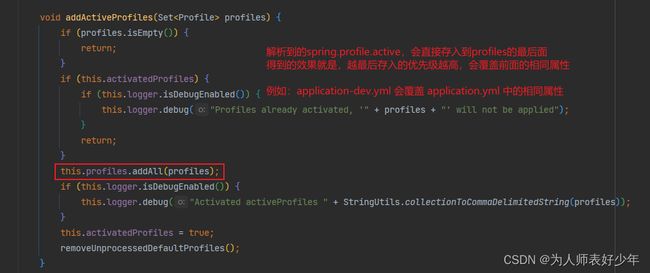
解析到的spring.profile.active会存到最后,代表优先级最高
解析到的spring.profile.include会存到最前面,代表其优先级最低
7) 我们的配置文件被加载后最终是放到了哪里呢?
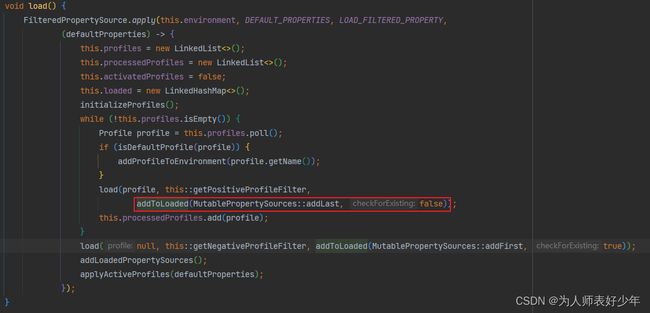
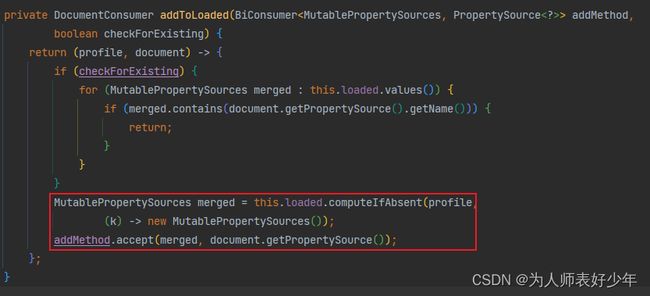
其实在我们调用load()的时候,一直传入了一个函数式接口DocumentConsumer,其中这个addToLoaded(MutablePropertySources::addLast, false)就是函数式接口的实现,这就是函数式变成,不得不说Spring的开发人员还是腻害的。
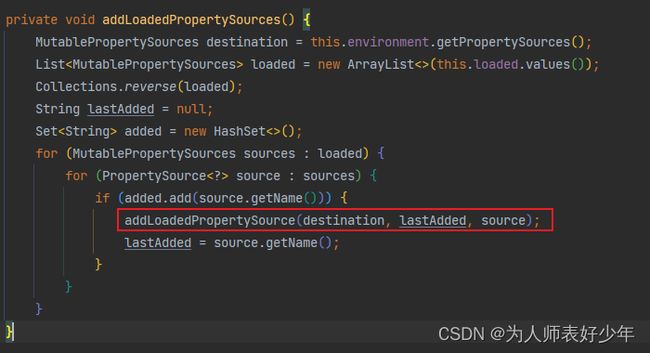
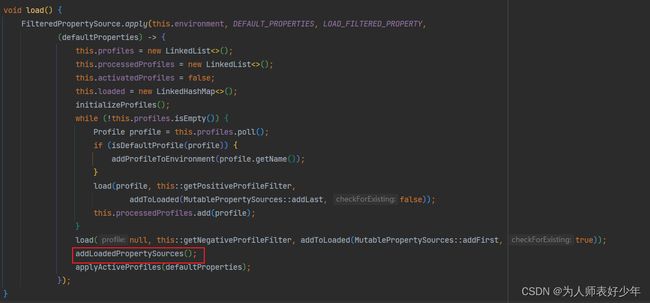
在我们加载完配置文件并封装成Document后,调用了上面DocumentConsumer的accept方法,将Document对象的PropertySources封装到了MutablePropertySources的propertySourceList中,并将MutablePropertySources对象放入了loaded集合中:
然后等到所有的配置文件都加载封装完成后,会统一将这些封装后的MutablePropertySources对象放入到Environment中。也就是说,最终我们所有的配置文件的信息都是加载到了Environment中的,以后我们要是拿都是在Environment中拿的
3.@Value是如何解析的
当把配置文件解析到Environment中,那么@Value是如何读取的?那么这里简单的介绍几个关键点
【第1点:解析@Value的入口】
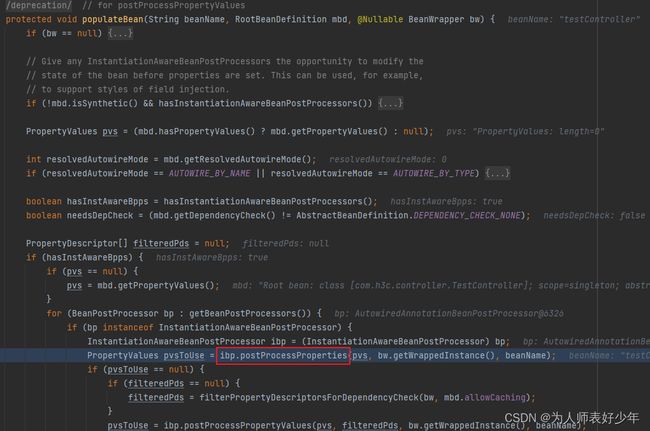
在AbstractAutowireCapableBeanFactory#doCreateBean(),其中会调用populateBean(),该方法负责Bean填充,包括解析@Autowired、@Resource、@Value
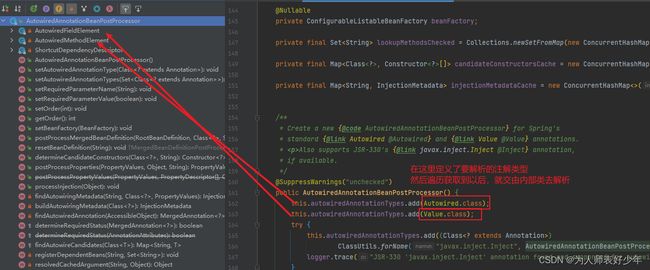
在该方法中,会通过后置处理器AutowiredAnnotationBeanPostProcessor来解析
在该后置处理器中,有2个内部类:
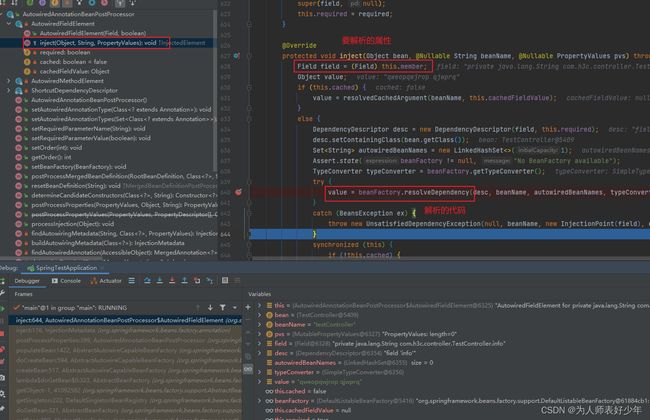
具体解析属性的方法inject()
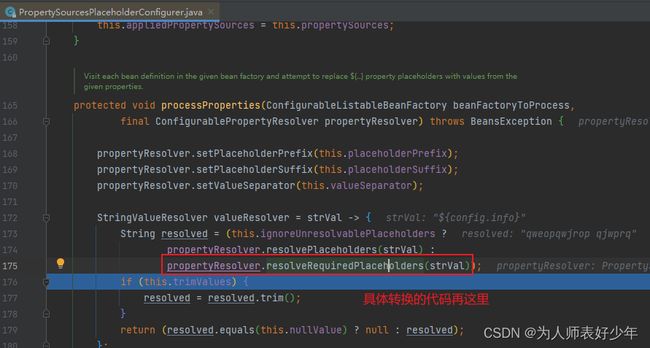
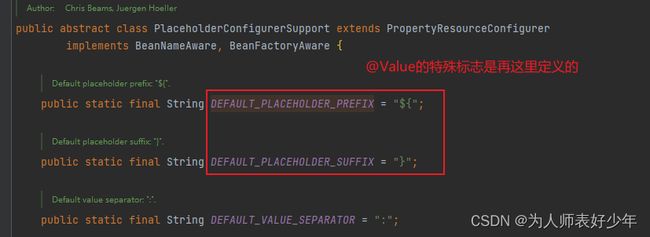
至此后续的逻辑就很清晰了,解析掉${},然后去Environment找即可,那么这里再贴几张图:
三、参考文章
https://blog.csdn.net/ITlikeyou/article/details/124652978 《SpringBoot加载配置文件原理分析》
https://blog.csdn.net/yaomingyang/article/details/109259884 《死磕源码系列【ConfigFileApplicationListener监听器源码解析】》

