PLG | Prometheus + Loki + Grafana 是时候把你的ELK扔掉了
目录
零、瞎BB
一、Pomtail
二、Loki
三、对接Grafana
Prometheus和Grafana默认你懂,本篇直接上 promtail 组件和 loki 。本文采用二进制安装部署
零、瞎BB
PLG 通常指的是 Prometheus , Loki , Grafana 的日志和监控栈,这是一个常见的开源解决方案组合,用于收集、存储和可视化日志和度量数据。
- Prometheus 主要用于收集和存储指标数据。
- Loki 专注于日志聚合和管理。
- Grafana 是用于数据的可视化和监控的工具。
在这个组合中, Promtail 是 Loki 的一个代理,负责收集日志并发送给 Loki 。 Loki 则负责存储和查询这些日志数据。日志文件本身通常存储在你的系统中的某个地方, Promtail 会监视这些日志文件,并将新的日志条目推送到 Loki 。
例如,如果你有一个应用程序,它的日志被写入到 /var/log/myapp 目录中,你会在 Promtail 的配置文件中指定这个目录。 Promtail 会监视目录中的变化,并将日志数据发送到Loki 。 Loki 则接收这些数据并将其存储在其数据库中,通常是结合使用本地存储和/或对象存储(如Amazon S3、Google Cloud Storage等)。这意味着,日志数据的生命周期如下:
1.应用程序生成日志,写入到它的日志文件中2.Promtail 被配置为监视这些日志文件,捕获其内容3.Promtail 将日志数据发送到 Loki4.Loki 接收日志数据并将其存储在后端存储中在 Grafana 中,你可以配置 Loki 数据源,然后创建仪表板来查询和可视化 Loki 中的日志数据。总的来说,PLG 栈的组件都有各自的职责,Promtail 不存储日志文件,它仅仅是作为一个中介,将日志数据从你的系统发送到 Loki 服务。Loki 是负责存储和查询日志数据的组件。
一、Pomtail
下载promtail:
curl -O -L "https://github.com/grafana/loki/releases/download/v2.9.3/promtail-linux-amd64.zip"解压:
unzip promtail-linux-amd64.zip
移下位置,方便后面加入systemd:
sudo mv promtail-linux-amd64 /usr/local/bin/下载配置文件,或者直接复制下文:
#下载
wget  --no-check-certificate https://raw.githubusercontent.com/grafana/loki/master/clients/cmd/promtail/promtail-local-config.yaml
#配置文件原文
server:
http_listen_port: 9080
grpc_listen_port: 0
positions:
filename: /tmp/positions.yaml
clients:
- url: http://localhost:3100/loki/api/v1/push
scrape_configs:
- job_name: system
static_configs:
- targets:
- localhost
labels:
job: varlogs
__path__: /var/log/*log根据需求将 clients 下的地址修改为Loki 所在地址。以及 labels 下日志文件的存放路径。若需要同时监听多个目录下的日志文件,写法如下:
#按需修改
server:
  http_listen_port: 9080
  grpc_listen_port: 0

positions:
  filename: /tmp/positions.yaml

clients:
  - url: http://localhost:3100/loki/api/v1/push

scrape_configs:
  - job_name: system
    static_configs:
      - targets:
          - localhost
        labels:
          job: varlogs
          __path__: /var/log/*.log

  - job_name: application
    static_configs:
      - targets:
          - localhost
        labels:
          job: applogs
          __path__: /path/to/your/application/logs/*.log

  - job_name: another_application
    static_configs:
      - targets:
          - localhost
        labels:
          job: anotherapplogs
          __path__: /another/path/to/logs/**/*.log  # 支持glob模式
这个配置定义了三个 scrape_configs ,分别用于从不同的目录收集日志:
- system 作业从 /var/log 目录下收集所有 .log 文件。
- application 作业从特定应用程序的日志目录收集日志。
- another_application 作业从另一个应用程序的日志目录收集日志,并且使用了 glob 模式来匹配更深层次的目录结构中的日志文件。
在 __path__ 标签中指定的路径支持使用通配符 * 来匹配文件名或目录名的一部分。 ** 模式可以匹配任意中间目录,这在指定具有多级子目录的日志路径时非常有用。
确保配置文件中的 positions 文件的路径对你的系统来说是可写的,因为 Promtail 会使用这个文件来记录哪些日志内容已被读取和发送。
移动一下:
sudo mkdir /etc/promtail && sudo mv promtail-local-config.yaml /etc/promtail/加入系统服务:
sudo vim /etc/systemd/system/promtail.service确认下地址是否一致:
[Unit]
Description=Promtail service
After=network.target

[Service]
Type=simple
ExecStart=/usr/local/bin/promtail-linux-amd64 -config.file=/etc/promtail/promtail-local-config.yaml
Restart=on-failure

[Install]
WantedBy=multi-user.target
sudo systemctl daemon-reloadsudo systemctl enable promtail.service --now二、Loki
下载Loki:
curl -O -L "https://github.com/grafana/loki/releases/download/v2.9.3/loki-linux-amd64.zip"解压:
unzip loki-linux-amd64.zipsudo mv loki-linux-amd64 /usr/local/bin/下载配置文件:
wget --no-check-certificate https://raw.githubusercontent.com/grafana/loki/master/cmd/loki/loki-local-config.yaml注意一下文件内容,如果不对就复制以下内容(按需修改):
sudo mkdir /etc/loki && sudo vim /etc/loki/loki-local-config.yamlauth_enabled: false
server:
http_listen_port: 3100
grpc_listen_port: 9096
common:
instance_addr: 127.0.0.1
path_prefix: /tmp/loki
storage:
filesystem:
chunks_directory: /tmp/loki/chunks
rules_directory: /tmp/loki/rules
replication_factor: 1
ring:
kvstore:
store: inmemory
query_range:
results_cache:
cache:
embedded_cache:
enabled: true
max_size_mb: 100
schema_config:
configs:
- from: 2020-10-24
store: tsdb
object_store: filesystem
schema: v12
index:
prefix: index_
period: 24h
ruler:
alertmanager_url: http://localhost:9093
# By default, Loki will send anonymous, but uniquely-identifiable usage and configuration
# analytics to Grafana Labs. These statistics are sent to https://stats.grafana.org/
#
# Statistics help us better understand how Loki is used, and they show us performance
# levels for most users. This helps us prioritize features and documentation.
# For more information on what's sent, look at
# https://github.com/grafana/loki/blob/main/pkg/analytics/stats.go
# Refer to the buildReport method to see what goes into a report.
#
# If you would like to disable reporting, uncomment the following lines:
#analytics:
# reporting_enabled: false加入系统服务:
sudo vim /etc/systemd/system/loki.service[Unit]
Description=Loki log aggregation system
After=network.target
[Service]
Type=simple
ExecStart=/usr/local/bin/loki-linux-amd64 -config.file /etc/loki/loki-local-config.yaml
[Install]
WantedBy=multi-user.targetsudo systemctl daemon-reloadsudo systemctl enable loki.service --now三、对接Grafana
点击添加数据源:
选择Loki:
输入IP端口并保存:
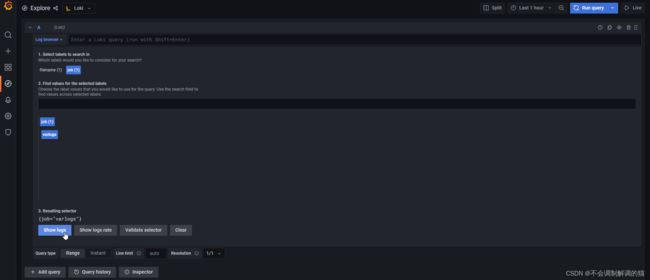
左侧点击Explore,上方选择Loki:
选择好后点击Show Logs:
效果(码一下)(有点恶心:


