smartKettle离线部署及问题记录
目录
- 第一章 前言
-
- 背景
- 目的
- 总体方向
- 第二章 部署
-
- 源码下载
- 后端部署
-
- 导入后端项目
- 修改settings.xml(自动下载相关jar包)
- 编译
- 修改配置文件application.yml
- 初始化数据库
- 打包上传启动
- 可以正常访问接口界面,即服务启动成功
- 前端部署
-
- 基础环境按照
- 编译
- 本地启动
- 服务器部署验证
-
- nginx配置
- 登录
- ⁉️问题记录
-
- ❓问题一: jar包下载不下来
-
- ❗解决方式一:正常不会有问题,建议直接使用项目中提供的settings.xml替换,修改地址即可
- ❕解决方式二:手动下载,费劲呢!!!!
-
- 修改jar包名称
- 逐一上传到本地仓库
- ❗解决方式三:已打包上传CSDN,免费下载
- ❕解决方式二:
- ❓问题二:启动报错(系统默认mysql5,使用8时忘了更新驱动包)
-
- ❗解决方式:替换msyql8驱动
-
- 先本地验证
第一章 前言
背景
昨天下载了Kettle9.2的源码,简单了解了下代码结构,今天来看下smartKettle,它相当于之前部署的pentaho-server-ce-9.4.0.0-343,是一款超轻量级的kettle web端调度监控平台,详见官网

目的
我的最终目的和smartKettle的终极目标是一致的,实现Web端的Kettle任务流程编排,今天部署smartKettle也是寻求一些启发点

总体方向
干就完了
第二章 部署
源码下载
下载地址:https://gitee.com/hundage/smartkettle.git
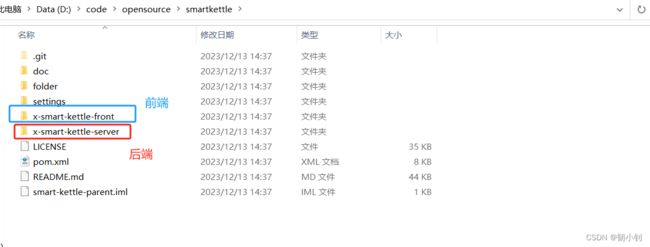
后端部署
导入后端项目

修改settings.xml(自动下载相关jar包)

settings.xml内容如下(别忘了修改本地仓库存放路径):
<settings xmlns="http://maven.apache.org/SETTINGS/1.0.0"
          xmlns:xsi="http://www.w3.org/2001/XMLSchema-instance"
          xsi:schemaLocation="http://maven.apache.org/SETTINGS/1.0.0 http://maven.apache.org/xsd/settings-1.0.0.xsd">
    <localRepository>D:\soft\apache-maven-3.8.5\apache-maven-3.8.5\repositorylocalRepository>
    <servers>
        <server>
            <id>rdc-releasesid>
            <username>Y3z0VZusername>
            <password>Bb8byTSlq0password>
        server>
        <server>
            <id>rdc-snapshotsid>
            <username>Y3z0VZusername>
            <password>Bb8byTSlq0password>
        server>
    servers>
    <mirrors>
        <mirror>
            <id>nexus-aliyunid>
            <mirrorOf>centralmirrorOf>
            <name>nexus-aliyunname>
            <url>https://maven.aliyun.com/nexus/content/groups/publicurl>
        mirror>

    mirrors>

    <profiles>
        <profile>
            <id>first-repositoryid>
            <repositories>
                <repository>
                    <id>rdc-snapshotsid>
                    <url>https://repo.rdc.aliyun.com/repository/128991-snapshot-NY2Ub0/url>
                    <releases>
                        <enabled>trueenabled>
                        <updatePolicy>alwaysupdatePolicy>
                    releases>
                    <snapshots>
                        <enabled>trueenabled>
                        <updatePolicy>alwaysupdatePolicy>
                    snapshots>
                repository>
            repositories>
        profile>
        <profile>
            <id>second-repositoryid>
            <repositories>
                <repository>
                    <id>rdc-releasesid>
                    <url>https://repo.rdc.aliyun.com/repository/128991-release-EJH8o1/url>
                    <releases>
                        <enabled>trueenabled>
                        <updatePolicy>alwaysupdatePolicy>
                    releases>
                    <snapshots>
                        <enabled>trueenabled>
                        <updatePolicy>alwaysupdatePolicy>
                    snapshots>
                repository>
            repositories>
        profile>
        <profile>
            <id>third-repositoryid>
            <repositories>
                <repository>
                    <id>centralid>
                    <url>https://maven.aliyun.com/nexus/content/groups/publicurl>
                    <releases>
                        <enabled>trueenabled>
                    releases>
                    <snapshots>
                        <enabled>trueenabled>
                    snapshots>
                repository>
            repositories>
        profile>
        <profile>
            <id>forth-repositoryid>
            <repositories>
                <repository>
                    <id>snapshotsid>
                    <url>https://maven.aliyun.com/repository/centralurl>
                    <releases>
                        <enabled>trueenabled>
                    releases>
                    <snapshots>
                        <enabled>trueenabled>
                    snapshots>
                repository>
            repositories>
        profile>
        <profile>
            <id>fifth-repositoryid>
            <repositories>
                <repository>
                    <id>pentaho-kettleid>
                    <name>pentaho-kettle仓库name>
                    <url>https://repo.orl.eng.hitachivantara.com/artifactory/pnt-mvn/url>
                repository>
            repositories>
        profile>
    profiles>
    <activeProfiles>
        <activeProfile>first-repositoryactiveProfile>
        <activeProfile>second-repositoryactiveProfile>
        <activeProfile>third-repositoryactiveProfile>
        <activeProfile>forth-repositoryactiveProfile>
        <activeProfile>fifth-repositoryactiveProfile>
    activeProfiles>
settings>
编译
想放弃了,什么玩意…

全量导入项目,不要只导入后端程序

修改配置文件application.yml
主要配置数据库信息和日志路径(如果不想修改文件,可以配置环境变量,对应配置文件中XTL_XXXX,不管那种方式都要麻烦一遍的)
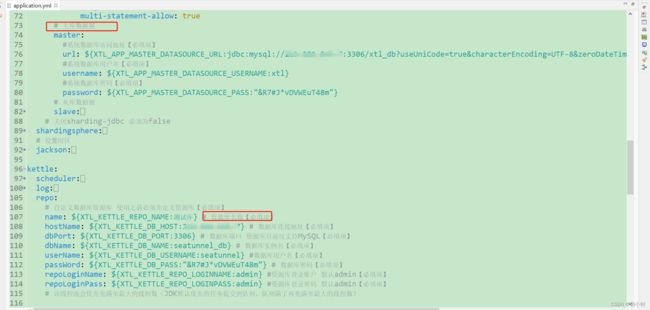
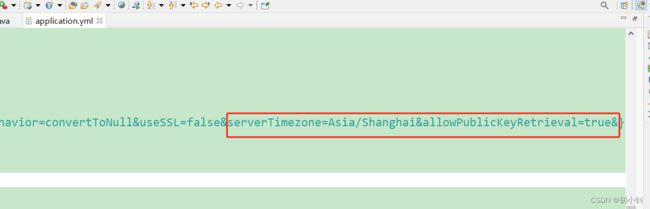
JDBC连接参考如下(注意serverTimezone和allowPublicKeyRetrieval,这里使用的mysql8,若是5请忽略):
jdbc:mysql://xxx:3306/xtl_db?useUniCode=true&characterEncoding=UTF-8&zeroDateTimeBehavior=convertToNull&useSSL=false&serverTimezone=Asia/Shanghai&allowPublicKeyRetrieval=true&
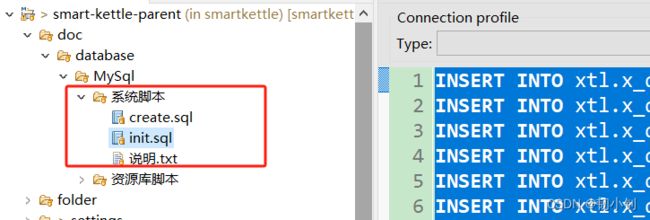
初始化数据库

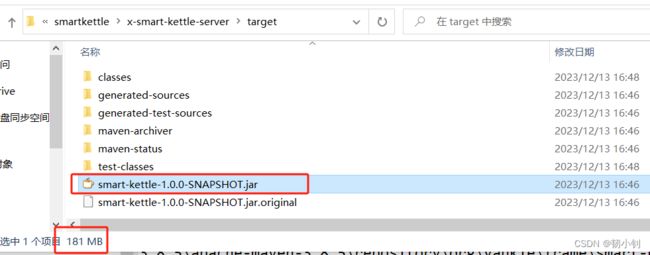
打包上传启动

指定后台运行服务:nohup java -jar smart-kettle-1.0.0-SNAPSHOT.jar /dev/null 2>&1 &
可以正常访问接口界面,即服务启动成功
Swagger地址:http://xxxx:9753/xtl-server/swagger-ui.html

前端部署
基础环境按照
之前安装过,就不赘述了,就是下载一个nodejs,配置下环境变量,可参照Vue项目创建(2.x/3.x 自动/手动)及问题记录
编译
- 这里使用的
VSCode软件,导入前端项目,执行npm install

- 打包:
npm run build


本地启动
- 配置服务器地址
- 执行启动:
npm run dev

- 成功登录

服务器部署验证
- 编译好的文件在
dist目录,直接压缩,上传到服务器,通过Nginx部署

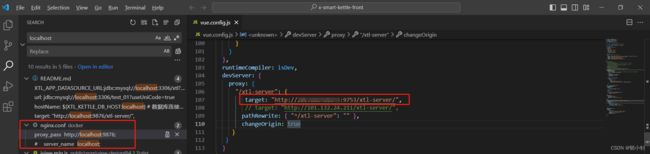
nginx配置
nginx安装可参照安装nginx两种方式及遇到问题
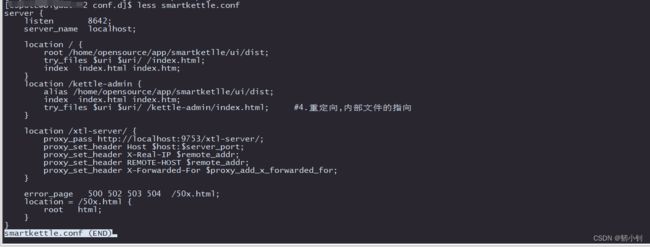
server {
    listen       8642;
    server_name  localhost;

    location / {
        root /home/opensource/app/smartketlle/ui/dist;
        try_files $uri $uri/ /index.html;
        index  index.html index.htm;
    }
    location /kettle-admin {
        alias /home/opensource/app/smartketlle/ui/dist;
        index  index.html index.htm;
        try_files $uri $uri/ /kettle-admin/index.html;     #4.重定向,内部文件的指向
    }

    location /xtl-server/ {
        proxy_pass http://localhost:9753/xtl-server/;
        proxy_set_header Host $host:$server_port;
        proxy_set_header X-Real-IP $remote_addr;
        proxy_set_header REMOTE-HOST $remote_addr;
        proxy_set_header X-Forwarded-For $proxy_add_x_forwarded_for;
    }

    error_page   500 502 503 504  /50x.html;
    location = /50x.html {
        root   html;
    }
}
登录

⁉️问题记录
❓问题一: jar包下载不下来
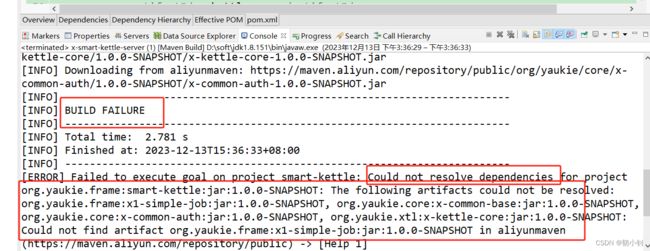

❗解决方式一:正常不会有问题,建议直接使用项目中提供的settings.xml替换,修改地址即可

❕解决方式二:手动下载,费劲呢!!!!
官方文档有说明,下载不下来情况下如何处理
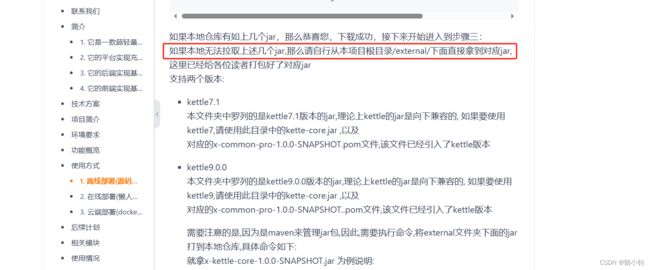

修改jar包名称

逐一上传到本地仓库
mvn install:install-file -Dfile=D:/code/opensource/smartkettle/x-smart-kettle-server/external/x-kettle-core-1.0.0-SNAPSHOT.jar -DgroupId=org.yaukie.xtl -DartifactId=x-kettle-core -Dversion=1.0.0-SNAPSHOT -Dpackaging=jar
mvn install:install-file -Dfile=D:/code/opensource/smartkettle/x-smart-kettle-server/external/x-common-base-1.0.0-SNAPSHOT.jar -DgroupId=org.yaukie.core -DartifactId=x-common-base -Dversion=1.0.0-SNAPSHOT -Dpackaging=jar
mvn install:install-file -Dfile=D:/code/opensource/smartkettle/x-smart-kettle-server/external/x-common-auth-1.0.0-SNAPSHOT.jar -DgroupId=org.yaukie.core -DartifactId=x-common-auth -Dversion=1.0.0-SNAPSHOT -Dpackaging=jar
mvn install:install-file -Dfile=D:/code/opensource/smartkettle/x-smart-kettle-server/external/x1-simple-job-1.0.0-SNAPSHOT.jar -DgroupId=org.yaukie.frame -DartifactId=x1-simple-job -Dversion=1.0.0-SNAPSHOT -Dpackaging=jar


❗解决方式三:已打包上传CSDN,免费下载
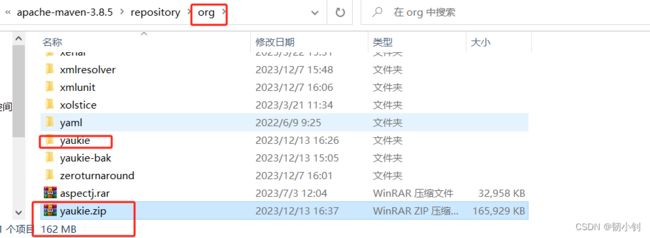
下载地址

❕解决方式二:
❓问题二:启动报错(系统默认mysql5,使用8时忘了更新驱动包)
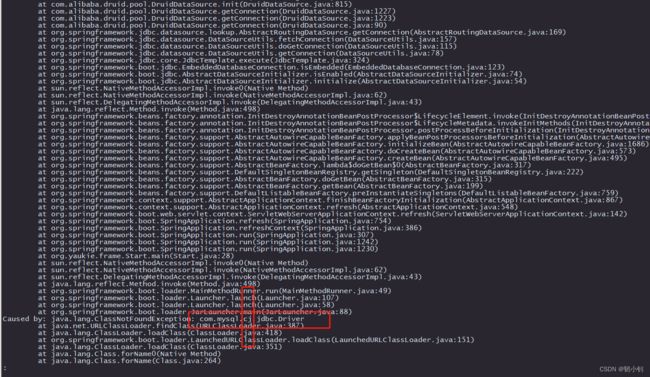
❗解决方式:替换msyql8驱动

        <dependency>
            <groupId>org.yaukie.coregroupId>
            <artifactId>x-common-baseartifactId>
            <version>1.0.0-SNAPSHOTversion>
            <exclusions>
                <exclusion>
                    <groupId>mysqlgroupId>
                    <artifactId>mysql-connector-javaartifactId>
                exclusion>
            exclusions>
        dependency>

        <dependency>
            <groupId>mysqlgroupId>
            <artifactId>mysql-connector-javaartifactId>
            <version>8.0.25version>
        dependency>
先本地验证
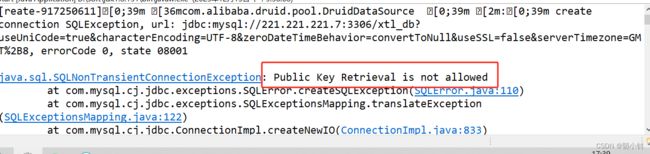
java.sql.SQLNonTransientConnectionException: Public Key Retrieval is not allowed
	at com.mysql.cj.jdbc.exceptions.SQLError.createSQLException(SQLError.java:110)
	at com.mysql.cj.jdbc.exceptions.SQLExceptionsMapping.translateException(SQLExceptionsMapping.java:122)
	at com.mysql.cj.jdbc.ConnectionImpl.createNewIO(ConnectionImpl.java:833)
	at com.mysql.cj.jdbc.ConnectionImpl.<init>(ConnectionImpl.java:453)
	at com.mysql.cj.jdbc.ConnectionImpl.getInstance(ConnectionImpl.java:246)
修改配置allowPublicKeyRetrieval=true,再次启动
启动成功;http://localhost:9753/xtl-server/swagger-ui.html

加更:smartkettle简单体验及源码阅读