第三章 SpringBoot数据访问
学习目标
-
掌握SpringBoot整合MyBatis的使用
-
掌握SpringBoot整合JPA的使用
-
掌握SpringBoot整合Redis的使用
在开发中,我们通过会对数据库的数据进行操作,SpringBoot在简化项目开发以及实现自动化配置的基础上,对关系型数据库和非关系型数据库的访问操作都提供了非常好的整合支持。本章将针对SpringBoot的数据访问进行讲解。
3.1 SpringBoot数据访问概述
Spring Data是Spring提供的一个用于简化数据库访问、支持云服务的开源框架。它是一个伞形项目,包含了大量关系型数据库及非关系型数据库的数据访问解决方案,其设计目的是使我们可以快速且简单的使用各种数据访问技术。SpringBoot默认采用整合Spring Data的方式统一处理数据访问层,通过添加大量自动配置,引入各种数据访问模板xxxTemplate以及统一的Repository接口,从而达到简化数据访问层的操作。
Spring Data提供了多种类型数据库支持,SpringBoot对Spring Data支持的数据库进行了整合管理,提供了各种依赖启动器。以下使SpringBoot提供的常见数据库依赖启动器
| 名称 | 描述 |
|---|---|
| spring-boot-starter-data-jpa | Spring Data JPA与Hibernate的启动器 |
| spring-boot-starter-data-mongodb | MongoDB和Spring Data MongoDB的启动器 |
| spring-boot-starter-data-neo4j | Neo4J图数据库和Spring Data Neo4j的启动器 |
| spring-boot-starter-data-redis | Redis键值数据存储与Spring Data Redis和Jedis客户端的启动器 |
需要说明的使,MyBatis作为操作数据库的流行框架,SpringBoot没有提供MyBatis场景依赖,但是MyBatis开发团队自己适配了SpringBoot,提供了mybatis-spring-boot-starter依赖启动器实现数据访问操作。
3.2 SpringBoot整合MyBatis
MyBatis是一款优秀的持久层框架,它支持定制化SQL、存储过程以及高级映射,避免了几乎所有的JDBC代码和手动设置参数以及获取结果集。MyBatis可以使用简单的XML或注解配置和映射原生信息,并将接口和Java的POJO(Plain Old Java Objects 普通Java对象)映射成数据库中的记录。SpringBoot官方虽然没有对MyBatis进行整合,但是MyBatis团队自己适配了对应的启动器,进一步简化了MyBatis对数据的操作。
3.2.1 基础环境搭建
因为SpringBoot框架开发很便利,所以实现SpringBoot与数据访问层框架(例如MyBatis)的整合非常简单,主要是引入对应的依赖启动器,并进行数据库相关参数设置即可。下面我们来搭建项目环境配置
1.数据准备
在mysql数据库中,创建一个名为springbootdata的数据库,在该数据库中创建两个表t_article和t_comment,并预先插入几条测试数据,SQL语句如下
#创建数据库
CREATE DATABASE springbootdata;
#选择使用数据库
USE springbootdata;
# 创建表t_article并插入相关数据
# 创建该表前如果该表已存在则删除重新创建
DROP TABLE IF EXISTS t_article;
CREATE TABLE t_article(
	id INT NOT NULL AUTO_INCREMENT COMMENT '文章id',
	title VARCHAR(200) DEFAULT NULL COMMENT '文章标题',
	content LONGTEXT COMMENT '文章内容',
	PRIMARY KEY (id)
)ENGINE=INNODB AUTO_INCREMENT=2 DEFAULT CHARSET=utf8;
INSERT INTO t_article VALUES(1,'SpringBoot基础入门','从入门到精通讲解……');
INSERT INTO t_article VALUES(2,'SpringCloud基础入门','从入门到精通讲解……');
#创建表t_comment并插入相关数据
DROP TABLE IF EXISTS t_comment;
CREATE TABLE t_comment(
	id INT NOT NULL AUTO_INCREMENT COMMENT '评论id',
	content LONGTEXT COMMENT '评论内容',
	author VARCHAR(200) DEFAULT NULL COMMENT '评论作者',
	a_id INT DEFAULT NULL COMMENT '关联的文章id',
	PRIMARY KEY (id)
)ENGINE=INNODB AUTO_INCREMENT=3 DEFAULT CHARSET=utf8;
INSERT INTO t_comment VALUES(1,'很全,很详细','狂奔的蜗牛',1);
INSERT INTO t_comment VALUES(2,'赞一个','tom',1);
INSERT INTO t_comment VALUES(3,'很详细','kitty',1);
INSERT INTO t_comment VALUES(4,'很好,非常详细','张三',1);
INSERT INTO t_comment VALUES(5,'很不错','张杨',2);
先创建了数据库springbootdata,然后创建了两个表,并向表中插入数据。其中评论表的外键与文章表的主键进行关联。
2.创建项目,引入相应的启动器
创建SpringBoot项目,在pom.xml文件中选择sql模块中的mysql和MyBatis依赖,并根据后续提示完成项目创建。
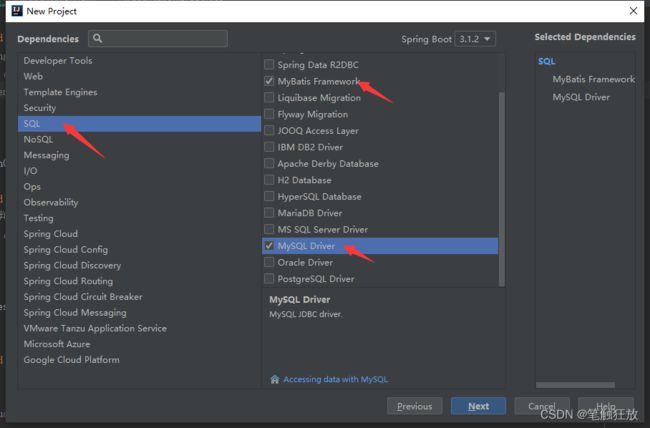
我们选择创建sql项目,使用mysql数据库数据库连接插件,使用mybatis框架简化sql操作。
接着编写数据库表对应的实体类,做对象关系型映射,在项目中创建包domain,并在该包中创建与数据库表对应的实体类Article和Comment。
package com.example.demo3.domain;

/**
 * 评论实体类
 */
public class Comment {
    private int id; //评论id
    private String contnet;//评论的内容
    private String author;//发表评论的作者
    private int aid;//关联文章的id

    public Comment(int id, String contnet, String author, int aid) {
        this.id = id;
        this.contnet = contnet;
        this.author = author;
        this.aid = aid;
    }

    public Comment() {
    }

    @Override
    public String toString() {
        return "Comment{" +
                "id=" + id +
                ", contnet='" + contnet + '\'' +
                ", author='" + author + '\'' +
                ", aid=" + aid +
                '}';
    }

    public int getId() {
        return id;
    }

    public void setId(int id) {
        this.id = id;
    }

    public String getContnet() {
        return contnet;
    }

    public void setContnet(String contnet) {
        this.contnet = contnet;
    }

    public String getAuthor() {
        return author;
    }

    public void setAuthor(String author) {
        this.author = author;
    }

    public int getAid() {
        return aid;
    }

    public void setAid(int aid) {
        this.aid = aid;
    }
}
package com.example.demo3.domain;
import java.util.List;
/**
* 文章实体类
*/
public class Article {
private int id;//文章id
private String title;//文章标题
private String content;//文章内容
private List comments;//该文章下的所有评论
@Override
public String toString() {
return "Article{" +
"id=" + id +
", title='" + title + '\'' +
", content='" + content + '\'' +
", comments=" + comments +
'}';
}
public int getId() {
return id;
}
public void setId(int id) {
this.id = id;
}
public String getTitle() {
return title;
}
public void setTitle(String title) {
this.title = title;
}
public String getContent() {
return content;
}
public void setContent(String content) {
this.content = content;
}
public List getComments() {
return comments;
}
public void setComments(List comments) {
this.comments = comments;
}
public Article(int id, String title, String content, List comments) {
this.id = id;
this.title = title;
this.content = content;
this.comments = comments;
}
public Article() {
}
} 3.编写配置文件
在application.properties配置文件中及逆行数据库连接配置。打开全局配置文件application.properties,在配置文件中编写对应的MySQL数据连接配置
# MySQL数据库连接配置
spring.datasource.url=jdbc:mysql://localhost:3306/springbootdata?useUnicode=true&characterEncoding=UTF-8&serverTimezone=UTC
spring.datasource.username=root
spring.datasource.password=admin
接着选择数据库连接池,SpringBoot 1.x版本默认使用的是tomcat.jdbc数据源,SpringBoot 2.x版本默认使用的是hikari数据源。如果使用其他数据源,还需要进行额外配置。
这里选择使用阿里巴巴的Druid数据源。在pom.xml文件中添加Druid数据源的依赖启动器
            com.alibaba
            druid-spring-boot-starter
            1.1.10
上述引入的依赖druid-spring-boot-starter,同样是阿里巴巴为了迎合SpringBoot项目而适配的Druid数据源启动器,当在pom.xml文件中引入该启动器后,不需要再进行其他额外配置,SpringBoot项目会自动识别配置Druid数据源。
需要说明的是,上述配置的Druid数据源启动器内部已经初始化了一些运行参数(例如initialSize,maxActive等),如果开发过程中需要修改第三方Druid的运行参数,则必须再全局配置文件中修改。
# 添加并配置第三方数据源Druid
# 配置连接池
spring.datasource.type=com.alibaba.druid.pool.DruidDataSource
# 初始化连接数
spring.datasource.druid.initial-size=20
# 最小连接数
spring.datasource.druid.min-idle=10
# 最大连接数
spring.datasource.druid.max-active=100
在application.properties配置文件中添加上述配置后,会发现配置的Druid的属性信息底纹为黄色,这是因为在SpringBoot提供的数据源自动配置类DataSourceProperties中,没有与这些参数对应的默认属性,所以这些设置的属性值无法识别和生效。为此,还需要编写一个自定义配置类,将配置文件中的属性注入到Druid数据源属性中。
在项目下创建config包,并在该包下创建一个自定义配置类对Druid数据源属性值进行注入
3.2.2 使用注解的方式整合MyBatis
相比Spring与MyBatis的整合,SpringBoot与MyBatis的整合会使项目开发更加简便,同时还支持XML和注解两种配置方式。下面我们使用注解的方式讲解SpringBoot与MyBatis的整合使用,
1.创建Mapper接口文件。
在项目中创建mapper包,并在包下创建一个用于对数据库表t_comment数据操作的接口CommentMapper
package com.example.demo3.mapper;

import com.example.demo3.domain.Comment;
import org.apache.ibatis.annotations.*;

@Mapper
public interface CommentMapper {
    @Select("select * from t_comment where id=#{id}")
    Comment findById(int id);

    @Insert("insert into t_comment(content,author,a_id) values(#{content},#{author},#{aid})")
    int insertComment(Comment comment);

   	@Update("update t_comment set content=#{content},author=#{author} where id=#{id}")
    int updateComment(Comment comment);

    @Delete("delete from t_comment where id=#{id}")
    int deleteComment(@Param("id") int id);
}
@Mapper注解表示该类使一个MyBatis接口文件,并保证能够被SpringBoot自动扫描到Spring容器中,在该接口内部,分别通过 @Select,@Insert,@Update,@Delete注解配合SQL语句完成了对数据库t_comment数据的增删改查操作。
小提示:在对应的接口类上添加了@Mapper注解,如果编写的Mapper接口过多时,需要重复为每一个接口文件添加@Mapper注解。为了避免这种麻烦,可以直接在SpringBoot项目启动类上添加@MapperScan(“xxx”)注解,不需要再逐个添加@Mapper注解。@MapperScan("xxx")注解的作用和@Mapper注解类似,但是它必须指定需要扫描的具体包名,例如@MapperScan("com.excomple.mapper").
2.编写单元测试进行接口方法测试
再项目的测试类中进行测试CommentMapper接口
package com.example.demo3;

import com.example.demo3.domain.Comment;
import com.example.demo3.mapper.CommentMapper;
import org.junit.Test;
import org.junit.runner.RunWith;
import org.springframework.beans.factory.annotation.Autowired;
import org.springframework.boot.test.context.SpringBootTest;
import org.springframework.test.context.junit4.SpringRunner;

@RunWith(SpringRunner.class)
@SpringBootTest
public class Demo3ApplicationTests {

    @Autowired
    CommentMapper commentMapper;//这里显示报红,并不是报错,不用担心

    @Test
    public void selectComment(){
        Comment comment = commentMapper.findById(1);
        System.out.println(comment);
    }

    @Test
    public void contextLoads() {
    }

}
3.整合测试
运行测试类进行测试时,遇到以下错误

该错误表示创建的项目与使用的JDK版本不匹配,这里我们需要修改模板对应的jdk版本,当前项目我们使用的时1.8的jdk,因此我们进行查看idea的当前设置


打开setting界面,找到以下选项

pom.xml中对应的jdk版本也要时1.8

重新build一下当前项目,这个版本问题解决了,但运行时遇到一个新的问题
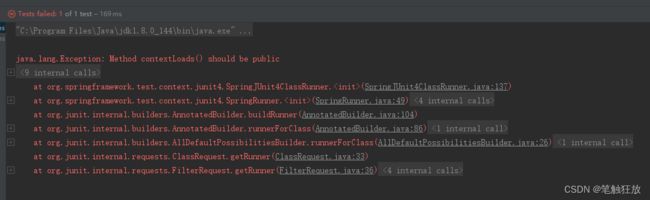
意思说测试类中的contentLoads方法没有public修饰符,这里我们给它加上,又遇到问题

这里我们再pom.xml文件中把这个依赖加上
            mysql
            mysql-connector-java
            8.0.11
再次运行,我们看到运行成功了

但是我们发现该数据库中的数据的a_id这个数据没有查询出来,这是因为我们定义的Comment实体类中定义的变量名为aid,但数据库t_comment表中字段名为a_id,为了解决上述问题,可以修改Comment实体类的该变量与数据库字段名保持一致,或者再全局配置文件中application.properties中添加开启驼峰命名匹配映射配置

# 开启驼峰命名匹配映射
mybatis.configuration.map-underscore-to-camel-case=true
再次运行,查看结果

使用注解的方式插入数据,修改数据,删除数据的操作这里省略……
@Test
    public void insertComment(){
        Comment comment=new Comment();
        comment.setAuthor("李四");
        comment.setContent("真滴不错");
        comment.setAid(2);
        int i = commentMapper.insertComment(comment);
        if (i>0){
            System.out.println("添加成功");
        }
    }

    @Test
    public void updateComment(){
        Comment comment=new Comment(6,"very good!!!","sam",0);
        int i = commentMapper.updateComment(comment);
        if (i>0){
            System.out.println("修改成功");
        }
    }

    @Test
    public void deleteComment(){
        int i = commentMapper.deleteComment(7);
        if (i>0){
            System.out.println("删除成功");
        }
    }
3.2.3 使用配置文件的方式整合MyBatis
SpringBoot与MyBatis整合使用时,不仅支持注解方式,还支持XML配置文件的方式。接下来我们通过代码演示
1.创建Mapper接口文件。
在项目的mapper包中,创建一个操作数据表t_article的接口ArticleMapper。
package com.example.demo3.mapper;

import com.example.demo3.domain.Article;
import org.apache.ibatis.annotations.Mapper;

@Mapper
public interface ArticleMapper {
    Article selectArticle(int id);
    int updateArticle(Article article);
}
2.创建XML映射文件
在项目的resource目录下,创建一个统一管理映射文件的包mapper,并在该包下创建一个与以上接口对应的ArticleMapper.xml
update t_article
title=#{title},
content=#{content}
where id=#{id}
3.配置XML映射文件路径
我们在项目中编写的XML映射文件,SpringBoot并无从知晓,所以无法扫描到该自定义编写的XML配置文件,还必须在全局配置文件application.properties中添加MyBatis映射文件路径的配置,同时需要添加实体类别名映射路径
# 配置MyBatis的XML配置文件路径
mybatis.mapper-locations=classpath:mapper/*.xml
# 配置XML映射文件中指定的实体类别名路径
mybatis.type-aliases-package=com.example.demo3.domain
上述配置代码中,在使用配置文件方式整合MyBatis时,MyBatis映射文件路径的配置必不可少;而实体类别名映射路径的配置时根据前面创建的XML映射文件别名使用情况来确定的,如果XML映射文件中使用的都是类的全路径名称,则不需要该配置项。
4.编写单元测试进行接口方法测试
 @Autowired
    ArticleMapper articleMapper;

    @Test
    public void selectArticle(){
        //查询文章编号为1的文章内容以及该文章下对应的所有评论
        Article article = articleMapper.selectArticle(1);
        System.out.println(article);
    }
如果出现报错,请仔细检查配置文件中的sql语句的配置是否与各种实体类之间的映射属性是都对应。

这里表示加载ApplicationContext对象失败,问题出在sqlSessionFactory无法根据资源创建对象,也就是表明问题出在sql语句的配置文件中,因此需要仔细检查sql语句的配置文件是否出现错误。
5.整合测试运行

其他sql语句操作读者进行操作练习
@Test
    public void updateArticle(){
        Article article=new Article();
        article.setId(2);
        article.setTitle("SpringCloud从入门到精通");
        article.setContent("基于Java的微服务分布式开发技术");
        int i = articleMapper.updateArticle(article);
        if (i>0){
            System.out.println("文章更新成功");
        }
    }
3.3 SpringBoot整合JPA
JPA(Java Persistence API,Java持久化API)是Sun公司官方提出的Java持久化规范,它为Java开发人员提供了一种对象/关系映射的工具管理Java中的关系型数据,其主要目的是简化现有的持久化开发工作和整合ORM(Object Relational Mapping,对象/关系映射)技术。Spring Data在JPA规范的基础上,充分利用其优点,提出了Spring Data JPA模块对具有ORM关系数据进行持久化操作。
3.3.1 Spring Data JPA介绍
Spring Data JPA是Spring再ORM框架,JPA规范的基础上封装的一套JPA应用框架,它提供了增删改查等常用功能,使开发者可以用较少的代码实现数据操作,同时还易于扩展。考虑到部分读者可能对Spring Data JPA并不熟悉,再正式讲解Spring boot整合JPA之前,我们先针对Spring Data JPA的基本使用进行简单介绍。
1.编写ORM实体类
Spring Data JPA框架是针对具有ORM关系的数据进行操作,所以再使用Spring Data JPA时,首先需要编写一个实体类与数据表进行映射,并且配置好映射关系
@Entity(name="t_comment")
public class Discuss{
    @Id
    @GeneratedValue(strategy=GenerationType.IDENTITY)
    private Integer id;
    @Column(name="a_id")
    private Integer aId;
    //省略get和set方法
}
上述代码定义了一个Spring Data JPA实体类DIscuss,并将该类与数据表t_comment进行映射。
@Entity注解标注要与数据库做映射的实体类,默认情况下,数据库表的名称就是首字母小写的类名。当然,还可以使用name属性指定映射的表名。
@Id注解标注在类属性或者getter方法上,表示某一个属性对应表中的主键。
@@GeneratedValue注解与@Id注解标注在同一个位置,用于表示属性对应主键的生成策略,可省略。Spring Data JPA支持的主键生成策略包括有TABLE(使用一个特定的数据库表格来保存主键)、SEQUENCE(不支持主键自增长的数据库主键生成策略)、IDENTITY(主键自增)和AUTO(JPA自主选择前面3种合适的策略,时默认选项)
@Column注解标注在属性上,当类属性与表字段名不同时,能够配合name属性表示类属性对应的表字段名。
2.编写Repository接口
下面那我们针对不同的表数据操作编写各自对应的Repository接口,并根据需要编写对应的数据操作方法
public interface DiscussRepository extends JpaRepository{
    public List findByAuthorNotNull();
    @Query("select c from t_comment c where c.aId=1")
    public List getDiscussPaged(Integer aid,Pageable pageable);
    @Query(value="select * from t_comment where a_Id=1",nativeQuery=true)
    public List getDiscussPaged2(Integer aid,Pageable pageable);
    @Transactional
    @Modifying
    @Query("update t_comment c set c.author=1 where c.id=2")
    public int updateDiscuss(String author,Integer id);
    @Transactional
    @Modifying
    @Query("delete from t_comment c where c.id=1")
    public int deleteDiscuss(Integer id);
}
上述代码实现了对数据进行删除,修改和查询的操作,下面针对这些操作的相关方法进行介绍
findByAuthorNotNull()该方法时一个基本的查询方法,上方没有任何注解,属于JPA支持的方法名关键字查询方式;同时通过定义的方法名可以猜测出,该方法的作用是查询author非空的Discuss评论信息。
getDiscussPaged()该方法上方通过@Query注解引入了一个SQL语句,用于通过文章分页ID查询Discuss评论信息
getDiscussPaged2()该方法的功能与getDiscussPaged()基本类似,区别是该方法上方的@Query注解将nativeQuery属性设置为true(默认为false),用来编写原生SQL语句。
updateDiscuss()和deleteDiscuss()方法,这两个方法同样使用@Query注解配置了对应的SQL语句,这两个方法分别对应数据的更新和删除操作;需要说明的是,数据更新或者删除操作的方法上还使用了@Transactional和@Modifying注解,其中@Transactional表示支持事务管理,@Modifying表示支持数据变更。 其中,Spring Data JPA中支持的方法名关键字及对应的SQL片段说明,如下表格
-
关键字 方法名示例 对应的SQL片段 And findByL astnameAndFirstname where x.lastname= ?1 and x.firstname = ?2 Or findByL astnameOrFirstname where x.lastname = ?1 or x.firstname = ?2 Is, Equals findByFirstname, findByFrstamels, where x.firstname= ?1 Between findByStartDateBetween where x.startDate between ?1 and ?2 Less Than findByAgeL essThan where x.age< ?1 Less ThanEqual frndByAgeL ess ThanEqual where x.age <= ?1 Greater Than findByAgeGreaterThan where x.age > ?1 Greater ThanEqual findByAgeGreaterThanEqual where x.age>= ?1 After findByStartDateAfter where x.startDate> ?1 Before findByStartDateBefore where x.startDate < ?1 IsNull findByAgelsNull where x.age is null IsNotNull, NotNull findByAge(ls)NotNull where x.age not null Like findByFirstnameLike where x.firstname like ?1 NotL ike findByFirstnameNotLike where x.firstname not like ?1 StartingWith findByFirstnameStartingWith where x.firstname like ?1 (绑定参数%) EndingWith findByFirstnameEndingWith where x.firstname like ?1 (绑定参数%) Containing findByFirstnameContaining where x.firstname like ?1 (绑定参数%) OrderBy findByAgeOrderByL astnameDesc where x.age = ?1 order by x.lastname desc Not findByLastnameNot where x.lastname <> ?1 n findByAgeIn(Collection ages) where x.age in ?1 Notln findByAgeNotlnCollection ages) where x.age notin ?1 True findByActiveTrue() where x.active = true False findByActiveF alse() where x.active = false IgnoreCase findByFirstnamelgnoreCase where UPPER(x.firstame) = UPPER(?1)
3.3.2 使用Spring Boot整合JPA
接下来我们演示一下项目,在pom.xml中添加依赖
            org.springframework.boot
            spring-boot-starter-data-jpa
上述代码中,并没有编写Spring Data JPA对应的版本号,这是因为SpringBoot对Spring Data JPA的本本号进行了统一管理。
接着在domain包中编写一个实体类对应数据库表的映射
package com.example.demo3.domain;

import org.springframework.data.annotation.Id;

import javax.persistence.Column;
import javax.persistence.Entity;
import javax.persistence.GeneratedValue;
import javax.persistence.GenerationType;

@Entity(name = "t_comment")
public class Discuss {
    @Id
    @GeneratedValue(strategy= GenerationType.IDENTITY)
    private Integer id;
    @Column(name="a_id")
    private Integer aId;

    public Integer getId() {
        return id;
    }

    public void setId(Integer id) {
        this.id = id;
    }

    public Integer getaId() {
        return aId;
    }

    public void setaId(Integer aId) {
        this.aId = aId;
    }
}
接下来编写接口文件
package com.example.demo3.mapper;

import com.example.demo3.domain.Discuss;
import org.springframework.data.domain.Pageable;
import org.springframework.data.jpa.repository.Modifying;
import org.springframework.data.jpa.repository.Query;
import org.springframework.transaction.annotation.Transactional;

import java.util.List;

public interface DiscussRepository extends JpaRepository  {
    public List findByAuthorNotNull();
    @Query("select c from t_comment c where c.aId=1")
    public List getDiscussPaged(Integer aid,Pageable pageable);
    @Query(value="select * from t_comment where a_Id=1",nativeQuery=true)
    public List getDiscussPaged2(Integer aid, Pageable pageable);
    @Transactional
    @Modifying
    @Query("update t_comment c set c.author=1 where c.id=2")
    public int updateDiscuss(String author,Integer id);
    @Transactional
    @Modifying
    @Query("delete from t_comment c where c.id=1")
    public int deleteDiscuss(Integer id);
}
最后编写测试类进行测试
3.4 SpringBoot整合Redis
除了对关系型数据库的整合支持外,SpringBoot对非关系型数据库也提供了非常好的支持。
3.4.1 Redis介绍
Redis是一个开源的、内存中的数据结构存储系统,它可以用作数据库,缓存和消息中间件,并提供多种语言的API。Redis支持多种类型的数据机构,例如字符串(strings)、散列(hashes)、列表(lists)、集合(sets)等。同时,Redis内部内置了复本(replication),LUA脚本,LRU驱动事件,事务和不同级别的磁盘持久化,并通过Redis Sentinel和自动分区提供高可用性。
相较于其他的key-value键值存储系统而言,Redis主要有以下优点:
-
存储速度快:Redis速度非常快,每秒可执行大约1100000次的设值操作,或者执行81000次的读取操作。
-
支持丰富的数据类型:Redis支持开发人员常用的大多数数据类型,例如列表,集合,配许集和散列等。
-
操作具有原子性:所有Redis操作都是原子操作,这确保如果两个客户端并发访问,Redis服务器能接受更新后的值。
-
提供多种功能:Redis提供了多种功能特性,可用作非关系型数据库,缓存中间件,消息中间件等。
在完成Redis的简单介绍后,下面我们来对Redis的安装配置进行说明。
Redis安装下载
使用非关系型数据库Redis,必须先进行安装配置并开启Redis服务,然后使用对应客户端连接使用。Redis支持多种方式的安装配置,例如Windows,Linux,Docker镜像安装等,不同安装方式安装过程也不相同。为了方便操作,此处选择在Windos平台下进行Redis安装。
先在GitHub上下载Windows平台下的Redis安装包,在下载列表中找到对应版本的Redis,并选择对应的安装包下载即可。
Releases · microsoftarchive/redis (github.com)

这里我们使用Redis3.2.100版本,因为该版本对应于SpringBoot2.1.3版本进行了自动化配置。下载完成后,将安装包进行解压到自定义文件夹下,这里建议最好不好放在中文路径下,不需要进行额外的安装和配置。
Redis服务开启于连接配置
完成Redis的下载安装后,启动Redis服务,并使用可视化客户端工具连接对应的Redis服务进行效果测试

从上图可以看出,windows下的Redis安装包解压后会有多个目录文件,包括两个重要的可执行文件:redis-server.exe和redis-cli.exe。其中,redis-server.exe用于开启Redis服务,redis-cli.exe用于开启客户端工具。这里选择双击redis-server.exe指令即可开启Redis服务

从图中可以看出,Redis服务正常启动,同时在终端窗口显示了当前Redis版本为3.2.100和默认启动端口号为6379.
接着Redis可视化客户端工具安装连接,Redis解压目录下的redis-cli.exe指令用于开启客户端工具,不过双击这个指令打开的是终端操作界面,对于Redis的可视化操作和查看并不方便。这里推荐使用一个Redis的客户端可视化管理工具Redis Desktop Manager连接Redis服务进行管理,这里直接进入redisdesktop官网及逆行下载安装。下载并安装完成后,打开并连接上对应的Redis服务。
Release 0.9.3 · RedisInsight/RedisDesktopManager · GitHub

![]()


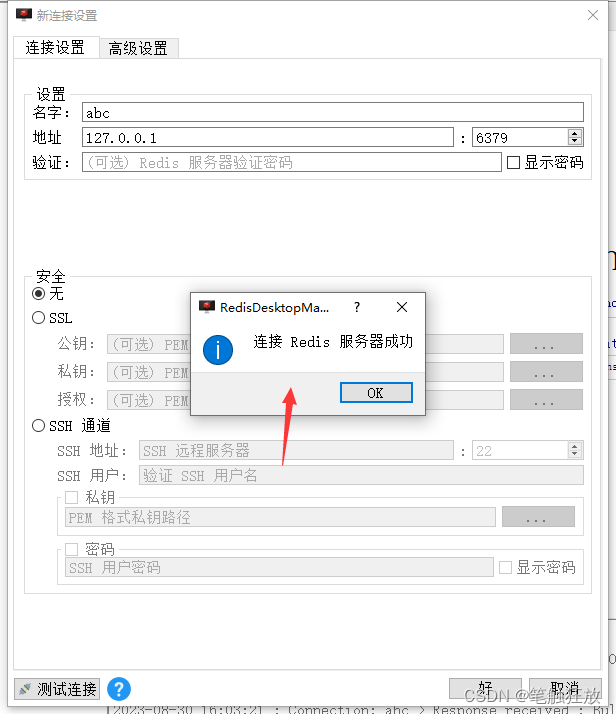

以上即安装和配置成功了。
3.4.2 使用Spring Boot整合Redis
接下来我们通过项目来整合Redis进行使用
1.添加依赖启动器
先在项目pom.xml文件中添加依赖启动器
            org.springfamework.boot
            spring-boot-starter-data-redis
以上依赖启动器代码中,也没有编写对应的版本号信息,这是因为SpringBoot为Redis实现了自动配置,所以会统一管理版本号信息。
2.编写实体类
在项目的domain包下创建以下几个实体类
Family.java
package com.example.demo3.domain;

import org.springframework.data.redis.core.index.Indexed;

public class Family {
    @Indexed
    private String type;
    @Indexed
    private String username;

    public Family() {
    }

    @Override
    public String toString() {
        return "Family{" +
                "type='" + type + '\'' +
                ", username='" + username + '\'' +
                '}';
    }

    public String getType() {
        return type;
    }

    public void setType(String type) {
        this.type = type;
    }

    public String getUsername() {
        return username;
    }

    public void setUsername(String username) {
        this.username = username;
    }

    public Family(String type, String username) {
        this.type = type;
        this.username = username;
    }
}
Address.java
package com.example.demo3.domain;

import org.springframework.data.redis.core.index.Indexed;

public class Address {
    @Indexed
    private String city;
    @Indexed
    private String country;

    public Address() {
    }

    public Address(String city, String country) {
        this.city = city;
        this.country = country;
    }

    @Override
    public String toString() {
        return "Address{" +
                "city='" + city + '\'' +
                ", country='" + country + '\'' +
                '}';
    }

    public String getCity() {
        return city;
    }

    public void setCity(String city) {
        this.city = city;
    }

    public String getCountry() {
        return country;
    }

    public void setCountry(String country) {
        this.country = country;
    }
}
Person.java
package com.example.demo3.domain;

import org.springframework.data.annotation.Id;
import org.springframework.data.redis.core.RedisHash;
import org.springframework.data.redis.core.index.Indexed;

import java.util.List;

//指定操作实体类对象在Redis数据库中的存储空间
@RedisHash("persons")
public class Person {
    @Id //标识实体类主键
    private String id;
    @Indexed //标识对应属性在Redis数据库中生成二级索引
    private String firstname;
    @Indexed
    private String lastname;
    private Address address;
    private List familyList;

    @Override
    public String toString() {
        return "Person{" +
                "id='" + id + '\'' +
                ", firstname='" + firstname + '\'' +
                ", lastname='" + lastname + '\'' +
                ", address=" + address +
                ", familyList=" + familyList +
                '}';
    }

    public String getId() {
        return id;
    }

    public void setId(String id) {
        this.id = id;
    }

    public String getFirstname() {
        return firstname;
    }

    public void setFirstname(String firstname) {
        this.firstname = firstname;
    }

    public String getLastname() {
        return lastname;
    }

    public void setLastname(String lastname) {
        this.lastname = lastname;
    }

    public Address getAddress() {
        return address;
    }

    public void setAddress(Address address) {
        this.address = address;
    }

    public List getFamilyList() {
        return familyList;
    }

    public void setFamilyList(List familyList) {
        this.familyList = familyList;
    }

    public Person() {
    }

    public Person(String id, String firstname, String lastname, Address address, List familyList) {
        this.id = id;
        this.firstname = firstname;
        this.lastname = lastname;
        this.address = address;
        this.familyList = familyList;
    }
}
@RedisHash("persons"):用于指定操作实体类对象在Redis数据库中的存储空间,此处表示针对Person实体类的数据操作都存储在Redis数据库中名为persons的存储空间下。
@Id:用于标识实体类主键。在Redis数据库中会默认生成字符串形式的HashKey标识唯一的实体对象id,当然也可以在数据存储时手动指定id。
@Indexed:用于标识对应属性在Redis数据库中生成二级索引。使用该注解后会在Redis数据库中生成属性对应的二级索引,索引名称就是属性名,可以方便的进行数据条件查询。
3.编写接口文件
SpringBoot针对包括Redis在内的一些常用数据库提供了自动化配置,可以通过实现Repository接口简化对数据库中的数据进行的增删改查操作,这些操作方法可以使用关键字方法进行数据操作。在mapper包下创建接口文件。
package com.example.demo3.mapper;

import com.example.demo3.domain.Person;
import org.springframework.data.domain.Page;
import org.springframework.data.domain.Pageable;
import org.springframework.data.repository.CrudRepository;

import java.util.List;

public interface PersonRepository extends CrudRepository {
    //根据最后的姓名查询人员信息
    List findByLastname(String lastname);
    Page findPersonByLastname(String lastname, Pageable pageable);
    //根据开始的姓名和最后的姓名查询人员信息
    List findByFirstnameAndLastname(String firstname,String lastname);
    //根据城市查找地址,根据地址关联查询人员
    List findByAddress_City(String city);
    //根据家庭成员姓名查找关联的人员
    List findByFamilyList_UsUsername(String username);

}
4.Redis数据库连接配置
在项目的全局配置文件application.properties中添加Redis数据库的连接配置
#Redis服务器地址
spring.redis.host=127.0.0.1
#Redis服务器连接端口
spring.redis.port=6379
#Redis服务器连接密码(默认为空)
#spring.redis.password=0000
5.编写单元测试进行接口方法测试
创建一个测试类,进行测试Redis数据库的使用,这里我们先往Redis数据库中添加两条人员信息数据
package com.example.demo3;

import com.example.demo3.domain.Address;
import com.example.demo3.domain.Family;
import com.example.demo3.domain.Person;
import com.example.demo3.mapper.PersonRepository;
import org.junit.Test;
import org.junit.runner.RunWith;
import org.springframework.beans.factory.annotation.Autowired;
import org.springframework.boot.test.context.SpringBootTest;
import org.springframework.test.context.junit4.SpringRunner;

import java.util.ArrayList;
import java.util.List;

@RunWith(SpringRunner.class)
@SpringBootTest
public class RedisTest {
    @Autowired
    PersonRepository personRepository;

    @Test
    public void savePerson(){
        Person person=new Person();
        person.setFirstname("张");
        person.setLastname("有才");
        Person person1=new Person();
        person1.setFirstname("James");
        person1.setLastname("Harden");

        //创建地址信息
        Address address=new Address("北京","china");
        person.setAddress(address);
        Address address2=new Address("纽约","USA");
        person1.setAddress(address2);
        //创建并添加家庭成员
        List familyList=new ArrayList<>();
        Family dad=new Family("父亲","张良");
        Family mom=new Family("母亲","李香君");
        familyList.add(dad);
        familyList.add(mom);
        person.setFamilyList(familyList);
        //向Redis数据库添加数据
        Person save = personRepository.save(person);
        System.out.println(save);
        Person save1 = personRepository.save(person1);
        System.out.println(save1);
    }
}
6.整合测试
通过运行,我们可以观察到数据可以被显示在控制台上

接着我们可以打开Redis的可视化客户端,刷新一下后,可以看到数据已经添加值Redis数据库中

其他的修改,查询和删除操作可自行编写,运行查看结构。
@Test
public void selectPerson(){
    List list = personRepository.findByAddress_City("北京");
    System.out.println(list);
}

@Test
public void updatePerson(){
    Person person = personRepository.findByFirstnameAndLastname("张", "有才").get(0);
    person.setLastname("小明");
    Person save = personRepository.save(person);
    System.out.println(save);
}

@Test
public void deletePerson(){
    Person person = personRepository.findByFirstnameAndLastname("张", "小明").get(0);
    personRepository.delete(person);
}
本章小结
本章主要讲解了SpringBoot的数据访问,包括SpringBoot与MyBaits整合,SpringBoot与JPA整合以及SpringBoot与Redis整合。SpringBoot支持与众多常用类型的关系型数据库和非关系型数据库操作框架的整合使用,极大的简化了整合配置和开发速度。本章选取了其中3个主要的整合技术进行讲解,读者在学习过程中务必仔细查看并亲自演示,同时要深刻体会SpringBoot与其他技术的整合思路。
习题
一、填空题
-
MyBatis为了利用SpringBoot的便利性,适配了对应的依赖启动器()。
-
SpringBoot2.x版本默认使用的是()数据库。
-
在SpringBoot项目启动类上添加了()注解,来替代@Mapper注解。
-
Spring Data JPA中,@Entity标注在类上,还要使用()属性指定具体映射的表名。
-
Redis提供了多种功能特性,可用作非关系型数据库、缓存插件、()等。
二、判断题
-
SpringBoot官方为所有常用技术框架都提供了对应的依赖启动器。()
-
SpringBoot为整合MyBatis技术框架提供了版本管理。()
-
SpringBoot操作MySQL数据库时,还必须配置指定的数据源类型。()
-
SpringBoot全局配置文件设置Druid数据源相关参数后,还需要自定义配置类注入这些属性。()
-
SpringBoot JPA中映射的实体类属性上的@Column注解可以省略。()
三、选择题
-
下列关于SpringBoot整合MyBatis实现的说法,正确的是()。
A.SpringBoot整合MyBatis必须提供mybatis-spring-boot-starter依赖
B.@MapperScan("xxx")注解的作用和@Mapper注解一样
C.在全局配置文件中配置MyBatis的XML映射文件位置要使用mybatis.mapper-locations属性
D.使用注解方式编写MyBatis接口文件数据修改方法时,还需要使用@Transactional注解
-
下列关于Spring Data JPA映射的实体类中相关注解的说法,正确的是()。
A.使用Spring Data JPA进行数据查询映射时,需要在配置文件中开启驼峰命名映射
B.使用@Entity注解时,还要使用name属性指定具体映射的表名
C.@Id注解必须标注在类属性上,表示主键对应的属性
D.@Transient注解表示指定属性不是到数据库表的字段的映射,ORM框架将忽略该属性
-
使用SpringBoot整合Spring Data JPA编写Repository接口时,下列说法错误的是()。(多选)
A.自定义Repository接口可以继承CurdRepository接口
B.可以在方法上添加@Update注解结合SQL语句实现数据修改
C.可以在方法上添加@Delete注解结合sql语句实现数据删除
D.进行数据变更操作时,必须在Repository接口方法上添加@Transactional注解
-
Redis是一个开源内存中的数据结构存储系统,可以用作()。(多选)
A.数据库
B.缓存中间件
C.消息中间件
D.以上都正确
-
当Redis作为数据库时,下列与SpringBoot整合使用的相关说明,正确的是()。
A.@RedisHash("persons")用于指定操作实体类对象在Redis数据库中的存储空间
B.@Id用于表示实体类主键,需要动手指定id生成策略
C.使用Redis数据库,必须为实体类数据添加@Indexed属性生成二级索引
D.编写操作Redis数据库的Repository接口文件时,需要继承JpaRepository接口