Rockchip平台双屏异显功能实现(基于Android13)
Rockchip平台双屏异显功能实现(基于Android13)
1. 异显实现方案
Rockchip SDK平台支持两种不同的异显方案:Android Presentation和Android Activity指定屏幕启动。
使用Android Presentation方案,需要在APP开发中调用相应接口以使指定视图(Presentation视图是一种特殊的对话框类型视图)在副屏上显示。
而使用Android Activity指定屏幕启动方案,APP在启动activity时可以使用display id参数直接在相应屏幕上显示,无需源代码便可以通过命令行或系统接口将第三方应用程序的activity投影到副屏上。
这两种方案主要区别在于:
-
Android Presentation方案需要独立开发activity并将需要显示的内容投影到副屏上,而Android Activity指定屏幕启动方案则可以不需要源代码,只需通过命令行或系统接口将第三方应用程序的activity投影到副屏上;
-
Android Presentation方案只有一个activity位于顶层,通过特殊的对话框将指定内容显示在副屏上,而Android Activity指定屏幕启动方案则是两个activity分别显示在主屏和副屏上。
1.1 Presentation
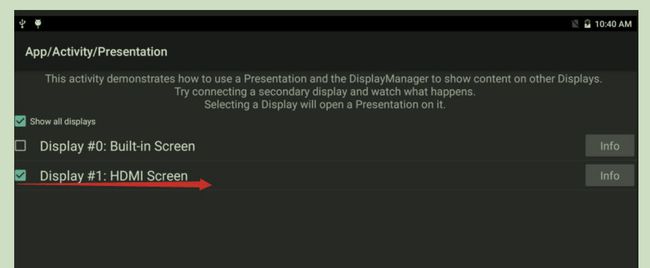
SDK已经提供了与该接口相关的演示demo,请进入development/samples/ApiDemos目录,使用mm编译生成相应的apk。安装apk后,点击App->Activity->Presentation选项即可进入Presentation调用界面。在该界面上,需要勾选副屏复选框选项,才能在副屏上显示相应的图片。
具体的代码位于以下路径:development/samples/ApiDemos/src/com/example/android/apis/app/PresentationActivity.java。

1.2 Android Activity 指定屏幕启动
在startActivity接口的参数中设置指定屏幕的display id,可以直接在指定屏幕上启动显示Activity。
Activity的多显示器支持需要设备支持Activity需要支持分屏属性,即在android:resizeableActivity="true"。这个属性在目标版本为Android N及以上时,android:resizeableActivity的默认值就是true。
ActivityOptions提供了两个新函数来支持多个显示器:
setLaunchDisplayId():指定Activity在启动后应该显示在哪个显示器上。getLaunchDisplayId():返回操作组件当前启动的显示器。
使用示例:
在示例中,使用MediaRouter接口获取副屏的display id,同样地,也可以使用DisplayManager接口获取相应的display id。需要注意的是,此处只能打开其他包中的Activity,否则会提示:“App does not support launch on secondary displays”。
private void showSecondByActivity(Context context) {
    ActivityOptions options = ActivityOptions.makeBasic();
    MediaRouter mediaRouter = (MediaRouter) context.getSystemService(Context.MEDIA_ROUTER_SERVICE);
    MediaRouter.RouteInfo route = mediaRouter.getSelectedRoute(MediaRouter.ROUTE_TYPE_LIVE_VIDEO);
    if (route != null) {
        Display presentationDisplay = route.getPresentationDisplay();
        options.setLaunchDisplayId(presentationDisplay.getDisplayId());
        //options.
        Intent intent = new Intent("android.intent.action.MUSIC_PLAYER");
        intent.addFlags(Intent.FLAG_ACTIVITY_NEW_TASK);
        startActivity(intent, options.toBundle());
    }
}
同时,adb shell也进行了扩展,以支持多个显示器。shell start命令现在可以用于启动操作组件,并指定目标显示器:
adb shell am start --display <display_id> <activity_name>
例如:adb shell am start --display 1 com.android.settings/.Settings(将Settings界面启动到指定的副屏)。
2. 副屏方向配置
RK3568 存在双屏和三屏的使用场景, 在双屏场景下,副屏可以通过设置属性 persist.sys.rotation.einit-1(属性值为 0,1,2,3)来调整不同的方向。例如,设置命令为 setprop persist.sys.rotation.einit-1 1,可以将副屏旋转 90 度。设置完毕后,需要重启机器才能生效。
在三屏场景下,存在一个屏幕做为主屏,另外两个屏幕做为副屏。根据如下 dumpsys input 信息,系统中三个显示屏对应的 viewport 如下:
- Viewport INTERNAL:
displayId=0,uniqueId=local:0,port=0,orientation=0,logicalFrame=[0, 0, 1080, 1920],physicalFrame=[0, 0, 1080, 1920],deviceSize=[1080, 1920],isActive=[1] - Viewport EXTERNAL:
displayId=0,uniqueId=local:1,port=1,orientation=1,logicalFrame=[0, 0, 1080, 1920],physicalFrame=[0, 0, 720, 1280],deviceSize=[720, 1280],isActive=[1] - Viewport EXTERNAL:
displayId=0,uniqueId=local:2,port=2,orientation=0,logicalFrame=[0, 0, 1080, 1920],physicalFrame=[0, 0, 1440, 900],deviceSize=[1440, 900],isActive=[1]
两个副屏需要分别设置 persist.sys.rotation.einit-1 和 persist.sys.rotation.einit-2(属性值为 0,1,2,3)这两个属性来控制对应屏幕的方向。(这两个属性分别对应 port1 和 port2 两个副屏)。
此外,对于 RK3288、RK3399、PX30 和 RK3326 等芯片,副屏方向可以通过设置属性 persist.sys.rotation.einit(属性值为 0,1,2,3)来调整。例如,设置命令为 setprop persist.sys.rotation.einit 1,可以将副屏旋转 90 度。设置完毕后,同样需要重启机器才能生效。
3. 其他配置
3.1 支持输入法在副屏显示
在 device/rockchip/common/display_settings.xml 中设置相应屏幕 shouldShowIme 为 true,如下配置:
<display-settings>
    <config identifier="0" />
    <display
        name="local:1"
        shouldShowIme="true"
        forcedDensity="240"/>
display-settings>
3.2 副屏 DPI 设置
在 device/rockchip/common/display_settings.xml 中设置 forcedDensity,例如:
<display-settings>
    <config identifier="0" />
    <display
        name="local:1"
        shouldShowIme="true"
        forcedDensity="240"/>
display-settings>
3.3 鼠标主副屏切换显示
设置 sys.mouse.presentation 为 1,打开该功能。异显状态时,开机鼠标默认在主屏显示,当鼠标移动到屏幕的边缘时,会自动切换到副屏的中心位置显示。
