编译安装Linux内核
编译安装Linux内核
Linux内核组成部分:
- kernel:内核核心,一般为bzImage,通常在/boot目录
vmlinuz-VERSION-RELEASE
- kernel object:内核对象,一般放置于
/lib/modules/VERSION-RELEASE/
- 辅助文件:ramdisk
initrd-VERSION-RELEASE.img:从CentOS 5 版本以前
initramfs-VERSION-RELEASE.img:从CentOS6 版本以后
1.1 内核版本
运行中的内核:
uname命令:打印系统信息
常用选项:
-n  打印网络节点主机名
-r  打印内核版本
-a  打印所有信息
1.2 内核模块命令
lsmod命令:显示Linux内核中模块的状态,显示的内容来自于: /proc/modules文件
modinfo命令:显示有关Linux内核模块的信息
功能:管理内核模块
配置文件:/etc/modprobe.conf, /etc/modprobe.d/*.conf
常用选项:
-n:只显示模块文件路径
-p:显示模块参数
-a:作者
-d:描述
modprobe命令:在Linux内核中添加和删除模块
常用选项:
-C:使用文件
-r:删除模块
depmod命令:生成模块.dep和map文件
insmod命令:将模块插入Linux内核的简单程序
rmmod命令:从Linux内核中删除模块的简单程序
1.3 编译内核
编译安装内核准备:
(1) 准备好开发环境
(2) 获取目标主机上硬件设备的相关信息
(3) 获取目标主机系统功能的相关信息,例如:需要启用相应的文件系统
(4) 获取内核源代码包,www.kernel.org
[root@centos7 ~]#yum -y install gcc gcc-c++ make ncurses-devel flex bison openssl-devel elfutils-libelf-devel
[root@centos7 ~]#tar xvf linux-5.15.51.tar.xz -C /usr/local/src
[root@centos7 ~]#cd /usr/local/src
[root@centos7 src]#ls
linux-5.15.51
[root@centos7 src]#du -sh *
1.2G	linux-5.15.51
[root@centos7 src]#cd linux-5.15.51/
[root@centos7 linux-5.15.51]#ls
arch   COPYING  Documentation  include  Kbuild   lib          Makefile  README   security  usr
block  CREDITS  drivers        init     Kconfig  LICENSES     mm        samples  sound     virt
certs  crypto   fs             ipc      kernel   MAINTAINERS  net       scripts  tools
[root@centos7 linux-5.15.51]#cp /boot/config-3.10.0-1160.el7.x86_64 .config
[root@centos7 linux-5.15.51]#vim .config
#修改下面三行
#CONFIG_MODULE_SIG=y    #注释此行
CONFIG_SYSTEM_TRUSTED_KEYRING=""    #修改此行
#CONFIG_DEBUG_INFO=y    #linux-5.8.5版本后需要注释此行

#升级gcc版本,可以到清华的镜像站上下载相关的依赖包
#https://mirrors.tuna.tsinghua.edu.cn/gnu/gcc/gcc-9.1.0/
#https://mirrors.tuna.tsinghua.edu.cn/gnu/gmp/
#https://mirrors.tuna.tsinghua.edu.cn/gnu/mpc/
#https://mirrors.tuna.tsinghua.edu.cn/gnu/mpfr/

[root@centos7 linux-5.15.51]#cd ..
[root@centos7 src]#tar xvf gcc-9.1.0.tar.gz
[root@centos7 src]#tar xvf gmp-6.1.2.tar.bz2 -C gcc-9.1.0/
[root@centos7 src]#cd gcc-9.1.0/
[root@centos7 gcc-9.1.0]#mv gmp-6.1.2 gmp
[root@centos7 gcc-9.1.0]#cd ..
[root@centos7 src]#tar xvf mpc-1.1.0.tar.gz -C gcc-9.1.0/
[root@centos7 src]#cd gcc-9.1.0/
[root@centos7 gcc-9.1.0]#mv mpc-1.1.0 mpc
[root@centos7 gcc-9.1.0]#cd ..
[root@centos7 src]#tar xvf mpfr-4.0.2.tar.gz -C gcc-9.1.0/
[root@centos7 src]#cd gcc-9.1.0/
[root@centos7 gcc-9.1.0]#mv mpfr-4.0.2 mpfr

#编译安装gcc
[root@centos7 gcc-9.1.0]#./configure --prefix=/usr/local/ --enable-checking=release --disable-multilib --enable-languages=c,c++ --enable-bootstrap
[root@centos7 gcc-9.1.0]#make -j 2  #CPU核数要多加,不然编译会很慢
[root@centos7 gcc-9.1.0]#make install

[root@centos7 gcc-9.1.0]#cd ..
[root@centos7 src]#cd linux-5.15.51/
[root@centos7 linux-5.15.51]#make help
[root@centos7 linux-5.15.51]#make menuconfig
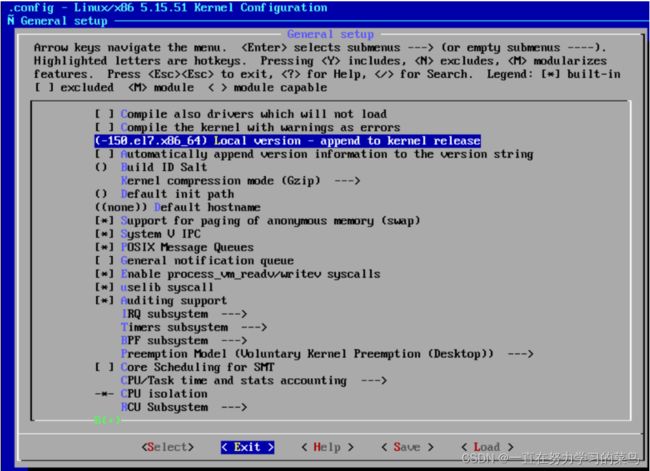
1.31 回到VMware虚拟机,继续操作,进入【常规设置】回车

1.32 添加内核版本,回车

1.33 输入自定义内核版本,回车

1.34 按【Tab键】,选择【Exit】退出
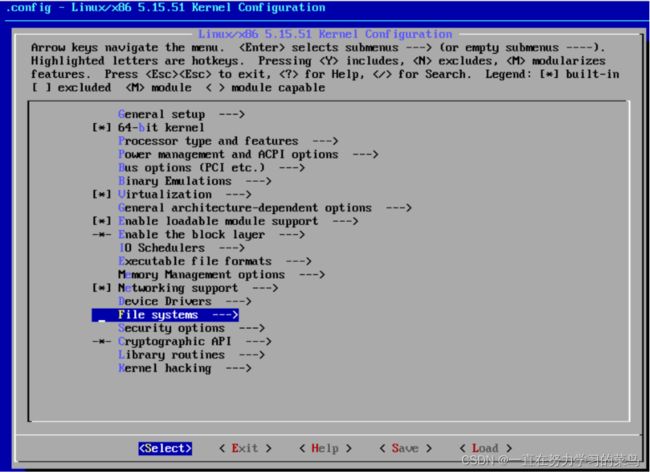
1.35 选择【文件系统】,回车
1.36 选择【NT 文件系统】,回车
1.37 选择【NTFS 文件系统】,按【空格键】,M表示模块化方式
1.38选择【支持调试和写】,按【空格键】选中,按【Tab键】,选择【Exit】,回车退出

1.39 按【Tab键】,选择【Exit】,回车退出
1.310 按【Tab键】,选择【Exit】,回车退出
1.311 保存配置,回车

[root@centos7 linux-5.15.51]#grep -i ntfs .config
CONFIG_NTFS_FS=m
CONFIG_NTFS_DEBUG=y
CONFIG_NTFS_RW=y
# CONFIG_NTFS3_FS is not set

[root@centos7 linux-5.15.51]#make -j 2  #CPU核数要多加,不然编译会很慢
[root@centos7 linux-5.15.51]#pwd
/usr/local/src/linux-5.15.51
[root@centos7 linux-5.15.51]#du -sh .
3.0G	.
[root@centos7 linux-5.15.51]#make modules_install
[root@centos7 linux-5.15.51]#ls /lib/modules
3.10.0-1160.el7.x86_64  5.15.51-150.el7.x86_64
[root@centos7 linux-5.15.51]#du -sh /lib/modules/*
45M	/lib/modules/3.10.0-1160.el7.x86_64
224M	/lib/modules/5.15.51-150.el7.x86_64
[root@centos7 linux-5.15.51]#make install
[root@centos7 linux-5.15.51]#ls /boot/
config-3.10.0-1160.el7.x86_64                            System.map
efi                                                      System.map-3.10.0-1160.el7.x86_64
grub                                                     System.map-5.15.51-150.el7.x86_64
grub2                                                    vmlinuz
initramfs-0-rescue-afe373e8a26e45c681032325645782c8.img  vmlinuz-0-rescue-afe373e8a26e45c681032325645782c8
initramfs-3.10.0-1160.el7.x86_64.img                     vmlinuz-3.10.0-1160.el7.x86_64
initramfs-5.15.51-150.el7.x86_64.img                     vmlinuz-5.15.51-150.el7.x86_64
symvers-3.10.0-1160.el7.x86_64.gz
1.4 选择Linux5.15内核启动
[root@centos7 linux-5.15.51]#reboot
[root@centos7 ~]#uname -r
5.15.51-150.el7.x86_64

1.5 内核编译说明
1.5.1 配置内核选项
支持“更新”模式进行配置:make help
(a) make config:基于命令行以遍历的方式配置内核中可配置的每个选项
(b) make menuconfig:基于curses的文本窗口界面
(c) make gconfig:基于GTK (GNOME)环境窗口界面
(d) make xconfig:基于QT(KDE)环境的窗口界面
支持“全新配置”模式进行配置
(a) make defconfig:基于内核为目标平台提供的“默认”配置进行配置
(b) make allyesconfig: 所有选项均回答为“yes“
(c) make allnoconfig: 所有选项均回答为“no“
1.5.2 编译内核
- 全编译:
make [-j #]
- 编译内核的一部分功能:
(a) 只编译某子目录中的相关代码
cd /usr/src/linux
make dir/
(b) 只编译一个特定的模块
cd /usr/src/linux
make dir/file.ko
1.5.3 交叉编译内核
编译的目标平台与当前平台不相同
make ARCH=arch_name
要获取特定目标平台的使用帮助
make ARCH=arch_name help
1.5.4 重新编译需要事先清理操作
make clean:清理大多数编译生成的文件,但会保留.config文件等
make mrproper: 清理所有编译生成的文件、config及某些备份文件
make distclean:包含 make mrproper,并清理patches以及编辑器备份文件
1.6 卸载内核
- 删除/usr/src/linux/目录下不需要的内核源码
- 删除/lib/modules/目录下不需要的内核库文件
- 删除/boot目录下启动的内核和内核映像文件
- 更改grub的配置文件,删除不需要的内核启动列表 grub2-mkconfig -o /boot/grub2/grub.cfg
- CentOS 8 还需要删除 /boot/loader/entries/5b85fc7444b240a992c42ce2a9f65db5-新内核版本.conf