【hcie-cloud】【21】容器详解【容器网络说明、容器存储说明、容器镜像说明、dockerfile详述、缩略词】【下】
文章目录
- 容器介绍,容器工作机制、容器常用命令说明
- 容器网络
-
- 容器网络简介
- 容器常用网络类型 - Bridge
- 容器常用网络类型 - Host
- 容器常用网络类型 - None
- 其他容器网络类型【Macvlan、Overlay、IPvlan】
- 容器网络相关配置
- 容器存储
-
- 容器中应用数据的存储
- 容器持久化存储配置
- 修改容器持久化存储
- 删除容器持久化存储
- 容器镜像
- 容器镜像说明
- 容器镜像分层结构
- 容器copy-on-write特性
- UnionFS联合文件系统
- AUFS简介
- OverlayFS简介
- OverlayFS简介
- Registry
- 容器镜像命名格式
- 查看镜像
- 拉取容器镜像
-
- 拉取公共镜像
- 拉去私有镜像
- 推送容器镜像
- 打包和解压容器镜像
- 删除容器镜像
- 制作镜像
-
- 方式1:使用Dockerfile制作镜像
- 方式2:使用命令docker commit
- Dockerfile详述
-
- Dockerfile简介
- Dockerfile结构
- Dockerfile基础镜像
- Dockerfile镜像描述信息
- Dockerfile构建容器指令 - RUN
- Dockerfile构建容器指令 - COPY
- Dockerfile构建容器指令 - ADD
- Dockerfile构建容器指令 - WORKDIR
- Dockerfile构建容器指令 - ENV
- Dockerfile构建容器指令 - EXPOSE
- Dockerfile构建容器指令 - VOLUME
- Dockerfile设置镜像启动时执行任务的命令 - CMD
- Dockerfile设置镜像启动时执行任务的命令 - ENTRYPOINT
- Dockerfile建议
- Dockerfile优化案例
- 缩略语
容器介绍,容器工作机制、容器常用命令说明
下面这篇文章
【hcie-cloud】【20】容器详解【容器介绍,容器工作机制、容器常用命令说明】【上】
容器网络
容器网络简介
- 容器的网络实现有两种方式:
- 第一种是容器引擎使用自带的网络子系统,使用可插拔的网络驱动实现网络功能,如docker
- 第二种是容器引擎没有网络子系统,需使用第三方的网络插件来实现各种网络功能,如Containerd、iSula等
- docker也支持使用第三方的网络插件
- 常见的第三方网络插件有flannel、calico等,在容器编排的场景中,强烈推荐使用第三方网络插件,由容器编排应用统一进行调度管理
- 第三方的网络插件如flannel、calico等,将放在容器编排中介绍,本小节重点介绍各个网络功能的实现原理及使用场景
容器常用网络类型 - Bridge
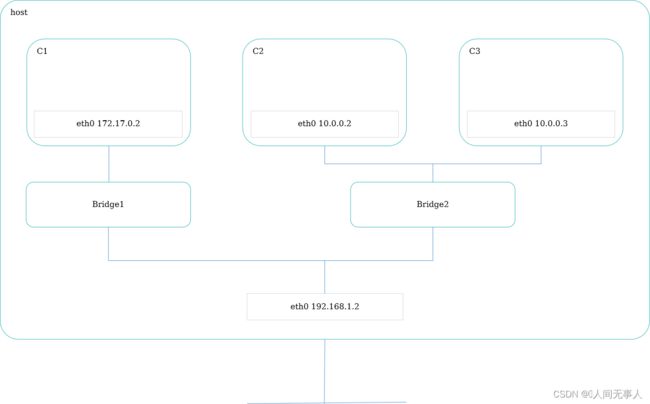
- Bridge是docker默认的网络类型,连接在相同bridge上的容器及宿主机可以相互通信;相反,连接在不同bridge的容器不能直接通信
- Bridge打通容器和宿主机之间的网络,本质是添加了对应的iptables条目,进行了NAT转换
容器常用网络类型 - Host
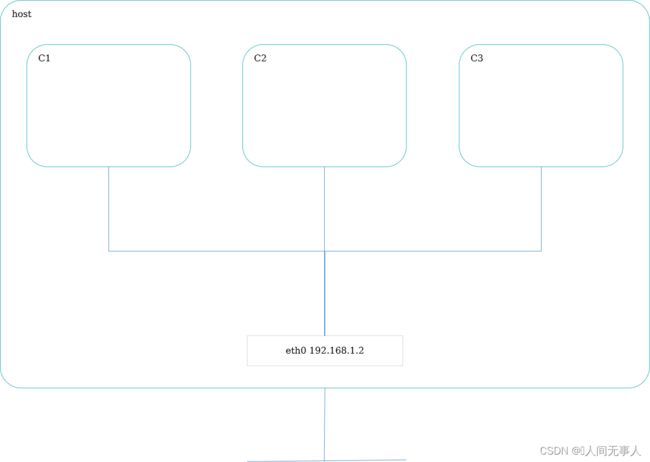
- Host网络类型中,容器共享宿主机的网络及接口,这意味着容器的网络配置和宿主机是一样的
- 使用host网络类型的容器,在转发性能方面可以得到最大的发挥,但是容器之间的隔离性不好,而且,如果容器中的业务使用相同的端口,会造成冲突,而导致容器下线
容器常用网络类型 - None
- None网络类型中,容器中仅有loopback接口,无法与外界进行通信
- 如果需要将容器彻底和外界进行隔离,例如在容器中观察某个病毒程序的运行等场景,那么将其网络类型设置为none
其他容器网络类型【Macvlan、Overlay、IPvlan】
- Macvlan
Macvlan网络类型中,允许用户为容器指定mac地址,可使其不需要bridge,像一个物理网卡一样直接连接到真实的网络环境中 - Overlay
Overlay类型的网络插件可以在多个宿主机上创建分布式网络,使运行在它们上面的容器使用进行互相通信。容器编排中常使用overlay网络 - Ipvlan
Ipvlan网络类型中,用户可以完全控制基于IPv4和IPv6的网络寻址 - Macvlan网络类型中,容器之间像物理网卡一样,相互之间没有隔离,一旦容器的数量比较庞大,则会造成广播风暴,占用大量的网络带宽
- 单机场景中一般不是用overlay,有bridge基本可以实现大部分功能
- IPvlan是经过考验的真正网络虚拟化技术的一个新的转折。Linux实现非常轻量级,因为它们不是使用传统的Linux网桥进行隔离,而是与Linux以太网接口或子接口相关联,以强制网络之间的分离和与物理网络的连接。
容器网络相关配置
- 命令
docker network ls可列出当前网络类型
[root@localhost etc]# docker network ls
NETWORK ID     NAME      DRIVER    SCOPE
de9318b2d1fc   bridge        bridge     local
eff3707e730d    host           host       local
44e296e50379   none          null       local
- 命令
docker network create可创建一个新的网络
[root@localhost etc]# docker network create -d macvlan test
78cfffc0e65c80ba378994f533a4b15bfd272768f6943cf5d05a56e3a0dd75e0
[root@localhost etc]# docker network ls
NETWORK ID     NAME      DRIVER    SCOPE
de9318b2d1fc   bridge        bridge      local
eff3707e730d   host             host        local
44e296e50379   none           null        local
78cfffc0e65c      test          macvlan    local
-
命令
docker network create可以指定网络的类型,还可以使用--subnet选项指定该网络的网段,--gateway选项指定该网络的网关,更多选项及其功能可使用help命令进行查看 -
命令
docker network inspect NetworkName可查看网络的详细信息
[root@localhost etc]# docker network inspect test
[
    {
        "Name": "test",
        "Id": "78cfffc0e65c80ba378994f533a4b15bfd272768f6943cf5d05a56e3a0dd75e0",
        "Created": "2022-04-20T02:14:23.608005889-04:00",
        "Scope": "local",
        "Driver": "macvlan",
        "EnableIPv6": false,
...........
        "Ingress": false,
        "ConfigFrom": {
            "Network": ""
        },
        "ConfigOnly": false,
        "Containers": {},
        "Options": {},
        "Labels": {}
    }
]
- 创建和运行容器时,使用
--network选项可为容器指定使用的网络,例如命令docker run --network test -d busybox sleep 3600可为容器设置其使用名称为test的网络
[root@localhost etc]# docker run --network test -d busybox sleep 3600
[root@localhost etc]# docker ps -a
CONTAINER ID   IMAGE     COMMAND        CREATED          STATUS          PORTS     NAMES
d9bba594e156   busybox   "sleep 3600"    57 seconds ago   Up 56 seconds             sharp_robinson
[root@localhost etc]# docker inspect sharp_robinson | grep -A 5 test
            "NetworkMode": "test",
            "PortBindings": {},
            "RestartPolicy": {
                "Name": "no",
                "MaximumRetryCount": 0
            },
--
                "test": {
                    "IPAMConfig": null,
                    "Links": null,
                    "Aliases": [
                        "d9bba594e156"
                    ],
容器存储
容器中应用数据的存储
-
对容器中数据的修改仅保存在临时读写层,无法进行永久存储,一旦容器被删除,这些数据就会同时被删除
-
如果需要将容器产生的数据做持久化保存,有两种方式实现:
- 将宿主机的文件或目录挂载给容器,产生的数据保存在宿主机上
- 使用第三方存储插件
-
容器停止时,临时读写层的数据不会被删除,只有容器被删除时,这些数据才会被删除
-
在容器编排章节重点介绍第三方存储插件,被章节主要介绍第一种方式
容器持久化存储配置
- 创建和运行容器时,使用-v选项可将宿主机的指定文件或目录挂载到容器中
-v参数可多次使用,用来挂载多个文件或目录到容器中- 挂载后的文件或目录会覆盖掉容器中原来的文件或目录
- 例如:
docker run -d -v /root/index.html:/usr/share/nginx/html/index.html nginx:1.21
将宿主机上的/root/index.html文件挂载给了容器的/usr/share/nginx/html/index.html
[root@localhost ~]# echo "hello CCE" > index.html
[root@localhost ~]# docker run -d -v /root/index.html:/usr/share/nginx/html/index.html nginx:1.21
E5517b6737cf405c47969cc6d9bfe96b0798ce351e90eebbf235e7a2babe9221
[root@localhost ~]# docker inspect e5 | grep IPAddress
            "SecondaryIPAddresses": null,
            "IPAddress": "172.17.0.2",
                    "IPAddress": "172.17.0.2",
[root@localhost ~]# curl 172.17.0.2:80
hello CCE
-v选项挂载宿主机文件或目录到容器时,可以设置容器对挂载后的数据的权限:-ro:容器对挂载后的数据有仅读权限-rw:默认权限,表示容器对挂载后的数据有读写权限
- 例如在命令
docker run -d -v /root/index.html:/usr/share/nginx/html/index.html:rw -v /etc/localtime:/etc/localtime:ro nginx:1.21中,/root/index.html可以被容器读写,/etc/localtime容器仅有读取权限
[root@localhost ~]# echo "hello CCE" > index.html
[root@localhost ~]# docker run -d -v /root/index.html:/usr/share/nginx/html/index.html:rw -v /etc/localtime:/etc/localtime:ro nginx:1.21
67d3926b4efc8dcd8e4160cf6f5260ff06f81b1b3a402e8c0d3723de4ec34eac
root@67d3926b4efc:/# echo "hello CCE again" >> /usr/share/nginx/html/index.html
root@67d3926b4efc:/# cat /usr/share/nginx/html/index.html
hello CCE
hello CCE again
root@67d3926b4efc:/# echo "hello CCE again" >> /etc/localtime
bash: /etc/localtime: Read-only file system
修改容器持久化存储
将宿主机的文件或目录挂载到容器后,如果要对其进行修改,如果容器对该文件具备读写权限,可以在容器中修改,也可以在宿主机上直接修改
[root@localhost ~]# docker ps -a
CONTAINER ID   IMAGE        COMMAND                  CREATED          STATUS          PORTS     NAMES
67d3926b4efc   nginx:1.21   "/docker-entrypoint.…"   10 minutes ago   Up 10 minutes   80/tcp    hungry_lehmann
[root@localhost ~]# curl 172.17.0.2:80
hello CCE
hello CCE again
[root@localhost ~]# echo "hello CCE one more time" >> index.html
[root@localhost ~]# curl 172.17.0.2:80
hello CCE
hello CCE again
hello CCE one more time
删除容器持久化存储
- 被挂载到容器中的宿主机文件或目录的生命周期独立于容器,因此,容器被删除后,这些文件仍然存在
- 如果要删除,需要在宿主机上执行rm操作
- 在删除容器时,使用-v选项并不会删除宿主机上的文件,仅删除容器产生的一些数据
- 容器在运行时,也可以在宿主机上删除被挂载的文件,但是一旦容器停止后就无法再启动了
容器镜像
容器镜像说明
-
容器镜像是容器的模板,容器是镜像的运行实例,runtime根据容器镜像创建容器
-
容器镜像挂载在容器根目录下,是为容器中的应用提供隔离后执行环境的文件系统
-
容器镜像打包了整个操作系统的文件和目录(rootfs),当然也包括应用本身。即,应用及其运行所需的所有依赖,都被封装在容器镜像中。保证了本地环境和云端环境的高度一致
-
容器镜像采用分层结构:
- 所有容器共享宿主机Kernel,并且不能修改宿主机Kernel。即,容器运行过程中使用容器镜像里的文件,使用宿主机OS上的Kernel
- 镜像是不可以修改的,不可以超过128层
-
对一个应用来说,操作系统是它运行所需要的最完整的依赖
-
容器镜像直接打包了应用运行所需要的整个操作系统,从而保证了本地环境和云端环境的高度一致。对软件开发而言,容器镜像打通了“开发 - 测试 - 部署”的流程
-
容器镜像只是提供了一套镜像文件系统中的各种文件,而各种内核相关的模块或者特性支持,完全依赖于宿主机
容器镜像分层结构
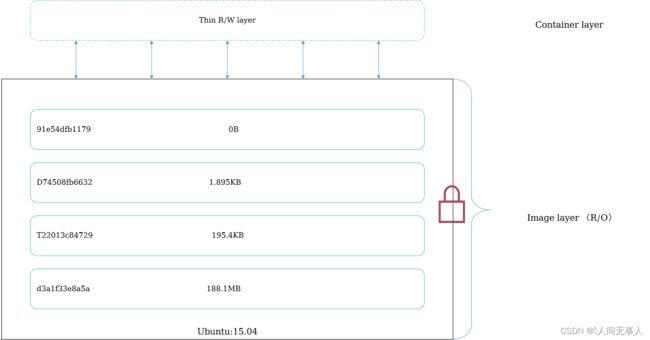
- Docker镜像中引入层layer的概念。镜像制作过程中的每一步操作,都会生成一个新的镜像层
- 容器镜像采用分层结构,可分为镜像层和容器层:
- 镜像层:只读,每一个镜像层都可以共享
- 容器层:可读写,在容器启动时被加载到镜像层之上
- 容器镜像
- 一个完整镜像中的所有镜像层联合在一起,即为一个统一的文件系统。用户在容器层中只能看到最上层的文件
- 镜像的分层结构使得镜像的制作以增量的方式进行。这样,每次镜像的拉取、推送时的数据量都比完整镜像小很多;且宿主机或Registry上容器镜像占用的真实存储空间也比所有容器镜像总和小很多,减少空间占用
容器copy-on-write特性
- 对容器的增删改查操作:
| 操作 | 具体执行 |
|---|---|
| 创建文件 | 新文件只能被添加在容器层中。 |
| 删除文件 | 依据容器分层结构由上往下依次查找。找到后,在容器层中记录该删除操作。具体实现是,UnionFS会在容器层创建一个”whiteout”文件,将被删除的文件“遮挡”起来。 |
| 修改文件 | 依据容器分层结构由上往下依次查找。找到后,将镜像层中的数据复制到容器层进行修改,修改后的数据保存在容器层中。(copy-on-write) |
| 读取文件 | 依据容器分层结构由上往下依次查找。 |
- 所有storage driver都支持镜像分层结构和写时复制(CoW)策略
UnionFS联合文件系统
- UnionFS主要的功能是将多个不同位置的目录联合挂载(union mount)到同一个目录下
- 每一个镜像层都是Linux操作系统文件与目录的一部分。在使用镜像时,docker会将所有的镜像层联合挂载到一个统一的挂载点上,表现为一个完整的Linux操作系统供容器使用
- docker镜像分层结构的实现,借助于UnionFS联合文件系统的能力
- Union File System联合文件系统,是实现docker镜像的技术基础。它是一种轻量级的高性能分层文件系统,支持将文件系统中的修改进行提交和层层叠加。这个特性使得镜像可通过分层实现和继承。同时支持将不同目录挂载到同一个虚拟文件系统下
- 以Overlay2为例:Overlay2是一种堆叠文件系统,它依赖并建立在其它的文件系统之上(如ext4fs、xfs等),并不直接参与磁盘空间结构的划分,仅将原来底层文件系统中不同的目录进行“合并”,然后向用户呈现,这也就是联合挂载技术
AUFS简介
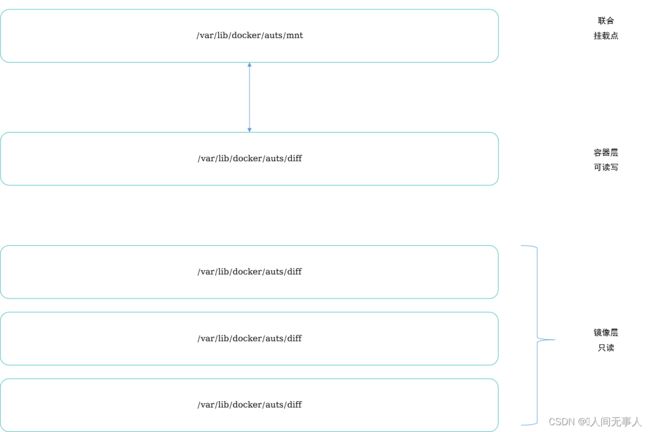
- AUFS 是联合文件系统的一种,它在主机上使用多层目录存储结构,每一个目录在 ausf 中都叫作分支,而在 docker 中则称之为层(layer),最终呈现给用户的则是一个普通单层的文件系统
- 每一个镜像层和容器层都是 /var/lib/docker 下的一个子目录,镜像层和容器层都在 AUFS/diff 目录下,每一层的目录名称是镜像或容器的 ID 值,联合挂载点在 AUFS/mnt 目录下,mnt 目录是真正的容器工作目录
- AUFS读取文件的流程:
- 如果要读取的文件在容器层中存在,则直接从容器层读取
- 如果要读取的文件在容器层中不存在时,则从镜像层中按照层级查找该文件,知道查找完成后,然后读取文件内容
- 如果要去读的文件既存在于镜像层,又存在于容器层,将会从容器层读取该文件
- AUFS修改文件的机制及流程
- AUFS 对文件的修改采用的是写时复制的工作机制,这种工作机制可以最大程度节省存储空间
- 当第一次在容器中修改某个文件时,AUFS 会触发写时复制操作,将被修改的文件从镜像层复制文件到容器层,然后再执行对应的修改操作。后面如果要再次修改文件,则直接在容器层进行修改
- 当文件被删除时,AUFS并不会真正将这个文件从镜像中删除,因为镜像层是只读的,而是创建一个whiteout格式的文件将要删除的文件遮挡起来,使用户看不到
OverlayFS简介
- OverlayFS是一个类似于AUFS的联合文件系统,它比AUFS部署起来更简单,性能更好。OverlayFS借助lowerdir、upperdir、merged和workdir实现和构建,其中workdir对用户侧不可见
- overlayFS文件系统的读流程:
- 如果文件在upperdir层,直接读取文件;
- 如果文件不在upperdir层,则从lowerdir层获取
- overlayFS文件系统的写流程:
- 如果在 upperdir 中不存在,overlay 和 overlay2 执行 copy_up 操作,把文件从 lowdir 拷贝到 upperdir,由于 overlayfs 是文件级别的(即使文件只有很少的一点修改,也会产生的 copy_up 的行为),后续对同一文件的在此写入操作将对已经复制到容器的文件的副本进行操作。这也就是常常说的写时复制(copy-on-write)
- 当文件在容器被删除时,在upperdir创建 whiteout 文件,lowerdir的文件是不会被删除的,因为他们是只读的,但 without 文件会阻止他们显示,当目录在容器内被删除时,在upperdir一个不透明的目录,这个和上面 whiteout 原理一样,阻止用户继续访问,即便镜像层仍然存在
OverlayFS简介
- OverlayFS有两种存储驱动:overlay和overlay2,其中推荐使用overlay2
- 使用docker inspect可查看到当前容器使用的存储驱动信息
[root@localhost ~]# docker inspect bf
……..
      "GraphDriver": {
            "Data": {
                "LowerDir": "/var/lib/docker/overlay2/b4eef5898b52ed697302ab7f03ac990b4eeac7f8d0b0e98d2ac1cd9f7af010d1-init/diff:/var/lib/docker/overlay2/801de6e91d75ed7a70a4978f40c1441d7020753fd30c0122a28108239b2dc042/diff:/var/lib/docker/overlay2/8b4ccfb6da748d8a3a311b06a6bd8dfb466f8953cf805fcfa1d374048e0d228d/diff:/var/lib/docker/overlay2/f7b0d2d35e7b39ad52706465dc5f50885ec12db1f2a87dbe6be00ad0c3bfbbea/diff:/var/lib/docker/overlay2/09ff411dc8224739cf2d5578ddbf21f6d6d5d3b6b04038fa9702f4338a40a097/diff:/var/lib/docker/overlay2/6549a19669295423943929a5273152ce34b28002c7a204595a7543e19ec9b415/diff",
                "MergedDir": "/var/lib/docker/overlay2/b4eef5898b52ed697302ab7f03ac990b4eeac7f8d0b0e98d2ac1cd9f7af010d1/merged",
                "UpperDir": "/var/lib/docker/overlay2/b4eef5898b52ed697302ab7f03ac990b4eeac7f8d0b0e98d2ac1cd9f7af010d1/diff",
                "WorkDir": "/var/lib/docker/overlay2/b4eef5898b52ed697302ab7f03ac990b4eeac7f8d0b0e98d2ac1cd9f7af010d1/work"
            },
            "Name": "overlay2"
        },
        "Mounts": [],
………….
Registry
-
Registry是存放容器镜像的仓库,用户可进行镜像下载和访问,它可分为公有和私有两类Registry
- 公有镜像仓库:
- docker Hub是docker公司为公众提供的托管Registry
- Quay.io现为Red Hat下的公共托管Registry
- 私有镜像仓库:
- 企业可以用docker Registry构建私有的Registry,也可以使用云镜像仓库服务实现
- Registry本身是一个开源项目,可以用于搭建私有Registry
- 公有镜像仓库:
-
云镜像仓库是云服务商提供的私有镜像仓库服务,常用的云镜像仓库服务有:
- 华为云的SWR
- 阿里云的ACR
-
云镜像仓库服务还会提供镜像加速器功能
-
使用命令
docker info可以查看到当前使用的镜像仓库地址
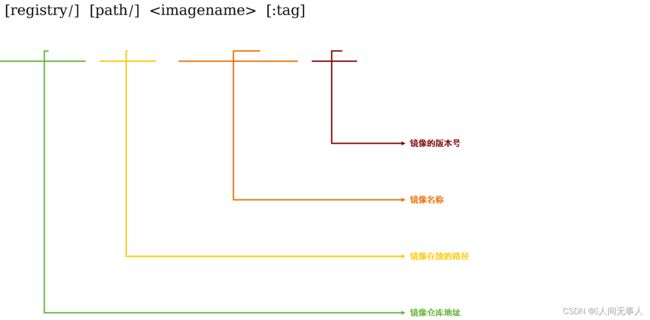
容器镜像命名格式
- 容器镜像一般包含四个部分:
registry:镜像仓库地址,如果不指定,一般表示使用官方的公共镜像。使用私有镜像仓库时,建议使用完整路径path:镜像存放的镜像仓库中的路径,使用私有镜像仓库时,建议使用完整路径imagename:容器镜像名称tag:镜像的版本号,如果不指定,则为latest,通常建议设置为版本号-镜像中包含的软件-基础镜像信息
查看镜像
- 使用命令docker images可列出当前宿主机上的镜像
[root@localhost ~]# docker images
REPOSITORY                                         TAG       IMAGE ID       CREATED       SIZE
swr.cn-north-4.myhuaweicloud.com/test-real/nginx   1.21      12766a6745ee   2 weeks ago   142MB
swr.cn-north-4.myhuaweicloud.com/test-real/nginx   test      12766a6745ee   2 weeks ago   142MB
nginx
- 使用命令docker inspect 镜像名称,可查看镜像的详细信息
[root@localhost ~]# docker inspect nginx:test
[
    {
        "Id": "sha256:12766a6745eea133de9fdcd03ff720fa971fdaf21113d4bc72b417c123b15619",
        "RepoTags": [
            "nginx:test",
            "swr.cn-north-4.myhuaweicloud.com/test-real/nginx:1.21",
            "swr.cn-north-4.myhuaweicloud.com/test-real/nginx:test"
        ],
        "RepoDigests": [
            swr.cn-north-4.myhuaweicloud.com/test-real/nginx@sha256:83d487b625d8c7818044c04f1b48aabccd3f51c3341fc300926846bca0c439e6
..........
拉取容器镜像
拉取公共镜像
- 使用命令
docker pull可将镜像从镜像仓库拉取到本地 - 例如命令
docker pull nginx:1.21可将版本为1.21的nginx镜像拉取到本地。在本命令中省略了镜像仓库地址和路径,系统将默认从官方镜像站拉取,如下所示的docker.io/library/
[root@localhost ~]# docker pull nginx:1.21
1.21: Pulling from library/nginx
c229119241af: Pull complete
2215908dc0a2: Pull complete
08c3cb2073f1: Pull complete
18f38162c0ce: Pull complete
10e2168f148a: Pull complete
c4ffe9532b5f: Pull complete
Digest: sha256:2275af0f20d71b293916f1958f8497f987b8d8fd8113df54635f2a5915002bf1
Status: Downloaded newer image for nginx:1.21
docker.io/library/nginx:1.21
[root@localhost ~]# docker images
REPOSITORY   TAG       IMAGE ID       CREATED       SIZE
nginx        1.21      12766a6745ee   2 weeks ago   142MB
拉去私有镜像
- 如果从私有镜像库中拉取镜像,首先需要登录镜像仓库,然后再拉取镜像
例如命令docker login -u xxxxxxx -p xxxxx swr.cn-north-4.myhuaweicloud.com可登录云上的私有镜像仓库,然后再使用命令docker pull swr.cn-north-4.myhuaweicloud.com/test-real/nginx:1.21
[root@localhost ~]# docker login -u xxxxxxx -p xxxxx swr.cn-north-4.myhuaweicloud.com
Login Succeeded
[root@localhost ~]# docker pull swr.cn-north-4.myhuaweicloud.com/test-real/nginx:1.21
1.21: Pulling from test-real/nginx
c229119241af: Pull complete
2215908dc0a2: Pull complete
08c3cb2073f1: Pull complete
18f38162c0ce: Pull complete
10e2168f148a: Pull complete
c4ffe9532b5f: Pull complete
Digest: sha256:83d487b625d8c7818044c04f1b48aabccd3f51c3341fc300926846bca0c439e6
Status: Downloaded newer image for swr.cn-north-4.myhuaweicloud.com/test-real/nginx:1.21
swr.cn-north-4.myhuaweicloud.com/test-real/nginx:1.21
[root@localhost ~]# docker images
REPOSITORY                                         TAG       IMAGE ID       CREATED       SIZE
swr.cn-north-4.myhuaweicloud.com/test-real/nginx   1.21      12766a6745ee   2 weeks ago   142MB
推送容器镜像
- 使用命令
docker push可将更新或者创建的镜像推送的容器仓库,可供其他人使用。在推送镜像时,要使用镜像的完整路径,才能推送到准确的位置 - 例如命令
docker push swr.cn-north-4.myhuaweicloud.com/test-real/nginx:1.21可将镜像推送到对应位置 - 在推送镜像时,如果镜像站已存在相同的镜像,系统会提示该镜像已存在
[root@localhost ~]# docker push swr.cn-north-4.myhuaweicloud.com/test-real/nginx:1.21
The push refers to repository [swr.cn-north-4.myhuaweicloud.com/test-real/nginx]
ea4bc0cd4a93: Layer already exists
fac199a5a1a5: Layer already exists
5c77d760e1f4: Layer already exists
33cf1b723f65: Layer already exists
ea207a4854e7: Layer already exists
608f3a074261: Layer already exists
1.21: digest: sha256:83d487b625d8c7818044c04f1b48aabccd3f51c3341fc300926846bca0c439e6 size: 1570
- 如果没有修改镜像内容,而仅是修改了镜像的信息,是否可以将修改后的镜像推送到相同的镜像站?
- 不可以,系统会检测每个层的信息,如果所有层的id都一致,系统会认为是同一个镜像
打包和解压容器镜像
- 使用命令
docker save可将一个或数个镜像打包成一个压缩包,打包后的镜像可以下载到本地
[root@localhost ~]# docker save nginx:test -o nginx
[root@localhost ~]# ls
anaconda-ks.cfg  nginx
- 使用命令
docker load可将打包后的镜像进行解压
[root@localhost ~]# docker load -i nginx
Loaded image: nginx:test
[root@localhost ~]# docker images
REPOSITORY                                                           TAG       IMAGE ID       CREATED           SIZE
swr.cn-north-4.myhuaweicloud.com/test-real/nginx   1.21      12766a6745ee   2 weeks ago   142MB
swr.cn-north-4.myhuaweicloud.com/test-real/nginx    test      12766a6745ee   2 weeks ago   142MB
nginx
删除容器镜像
使用命令docker rmi可删除当前宿主机上的镜像
[root@localhost ~]# docker images
REPOSITORY                                         TAG       IMAGE ID       CREATED       SIZE
nginx                                              test      12766a6745ee   2 weeks ago   142MB
swr.cn-north-4.myhuaweicloud.com/test-real/nginx   1.21      12766a6745ee   2 weeks ago   142MB
swr.cn-north-4.myhuaweicloud.com/test-real/nginx   test      12766a6745ee   2 weeks ago   142MB
[root@localhost ~]# docker rmi nginx:test
Untagged: nginx:test
[root@localhost ~]# docker images
REPOSITORY                                         TAG       IMAGE ID       CREATED       SIZE
swr.cn-north-4.myhuaweicloud.com/test-real/nginx   1.21      12766a6745ee   2 weeks ago   142MB
swr.cn-north-4.myhuaweicloud.com/test-real/nginx   test      12766a6745ee   2 weeks ago   142MB
制作镜像
方式1:使用Dockerfile制作镜像
推荐用这种方式,直接去看我下面这篇文章,下面文章是操作,下面标题Dockerfile详述是概念,可以都看看了解一下。
docker镜像构建详细说明
方式2:使用命令docker commit
- 使用命令docker commit,可以将修改后的容器提交副本,形成一个新的容器
docker commit命令创建镜像比较方便,但是在传递方面不如Dockerfile,因此目前Dockerfile是比较推荐的创建镜像的方式,后续主要介绍Dockerfile来创建镜像的方式
[root@localhost ~]# docker images
REPOSITORY   TAG       IMAGE ID       CREATED       SIZE
nginx        1.21      12766a6745ee   2 weeks ago   142MB
[root@localhost ~]# docker run -d nginx:1.21
bd46d46a32a4c4c02cb591226334d28630a6b3e1db98c6999170478f5adba24e
[root@localhost ~]# docker exec -it bd /bin/bash
root@bd46d46a32a4:/# echo "hello CCE" > /usr/share/nginx/html/index.html
root@bd46d46a32a4:/# exit
Exit
[root@localhost ~]# docker commit bd nginx:test
sha256:d60c3f8cee30013b1649c3ec1cac1029d486f4f1ffe951a9bce45ad3ca184062
[root@localhost ~]# docker images
REPOSITORY   TAG       IMAGE ID       CREATED         SIZE
nginx        test       d60c3f8cee30   5 seconds ago   142MB
nginx        1.21      12766a6745ee   2 weeks ago     142MB
Dockerfile详述
Dockerfile简介
- Dockerfile是一个包含了一系列命令的文本文件,这些命令可以用来构建一个容器镜像
- Dockerfile文件中的注释以“#”开始
- 在Dockerfile所在的目录,使用命令docker build构建镜像;或者在命令docker build后添加-f选项,用来指定Dockerfile的具体位置
- 在命令docker build后面添加-t选项,用来为创建的镜像指定tag
Dockerfile结构
Dockerfile基础镜像
- 在制作镜像时,通常会以一个镜像为基础,然后在其基础上进行修改,作为基础的镜像就叫基础镜像,也被称为base镜像
- Scratch是一个特殊的基础镜像,表示一个空白的镜像,制作Linux发行版镜像时,通常会使用scratch作为基础镜像
- 在Dockerfile中,使用FROM命令指定基础镜像,不可以省略,必须是Dockerfile的第一条有效指令
Dockerfile镜像描述信息
- Dockerfile中的镜像描述信息用来对镜像进行说明,例如该镜像的作者、用途等元数据
- Dockerfile中的镜像描述信息使用LABEL指令进行添加,描述信息以键值对的形式体现
- 一个LABEL指令后面可添加多个键值对,也可以多次使用LABEL设置多条信息
- 在LABEL指令后使用“/”进行换行
- 在Dockerfile中,镜像描述信息是非必选内容
Dockerfile构建容器指令 - RUN
- Dockerfile在容器构建时使用RUN指令在容器内执行某些操作,例如安装软件、创建文件等
- RUN指令可以在同一Dockerfile中多次出现,每执行一次,镜像就会增加一层
- 一条RUN指令后面可以执行多条命令,命令之间使用“&&”隔开
- 使用RUN指令如果要进行换行,需使用“\”
Dockerfile构建容器指令 - COPY
Dockerfile构建容器时使用COPY指令可以将宿主机的文件拷贝到镜像当中

Dockerfile构建容器指令 - ADD
- Dockerfile中的ADD指令和COPY指令的作用一样,也是将宿主机上的文件拷贝到镜像中
- ADD可以将tar、gz等格式的压缩包在拷贝到镜像中后自动解压,并将压缩包从镜像中删除
- 对比ADD,官方更推荐是用COPY
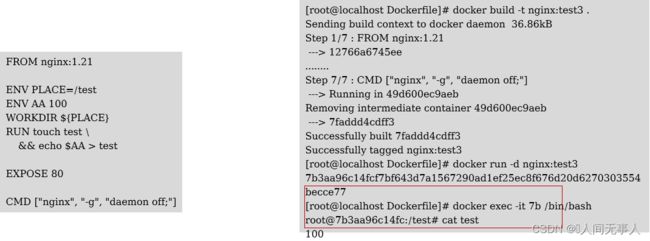
上面案例中,哪个效果更好?
Dockerfile构建容器指令 - WORKDIR
- Dockerfile在容器构建时使用WORKDIR指令切换容器的工作目录
- 如果所指定的工作目录不存在,WORKDIR会自动创建该目录
- 在Dockerfile中可多次使用WORKDIR来切换目录
Dockerfile构建容器指令 - ENV
- Dockerfile在容器构建时可使用ENV指令创建环境变量
- 在Dockerfile中可多次使用ENV来创建多个环境变量
Dockerfile构建容器指令 - EXPOSE
- Dockerfile在容器构建时可使用EXPOSE指令宣告镜像启动时暴露的端口
- 如果需要暴露多个端口,可依次列在EXPOSE后面
- 如果要指定端口协议,格式为“EXPOSE 端口号/协议”,例如:“EXPOSE 80/tcp”
Dockerfile构建容器指令 - VOLUME
- Dockerfile在容器构建时可使用VOLUME指令将容器中的文件或目录挂载到宿主机上
- 使用VOLUME指令挂载的文件或目录自动映射到宿主机的/var/lib/docker/volumes/volume name/_data目录下
- 删除容器时,由容器映射出来的数据默认不会同时被删除;如果需要同时删除,需要在删除容器时添加-v选项
Dockerfile设置镜像启动时执行任务的命令 - CMD
-
Dockerfile在容器构建时可使用CMD指令设置镜像启动时执行的命令
Dockerfile设置镜像启动时执行任务的命令 - ENTRYPOINT
- Dockerfile在容器构建时也可以使用ENTRYPOINT指令设置镜像启动时执行的命令
- ENTRYPOINT与CMD不同,所执行的命令不会被覆盖
- ENTRYPOINT后面一般是一个脚本,用于容器启动时执行一些初始化配置
- ENTRYPOINT和CMD同时存在时,CMD中的内容会作为ENTRYPOINT的参数或选项
Dockerfile建议
- 尽可能选择轻量级基础镜像
- 优化镜像层缓存
- 尽可能减少镜像层数
- 分阶段构建
- 尽量将Dockerfile相关文件放在同一目录
Dockerfile优化案例
- 以下Dockerfile存在哪些可优化的点?
FROM centos:7

RUN useradd nginx
COPY CentOS-Base.repo /etc/yum.repos.d/CentOS-Base.repo
RUN yum install -y wget
RUN wget -c http://nginx.org/download/nginx-1.21.0.tar.gz
RUN tar -xzvf nginx-1.21.0.tar.gz
RUN yum -y install gcc gcc-c++ autoconf automake make pcre-devel openssl openssl-devel
WORKDIR nginx-1.21.0
RUN ./configure --prefix=/usr/local/nginx/ --user=nginx --group=nginx --without-http_rewrite_module
RUN make && make install
RUN cp /usr/local/nginx/sbin/nginx /usr/local/sbin/
EXPOSE 80
ENTRYPOINT ["nginx","-g","daemon off;"]
-
有如下可以优化
- 基础镜像使用debian或其他轻量级镜像
- 尽可能合并RUN
- 把可能变化的构建操作放到下层
- 将编译前的文件放入一个镜像,正式的镜像从中拷贝编译后的文件
- 完成后删除多余的文件
-
优化后dockfile如下:
FROM centos:7 as build

COPY CentOS-Base.repo /etc/yum.repos.d/CentOS-Base.repo
RUN useradd nginx && \
    yum install -y wget gcc gcc-c++ autoconf automake make pcre-devel openssl openssl-devel && \
    wget -c http://nginx.org/download/nginx-1.21.0.tar.gz && \
    tar -xzvf nginx-1.21.0.tar.gz
WORKDIR nginx-1.21.0
RUN ./configure --prefix=/usr/local/nginx/ --user=nginx --group=nginx --without-http_rewrite_module && \
    make && make install


FROM debian:latest
RUN useradd nginx
COPY --from=build /usr/local/nginx/ /usr/local/nginx/
COPY --from=build /usr/local/nginx/sbin/nginx /usr/local/sbin/nginx
EXPOSE 80
ENTRYPOINT ["nginx","-g","daemon off;"]
缩略语
| 缩略语 | 英文全称 | 解释 |
|---|---|---|
| API | Application Programming Interface | 应用编程接口,指的是应用程序之间为了保证互相通讯所提供的一系列特殊规则和要求 |
| K8s | Kubernetes | Kubernetes的缩写 |
| CLI | Command-line | Interface 命令行视图 |
| LB | Load Balance | 负载均衡 |
| AI | Artificial Intelligence | 人工智能 |
| OA | Office Automation | 办公自动化 |
| OTT | Over The Top | 通过互联网向用户提供各种应用服务 |
| CSI | Container Storage Interface | 容器存储接口 |
| CCE | Cloud Container Engine | 华为云容器引擎 |
| HCS | HUAWEI CLOUD Stack | 华为云解决方案名称 |
