Abp 创建一个模块项目demo

Demo效果 :简单的单表crud后台服务。不包含UI
项目类型是模块ABP。生成的结构和 多应用/单应用 有差异。
结合文档以及git的源码分享一下demo的理解
abp文档:API/Auto API Controllers | Documentation Center | ABP.IO
前置准备:
Net8 环境:下载 .NET 8.0 (Linux、macOS 和 Windows)
Vs2022 17.8版本以上
1.根据指令生成模版
2.项目结构如下
还有个test文件夹我移除了
首先我们要知道各个模块主要干嘛的
领域层
domian :基本的领域层,它包含前面介绍的所有构建块(实体、值对象、域服务、规范、存储库接口等)
domian.Shared:它包含一些属于领域层的类型,但与所有其他层共享。例如,它可能包含一些与领域对象相关的常量和枚举,但需要被其他层重用
应用层
Application: 是实现Contracts项目中定义的接口的基本应用程序层 (可以直接将应用层生成接口)
Application.Contracts: 包含应用程序服务接口和这些接口使用的dto。这个项目可以被客户端应用程序共享(包括UI)
基础服务层
EntityFrameworkCore:它是EF Core的基本集成包。你的应用程序的DbContext,数据库映射,存储库的实现和其他EF Core相关的东西都在这里
表示层 (本次demo没有ui 没这一层)
Web: 是一个ASP.NET Core MVC / Razor Pages 应用程序, 这是唯一为应用程序和api服务的可执行应用程序
远程服务层
HttpApi:项目包含解决方案定义的HTTP接口。它通常包含MVC控制器和相关模型。因此,您可以在这个项目中编写HTTP接口。
HttpApi.Client:当您有一个需要使用HTTP接口的c#应用程序时,此项目是有用的。一旦客户端应用程序引用了这个项目,它就可以直接注入和使用应用程序服务。这得益于ABP框架的 动态c#客户端API代理系统
1.首先建立实体。 在 Domian 下面新建一个productConfig类 。
继承FullAuditedAggregateRoot 泛型根据你的id的类型。这是abp自带的实体类。但是底层都是必须继承 Entity。这封装包含了基本的修改人和逻辑删除的扩展字段不用单独封了。
2.因为我使用的是ef core 所以刚好在 EntityFrameworkCore 下的 DbContext.cs文件夹下 注入我的表。以及添加数据库的映射关系
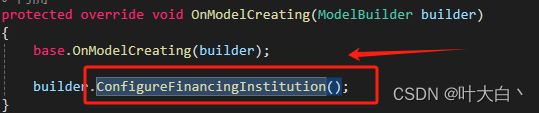
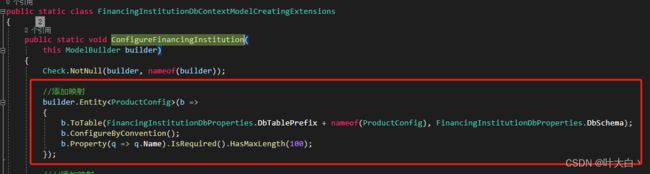
非模版项目:

模版项目: 上面的办法行不通,需要在DbContextModelCreatingExtensions类 下写映射关系。不然host无法读取到表的存在
3.先在host 下的 appsettings.json里配置好连接字符串
![]()
用的是ef 所以需要数据迁移。首先要准备好确定 dotnet --ef 是否安装。
模版项目在host下执行下面语句(其余项目在EntityFrameworkCore 下执行)
(不管是host 还是 core 都需要把项目设置为启动项。再在程序包控制台执行语句)
会自动创建个Migrations文件夹。再生成的迁移文件里。会看到表的生成语句的存在
dotnet ef migrations add Added_ProductConfig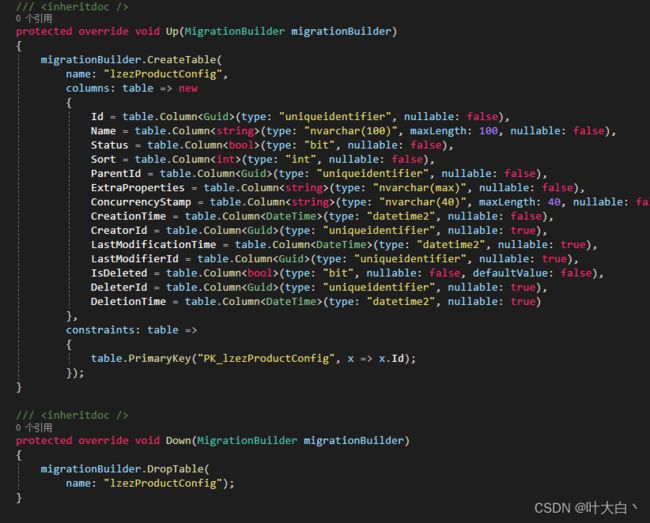
然后再执行一下语句会生成我创建的实体表。执行完检查下表有米有。
(如果是模版项目记得把Authservice 也执行一下2个语句不然最终起不来。缺表)
dotnet ef database update
Autherserver 和Host的表
4. 在 Application.Contracts 下创建
1个入参的dto和出参dto
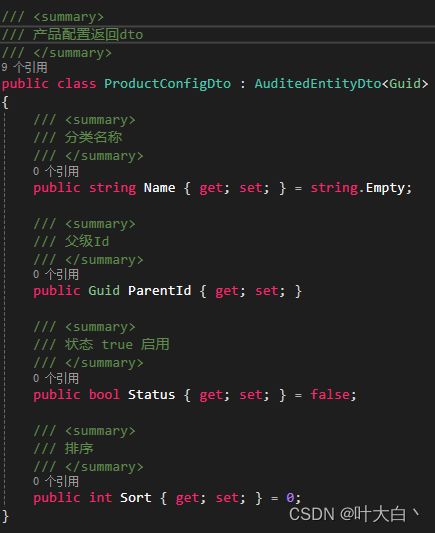
以及1个应用层的接口。
以及修改一个domian 下的 FinancingInstitutionApplicationModule 类。改为false 
5.在 Domian下新建一个接口 IProductConfigRepository 用于在实体赋值时的验重查询操作
public interface IProductConfigRepository : IRepository
{
    Task FindByNameAsync(string name);

    Task> GetListAsync(
        int skipCount,
        int maxResultCount,
        string sorting,
        string filter = null
    );
} 在EntityFrameworkCore 下创建一个对应的实现
 ///
 /// 产品分类表检验类
 ///
 public class EfCoreProductConfigRepository : EfCoreRepository,
     IProductConfigRepository
 {
     public EfCoreProductConfigRepository(
     IDbContextProvider dbContextProvider)
     : base(dbContextProvider)
     {
     }

     public async Task FindByNameAsync(string name)
     {
         var dbSet = await GetDbSetAsync();
         return await dbSet.FirstOrDefaultAsync(p => p.Name == name);
     }

     public async Task> GetListAsync(
         int skipCount,
         int maxResultCount,
         string sorting,
         string filter = null)
     {
         var dbSet = await GetDbSetAsync();
         return await dbSet
             .WhereIf(
                 !filter.IsNullOrWhiteSpace(),
                 author => author.Name.Contains(filter)
             )
             .OrderBy(sorting)
             .Skip(skipCount)
             .Take(maxResultCount)
             .ToListAsync();
     }
 }
6.在 Domian下面新建一个类 ProductConfigManage 。因为我只有crud。实际对于实体来说有修改操作的只有3个行为。增删改。从面向对象的角度理解会更容易理解。根据行为。做该领域内这个行为需要做的事情。前1个步骤就是为这个做铺垫
///
/// 实体层聚合类
///
public class ProductConfigManage : DomainService
{
private readonly IProductConfigRepository _productConfigRepository;
public ProductConfigManage(IProductConfigRepository productConfigRepository)
{
_productConfigRepository = productConfigRepository;
}
///
/// 新增
///
/// CreateAsync(
[Required] string name, bool status, int sort, Guid partentId)
{
Check.NotNullOrWhiteSpace(name, nameof(name));
var checkExits = await _productConfigRepository.FindByNameAsync(name);
if (checkExits != null)
throw new ProductAlreadyExistsException(name);
return new ProductConfig(GuidGenerator.Create(), name, status, sort, partentId);
}
///
/// 修改
///
/// UpdateAsync([Required] ProductConfig config, [Required] string name, bool status, int sort, Guid partentId)
{
Check.NotNullOrWhiteSpace(name, nameof(name));
var checkExits = await _productConfigRepository.FindByNameAsync(name);
if (checkExits != null && config.Id != checkExits.Id)
throw new ProductAlreadyExistsException(name);
return config.Upd(name, status, sort, partentId);
}
///
/// 删除
///
/// DeleteAsync([Required] ProductConfig config)
{
var checkExits = await _productConfigRepository.FindAsync(p => p.Id == config.Id);
if (checkExits == null)
throw new ProductAlreadyExistsException(config.Name);
return config.Del();
}
} 同时实体里。增加对应的增删改 需要的实体赋值
 ///
 /// 基础配置
 ///
 public class ProductConfig : FullAuditedAggregateRoot
 {
     ///
     /// 分类名称
     ///
     public string Name { get; set; } = string.Empty;

     ///
     /// 状态 true 启用
     ///
     public bool Status { get; set; } = false;

     ///
     /// 排序
     ///
     public int Sort { get; set; } = 0;

     ///
     /// 父级Id
     ///
     public Guid ParentId { get; set; }

     internal ProductConfig(Guid id, [NotNull] string name, bool status, int sort, Guid parentId)
     {
         Id = id;
         SetName(name);
         Status = status;
         Sort = sort;
         ParentId = parentId;
     }

     internal ProductConfig Upd([NotNull] string name, bool status, int sort, Guid parentId)
     {
         SetName(name);
         Status = status;
         Sort = sort;
         ParentId = parentId;
         return this;
     }

     internal ProductConfig Del()
     {
         IsDeleted = true;
         DeletionTime = DateTime.Now;
         return this;
     }

     //效验名称最大为100
     private void SetName([NotNull] string name)
     {
         Name = Check.NotNullOrWhiteSpace(
         name,
         nameof(name),
         maxLength: 100
     );
     }
 }
7.完成应用层。在 Application 下面新建 ProductConfigAppService类
继承 ApplicationService。 底层最终都是继承这个。也封装了很多例如 crudappservice 但是必须实现对应的接口。这个就看个人喜好了。这样的写法应用层非常的直观。新增 =>直接在domian层获取新增的实体然后去数据层直接保存。对象化操作的写接口。
///
/// 产品分类服务
///
public class ProductConfigAppService : Volo.Abp.Application.Services.ApplicationService, IProductConfigAppService
{
private readonly IRepository _Repository;
private readonly ProductConfigManage _configManager;
public ProductConfigAppService(
IRepository repository,
ProductConfigManage configManager)
{
_Repository = repository;
_configManager = configManager;
}
///
/// 获取全部配置
///
/// > GetAll()
{
var source = await _Repository.GetListAsync(p => true);
if (source == null || source.Count <= 0)
return new PagedResultDto();
var returnDto = source.Select(x =>
{
var dto = ConverMap(x);
return dto;
}).ToList();
var count = await _Repository.GetCountAsync();
return new PagedResultDto(count, returnDto);
}
///
/// 获取指定配置
///
/// GetModel(Guid id)
{
var source = await _Repository.FindAsync(p => p.Id.Equals(id));
if (source == null)
return new ProductConfigDto();
return ConverMap(source);
}
///
/// 新增配置
///
///
/// AddAsync(AddAndUpdProductConfigDto input)
{
var model = await _configManager.CreateAsync(input.Name, input.Status, input.Sort, input.ParentId);
await _Repository.InsertAsync(model);
return ConverMap(model);
}
///
/// 修改配置
///
///
///
/// (input.Id, nameof(input.Id));
var check = await _Repository.FindAsync(p => p.Id == input.Id);
if (check == null)
throw new Exception("数据不存在");
var model = await _configManager.UpdateAsync(check, input.Name, input.Status, input.Sort, input.ParentId);
await _Repository.UpdateAsync(model);
}
///
/// 删除配置
///
///
///
/// (id, nameof(id));
var check = await _Repository.FindAsync(p => p.Id == id);
if (check == null)
throw new Exception("数据不存在");
var model = await _configManager.DeleteAsync(check);
await _Repository.UpdateAsync(model);
}
///
/// 转换实体
///
///
/// (source);
}
catch (Exception e)
{
return new ProductConfigDto();
}
}
} 8.应用层写完了。动态生成api启动项目
在 host下的 FinancingInstitutionHttpApiHostModule 里动态注入我们的模块 生成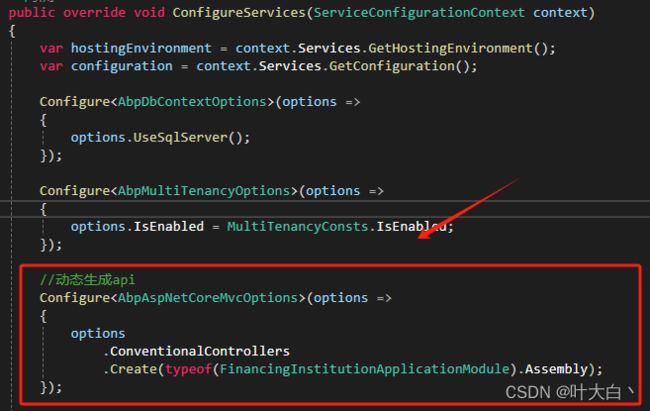
9.启动项目 接口的生成规则是这样的。我写的不规范所以是这样的。


abp是带验签的 。不过只是demo 我没启动authserve项目了。
需要使用的话就一样配置authserver服务的连接字符串以及ef的2个指令生成所需的表。
再按照下面官方文档的运行步骤启动即可
Demo写完了 跑一下 : 插入一条数据 OK

(如果运行项目的时候报错 abpsetting 不存在。就是表没创建成功。重新跑下ef那2个语句确保表都有了) 。