Ubuntu小技巧17--常用软件服务配置方法2
Ubuntu小技巧17--常用软件服务配置方法2
- 1 娱乐办公
- 2 专业工具软件
- 3 常见错误及注意事项
-
- 3.1 常见错误
- 3.2 注意事项
- 4 说明
笔者之前已经在博文 Ubuntu小技巧17–常用软件服务配置方法 中记录了ubuntu上大量软件配置方法和常见异常错误的处理方法,但是内容较多、排版不太和谐,因此后续会在此处续更。老版本上的软件安装和常见问题再次出现时,将会同步更新到此处。
1 娱乐办公
-
handbrake
HandBrake 是可用于 Linux、Windows 和 macOS 的最受欢迎的开源视频转换器之一。
此 GUI 应用让你只需单击几下即可将视频从一种格式转换为另一种格式。你还可以根据需要自定义输出视频。安装: sudo add-apt-repository ppa:stebbins/handbrake-releases sudo apt update sudo apt-get install handbrake-gtk 卸载: sudo apt remove handbrake-gtk sudo add-apt-repository -r ppa:stebbins/handbrake-releases -
聊天软件skype
可以直接 snap 安装snap install skype -
视频播放器vlc
snap install vlc -
屏幕录像工具 simplescreenrecorder-brlin
snap install simplescreenrecorder-brlin -
安装搜狗输入法
在官网下载 sogou Linux安装包, 参考 Ubuntu搜狗输入法安装指南 或 Ubuntu搜狗输入法安装指南 安装即可;
安装后需要在语言支持中设置-》添加或者删除语言-》中文简体-》键盘输入法系统选择 fcitx;
安装后如果报错则apt -f install修复,不报错重启系统即可生效。
注意事项:
不要随意删除home目录下不认识的.local 和 .cache文件,删除后可能导致有些配置丢失,出现一些奇怪的问题,例如不能怎么调整都是繁体字(那样的话就只能考虑重装Ubuntu了) -
wps office 软件
在 wpslinux 下载地址 下载deb 安装包,下载后 dpkg -i wps***.deb 安装即可,若安装错处则apt-get install -f 修复一下即可。
截至20211020, 也可以直接使用snap安装软件, snap install wps-office
卸载方法:apt-get purge wps-office -
网易云音乐
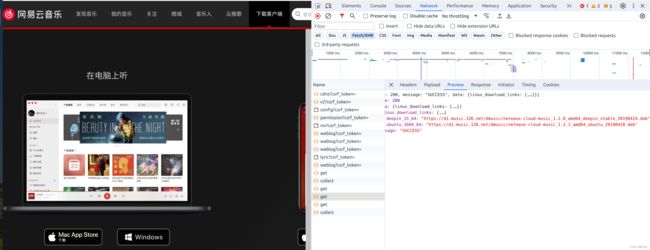
官方主页已经下线了下载链接了,但可以在Downlowds请求中获取到deepin和ubuntu的两个最近版本,如下:"linux_download_links": { "deepin_15_64": "https://d1.music.126.net/dmusic/netease-cloud-music_1.2.0_amd64_deepin_stable_20190424.deb", "ubuntu_1604_64": "https://d1.music.126.net/dmusic/netease-cloud-music_1.2.1_amd64_ubuntu_20190428.deb" } 然后 dpkg -i netease-cloud-music_1.2.1_amd64_ubuntu_20190428.deb 即可安装了; 注意事项: 笔者最近打开云音乐(ubuntu22.04 Desktop)发现字体极小,根据网友经验调整启动脚本中的环境变量即可解决 [ubuntu下网易云音乐适配高分辨率屏幕](https://blog.csdn.net/a1171936767/article/details/114324666) $ cat /opt/netease/netease-cloud-music/netease-cloud-music.bash #!/bin/sh HERE="$(dirname "$(readlink -f "${0}")")" # export QT_SCALE_FACTOR=2 # 方法一,笔者笔记本字体刚刚好 export QT_AUTO_SCREEN_SCALE_FACTOR=1 # 方法2,字体可能很大 export LD_LIBRARY_PATH="${HERE}"/libs export QT_PLUGIN_PATH="${HERE}"/plugins export QT_QPA_PLATFORM_PLUGIN_PATH="${HERE}"/plugins/platforms cd /lib/x86_64-linux-gnu/ # add one line, cd /xxx, 可以解决无法打开cloudmusic的问题 exec "${HERE}"/netease-cloud-music $@
2 专业工具软件
-
配置科学网络
申请阿里云海外服务器(建议申请抢占式vpc+按量付费的网络),执行如下命令(自行按需去掉多余的符号),按照需要选择即可
wget --no-check-certificate https://raw.githubusercontent.com/teddysun/{shadow}{socks}_install/master/{shadow}{socksR}.sh
bash {shadow}{socksR}.sh
然后在机器上安装对应的客户端(github可以很容易搜到的),配置端口和ip即可使用; 也可以直接通过snap安装
snap install ss-qt
自动关机,关机后不收取网络、cpu内存费用(配置eip的会收取eip费用)
pip3 安装如下包: pip3 install aliyun-python-sdk-core aliyun-python-sdk-ecs aliyun-python-sdk-core 2.13.30 aliyun-python-sdk-ecs 4.23.7 相关停机不收费代码: 需要在 AccessKey 管理 中新见accessKey, 然后找到机器的区域代码,并更改实例Id vim cat stop_ecs.py #!/usr/bin/env python #coding=utf-8 from aliyunsdkcore.client import AcsClient from aliyunsdkcore.acs_exception.exceptions import ClientException from aliyunsdkcore.acs_exception.exceptions import ServerException from aliyunsdkecs.request.v20140526.StopInstanceRequest import StopInstanceRequest client = AcsClient('xx_id', 'xx_key', 'ap-southeast-1') request = StopInstanceRequest() request.set_accept_format('json') request.set_InstanceId("i-t4ne48e1aqezu02hzrnv") request.set_StoppedMode('StopCharging') response = client.do_action_with_exception(request) # python2: print(response) print(str(response, encoding='utf-8')) 添加自动关机功能: 10 1 * * * python3 /root/code/stop_ecs.py -
3D 制作工具blender
blender 是一個免費開源的3D創作工具,它可以同時在Windows、Linux和Mac上運行。
linux 上直接使用 snap 安裝:snap install blenderdocs.blender
-
图像编辑软件gimp(类似与PS)
snap install gimpgithub snapcrafters/gimp
-
安装openjdk-11
在 archived openjdk 下载openjdk的安装包,然后新增配置到profile即可实现全局jdk。vim /etc/profile export JAVA_HOME=/usr/local/jdk-11.0.2/ export JRE_HOME=$JAVA_HOME/jre export PATH=$JAVA_HOME/bin:$JRE_HOME/bin:$PATH重新进入终端就OK了,如果需要设置个人环境,则直接添加到~/.bashrc 即可。
-
终端配置
大部分终端配置可以在.bashrc中调整,此处列举几个常用的配置,后续会持续在此处更新相关配置1. 设置终端用户名称显示方式 export PS1="xg05:\w$ " 显示内容为:xg05:~$ 2. 设置ls命令样式 alias ls='ls --color=auto' 设置ls命令自动配置不同颜色 -
常见基础软件
apt-get install -y inetutils-ping # 安装ping apt-get install -y telnet apt-get install -y net-tools # 安装 netstat apt-get install -y tzdata # 一般容器默认为UTC时间,可以通过安装tzdata来调整时间为CST-Shanghai,dpkg-reconfigure tzdata 可以用来手动配置时间 apt-get install procps # install ps 命令 apt install dnsutils # nslookup -
linux 内核版本
1. 删除多余内核版本 查看内核信息: dpkg --get-selections|grep linux 删除指定内核相关配置文件: apt-get autoremove linux-image-5.11.0-25-generic apt-get autoremove linux-modules-5.11.0-25-generic apt-get autoremove linux-hwe-5.11-headers-5.11.0-25 apt-get autoremove linux-headers-5.11.0-25-generic 删除完毕就重启系统 2. 锁定|解锁内核版本 锁定: apt-mark hold linux-image-generic linux-headers-generic 解锁: apt-mark unhold linux-image-generic linux-headers-generic 3. 安装指定内核版本 安装 5.8.0-63 内核: apt-get install linux-image-5.8.0-63-generic linux-headers-5.8.0-63 linux-modules-5.8.0-63-generic -
常见命令
1. 查看外网ip curl cip.cc # 或者可以直接在百度输入 ip 2. top 使用技巧 top 命令后,输入大写P对cpu排序,输入大写M对内存排序 3. dmesg -T #查看内核日志 4. 谷歌浏览器|Chrome 浏览器使用 Inspect 后,通过 ctrl+shift+P 就可进入Run command命令行,然后就可以使用很多有用命令(例如截图) 5. dmidecode 查看机器硬件配置 dmidecode | grep -i -A 18 "Memory Device" 查看机器内存信息,grep 其它硬件就可以查看其它信息了 -
install alibaba apt source
阿里云开源镜像站
开发者社区> 镜像站> ubuntu
开发者社区> 镜像站> debian
开发者社区> 镜像站> centos -
install vmware workstation
下载 VMware-Workstation-Full-16.0.0-16894299.x86_64.bundle
下载 VMware-Workstation-Full-16.2.3-19376536.x86_64.bundle
下载 VMware-Workstation-Full-17.5.0-22583795.x86_64.bundlechmod u+x VMware-Workstation-Full-16.2.3-19376536.x86_64.bundle 注意:较高版本的内核在安装的时候会出现 vmnet和vmmon 内核模块编译失败的现象, 解决方法: 下载 https://gitee.com/forgeek/VMware_update/blob/master/vmware-update.sh 后更改VMWARE_VERSION 为实际版本,然后重新编译模块即可(笔者使用该放在在 ubuntu20.04 5.13.0-40 上正常安装了VMware-Workstation-Full-16.0.0-16894299.x86_64.bundle)。 笔者早期 linux-modules-5.8.0-63-generic 的ubuntu可以正常安装,后面linux-modules-5.13.0* 安装就报错 补充说明: 笔者2022/08/02 安装ubuntu22.04 5.15.0-43-generic 内核,发现就不支持,因为该方法 vm16.0.0 支持最新内核版本为 5.13.0, 因此若想使用vm16.0.0 则需要降低系统内核版本。 需要安装 apt-get install build-essential 否则会报错: Build environment error! A required application is missing and Modconfig can not continue. xzCheck the log for more details 卸载方法: vmware-installer -u vmware-workstation
3 常见错误及注意事项
3.1 常见错误
-
ubuntu 系統下音響單個無聲音的原因
筆者最近發現音響單個無聲音,本來以爲音響壞了,但是在Windows上測試發現是正常的,因此還以是誤設置導致的,因此查找了以下聲音配置,發現是Balance值異常導致的。
如下圖,最好將Balance設置爲最中間,設置爲Left會導致Right無聲音,Right同理。

-
ubuntu 下卸载pycharm、IntelliJIdea、GoLand
cd /home/UserName/.config/JetBrains 删除不需要的文件夹,然后删除解压的安装包即可。 -
ubuntu20.04 软件中心无法打开
最近笔者突然发现软件中心无法打开,经过查阅后发现可能是之前安装snap的app-store导致的,因此重新安装softwore并卸载snap-store,随后恢复正常。apt install ubuntu-software snap remove snap-store //删除snap商店 -
screen -S upload_svn 报错 Cannot open your terminal ‘/dev/pts/0’ - please check.
解决方法:执行 script /dev/null 后再执行screen 命令 -
df -h 卡死解决经验
笔者最近使用df -h,发现处于卡死状态;
查阅资料后发现可以通过 strace df -h 来追踪卡在哪里,strace 后发现卡在获取 /mnt/bak_108处,如下图所示;
因此继续检查该目录,发现该目录是之前挂载的nfs,而该nfs已经下线了,因此虚挂着,导致无法正常获取信息;
随后重新从/etc/fstab 中注释掉nfs挂载项,并 umount -l /mnt/bak_108 强制卸载该目录;
最后重新df -h,正常执行成功。

-
Ubuntu 播放mkv文件异常
参考文档 H.264 (Main Profile) decoder are required to play the file, but are not installed报错内容 MPEG-4 AAC decoder, H.264 (Main Profile) decoder are required to play the file, but are not installed. 解决方法: apt install ubuntu-restricted-extras apt install libdvdnav4 libdvd-pkg gstreamer1.0-plugins-bad gstreamer1.0-plugins-ugly libdvd-pkg apt install mpv -
ssh 登录报错 unable to authenticate using any of the configured authentication methods
ssh username@ip 登录时候报错: unable to authenticate using any of the configured authentication methods linux 直接报错 Permission denied (publickey) 检查发现: /etc/ssh/sshd_config 的 PasswordAuthentication no 需要设置为 PasswordAuthentication yes 并重启ssh服务即可,也可以直接用公私钥登录 -
ubuntu20.04 升级到ubuntu21.04出现无左侧菜单栏
笔者最近升级ubuntu到21.04, 升级后发现无法正常显示左边菜单栏目,如下图所示; 查阅资料发现需要重新安装ubuntu-desktop,安装后重启就恢复正常
apt-get install   ubuntu-desktop
3.2 注意事项
- 可以通过 strace 命令来跟踪系统调用和信号,有利于程序debug。
4 说明
笔者使用的系统主要为ubuntu 1604|1804 server版本、ubuntu 2204 desktop版本。
一般情况下两者都可以使用,特殊情况下会注明系统版本。

