Spring踩坑总结之Core篇
刚开始学习 Spring 的时候,总免不了踩坑。后来熟练了,再遇到那些报错习以为常,能快速解决。这个阶段开始看 Spring 的源码,但总是断断续续的,不连贯,看过就忘。最近重新捡起来,学习了一个专栏,试着总结下。
本文将从踩坑的方式,讲述 Spring Core 模块容易遇到一些坑,分析产生原因、解决方式。内容主要包括了 Spring Bean 的定义、依赖注入、Bean 的创建过程、AOP 等几个方面。
1、Spring Bean 的定义
案例一:SpringBoot 扫描不到 Bean
SpringBoot 中通过 @SpringBootApplication 声明启动类,当运行该类的 main 方法时,就会自动装配所有的 Spring Bean 到 Spring 容器中。
@SpringBootApplication
public class DemoApplication {
    public static void main(String[] args) {
        SpringApplication.run(DemoApplication.class, args);
    }
}
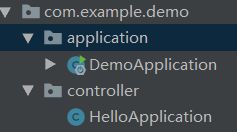
现定义一个 Controler 类,将 Application 类和 Controller 类分别放置到两个包中,会发现运行后 Controller 类并未生效,即所有 uri 都访问不到。
而当将两个类放到同一包下时,Controller 类又能正常访问。

显然是Bean定义失效了,这是为何?
案例分析
SpringBoot 中启动类的 @SpringBootApplication 注解继承了其他一些注解,其中 @ComponentScan 就是其定义扫描 Bean 的配置。
@ComponentScan(excludeFilters = { @Filter(type = FilterType.CUSTOM, classes = TypeExcludeFilter.class),
		@Filter(type = FilterType.CUSTOM, classes = AutoConfigurationExcludeFilter.class) })
@ComponentScan 会去扫描其属性 basePackages 指定位置的所有 Bean
但是 @SpringBootApplication 中并没有设置 basePackages 的值,那么问题就是当 @ComponentScan 的指定位置 basePackages 为空时,SpringBoot 会如何处理?
/** * Base packages to scan for annotated components. *{@link #value} is an alias for (and mutually exclusive with) this * attribute. *
Use {@link #basePackageClasses} for a type-safe alternative to * String-based package names. */ @AliasFor("value") String[] basePackages() default {};
调试定位到 ComponentScanAnnotationParser#parse 中,发现当值为空时,会获取 Application 类所在包作为值填入。

从上述调试可知,当 basePackages 为空时,扫描的包会是使用了 @ComponentScan 注解的类所在的包,在本例中即 DemoApplication 类。而上述 Controller 类失效的原因就很明显了,它完全不在 Application类,所在的包内,也就脱离了扫描范围。
案例二:构造器注入失败
定义一个 Service 并给它添加一个带参数的构造器。
@Service
public class DemoService {
    public DemoService(String name) {
    }
}
此时启动 Spring 容器,会得到类似这样的报错。
Parameter 0 of constructor in com.example.demo.service.DemoService required a bean of type ‘java.lang.String’ that could not be found.
显然,Spring 把这个入参当作一个 Bean 了,由于找不到这个 Bean 导致 DemoService 构造失败,我们来分析一下这个错误是如何产生的。
案例分析
Spring 使用 AbstractAutowireCapableBeanFactory#createBeanInstance 方法创建 Bean。它的核心逻辑是①寻找 Bean 构造器 ②反射调用构造器创建实例。
// Candidate constructors for autowiring?
Constructor<?>[] ctors = determineConstructorsFromBeanPostProcessors(beanClass, beanName);
if (ctors != null || mbd.getResolvedAutowireMode() == AUTOWIRE_CONSTRUCTOR ||
		mbd.hasConstructorArgumentValues() || !ObjectUtils.isEmpty(args)) {
	return autowireConstructor(beanName, mbd, ctors, args);
}
上面 autowireConstructor 方法除了需要构造器,还需要确定构造器对应的入参。
回到案例,已知构造 DemoService(String name),Spring 需要找到入参 name 的值进行注入。
ConstructorResolver#autowireConstructor 方法中调用 createArgumentArray 方法来获取调用构造器的参数数组。
argsHolder = createArgumentArray(beanName, mbd, resolvedValues, bw, paramTypes, paramNames,
	getUserDeclaredConstructor(candidate), autowiring, candidates.length == 1);
其最终是从 BeanFactory 中获取 Bean,也就是说将入参值作为 BeanName 去获取对应的 Bean,当找不到对应的 Bean 就抛出异常终止运行。
return this.beanFactory.resolveDependency(
	new DependencyDescriptor(param, true), beanName, autowiredBeanNames, typeConverter);
2、依赖注入错误
案例一:多个同类型 Bean 被注入
required a single bean, but 2 were found
这个错误是注入单个Bean时同时发现了多个,Spring不知道该选择哪个。下面来复现场景,定义 DemoService 接口,Demo1ServceImpl 和 Demo2ServiceImpl 实现该接口
@Service
public class Demo1ServiceImpl implements DemoService {
}

@Service
public class Demo2ServiceImpl implements DemoService {
}
在另一个 Bean 中使用 @Autowired 注入该 DemoService,就会得到上面的报错
@Controller
public class DemoController {
    @Autowired
    private DemoService demoService;
    // ... 为减少篇幅,省略其它代码
}
案例分析
分析问题的原因需要弄清楚 @Autowired 依赖注入的原理。当 Bean 被实例化时,有两个核心步骤:
- 执行 AbstractAutowireCapableBeanFactory#createBeanInstance 方法:通过构造器
反射构造出这个 Bean。(本案例中实例化 DemoController ) - 执行 AbstractAutowireCapableBeanFactory#populate 方法:给这个 Bean 注入依赖。(本案例中就是注入 DemoService )
其步骤 2 就是依赖注入的关键,这个过程执行各种 BeanPostProcessor 处理器,而 Autowired 的实现用到了 AutowiredAnnotationBeanPostProcessor,核心代码如下:
for (InstantiationAwareBeanPostProcessor bp : getBeanPostProcessorCache().instantiationAware) {
	PropertyValues pvsToUse = bp.postProcessProperties(pvs, bw.getWrappedInstance(), beanName);
	if (pvsToUse == null) {
		if (filteredPds == null) {
			filteredPds = filterPropertyDescriptorsForDependencyCheck(bw, mbd.allowCaching);
		}
		pvsToUse = bp.postProcessPropertyValues(pvs, filteredPds, bw.getWrappedInstance(), beanName);
		if (pvsToUse == null) {
			return;
		}
	}
	pvs = pvsToUse;
}
AutowiredAnnotationBeanPostProcessor 的注入依赖过程分成两步,都是在其 postProcessProperties 方法中完成:
- 找出所有需要依赖注入的字段和方法 AutowiredAnnotationBeanPostProcessor#findAutowiringMetadata
- 根据依赖信息寻找出依赖并完成注入 InjectionMetadata#inject
本案例是由于多个依赖导致注入失败,说明问题发生在第2步寻找依赖的过程。
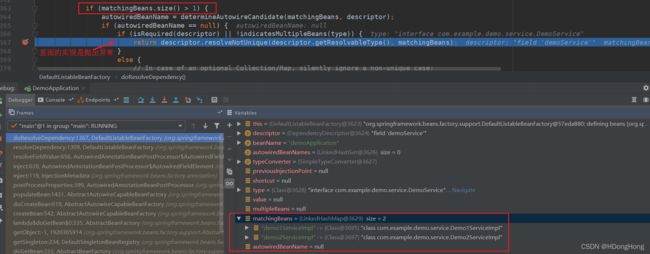
现在通过断点调试,可以定位到 DefaultListableBeanFactory#doResolveDependency 中抛出了异常。

如上图,当根据 DemoService 这个类型来找出依赖时,会找出 2 个依赖,分
别为 demo1ServiceImpl 和 demo2ServiceImpl。这种情况下,走到 resolveNotUnique 方法抛出异常 NoUniqueBeanDefinitionException。
当然,多个同类型依赖不是必定报错,通过下面代码可以看出 resolveNotUnique 方法的执行出了数量 > 1,还需要满足两个条件:
if (matchingBeans.size() > 1) {
	autowiredBeanName = determineAutowireCandidate(matchingBeans, descriptor);
	if (autowiredBeanName == null) {
		if (isRequired(descriptor) || !indicatesMultipleBeans(type)) {
			return descriptor.resolveNotUnique(descriptor.getResolvableType(), matchingBeans);
		}
- determineAutowireCandidate 方法找不到高优先级的 Bean
- @Autowired 的 required 属性是 true,或者声明注入的类型不是集合,比如List、Map
这两点其实在报错信息中也有提示
Consider marking one of the beans as @Primary, updating the consumer to accept multiple beans, or using @Qualifier to identify the bean that should be consumed
案例二:显示引用 Bean 时忽略大小写
引用 Bean 时使用 @Qualifier 可以指定 BeanName,同样能解决案例一的问题,但如果不小心把 BeanName 的首字母大写,却是会得到找不到 Bean 的报错
@Autowired
@Qualifier("Demo1ServiceImpl")
private DemoService demoService;
错误信息:
Field demoService in com.example.demo.DemoApplication required a bean of type ‘com.example.demo.service.DemoService’ that could not be found.
The injection point has the following annotations:
- @org.springframework.beans.factory.annotation.Autowired(required=true)
- @org.springframework.beans.factory.annotation.Qualifier(value=Demo1ServiceImpl)
The following candidates were found but could not be injected:
- User-defined bean
- User-defined bean
本案例,我们来分析下为什么 Spring Bean 的首字母默认是小写。
案例分析
SpringBoot 启动时会扫描 package 找到被 @Component 标记的 Bean,并为每个 Bean 生成 BeanName,关键代码如下(ClassPathBeanDefinitionScanner#doScan):
protected Set<BeanDefinitionHolder> doScan(String... basePackages) {
	Assert.notEmpty(basePackages, "At least one base package must be specified");
	Set<BeanDefinitionHolder> beanDefinitions = new LinkedHashSet<>();
	for (String basePackage : basePackages) {
		// 扫描包
		Set<BeanDefinition> candidates = findCandidateComponents(basePackage);
		for (BeanDefinition candidate : candidates) {
			ScopeMetadata scopeMetadata = this.scopeMetadataResolver.resolveScopeMetadata(candidate);
			candidate.setScope(scopeMetadata.getScopeName());
			// 生成 BeanName
			String beanName = this.beanNameGenerator.generateBeanName(candidate, this.registry);
// ...
生成 BeanName 的方法是在 BeanNameGenerator#generateBeanName 中,其实现类 AnnotationBeanNameGenerator 的代码逻辑如下:
public String generateBeanName(BeanDefinition definition, BeanDefinitionRegistry registry) {
	if (definition instanceof AnnotatedBeanDefinition) {
		String beanName = determineBeanNameFromAnnotation((AnnotatedBeanDefinition) definition);
		if (StringUtils.hasText(beanName)) {
			// Explicit bean name found.
			return beanName;
		}
	}
	// Fallback: generate a unique default bean name.
	return buildDefaultBeanName(definition, registry);
}
流程是先看 Bean 有没有显式指定名称,如果有则用显式名称,如果没有则产生一个默认名称。我们需要看下默认名称的生成方式(AnnotationBeanNameGenerator#buildDefaultBeanName)

本案例中,ClassUtils.getShortName 拿到的短名是 Demo1ServiceImpl,接着调用 Introspector#decapitalize 方法,这里面会将短名的首个字母转成小写,即 demo1ServiceImpl
public static String decapitalize(String name) {
      // ... 省略
      char chars[] = name.toCharArray();
      chars[0] = Character.toLowerCase(chars[0]);
      return new String(chars);
  }
至此,解释了 Bean 首字母默认是小写的原因。
案例延伸
知道了 BeanName 的生成方式,那么当 Bean 是内部类时,默认的 BeanName 又是什么。
在 Demo1ServiceImpl 类中定义 InnerService 内部类,它的 BeanName 是什么?
@Service
public class Demo1ServiceImpl implements DemoService {
    @Service
    public static class InnerService {
    }
}
这其实取决于 ClassUtils.getShortName 的实现,此时拿到的短名是 Demo1ServiceImpl.InnerService,答案也就很明显了。
3、Bean 的创建流程
案例一:为什么 @PostConstruct 方法中可以预处理
在 Spring Bean 中做预处理操作的时候通常会用到 @PostConstruct 注解,比如在责任链的启动类中将各个节点组装成责任链去执行。示例代码如下:
@Component
public class WorkerRunner {
    private List<Worker> workerList;
    @Autowired
    private AuthenticationWorker authenticationWorker;
    @Autowired
    private UserInfoWorker userInfoWorker;
    @Autowired
    private GoodsInfoWorker goodsInfoWorker;

    @PostConstruct
    public void before() {
        workerList = new ArrayList<>();
        workerList.add(authenticationWorker);
        workerList.add(userInfoWorker);
        workerList.add(goodsInfoWorker);
    }

    public void run() {
    	// 每个 Worker#work 会打印当前 Worker 类名
        workerList.forEach(Worker::work);
    }
}
运行 WorkerRunner#run 方法,结果如下:
AuthenticationWorker
UserInfoWorker
GoodsInfoWorker
设想下,如果我们把 before 方法中组装责任链的逻辑放到 WorkerRunner 构造器中,会发生什么?
public class WorkerRunner {
	// ... 省略
    public WorkerRunner() {
        workerList = new ArrayList<>();
        workerList.add(authenticationWorker);
        workerList.add(userInfoWorker);
        workerList.add(goodsInfoWorker);
    }
	// ...
}
运行 WorkerRunner#run,得到的是 NullPointerException 空指针异常。
开启调试模式,发现此时 workerList 中 3 个元素都是 null,但是此时类内注入这 3 个都有值!如下图所示:

上述的案例可以看出,构造器中的代码运行时,依赖的 Bean 还未完成注入,而当运行 @PostConstruct 注解方法时,已经完成了依赖注入。下面将介绍 Bean 的生命周期来分析这其中的原因。
案例分析
创建 Bean 的核心逻辑是 AbstractAutowireCapableBeanFactory#doCreateBean 中完成的,它的关键步骤是:① 实例化 Bean createBeanInstance;② 装配依赖 populateBean;③ 初始化 Bean,回调各种定制的初始化方法 initializeBean。源代码如下:
protected Object doCreateBean(String beanName, RootBeanDefinition mbd, @Nullable Object[] args)
			throws BeanCreationException {
		// ... 省略
		if (instanceWrapper == null) {
			instanceWrapper = createBeanInstance(beanName, mbd, args);
		}
		Object bean = instanceWrapper.getWrappedInstance();

		// ... 省略
		Object exposedObject = bean;
		try {
			populateBean(beanName, mbd, instanceWrapper);
			exposedObject = initializeBean(beanName, exposedObject, mbd);
		}
		// ... 省略
	}
根据这三个步骤,可以看出构造器方法应该是在 createBeanInstance 中被调用到,通过调试可以确定调用链路是
createBeanInstance > DefaultListableBeanFactory#instantiateBean > SimpleInstantiationStrategy#instantiate,最终执行到
BeanUtils#instantiateClass
关键代码如下:
return ctor.newInstance(argsWithDefaultValues);
而依赖注入是在 populateBean 方法中完成,所以案例中构造器执行的时候,依赖的 3 个 Bean 此时还没有被注入,拿到的值自然就是 null 了。
populateBean 方法执行后就会执行 initializeBean 方法,我们来看下它的源代码:
protected Object initializeBean(String beanName, Object bean, @Nullable RootBeanDefinition mbd) {
	// ... 省略
	if (mbd == null || !mbd.isSynthetic()) {
		wrappedBean = applyBeanPostProcessorsBeforeInitialization(wrappedBean, beanName);
	}
	// ... 省略
}
applyBeanPostProcessorsBeforeInitialization 方法最终执行到后置处理器 InitDestroyAnnotationBeanPostProcessor 的 buildLifecycleMetadata 方法,源代码如下:
private LifecycleMetadata buildLifecycleMetadata(final Class<?> clazz) {
	// ... 省略
	do {
		final List<LifecycleElement> currInitMethods = new ArrayList<>();
		final List<LifecycleElement> currDestroyMethods = new ArrayList<>();

		ReflectionUtils.doWithLocalMethods(targetClass, method -> {
		// 这里 this.initAnnotationType 就是 PostConstruct.class
			if (this.initAnnotationType != null && method.isAnnotationPresent(this.initAnnotationType)) {
				LifecycleElement element = new LifecycleElement(method);
				currInitMethods.add(element);
	// ... 省略
}
在这个方法里,Spring 将遍历查找被 PostConstruct.class 注解过的方法,返回到上层,
并最终调用该方法。这样就清楚了 @PostConstruct 能做预处理的原因。
4、AOP 常见错误
Spring 两个核心特性:IOC 和 AOP,AOP 本质上是代理模式的实现,Spring AOP 利用 CGlib 和 JDK 动态代理两种方式实现运行时动态增强方法,下面来看看 AOP 的一些常见错误案例。
案例一:调用类内被拦截方法时 AOP 失效
假设这样一个场景,我们在 DemoServiceImpl 中定义 run 方法和 printLog 方法,run 方法内部调用 printLog() 方法
@Service
public class DemoServiceImpl implements DemoService {
    @Override
    public void run() {
        printLog();
    }
    @Override
    public void printLog() {
        System.out.println("hello");
    }
}
再定义一个切面 AopAspect,拦截 printLog 方法,对其增强,在方法执行完成后打印耗时日志
@Aspect
@Component
public class AopAspect {
    @Around("execution(* com.example.demo.service.DemoServiceImpl.printLog(..))")
    public void printCostTime(ProceedingJoinPoint joinPoint) throws Throwable {
        long start = System.currentTimeMillis();
        joinPoint.proceed();
        System.out.println("printLog time cost(ms): " + (System.currentTimeMillis() - start));
    }
}
此时我们调用 DemoServiceImpl#run 方法,会发现得到的结果是:
hello
结果中没有 printLog 方法的耗时日志,说明 AOP 拦截没有生效。而调用 DemoServiceImpl#printLog 方法,结果如下,耗时日志正常打印出来:
hello
printLog time cost(ms): 15
基于此场景,我们来分析下为什么 DemoServiceImpl#run 方法执行后没有打印 printLog 的耗时日志?
案例分析
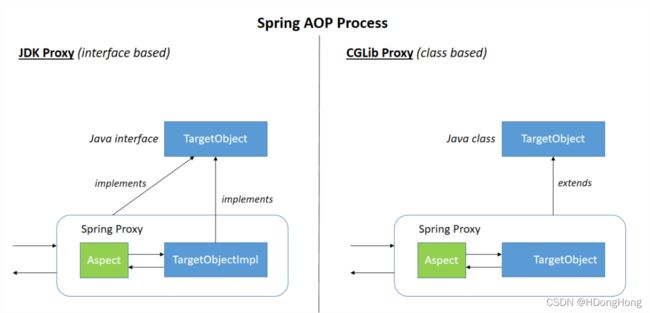
Spring AOP 的底层是动态代理,创建代理的方式有两种,JDK 的方式和 CGLIB 的方
式。
创建代理类的时机是在创建 Bean 的时候,创建 Bean 的工作是在 AbstractAutowireCapableBeanFactory#doCreateBean 中完成的,它的核心步骤是:① 实例化 Bean createBeanInstance;② 装配依赖 populateBean;③ 回调用户定制的初始化方法 initializeBean。
而代理类的生成就是在步骤 ③ 完成的,initializeBean 方法中调用了 AbstractAutowireCapableBeanFactory#applyBeanPostProcessorsAfterInitialization 方法,这里面循环执行了一批 BeanPostProcessor#postProcessAfterInitialization 方法,代码如下:
public Object applyBeanPostProcessorsAfterInitialization(Object existingBean, String beanName)
		throws BeansException {
	Object result = existingBean;
	for (BeanPostProcessor processor : getBeanPostProcessors()) {
		Object current = processor.postProcessAfterInitialization(result, beanName);
		if (current == null) {
			return result;
		}
		result = current;
	}
	return result;
}
而 AnnotationAwareAspectJAutoProxyCreator 是创建代理对象的关键实现,同时也是 BeanPostProcessor 的实现类,来看下它对于 postProcessAfterInitialization 方法的实现:
public Object postProcessAfterInitialization(@Nullable Object bean, String beanName) {
	if (bean != null) {
		Object cacheKey = getCacheKey(bean.getClass(), beanName);
		if (this.earlyProxyReferences.remove(cacheKey) != bean) {
			return wrapIfNecessary(bean, beanName, cacheKey);
		}
	}
	return bean;
}
实现关键是 wrapIfNecessary 方法,从名称能猜测含义是看是否需要使用 AOP 包装类,需要的话就生成并返回包装类。再看其具体实现:
protected Object wrapIfNecessary(Object bean, String beanName, Object cacheKey) {
	// ... 省略
	Object[] specificInterceptors = getAdvicesAndAdvisorsForBean(bean.getClass(), beanName, null);
	if (specificInterceptors != DO_NOT_PROXY) {
		this.advisedBeans.put(cacheKey, Boolean.TRUE);
		Object proxy = createProxy(
				bean.getClass(), beanName, specificInterceptors, new SingletonTargetSource(bean));
		this.proxyTypes.put(cacheKey, proxy.getClass());
		return proxy;
	}
	// ... 省略
}
从上面代码能看到 createProxy 方法创建了代理对象,替代了原来的 Bean。这意味着从我们在外部注入被 AOP 拦截的对象时,拿到的实际是代理对象。
案例解答
我们外部调用 printLog 方法能打印出耗时日志,是因为此时的对象是 AOP 产生的代理对象,示例:
public class DemoServiceImplProxy {
	DemoServiceImpl demoServiceImpl;
	void printLog() {
		// 执行前的织入逻辑 ...
		long start = System.currentTimeMillis();

		// 正式原 Bean 的逻辑
		demoServiceImpl.printLog();

		// 执行后的织入逻辑 ...
		System.out.println("printLog time cost(ms): " + (System.currentTimeMillis() - start));
	}
}
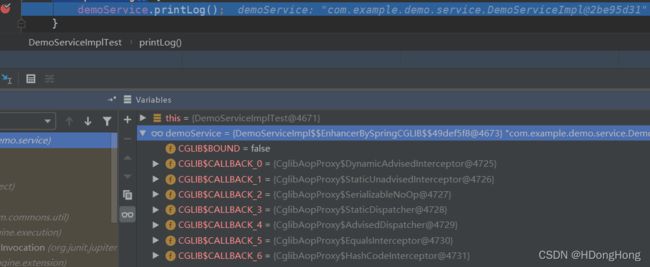
调试可以看到此时 demoService 的实现类是 CGLIB 产生的:

而 DemoServiceImpl#run 方法没有 AOP 失效就是因为它是内部调用的 printLog 方法,其实是通过 this 引用调用的,此时 this 就是当前 Bean,即 DemoServiceImpl。
这也解释了在同类内调用 @Transactional 注解方法时,事务管理会失效的原因,这类问题可以通过 @EnableAspectJAutoProxy 解决,这里就不展开了。
案例延伸
根据上面的分析,我们可以在 DemoServiceImpl 类中自己引用自己,拿到的 Bean 是代理对象,AOP 就不会失效。看下面这段代码示例,它使用 @Autowired 注入依赖,可以思考下为什么还需要使用 @Lazy 懒加载
@Service
public class DemoServiceImpl implements DemoService {
    @Lazy
    @Autowired
    private DemoServiceImpl demoService;

    @Override
    public void run() {
        demoService.printLog();
    }
}
总结
- Spring Bean 定义中了解到 SpringBoot 默认扫描包的范围是启动类所在包及其子包;同时要注意定义 Bean 的时候,构造器的入参会被认为是被注入的依赖。
- 使用 @Autowired 注入依赖的时候需要注意该 Bean 是否有多种实现,是否通过 @Qualifier 指定 BeanName,是否区分好大小写。
- 在 Bean 中有预处理操作时可以使用 @PostConstruct 实现,谨慎在构造器中操作;创建 Bean 的核心逻辑是 AbstractAutowireCapableBeanFactory#doCreateBean 中完成的,它的关键步骤是:① 实例化 Bean createBeanInstance;② 装配依赖 populateBean;③ 初始化 Bean,回调各种定制的初始化方法 initializeBean。
- 类内调用被 AOP 拦截的方法时,如果期望它生效,可以注入当前类或者使用 @EnableAspectJAutoProxy,目的是拿到当前代理对象进行调用。这部分的源代码实现在 doCreateBean 方法的 initializeBean 步骤中完成类的包装并替换。
