PostgreSQL内存浅析
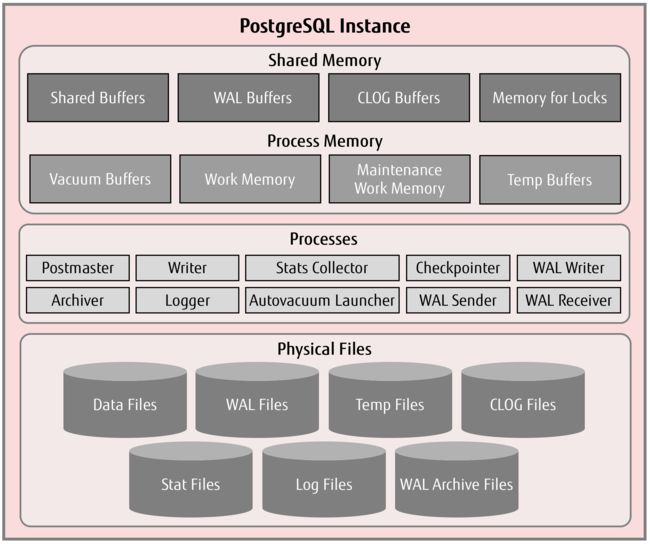
体系结构

(https://www.postgresql.fastware.com/blog/lets-get-back-to-basics-postgresql-memory-components)

(http://geekdaxue.co/read/fcant@sql/qts5is)
共享内存
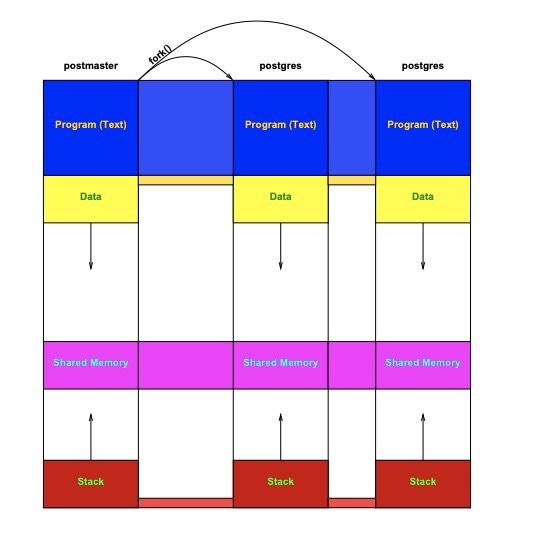
linux的共享内存实现
(https://momjian.us/main/writings/pgsql/inside_shmem.pdf)
linux上的共享内存
共享内存是基于 Unix 的操作系统(包括 Linux)支持的 IPC(进程间通信)机制。它是一种内存类型,多个进程可以同时使用它们来相互通信。共享内存是最快的IPC(inter-process communication)机制之一,因为它不需要进程间相互copy数据。进程可以通过自己的地址空间访问到共享内存。
共享内存的两种形式
共享内存的一种形式是内存映射文件。一旦多个进程将同一文件映射到其地址空间,它们就可以访问文件的内容,并直接使用映射的内存同时更新文件。共享内存的另一种形式是匿名内存。它是指程序分配的共享内存区域,而不将其与文件或持久存储机制相关联。
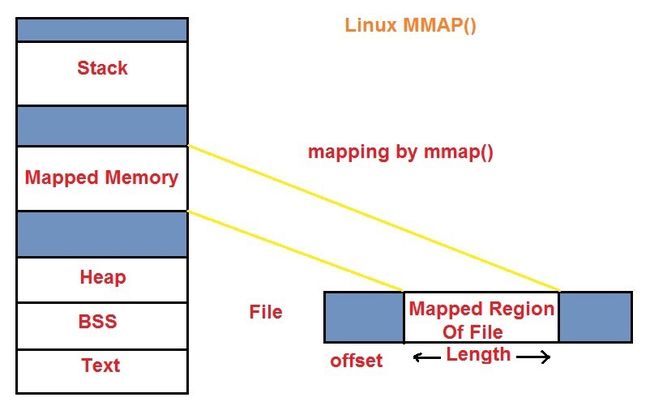
mmap()
map file 到一个进程的地址空间使用的是mmap(),匿名内存也可以用mmap()。mmap是标准C库里的。匿名内存使用的flag应是MAP_ANONYMOUS orMAP_ANON,此时fd为空或者-1,offset应该为0。
http://www.tutorialsdaddy.com/courses/linux-device-driver/lessons/mmap/
pg中的共享内存

https://www.interdb.jp/pg/pgsql02.html
pg中有许多共享内存:shared buffers、wal buffer、clog buffer、lock space等
shared buffer
pg缓存数据的共享内存区,类似oracle的SGA。当数据命中shared buffer时,直接从内存中读取而不需要发生磁盘IO。
PostgreSQL 将表中的页面和索引从持久存储加载到该区域,并直接操作它们。
wal buffer
为确保服务器故障不会丢失任何数据,PostgreSQL 支持 WAL 机制。WAL 数据(也称为 XLOG 记录)是 PostgreSQL 中的事务日志。WAL BUFFER是写入持久性存储之前 WAL 数据的缓冲区。
CLOG BUFFER
提交日志 (CLOG) 为并发控制机制保留所有事务(例如,in_progress、已提交、已中止)的状态。 相应的CLOG BUFFER是CLOG写入磁盘前的缓冲区。
pg的共享内存相关参数
shared_buffers
默认128M,建议配置为25%总内存。因为PostgreSQL的私有内存一般会占的比较多,而且依赖cache,必须给OS留足内存,所以不建议像oracle那样把SGA调到一个比较大的值(相对总内存来说)。
shared_memory_type
指定共享内存的实现方法,不仅是shared_buffer也包含其他共享数据的区域。
共享内存的实现方式因平台而不同,(看上去)linux的默认为mmap。其他值有:
posix(for POSIX shared memory allocated usingshm_open)sysv(for System V shared memory allocated viashmget)windows(for Windows shared memory)mmap(to simulate shared memory using memory-mapped files stored in the data directory)
默认情况下,PostgreSQL使用极少量的System V共享内存,绝大部分都是mmap共享内存。由于POSIX和System V的IPC区别,信号实现不同,可显式将shared_memory_type参数调整IPC实现机制:
-
设置system V IPC(默认是
mmap):
在Linux和FreeBSD系统中默认共享内存系统设置一般足够了,shared_memory_type设置为sysv在这2个系统上也不生效(System V semaphores are not used on this platform)。
OpenBSD系统上,如果将shared_memory_type设置为sysv,默认的共享内存系统参数就不够,需要通过sysctl调整。 -
设置POSIX IPC:
POSIX semaphores在Linux和FreeBSD上有效。
dynamic_shared_memory_type
动态共享内存的机制,默认为posix,该参数对并行查询很重要。关于/dev/shm的社区邮件描述:
PostgreSQL creates segments in /dev/shm for parallel queries (via
shm_open()), not for shared buffers. The amount used is controlled by
work_mem. Queries can use up to work_mem for each node you see in the
EXPLAIN plan, and for each process, so it can be quite a lot if you
have lots of parallel worker processes and/or lots of
tables/partitions being sorted or hashed in your query.
翻译:
- 并行查询用的是POSIX,会在
/dev/shm创建segment - 并行查询不是使用的
shared buffers - 每个查询的plan node由
work_mem限制!
min_dynamic_shared_memory
被并行查询使用的内存初始大小,在server启动时分配,与huge_pages,dynamic_shared_memory_type相关
huge_pages
该参数控制主共享内存区是否使用大页,也就是说私有内存、操作上的内存不受这个限制。pg使用大页目前只支持linux和windows系统;在linux系统中,只支持shared_memory_type设置为mmap时!
| 可用设置 | 描述 |
|---|---|
| try | default, 尝试申请大页 |
| on | 用大页内存,没申请到大页不会启动server |
| off | 不使用大页 |
huge_page_size
控制大页的大小。默认为0,表示pg使用的是操作系统提供的大页大小。只在linux上支持设置非默认值。
pg_shmem_allocations视图
pg_shmem_allocations是pg13开始提供的视图,可查看主要的共享内存段的分配情况,包括postgres本身和插件的。
> select sum(allocated_size)/1024/1024/1024 gb from pg_shmem_allocations;
         gb
--------------------
 2.7658920288085938

 >select * from pg_shmem_allocations order by 4 desc;
                name                 |    off     |    size    | allocated_size
-------------------------------------+------------+------------+----------------
 Buffer Blocks                       |   38575360 | 2415919104 |     2415919104
 [null]                              | 2729553280 |  240300672 |      240300672
 <anonymous>                         |     [null] |  240198528 |      240198528
 Buffer Descriptors                  |   19700992 |   18874368 |       18874368
 XLOG Ctl                            |     171008 |   16803472 |       16803584
 Backend Activity Buffer             | 2707733248 |   10680320 |       10680320
...
NULL表示未使用的内存,anonymous表示匿名页的分配
pg_shmem_allocations视图的大部分内存模块都挺难理解的,直接搜源码也能找到,不过没有一个直观的解释,只是把源码相关init内存模块的数据展示出来。
示例buffer blocks:
直接源码搜索“buffer blocks”:
//初始化shared buffer pool
//只调用一次,在shared memory初始化时
void
InitBufferPool(void)
{
	bool		foundBufs,
				foundDescs,
				foundIOCV,
				foundBufCkpt;

	/* Align descriptors to a cacheline boundary. */
	BufferDescriptors = (BufferDescPadded *)
		ShmemInitStruct("Buffer Descriptors",
						NBuffers * sizeof(BufferDescPadded),
						&foundDescs);

	BufferBlocks = (char *)
		ShmemInitStruct("Buffer Blocks",
						NBuffers * (Size) BLCKSZ, &foundBufs);

	/* Align condition variables to cacheline boundary. */
	BufferIOCVArray = (ConditionVariableMinimallyPadded *)
		ShmemInitStruct("Buffer IO Condition Variables",
						NBuffers * sizeof(ConditionVariableMinimallyPadded),
						&foundIOCV);

//Checkpoint BufferIds是用来在shared memory中排序checkpoint的
	CkptBufferIds = (CkptSortItem *)
		ShmemInitStruct("Checkpoint BufferIds",
						NBuffers * sizeof(CkptSortItem), &foundBufCkpt);
}
- InitBufferPool()函数是初始化shared buffer的
- shared buffer有4个子池:Buffer Descriptors,Buffer Blocks,Buffer IO Condition Variables,Checkpoint BufferIds
私有内存
私有内存是pg为每个session或进程分配的内存区域,它们通常不像shared buffer那样只有一个。每个进程的私有内存是不能相互访问的。

temp_buffers
temp buffer用于缓存临时表数据,默认8m。temp_buffers是私有内存,所以临时表只能当前session可见。
work_mem
查询操作(query operation)所使用的最大内存,如排序、hash表,默认4m。
each query or each plan node?
官方文档:
Note that a complex query might perform several sort and hash operations at the same time, with each operation generally being allowed to use as much memory as this value specifies before it starts to write data into temporary files.
关于/dev/shm的社区邮件:
Queries can use up to work_mem for each node you see in the
EXPLAIN plan,
该参数是针对查询中的每个operation(plan node),而不是each query。一个query可以有很多并行的operation,所以一个查询也可能占用很多内存。所以work_mem的设置需要很谨慎,不能设置的过高导致操作系统内存被耗尽,如最坏的情况:多个会话、会话有多个plan node、plan node使用的大量消耗work mem的operation。
哪些operation会使用到work mem?:
对于sort操作有:ORDER BY、DISTINCT、merge joins;对于使用hash表有: hash joins、hash-based aggregation、memoize nodes、基于hash的in子查询
hash_mem_multiplier
用于限制基于hash-based operations的内存大小,限制是hash_mem_multiplier*work mem。hash_mem_multiplier默认为2。
虽然可以限制work mem,但是无法限制query使用了多少个hash操作,所以pg13增加了这个参数。也就是说12(含)以前,是很难限制hash table的内存的。
我们在9.6的生产环境中找到消耗300G内存的一个会话,罪魁祸首就是低版本没有hash table限制和执行计划错误的使用hash table
maintenance_work_mem
VACUUM, CREATE INDEX, and ALTER TABLE ADD FOREIGN KEY等操作使用的内存区域,这些都是会话发起的操作,有独立的进程,使用私有内存。在一个会话中这些maintenance操作是不能并行的,而且一把并发量也不高,所以这个参数可以调整比较大。
autovacuum也可能用到这个内存区域和限制,参考autovacuum_work_mem解释
autovacuum_work_mem
每个autovacuum worker process使用的最大内存,默认-1,表示使用maintenance_work_mem参数来限制autovacuum worker。vacuum最多使用1GB的内存,autovacuum同样是这个限制,所以vacuum/autovacuumd的内存限制设置到超过1G没有意义。
vacuum_buffer_usage_limit
限制VACUUM、ANALYZE从共享内存中访问的page数,以防太多的page被evict。default为256kb,0表示没有限制。
在使用VACUUM、ANALYZE命令时可指定BUFFER_USAGE_LIMIT,此时的设置优先级高于GUI参数vacuum_buffer_usage_limit
max_stack_depth
执行堆栈的最大安全深度,一般意味着单个backend进程上执行一个递归函数的堆栈深度。默认为2MB。操作系统kernel stack limit应设置的比这个max_stack_depth大一点。
递归函数超过堆栈深度会报如下错误:
ERROR: stack depth limit exceeded HINT:
Increase the configuration parameter max_stack_depth (currently 2048kB),
after ensuring the platform’s stack depth limit is adequate.
logical_decoding_work_mem
pg13以前,逻辑解析最多会在内存中保留4096条变更(max_changes_in_memory代码中写死)。pg13引入参数logical_decoding_work_mem,如果逻辑解析持有的数据大过这个内存值,会写入磁盘。默认64MB。
each replication connection only uses a single buffer of this size,
一般来说逻辑复制链路不会很多,所以logical_decoding_work_mem设置大一点也没有关系
xxCache
xxCache也是私有内存,例如pg会将relation的元数据缓存到relcache。在官方文档中相关描述比较少,但是PG的内存问题往往跟这个相关。
例如catalog cache导致每个backend process都占用了很多内存而且不释放的问题,在许多环境中都出现了。这里是2016年德哥提的关于catalog cache占用较多内存的社区邮件
Every PostgreSQL session holds system data in own cache. Usually this cache is pretty small (for significant numbers of users). But can be pretty big if your catalog is untypically big and you touch almost all objects from
catalog in session. A implementation of this cache is simple - there is not
delete or limits. There is not garabage collector (and issue related to
GC), what is great, but the long sessions on big catalog can be problem.
The solution is simple - close session over some time or over some number of operations. Then all memory in caches will be released.
社区对于catalog cache解释:
- 每个会话都有自己的cache缓存系统数据(元数据等)
- 一般这个cache很小。当catalog很大且会话访问过所有catalog时,cache会变的很大
- cache的管理很简单,没有删除机制和limit限制(其实有invalidation消息)
- 关闭会话会释放cache
Tom Lane大佬的解决方案也是简单粗暴——加硬件资源:
I do not think you should complain if that takes a great deal of memory.Either rethink why you need so many tables, or buy hardware commensurate with the size of your problem.
其实cache也有很多知识点需要关注,了解其原理后cache导致的内存问题解决办法可能不只是一种。
xxCache有很多种类,如relcache、syscache、plancache等等。由于资料比较少,理解xxcache只有翻看源码了。xxCache主要源码都在src/backend/utils/cache下。
源码结构:
inval.c				--私有cache的invalidation消息分发器。对应的share cache的invalidation消息处理为sinval.c
relfilenodemap.c	--relfilenode to oid mapping cache
ts_cache.c			--Tsearch(文本搜索)相关对象的cache
relmapper.c			--catalog to relfilenode mapping cache
typcache.c			--type cache
spccache.c			--tablespace cache
evtcache.c			--event trigger cache
attoptcache.c		--attribute cache
plancache.c			--plan cache
relcache.c			--relation cache 							 							*本次重点*
catcache.c			--system catalog cache  					 					*本次重点*
syscache.c			--在catcache上一层,也是system catalog cache	 *本次重点*
lsyscache.c			--为了方便查询catalog cache的routines,l应该指lookup
partcache.c			--操作在relcache中的分区信息的routines
处理各类cache外,还包含一些操作、消息的源码。下面重点关注的是relcache、catcache/syscache和invalidation消息。
relcache
relcache条目数据保存了什么?
在src/include/utils/rel.h中定义relcache的条目:
* POSTGRES relation descriptor (a/k/a relcache entry) definitions.
其中RelationData是relcache条目最主要的数据结构:
typedef struct RelationData
{
	RelFileNode rd_node;		/* relation的物理标识 */
	SMgrRelation rd_smgr;		/* 缓存的文件句柄,没有则为NULL, or NULL */
	int			rd_refcnt;		/* reference count */
	BackendId	rd_backend;		/* 如果是临时relation,它的所有者backend id */
	bool		rd_islocaltemp; /* 是不是当前会话的temp rel */
	bool		rd_isnailed;	/* 是否已经nail再cache中 */
	bool		rd_isvalid;		/* relcache条目是否有效 */
	bool		rd_indexvalid;	/* relation上的索引是否有效 */
	bool		rd_statvalid;	/* relation上的统计信息是否有效 */
...
	/* 一些子事务信息 */
	SubTransactionId rd_createSubid;	/* rel was created in current xact */
	SubTransactionId rd_newRelfilenodeSubid;	/* highest subxact changing  rd_node to current value */
	SubTransactionId rd_firstRelfilenodeSubid;	/* highest subxact changing rd_node to any value */
	SubTransactionId rd_droppedSubid;	/* dropped with another Subid set */

	Form_pg_class rd_rel;		/* RELATION的在pg_class上的元组指针 */
	TupleDesc	rd_att;			/* 元组的描述信息 */
	Oid			rd_id;			/* relation的oid */
	LockInfoData rd_lockInfo;	/* relation上的锁信息 */
	RuleLock   *rd_rules;		/* rewrite rules */
	MemoryContext rd_rulescxt;	/* rd_rules的私有memory cxt */
	TriggerDesc *trigdesc;		/* 触发器信息,rel上没有为NULL */
...
	/* 外键信息 */
	List	   *rd_fkeylist;	/* list of ForeignKeyCacheInfo (see below) */
	bool		rd_fkeyvalid;	/* true if list has been computed */
	/* 分区信息 */
	PartitionKey rd_partkey;	/* partition key, or NULL */
	MemoryContext rd_partkeycxt;	/* private context for rd_partkey, if any */
...
	List	   *rd_indexlist;	/* 所有索引的OID列表 */
	Oid			rd_pkindex;		/* 主键的oid */
	Oid			rd_replidindex; /* replica identity index的oid */

	List	   *rd_statlist;	/* extended stats的oid列表 */
...

	PublicationDesc *rd_pubdesc;	/* publication descriptor, or NULL */
...
	bytea	   *rd_options;		/* parsed pg_class.reloptions */
...
	Form_pg_index rd_index;		/* 索引在pg_index元组的描述 */
	struct HeapTupleData *rd_indextuple;	/* 所有pg_index元组 */
	MemoryContext rd_indexcxt;	/* index的cxt */
...
	void	   *rd_amcache;		/* available for use by index/table AM */
...
	struct FdwRoutine *rd_fdwroutine;	/* cached function pointers, or NULL */

...
} RelationData;
RelationData包含了非常多的relation相关的元数据:oid、pg_class、分区表、子事务、行安全策略、统计信息、索引元数据、am等等。
relcache的ROUTINES
ROUTINES源码位于src/backend/utils/cache/relcache.c
主要有5个阶段
RelationCacheInitialize- 初始化relcache,初始化为空的RelationCacheInitializePhase2- 初始化共享的catalogRelationCacheInitializePhase3- 完成初始化relcacheRelationIdGetRelation- 通过relation id获得rel描述RelationClose- 关闭一个relation
这5个阶段是relcache中的5个主要逻辑,相当于一个rel entry的生命周期,而不是relcache的生命周期。前三个阶段都是relcache的初始化,他们会初始化relcache,加载一些系统表和其索引;后两个阶段是获得reldesc的逻辑和关闭relation的逻辑,relcache本身还是存在的。
第一阶段:RelationCacheInitialize
RelationCacheInitialize 初始化relcache:
//定义初始大小400
#define INITRELCACHESIZE		400

void
RelationCacheInitialize(void)
{
	HASHCTL		ctl;
	int			allocsize;

	/*
	 * make sure cache memory context exists
	 */
	 //检查是否有cache mctx,没有则创建一个
	if (!CacheMemoryContext)
		CreateCacheMemoryContext();

	 //创建索引到relcache的哈希表
	ctl.keysize = sizeof(Oid);
	ctl.entrysize = sizeof(RelIdCacheEnt);
	RelationIdCache = hash_create("Relcache by OID", INITRELCACHESIZE,
								  &ctl, HASH_ELEM | HASH_BLOBS);
...
	// 初始化relation mapper
	RelationMapInitialize();
}
RelationCacheInitialize没有分配任何rel的操作,只是对relcache做初始化内存、hash表、mapper等
第二阶段:RelationCacheInitializePhase2
void
RelationCacheInitializePhase2(void)
{
	MemoryContext oldcxt;

	//初始化 relation mapper
	RelationMapInitializePhase2();

	//如果是bootstrap模式,共享catalog还不存在,所以可以什么也不做
	if (IsBootstrapProcessingMode())
		return;

	 //switch到当前的cache mctx
	oldcxt = MemoryContextSwitchTo(CacheMemoryContext);

	 //尝试加载共享的relcache file
	if (!load_relcache_init_file(true))//如果没有加载初始化文件
	{
		formrdesc("pg_database", DatabaseRelation_Rowtype_Id, true,
				  Natts_pg_database, Desc_pg_database);
		formrdesc("pg_authid", AuthIdRelation_Rowtype_Id, true,
				  Natts_pg_authid, Desc_pg_authid);
		formrdesc("pg_auth_members", AuthMemRelation_Rowtype_Id, true,
				  Natts_pg_auth_members, Desc_pg_auth_members);
		formrdesc("pg_shseclabel", SharedSecLabelRelation_Rowtype_Id, true,
				  Natts_pg_shseclabel, Desc_pg_shseclabel);
		formrdesc("pg_subscription", SubscriptionRelation_Rowtype_Id, true,
				  Natts_pg_subscription, Desc_pg_subscription);

#define NUM_CRITICAL_SHARED_RELS	5	/* fix if you change list above */
	}

	MemoryContextSwitchTo(oldcxt);
}
init file分为了shared 和local cache init file,load_relcache_init_file()就是尝试从这两种文件中load数据到relcache中(这里应该只加载共享的)。如果load失败,则创建pg_database、pg_authid等5个基本的系统表的描述信息。
第三阶段:
RelationCacheInitializePhase3初始化的第三阶段,内容也是最多的:
void
RelationCacheInitializePhase3(void)
{
	HASH_SEQ_STATUS status;
	RelIdCacheEnt *idhentry;
	MemoryContext oldcxt;
	bool		needNewCacheFile = !criticalSharedRelcachesBuilt;

	RelationMapInitializePhase3();

	//切换到CacheMemoryContext
	oldcxt = MemoryContextSwitchTo(CacheMemoryContext);

	//跟2阶段差不多,加载更多的系统表描述
	if (IsBootstrapProcessingMode() ||
		!load_relcache_init_file(false))
	{
		needNewCacheFile = true;

		formrdesc("pg_class", RelationRelation_Rowtype_Id, false,
				  Natts_pg_class, Desc_pg_class);
		formrdesc("pg_attribute", AttributeRelation_Rowtype_Id, false,
				  Natts_pg_attribute, Desc_pg_attribute);
		formrdesc("pg_proc", ProcedureRelation_Rowtype_Id, false,
				  Natts_pg_proc, Desc_pg_proc);
		formrdesc("pg_type", TypeRelation_Rowtype_Id, false,
				  Natts_pg_type, Desc_pg_type);

#define NUM_CRITICAL_LOCAL_RELS 4	/* fix if you change list above */
	}

	MemoryContextSwitchTo(oldcxt);
...
	//如果我们还没有获得关键的系统索引,现在就做
	//因为catcache and/or opclass cache依赖relcache中的关键系统索引
	if (!criticalRelcachesBuilt)//如果未load关键索引
	{
		load_critical_index(ClassOidIndexId,
							RelationRelationId);
...
		load_critical_index(TriggerRelidNameIndexId,
							TriggerRelationId);

#define NUM_CRITICAL_LOCAL_INDEXES	7	/* fix if you change list above */

		criticalRelcachesBuilt = true; //打个标记,关键系统表索引已获得
	}

	//继续处理共享的关键系统表索引。这些共享关键系统表在某些情况(autovacuum、客户端认证等)下需要
	if (!criticalSharedRelcachesBuilt)
	{
		load_critical_index(DatabaseNameIndexId,
							DatabaseRelationId);
...
		load_critical_index(SharedSecLabelObjectIndexId,
							SharedSecLabelRelationId);

#define NUM_CRITICAL_SHARED_INDEXES 6	/* fix if you change list above */

		criticalSharedRelcachesBuilt = true;//打个标记,共享关键系统表索引已获得
	}

	 //扫描relcache中的所有条目并更新那些在formrdesc 或init file中有错误的
	 //如果有错误,读pg_class数据然后替换错误条目
	 //因为cache file中没有rule、trigger、安全策略,同时也从pg_class中获取
...
	while ((idhentry = (RelIdCacheEnt *) hash_seq_search(&status)) != NULL)
	{
		Relation	relation = idhentry->reldesc;
		bool		restart = false;


		//确保正在使用的relation不要flush
		RelationIncrementReferenceCount(relation);

		 //如果是错误的条目,从pg_class中读元组
		if (relation->rd_rel->relowner == InvalidOid)
		{
		...
			memcpy((char *) relation->rd_rel, (char *) relp, CLASS_TUPLE_SIZE);

			//更新rd_option
			if (relation->rd_options)
				pfree(relation->rd_options);
			RelationParseRelOptions(relation, htup);
...
			ReleaseSysCache(htup);
...
			restart = true;
		}

		//修复那些不在init file中的数据
		//例如relhasrules、relhastriggers可能已经过时或错误了
		if (relation->rd_rel->relhasrules && relation->rd_rules == NULL)
		{
			RelationBuildRuleLock(relation);
			if (relation->rd_rules == NULL)
				relation->rd_rel->relhasrules = false;
			restart = true;
		}
		if (relation->rd_rel->relhastriggers && relation->trigdesc == NULL)
		{
			RelationBuildTriggers(relation);
			if (relation->trigdesc == NULL)
				relation->rd_rel->relhastriggers = false;
			restart = true;
		}

		 //reload行安全策略,因为init文件里没有
		if (relation->rd_rel->relrowsecurity && relation->rd_rsdesc == NULL)
		{
			RelationBuildRowSecurity(relation);

			Assert(relation->rd_rsdesc != NULL);
			restart = true;
		}

		//如果需要reload tableam
		if (relation->rd_tableam == NULL &&
			(RELKIND_HAS_TABLE_AM(relation->rd_rel->relkind) || relation->rd_rel->relkind == RELKIND_SEQUENCE))
		{
			RelationInitTableAccessMethod(relation);
			Assert(relation->rd_tableam != NULL);

			restart = true;
		}

		//持有数计数-1
		RelationDecrementReferenceCount(relation);

...
	//最后,如果需要,更新init file(毕竟可能有reload,别浪费了)
	if (needNewCacheFile)
	{
		InitCatalogCachePhase2();

		/* now write the files */
		write_relcache_init_file(true); //写global init file
		write_relcache_init_file(false); //写private init file
	}
}
RelationCacheInitializePhase3()相比于2阶段加载的5个系统表,加载了更多的系统表,比如pg_class、pg_proc等,以及加载这些表上的索引。当然这些rel加载的前提是cache中没有或者已过期。reload完成后,再把“新”的catalog写入到init file中。
最后写入init file时,看下对应的write_relcache_init_file函数源码,便可以知道传入参数true和false的含义:
static void
write_relcache_init_file(bool shared)
{
···
	if (shared)
	{
		snprintf(tempfilename, sizeof(tempfilename), "global/%s.%d",
				 RELCACHE_INIT_FILENAME, MyProcPid);
		snprintf(finalfilename, sizeof(finalfilename), "global/%s",
				 RELCACHE_INIT_FILENAME);
	}
	else
	{
		snprintf(tempfilename, sizeof(tempfilename), "%s/%s.%d",
				 DatabasePath, RELCACHE_INIT_FILENAME, MyProcPid);
		snprintf(finalfilename, sizeof(finalfilename), "%s/%s",
				 DatabasePath, RELCACHE_INIT_FILENAME);
	}
...
}
true表示写入到global init file
false表示写入到local init file
其中RELCACHE_INIT_FILENAME参数宏定义:
#define RELCACHE_INIT_FILENAME "pg_internal.init"
so,写入的init file为:
- shared:
global/pg_internal.init - local:
DatabasePath/pg_internal.init和DatabasePath/pg_internal.init.myPID
我们看下真实的init文件路径:
[postgres]$ find ./ -name *init*
./global/pg_internal.init       #shared
./base/1/pg_internal.init       #local
./base/13577/pg_internal.init   #local
./base/13578/pg_internal.init	#local
./base/16398/pg_internal.init	#local
./base/16811/pg_internal.init	#local
./base/17674/pg_internal.init	#local
初始化三阶段的调用示意图:

(https://blog.japinli.top/2022/07/postgres-relcache-and-syscache/)
第四阶段:RelationIdGetRelation
通过OID找到reldesc。caller只需要拿到OID 的AccessShareLock,也要自己加减rel的持有数。
Relation
RelationIdGetRelation(Oid relationId)
{
	Relation	rd;

	//确保在事务里
	Assert(IsTransactionState());

	//首次尝试在reldesc中找到cache
	RelationIdCacheLookup(relationId, rd);

	if (RelationIsValid(rd))
	{
		//已删除的relation返回null
		if (rd->rd_droppedSubid != InvalidSubTransactionId)
		{
			Assert(!rd->rd_isvalid);
			return NULL;
		}

		RelationIncrementReferenceCount(rd);
		if (!rd->rd_isvalid)//如果cache中的rel是无效的,重新让他有效
		{
			if (rd->rd_rel->relkind == RELKIND_INDEX ||
				rd->rd_rel->relkind == RELKIND_PARTITIONED_INDEX) //索引信息直接加载
				RelationReloadIndexInfo(rd);
			else  //如果是非索引,则清理reldesc
				RelationClearRelation(rd, true);
...
		}
		return rd;
	}

	//没有reldesc了,新建一个reldesc
	rd = RelationBuildDesc(relationId, true);
	if (RelationIsValid(rd))
		RelationIncrementReferenceCount(rd);
	return rd;
}
RelationIdGetRelation 比较简单,就是通过OID拿到reldesc和索引信息
第五阶段:RelationClose
RelationClose的代码也比较简单:
void
RelationClose(Relation relation)
{
	//不需要锁的操作,直接简单的refcount-1
	RelationDecrementReferenceCount(relation);

	 //如果没有会话打开relation,可以删除分区描述信息(partition descriptors)
	if (RelationHasReferenceCountZero(relation))
	{
		if (relation->rd_pdcxt != NULL &&
			relation->rd_pdcxt->firstchild != NULL)
			MemoryContextDeleteChildren(relation->rd_pdcxt);

		if (relation->rd_pddcxt != NULL &&
			relation->rd_pddcxt->firstchild != NULL)
			MemoryContextDeleteChildren(relation->rd_pddcxt);
	}

#ifdef RELCACHE_FORCE_RELEASE
	if (RelationHasReferenceCountZero(relation) &&
		relation->rd_createSubid == InvalidSubTransactionId &&
		relation->rd_firstRelfilenodeSubid == InvalidSubTransactionId)
		RelationClearRelation(relation, false);
#endif
}
RelationClose 是对关闭访问relation的操作,一般来说这个函数只会将访问relation的会话数refcount减少。但是也有例外情况:
- 当
refcount为0时,会执行MemoryContextDeleteChildren(),这个MemoryContextDeleteChildren()函数,将删除其子分区描述相关的mctx,这个是会释放内存的。 - 当
refcount为0且有标记宏定义DRELCACHE_FORCE_RELEASE时,使用RelationClearRelation()函数删除hash表的entry,这一步不会释放内存。这个DRELCACHE_FORCE_RELEASE宏没有找到(只有显示编译才会有?)。
relcache也不是完全没有释放内存的逻辑,不过触发条件比较苛刻,且删除的内存也不是relcache中的所有内存。
syscache/catcache
CatCache缓存的是系统表中的Tuple,基于CatCache基础之上还有一层SysCache(KV接口),本质上可以认为CatCache和SysCache一起把系统表中的数据在内存中按照KV方式重新组织。
syscache/catcache要更复杂一点,这里简单提炼一点容易解读的内容,主要是为了了解syscache的缓存内容和load机制。进一步的源码解读可参阅postgreSQL源码分析——存储管理——内存管理(3)和 PostgreSQL RelCache 和 SysCache 缓存
catcache结构体
typedef struct catcache
{
	int			id;				//cache id,id定义在syscache.h中
	int			cc_nbuckets;	//这个cache的hash桶个数
	TupleDesc	cc_tupdesc;		//元组描述,由reldesc拷贝而来
...
	const char *cc_relname;		//元组对应的系统表名
	Oid			cc_reloid;		//系统表的OID
	Oid			cc_indexoid;	//cache key的索引OID
	bool		cc_relisshared; //表是否跨db共享?
...
	//catcache使用的统计信息
#ifdef CATCACHE_STATS
	long		cc_searches;	//查询该catcache的次数
	long		cc_hits;		//命中次数
	long		cc_neg_hits;	//negative entry的命中次数
...
#endif
} CatCache;
catcache条目
typedef struct catctup
{
	int			ct_magic;		//标识catctup条目
#define CT_MAGIC   0x57261502

	uint32		hash_value;		//这个tuple的hash键值
...

	//不会返回死元组,但是在refcount变成零时,会从catcache中删除
	int			refcount;		//元组的refcount,标志是否有访问
	bool		dead;			//死元组,但是还没有清理
	bool		negative;		//是否是negative cache entry?
	HeapTupleData tuple;		//元组头结构

...
	CatCache   *my_cache;		//链接到该元组所属的catcache
} CatCTup;
SearchCatCacheMiss()函数
SearchCatCacheMiss()是catcache hit miss的主要函数,并且在miss后会产生访问字典中的元组
static pg_noinline HeapTuple
SearchCatCacheMiss(CatCache *cache,
				   int nkeys,
				   uint32 hashValue,
				   Index hashIndex,
				   Datum v1,
				   Datum v2,
				   Datum v3,
				   Datum v4)
{
	ScanKeyData cur_skey[CATCACHE_MAXKEYS];
	Relation	relation;
	SysScanDesc scandesc;
	HeapTuple	ntp;
	CatCTup    *ct;
	Datum		arguments[CATCACHE_MAXKEYS];

...

	//cache中未找到元组,所以需要尝试直接从表中找
	//找到就加到cache中
	//没有找到就加一个negative cache条目
	relation = table_open(cache->cc_reloid, AccessShareLock);

	scandesc = systable_beginscan(relation,
								  cache->cc_indexoid,
								  IndexScanOK(cache, cur_skey),
								  NULL,
								  nkeys,
								  cur_skey);

	ct = NULL;
	//元组有效时,创建一个条目
	while (HeapTupleIsValid(ntp = systable_getnext(scandesc)))
	{
		ct = CatalogCacheCreateEntry(cache, ntp, arguments,
									 hashValue, hashIndex,
									 false);  //创建一个条目
		//refcount立即+1
		ResourceOwnerEnlargeCatCacheRefs(CurrentResourceOwner);
		ct->refcount++;
		ResourceOwnerRememberCatCacheRef(CurrentResourceOwner, &ct->tuple);
		break;					/* assume only one match */
	}

	systable_endscan(scandesc);

	table_close(relation, AccessShareLock);

	/*
	//如果没有找到元组,需要创建一个negative cache条目,相当于假元组
	//假元组有key column,其余都是null的
	//,因为在启动阶段invalidation机制未激活且在元组真的在稍后创建后无法清理他们
	//所以这个阶段,不会创建negative条目
	if (ct == NULL) //如果没有找到元组,进入以下逻辑
	{
		if (IsBootstrapProcessingMode()) //如果是启动阶段直接返回NULL
			return NULL;

		ct = CatalogCacheCreateEntry(cache, NULL, arguments,
									 hashValue, hashIndex,
									 true); //创建条目

		CACHE_elog(DEBUG2, "SearchCatCache(%s): Contains %d/%d tuples",
				   cache->cc_relname, cache->cc_ntup, CacheHdr->ch_ntup);
		CACHE_elog(DEBUG2, "SearchCatCache(%s): put neg entry in bucket %d",
				   cache->cc_relname, hashIndex);

		//negative条目不返回给caller,refcount也是0
		return NULL;
	}
...
	return &ct->tuple;
}
这里的假元组negative cache entry很精彩,将一个不存在的元组缓存在catcache中,下次再发生访问就不需要再到数据字典中找元组了,避免了无意义的多次查数据字典。
cache validation消息
当元组发生update或delete后,由于事务可见性规则,这些在事务结束后不可见的元组需要被告知给cache,使cache中的元组invalidated,在下次读取时再load。同样,因为insert而产生新元组时,cache中的negative cache entry也可能需要flush出去以匹配新元组。其中一个比较常见的常见是DDL,DDL可能导致元数据中的某些tuple失效,此时就需要发送cache validation给各个私有cache让他们清理cache条目。
这个cache validation机制适用于syscache、relcache等私有cache池的管理。由于idle的backend不会读sinval events,所以需要主动send消息让lag backend能“catch up”。当完成事务时,必须要将invalidation events通过SI message queue广播给其他backends。
源码分为两块,sinval和inval
- Invalidation interface: src/include/utils/inval.h
- Invalidation dispatch: src/backend/utils/cache/inval.c
- Invalidation message sharing interface: src/include/storage/sinval.h
- Invalidation message sharing dispatch: src/backend/storage/ipc/sinval.c
- Invalidation message sharing data structures interface: src/include/storage/sinvaladt.h
- Invalidation message sharing data structures: src/backend/storage/ipc/sinvaladt.c
在src/backend/utils/cache/inval.c中包含shared-invalidation消息结构体:
typedef union
{
	int8		id;				/* type field --- must be first */
	SharedInvalCatcacheMsg cc;
	SharedInvalCatalogMsg cat;
	SharedInvalRelcacheMsg rc;
	SharedInvalSmgrMsg sm;
	SharedInvalRelmapMsg rm;
	SharedInvalSnapshotMsg sn;
} SharedInvalidationMessage;
shared-invalidation消息包含如下种类:
- 使指定catcache条目失效
- 使某个系统catalog的整个catcache条目失效
- 使指定relcache条目失效
- 使所有relcache条目失效
- 使某个对应物理relation的smgr的cache条目失效
- 使 mapped-relation 失效
- 使扫描过relation的保存了的快照失效
消息位于共享内存队列中,直到所有其他进程读取它们。通常,接收进程仅在特定时间读取消息,因此,如果接收进程处于空闲状态(即不处理任何用户请求)或忙于执行其他操作,以至于它们没有时间读取这些消息,则消息可能会无限期地继续留在共享内存中。在不幸的情况下,如果此共享内存空间不再可用于进程来存储新消息,则该进程将不得不承担清理任务。(实际上,这种清理是主动完成的,因此很少会用完空间)若要丢弃旧消息,必须确保所有其他进程都已读取它们。如果某些进程由于上述原因无法做到这一点,它必须明确地向滞后的进程发送信号,要求它们赶上。一旦滞后进程赶上来,就可以随意丢弃这些消息。
处理消息时,首先检查消息中指定的目录元组当前是否在缓存中(消息中还指定了 syscache 标识),如果是,则将其从缓存的哈希表中删除。下次请求该元组时,将从基础目录表中重新读取该元组并将其添加到哈希表中,因此后续访问将读取新值。如果进程已锁定特定数据库对象,阻止并发进程再修改它,则它可以继续使用缓存的元组,直到释放锁定。
xxCache的问题小结
xxCache有许多种类,其中比较著名的有plancache、relcache、syscache。这些cache属于私有内存,存在于每个backend进程中。这些cache没有lru机制来淘汰过期的数据,他们通过invalidation消息清理全局都不需要的快照、元数据信息,比如对象被删除了的时候。
- relcache是最有可能占用较多内存的地方,relcache会加载元数据信息,初始化过程中会读取*.init文件以加快加载元数据到relcache中。后续在需要读取到其他元数据时,也会进行加载。
- catcache缓存数据字典的元组信息,syscache是基于catcache上一层的,可理解为他俩一起实现这个数据字段缓存。如果元组不存在,则会生成一个negative条目,以访下次访问还要访问数据字典。同样的,catcache miss也会去读数据字典中的元组。
- cache validation消息是为了告知cache中缓存的元组、快照信息已经过久,它可以使对应的relcache、catcache条目失效。条目会从从缓存的哈希表中删除,这一步会释放内存。
由于cache的内存释放机制很少,当元数据较多的时候(很多的表、分区表),relcache、catcache可能会占用很多内存,而且是每个backend多有可能这样。
可能的解决办法:
- global cache。像oracle的dictionary cache那样,缓存在一个地方,共享访问。如PolarDB的Global RelCache已实现此功能
- LRU。需要适合cache的LRU机制将冷热端分离,过旧的cache条目从hash table中清理即可。此时可能需要cache limit参数限制cache的大小,最好每个cache来一个···
- 线程模式。内存对于线程来说都共享的访问的,天然的优势
- 定期断开长连接。以上都是空了吹。
- 不要建太多的表、分区(注意pg中分区表的分区也是表)
memory contexts
PostgresSQL通过memory context机制来管理内存。之前有做过一篇memory contexts的译文,大致总结如下:
- C语言必须显示释放内存,为了减少内存泄漏的风险,PostgreSQL实现了memory contexts来管理私有内存
- memory contexts不需要每次用完都释放内存,而是通过删除某个context来实现内存释放
- memory contexts是一个层级结构,父级context的释放会递归删除所有子contexts
- 除了调试之外,memory contexts的内存使用情况是比较难观察的。pg14开始有pg_backend_memory_contexts视图可以观察当前会话的当前memory_context使用情况
(https://www.pgcon.org/2019/schedule/attachments/514_introduction-memory-contexts.pdf)
源码分析
在 PostgreSQL 中,所有内存的申请、释放和重置都是在内存上下文中进行的,因此不会直接使用 malloc()、realloc() 和 free() 系统调用函数,而是使用 palloc()、repalloc() 和 pfree() 来实现内存的分配、重分配和释放。
C库的内存函数
C库动态内存分配函数有如下几个:
- malloc():C库的malloc()函数(memory allocation)用于分配大块内存
- calloc():C库的calloc()函数(contiguous allocation)用于分配连续内存
- free():用于释放内存。malloc(),calloc()不会释放内存,动态分配内存后都需要用free()释放内存
- realloc():用于重新分配内存(re-allocation)
另外还有一个C库函数memset(),用来给内存块填充具体的值。
pg代码定义的内存函数
真正被PostgreSQL源码大量调用的内存申请、释放等函数是palloc()、palloc0(),repalloc(),pfree()。他们大部分情况下不会直接跟操作系统内存(C库函数)交互,只有某些情况下会调用C库内存函数。相当于对操作系统内存操作做了一层保护,对于小内存的操作由pg自己完成。
palloc():
palloc()主要是调用MemoryContext的方法alloc。alloc是对MemoryContextAlloc函数的调用,而MemoryContextAlloc函数实际上是调用了当前内存上下文的methods字段中所指定的AllocSetAlloc函数
void *
palloc(Size size)
{
	/* duplicates MemoryContextAlloc to avoid increased overhead */
	void	   *ret;
	MemoryContext context = CurrentMemoryContext;
...
	ret = context->methods->alloc(context, size);
....
	return ret;
}
palloc0():
void *
palloc0(Size size)
{
...
	ret = context->methods->alloc(context, size);
...
	MemSetAligned(ret, 0, size);

	return ret;
}
MemSetAligned是宏定义的,实际上就是调用C库的memset做内存填充,不过MemSetAligned传入的value是0
#define MemSetAligned(start, val, len)\
...\
	memset(_start, _val, _len); \
...
palloc0相对pallo,除了都调用alloc(context, size),palloc0还会把内存的内容置0。
repalloc():
realloc()主要是调用MemoryContext的方法realloc,realloc函数指针对应于AllocSetRealloc函数
/*
 * repalloc
 *		Adjust the size of a previously allocated chunk.
 */
void *
repalloc(void *pointer, Size size)
{
	MemoryContext context = GetMemoryChunkContext(pointer);
...
	ret = context->methods->realloc(context, pointer, size);
...
	return ret;
}
pfree():
pfree将调用内存片所属的内存上下文的methods字段中的free_p函数指针来释放内存片的空间。目前,PG中free_p指针实际指向AllocSetFree函数
/*
 * pfree
 *		Release an allocated chunk.
 */
void
pfree(void *pointer)
{
	MemoryContext context = GetMemoryChunkContext(pointer);

	context->methods->free_p(context, pointer);
	VALGRIND_MEMPOOL_FREE(context, pointer);
}
AllocSetAlloc分配内存
查看其中的alloc方法,alloc最终指向AllocSetAlloc函数。AllocSetAlloc看上去比较复杂,分段看的话比较好理解:
static void *
AllocSetAlloc(MemoryContext context, Size size)
{
	AllocSet	set = (AllocSet) context;
	AllocBlock	block;
	AllocChunk	chunk;
	int			fidx;
	Size		chunk_size;
	Size		blksize;
...

	//如果申请的内存大小超过chunk的最大值,分配整个内存block
	if (size > set->allocChunkLimit)
	{
...
		block = (AllocBlock) malloc(blksize);
...
	}

	//如果申请的内存大小小于chunk,从free list中找是否有free chunk可以使用
	fidx = AllocSetFreeIndex(size);
	chunk = set->freelist[fidx];
	if (chunk != NULL)  //freelist中有chunk可以使用
	{
		Assert(chunk->size >= size);

		set->freelist[fidx] = (AllocChunk) chunk->aset;

		chunk->aset = (void *) set;
...
		return AllocChunkGetPointer(chunk);
	}

...
	 //如果有空间,尝试把chunk放到allocation block,如果没有,需要新建一个block
	if ((block = set->blocks) != NULL)
	{
		Size		availspace = block->endptr - block->freeptr;

		if (availspace < (chunk_size + ALLOC_CHUNKHDRSZ))
		{
...
			block = NULL;
		}
	}
	//没有空间,创建新block
	if (block == NULL)
	{
		Size		required_size;

...
		//申请的block大小为2的冥,不超过 maxBlockSize
		required_size = chunk_size + ALLOC_BLOCKHDRSZ + ALLOC_CHUNKHDRSZ;
		while (blksize < required_size)
			blksize <<= 1;

		//使用malloc分配块,size为2的冥
		block = (AllocBlock) malloc(blksize);

...
}
(https://smartkeyerror.com/PostgreSQL-MemoryContext)
palloc()=>AllocSetAlloc()只有在申请的内存超过chunk大小限制或者freelist中没有空闲block的时候,才会调用malloc()去向操作系统申请内存;其余情况都是在freelist中拿已有的free chunk。
pfree()也是类似的(不示例了):
pfree()=>AllocSetFree()释放一个内存上下文中指定的内存片,如果指定要释放的内存片是内存块中唯一的一个内存片,则将调用free()直接释放该内存块。否则,将指定的内存片加入到Freelist链表中以便下次分配
查看mcxt内存大小
- pg14+:pg_backend_memory_contexts 视图直接在库内查看mcxt内存
lzldb=> SELECT * FROM pg_backend_memory_contexts ORDER BY used_bytes DESC LIMIT 5;
          name           | ident |      parent      | level | total_bytes | total_nblocks | free_bytes | free_chunks | used_bytes
-------------------------+-------+------------------+-------+-------------+---------------+------------+-------------+------------
 CacheMemoryContext      |       | TopMemoryContext |     1 |     1048576 |             8 |     508216 |           1 |     540360
 Timezones               |       | TopMemoryContext |     1 |      104120 |             2 |       2616 |           0 |     101504
 TopMemoryContext        |       |                  |     0 |       97680 |             5 |      12904 |           7 |      84776
 ExecutorState           |       | PortalContext    |     3 |       49208 |             4 |       4424 |           3 |      44784
 WAL record construction |       | TopMemoryContext |     1 |       49768 |             2 |       6360 |           0 |      43408
- pg14+:pg_log_backend_memory_contexts函数输出内存信息到log文件,输出类似MemoryContextStats(TopMemoryContext)的log输出
SELECT pg_log_backend_memory_contexts(9293);
- 通用-gdb MemoryContextStats(TopMemoryContext)
gdb调用MemoryContextStats(TopMemoryContext):
gdb
(gdb) attach 9293
(gdb) p MemoryContextStats(TopMemoryContext)
$2 = void
log输出:
TopMemoryContext: 97680 total in 5 blocks; 16856 free (16 chunks); 80824 used
  TableSpace cache: 8192 total in 1 blocks; 2088 free (0 chunks); 6104 used
  RowDescriptionContext: 8192 total in 1 blocks; 6888 free (0 chunks); 1304 used
  MessageContext: 8192 total in 1 blocks; 6888 free (1 chunks); 1304 used
  Operator class cache: 8192 total in 1 blocks; 552 free (0 chunks); 7640 used
...
  Relcache by OID: 16384 total in 2 blocks; 3504 free (2 chunks); 12880 used
  CacheMemoryContext: 524288 total in 7 blocks; 90840 free (0 chunks); 433448 used
    index info: 2048 total in 2 blocks; 904 free (0 chunks); 1144 used: pg_statistic_ext_relid_index
...
    index info: 2048 total in 2 blocks; 824 free (0 chunks); 1224 used: pg_database_oid_index
    index info: 2048 total in 2 blocks; 824 free (0 chunks); 1224 used: pg_authid_rolname_index
  WAL record construction: 49768 total in 2 blocks; 6360 free (0 chunks); 43408 used
  PrivateRefCount: 8192 total in 1 blocks; 2616 free (0 chunks); 5576 used
  MdSmgr: 8192 total in 1 blocks; 7592 free (0 chunks); 600 used
  LOCALLOCK hash: 8192 total in 1 blocks; 552 free (0 chunks); 7640 used
  Timezones: 104120 total in 2 blocks; 2616 free (0 chunks); 101504 used
  ErrorContext: 8192 total in 1 blocks; 7928 free (3 chunks); 264 used
小结
references
src/backend/utils/mmgr/mcxt.c
src/backend/utils/mmgr/README
https://momjian.us/main/writings/pgsql/inside_shmem.pdf
https://www.interdb.jp/pg/pgsql02.html
https://www.postgresql.org/docs/current/runtime-config-resource.htm
https://www.postgresql.org/docs/16/kernel-resources.html
https://blog.csdn.net/weixin_45644897/article/details/121340327
https://help.aliyun.com/zh/polardb/polardb-for-postgresql/global-cache
https://www.cnblogs.com/feishujun/p/PostgreSQLSourceAnalysis_cache02.html
https://blog.japinli.top/2022/07/postgres-relcache-and-syscache/
https://amitlan.com/2019/06/14/caches-inval.html
https://www.cybertec-postgresql.com/en/memory-context-for-postgresql-memory-management/
https://www.geeksforgeeks.org/dynamic-memory-allocation-in-c-using-malloc-calloc-free-and-realloc/
https://www.cnblogs.com/feishujun/p/PostgreSQLSourceAnalysis_mmgr01.html
https://www.cnblogs.com/feishujun/p/PostgreSQLSourceAnalysis_mmgr02.html
https://smartkeyerror.com/PostgreSQL-MemoryContext
https://jnidzwetzki.github.io/2022/05/28/postgres-memory-context.html
https://www.pgcon.org/2019/schedule/attachments/514_introduction-memory-contexts.pdf


