【Python数据可视化】matplotlib之绘制高级图形:散点图、热力图、等值线图、极坐标图
文章传送门
| Python 数据可视化 |
|---|
| matplotlib之绘制常用图形:折线图、柱状图(条形图)、饼图和直方图 |
| matplotlib之设置坐标:添加坐标轴名字、设置坐标范围、设置主次刻度、坐标轴文字旋转并标出坐标值 |
| matplotlib之增加图形内容:设置图例、设置中文标题、设置网格效果 |
| matplotlib之设置子图:绘制子图、子图共享x轴坐标 |
| matplotlib之绘制高级图形:散点图、热力图、等值线图、极坐标图 |
| matplotlib之绘制三维图形:三维散点图、三维柱状图、三维曲面图 |
目录
- 简述 / 前言
- 1. 散点图
- 2. 热力图
- 3. 等值线图
- 4. 极坐标图
简述 / 前言
前面介绍了一些常用技巧和常见的图形(折线图、柱状图(条形图)、饼图和直方图),这篇分享一下如何绘制一些高级图形:散点图、热力图、等值线图、极坐标图。
1. 散点图
关键方法:.scatter(),需要搭配 matplotlib.pyplot.subplots 一起使用,因为需要创建 figure 对象。
-
普通散点图一般用法:
.scatter(l_x, l_y, s=s, alpha=alpha, color=color); -
频率散点图一般用法:
.scatter(l_x, l_y, s=quantities * 100, alpha=alpha, color=color); -
各参数含义如下:
参数 含义 l_x 散点在x轴的位置 l_y 散点在y轴的位置 quantities 统计量(当要显示每个点的频率时使用) s 每个散点的大小(普通的散点图s可以为固定值,如果要显示每个点的频率,可以修改此处) alpha 透明度,取值范围:[0, 1],值越小越透明 color 每个散点的颜色 -
普通散点图
示例:import matplotlib.pyplot as plt import numpy as np # 新建figure对象 fig, ax = plt.subplots() x = np.random.randn(100) y = np.random.randn(100) ax.scatter(x, y, s=50, alpha=0.7, color='g') # 设置标题 plt.title("普通散点图", fontdict={'fontname': 'FangSong', 'fontsize': 'xx-large', 'fontweight': 'bold'}) plt.xlabel('x轴', fontdict={'fontname': 'FangSong', 'fontsize': 20}) plt.ylabel('y轴', fontdict={'fontname': 'FangSong', 'fontsize': 20}) plt.grid() plt.show() -
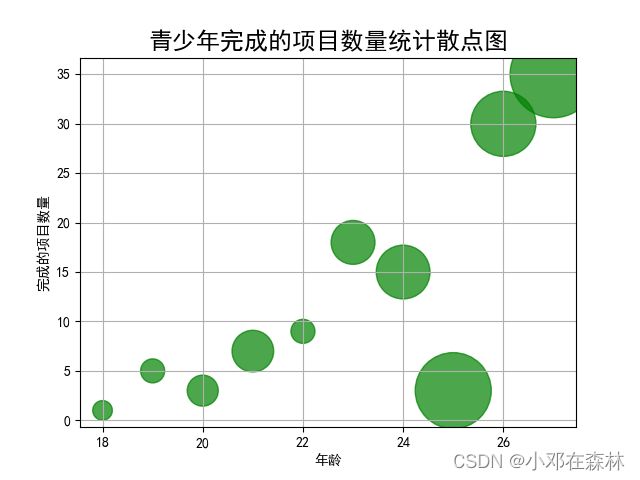
频率散点图
示例:import matplotlib.pyplot as plt import numpy as np # 新建figure对象 fig, ax = plt.subplots() ages = np.arange(18, 28, 1) papers = np.array([1, 5, 3, 7, 9, 18, 15, 3, 30, 35]) quantities = np.array([2, 3, 5, 9, 3, 10, 15, 30, 22, 39]) ax.scatter(ages, papers, s=quantities * 100, alpha=0.7, color='g') plt.rcParams['font.sans-serif'] = ['SimHei'] # 设置中文 # 设置标题 plt.title("青少年完成的项目数量统计散点图", fontsize='xx-large', fontweight='bold') plt.xlabel('年龄') plt.ylabel('完成的项目数量') plt.grid() plt.show()
2. 热力图
- 热力图
-
关键方法:
.inshow() -
一般用法:
.inshow(data, cmap=cmap),各参数含义如下:参数 含义 data 输入的数据 cmap 指定填充风格,有内置颜色,也可以自定义颜色,内置的风格有: Accent,Accent_r,Blues,Blues_r,BrBG,BrBG_r,BuGn,BuGn_r,BuPu,BuPu_r,CMRmap,CMRmap_r,Dark2,Dark2_r,GnBu,GnBu_r,Greens,Greens_r,Greys,Greys_r,OrRd,OrRd_r,Oranges,Oranges_r,PRGn,PRGn_r,Paired,Paired_r,Pastel1,Pastel1_r,Pastel2,Pastel2_r,PiYG,PiYG_r,PuBu,PuBuGn,PuBuGn_r,PuBu_r,PuOr,PuOr_r,PuRd,PuRd_r,Purples,Purples_r,RdBu,RdBu_r,RdGy,RdGy_r,RdPu,RdPu_r,RdYlBu,RdYlBu_r,RdYlGn,RdYlGn_r,Reds,Reds_r,Set1,Set1_r,Set2,Set2_r,Set3,Set3_r,Spectral,Spectral_r,Wistia,Wistia_r,YlGn,YlGnBu,YlGnBu_r,YlGn_r,YlOrBr,YlOrBr_r,YlOrRd,YlOrRd_r,afmhot,afmhot_r,autumn,autumn_r,binary,binary_r,bone,bone_r,brg,brg_r,bwr,bwr_r,cividis,cividis_r,cool,cool_r,coolwarm,coolwarm_r,copper,copper_r,cubehelix,cubehelix_r,flag,flag_r,gist_earth,gist_earth_r,gist_gray,gist_gray_r,gist_heat,gist_heat_r,gist_ncar,gist_ncar_r,gist_rainbow,gist_rainbow_r,gist_stern,gist_stern_r,gist_yarg,gist_yarg_r,gnuplot,gnuplot2,gnuplot2_r,gnuplot_r,gray,gray_r,hot,hot_r,hsv,hsv_r,inferno,inferno_r,jet,jet_r,magma,magma_r,nipy_spectral,nipy_spectral_r,ocean,ocean_r,pink,pink_r,plasma,plasma_r,prism,prism_r,rainbow,rainbow_r,seismic,seismic_r,spring,spring_r,summer,summer_r,tab10,tab10_r,tab20,tab20_r,tab20b,tab20b_r,tab20c,tab20c_r,terrain,terrain_r,turbo,turbo_r,twilight,twilight_r,twilight_shifted,twilight_shifted_r,viridis,viridis_r,winter,winter_r -
添加右侧颜色刻度表关键方法:
.colorbar()
-
示例:
from matplotlib import pyplot as plt

# 定义热图的横纵坐标
xLabel = ['class1', 'class2', 'class3', 'class4', 'class5']
yLabel = ['1月', '2月', '3月', '4月']
# 前4个月的盈利数据
data = [[12, 45, 94, 65, 32], [65, 64, 89, 12, 46], [32, 46, 97, 31, 33], [96, 84, 32, 79, 45]]
fig = plt.figure()
# 定义子图
ax = fig.add_subplot(111)
# 定义横纵坐标的刻度
ax.set_yticks(range(len(yLabel)))
ax.set_yticklabels(yLabel)
ax.set_xticks(range(len(xLabel)))
ax.set_xticklabels(xLabel)
# 选择颜色的填充风格,这里选择 summer_r
im = ax.imshow(data, cmap='summer_r')
# 添加颜色刻度条
plt.colorbar(im)
# 添加中文标题
plt.rcParams['font.sans-serif'] = ['SimHei']
plt.title("各部门盈利情况")
plt.xlabel('部门名称')
plt.ylabel('盈利')
plt.show()
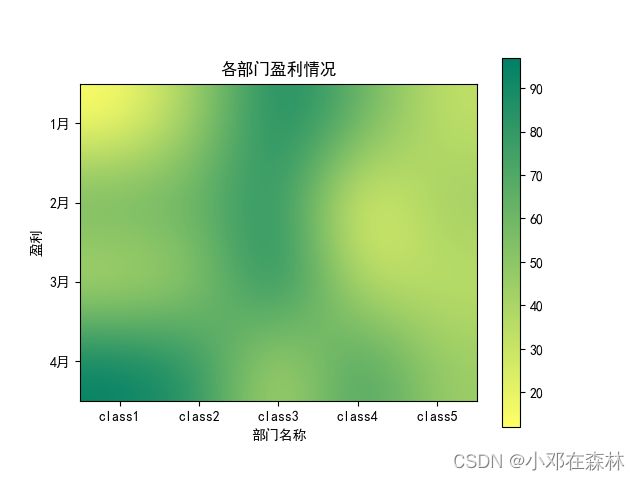
- 另外一种常用方法:
.inshow(data, cmap=cmap, interpolation=interpolation),各参数含义如下(data和cmap含义和上面一样,这里只介绍interpolation):参数 含义 interpolation 插值方法,用于控制图像的平滑程度和细节程度。可以选择: antialiased,none,nearest,bilinear,bicubic,spline16,spline36,hanning,hamming,hermite,kaiser,quadric,catrom,gaussian,bessel,mitchell,sinc,lanczos,blackman
示例:
from matplotlib import pyplot as plt

# 定义热图的横纵坐标
xLabel = ['class1', 'class2', 'class3', 'class4', 'class5']
yLabel = ['1月', '2月', '3月', '4月']
# 前4个月的盈利数据
data = [[12, 45, 94, 65, 32], [65, 64, 89, 12, 46], [32, 46, 97, 31, 33], [96, 84, 32, 79, 45]]
fig = plt.figure()
# 定义子图
ax = fig.add_subplot(111)
# 定义横纵坐标的刻度
ax.set_yticks(range(len(yLabel)))
ax.set_yticklabels(yLabel)
ax.set_xticks(range(len(xLabel)))
ax.set_xticklabels(xLabel)
# 选择颜色的填充风格,这里选择hot
im = ax.imshow(data, cmap='summer_r', interpolation='bicubic')
# 添加颜色刻度条
plt.colorbar(im)
# 添加中文标题
plt.rcParams['font.sans-serif'] = ['SimHei']
plt.title("各部门盈利情况")
plt.xlabel('部门名称')
plt.ylabel('盈利')
plt.show()
3. 等值线图
生成等值线图关键方法:.contour()
但是在生成等值线图前,我们需要拿到一圈圈的数据,这时候会用到 .meshgrid() 方法!
一般用法:.contour(gridX, gridY, Z, cmap=cmap),各参数含义如下:
| 参数 | 含义 |
|---|---|
| gridX, gridY | 一圈圈网格线数据 |
| Z | 要绘制等值线的函数 |
| cmap | 指定填充风格,有内置颜色(具体内置样式见上面),也可以自定义颜色 |
示例(画出 Z = x*x + y*y 的等值线图):
import numpy as np
import matplotlib.pyplot as plt

x = np.arange(-20, 20, 0.1)
y = np.arange(-20, 20, 0.1)
# 用两个坐标轴上的点在平面上画网格
gridX, gridY = np.meshgrid(x, y)
# 定义绘制等值线的函数
Z = gridX * gridX + gridY * gridY
# 画等值线,用渐变色来区分
contour = plt.contour(gridX, gridY, Z, cmap='summer_r')
# 标记等值线
plt.clabel(contour, inline=1)
plt.show()
4. 极坐标图
关键参数:projection='polar'
示例:
import matplotlib.pyplot as plt
import numpy as np

theta = np.arange(0, 2*np.pi, 0.01)
ax = plt.subplot(111, projection='polar')
ax.plot(theta, theta/10, linestyle='-', lw=5, color='g')
plt.show()


