四、SpringSecurity OAuth2统一授权服务
代码
代码仓库:地址
代码分支:lesson4
简介
在先前文章中我们实战演练了在SpringBoot单体应用中使用SpringSecurity开发自定义登录流程以及动态权限控制,有兴趣的同学可以前往博客阅读SpringSecurity相关文章(所有代码都已上传到Gitee仓库, 每篇文章都有一个专属分支)。随着业务的扩张,单体应用无法满足业务需求,微服务是当前大型商业服务的主流架构,在Java领域中,SpringCloud 全家桶是微服务主流开发框架,Spring Cloud Alibaba 是在Spring Cloud 的基础上进行扩展,目的是为了更好的搭配使用Alibaba生态中的微服务组件(Nacos、Sentinel、Seata等),具体内容可查看文档。
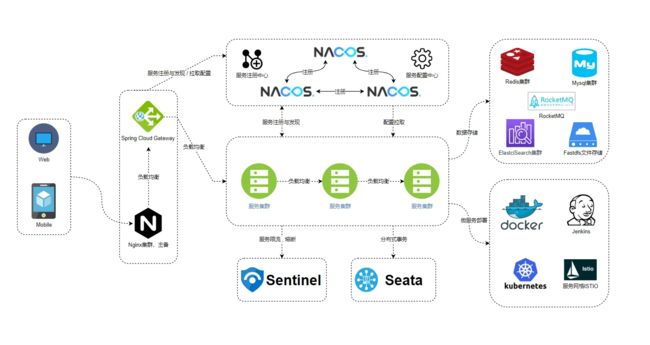
微服务框架如下所示:
上图中的服务集群代表具体业务服务,微服务下的权限控制是为了实现服务集群的安全访问,每个服务集群包含1~N个服务,如果每个服务都定义一套安全策略,那么后期维护将会是一个大工程,因此需要统一安全策略,实现全局安全访问。
OAuth2
OAuth是一个关于授权(authorization)的开放网络标准,2.0版本在全世界得到广泛应用,网上有很多讲解OAuth2的文档,如果你对OAuth没有概念,可以查看往期文章:理解OAuth2.0、OAuth2.0的一个简单解释、OAuth2.0的四种调用方式。
假设我们是一家公司,公司内部有以下业务部门:
- 微信:提供聊天、账户系统,同时对外提供账户授权登录服务
- 电子支付:提供在线支付服务
- 王者荣耀:提供王者荣耀游戏服务
为了实现各个业务系统之间相互调用,需要一套授权系统,对内外系统提供统一的授权访问服务,OAuth协议能够满足上述要求,只需要一套授权服务就能同时满足内外系统的调用要求。
SpringSecurity OAuth
OAuth 涉及四个角色:
- 用户:实际拥有资源所有权的使用者,例如:张三
- 客户端:提供应用功能的程序客户端,可以是APP形式、web形式,例如:时间海绵博客()
- 授权服务:实现OAuth2授权协议,对外提供授权服务,例如:微信开发平台
- 资源服务:对外提供资源访问服务,例如:我们使用微信的微信扫码登录时为网站提供用户信息的微信服务
下面以微信登录为例:
传统的模式中,我们默认web客户端是可信任的,所以没有用户授权的过程,可以访问任何数据。在OAuth协议中,客户端默认是不可信任的,需要进行授权处理。无论是内部客户端还是外部客户端都需要得到授权服务器的认证,但是内部和外部客户端可以使用不同的授权认证方式(比如最严格的授权码方式和最简单的客户端方式)。
授权服务器
使用 spring-security-oauth2 搭建授权服务器,对外提供以下功能:
-
/oauth/authorize 获取授权码
-
/oauth/token 提供客户端(client_credentials)、简化(implicit)、密码(password)、刷新Token(refresh_token),授权码(authorization_code)方式获取access_token
-
/oauth/check_token 依据access_token获取授权信息
同时需要管理客户端信息,客户端信息包含以下属性:
-
clientId 客户端Id
-
clientSecret 客户端密码
-
resourceId 资源Id,用于指定可以访问哪些资源服务
-
authorizedGrantTypes 授权模式,客户端(client_credentials)、简化(implicit)、密码(password)、授权码(authorization_code)
-
scopes 授权范围,可以指定客户端访问权限,这个在协议中没有明确指明作用,各个授权服务可以基于业务自行处理
-
authorities 权限,客户端授权模式下需要配置,其它模式下可以不配置
-
redirectUri 授权结果跳转地址
在先前的文章中提到了UserDetailsService用于查询用户信息,在OAuth中需要提供ClientDetailsService来查询客户端信息,代码如下:
public class AuthClientDetailService implements ClientDetailsService {
    private ClientDetailsService clientDetailsService;
    public AuthClientDetailService() {
        InMemoryClientDetailsServiceBuilder builder = new InMemoryClientDetailsServiceBuilder();
        builder.withClient("blog")// client_id
                .secret(new BCryptPasswordEncoder().encode("blog"))
                .resourceIds("blog", "resource")
                .authorizedGrantTypes("authorization_code", "password", "client_credentials", "implicit", "refresh_token")// 该client允许的授权类型 authorization_code,password,refresh_token,implicit,client_credentials
                .scopes("all", "user")// 允许的授权范围
                .autoApprove(false) //加上验证回调地址
                .authorities("blog")
                .accessTokenValiditySeconds(60 * 60 * 2) // 令牌默认有效期2小时
                .refreshTokenValiditySeconds(60 * 60 * 24 * 3) // 刷新令牌默认有效期3天
                .redirectUris("https://blog.hzchendou.com");
        try {
            this.clientDetailsService = builder.build();
        } catch (Exception e) {
            System.exit(-1);
        }
    }
    @Override
    public ClientDetails loadClientByClientId(String clientId) throws ClientRegistrationException {
        return this.clientDetailsService.loadClientByClientId(clientId);
    }
}
同时需要引入AuthorizationServerConfigurer对授权服务进行配置,代码如下:
@Configuration
@EnableAuthorizationServer
public class AuthorizationServerConfig extends AuthorizationServerConfigurerAdapter {
    @Autowired
    private AuthClientDetailService authClientDetailService;
    @Autowired
    private AuthenticationManager authenticationManager;
    /**
     * 配置客户端信息
     *
     * @param clients
     * @throws Exception
     */
    @Override
    public void configure(ClientDetailsServiceConfigurer clients) throws Exception {
        clients.withClientDetails(authClientDetailService);
    }
    /**
     * 配置OAuth token相关配置
     *
     * @param endpoints
     * @throws Exception
     */
    @Override
    public void configure(AuthorizationServerEndpointsConfigurer endpoints) throws Exception {
        endpoints
                .authenticationManager(authenticationManager)/// 用于密码模式验证时需要提供客户端身份验证
                .reuseRefreshTokens(false);
    }
    @Override
    public void configure(AuthorizationServerSecurityConfigurer security) throws Exception {
        security.authenticationEntryPoint(new AuthAuthenticationEntryPoint());
        security.tokenKeyAccess("permitAll()")//oauth/token_key是公开
                .checkTokenAccess("permitAll()");//oauth/check_token公开
        /// 配置使用 客户端id 和密码的方式进行登录(使用明文传输,不推荐)
        AuthClientCredentialsTokenEndpointFilter endpointFilter = new AuthClientCredentialsTokenEndpointFilter(security);
        endpointFilter.afterPropertiesSet();
        endpointFilter.setAuthenticationEntryPoint(new AuthAuthenticationEntryPoint());
        // 客户端认证之前的过滤器
        security.addTokenEndpointAuthenticationFilter(endpointFilter);
    }
}
使用@EnableAuthorizationServer注解配置会自动配置AuthorizationEndpoint、TokenEndpoint、CheckTokenEndpoint接口,提供OAuth授权服务。
至此完成授权服务搭建
资源服务器搭建
资源服务器也是使用spring-security-oauth2进行搭建,通过上面的介绍,我们知道资源服务器需要识别access_token来获取用户授权的信息内容,配置信息如下:
@EnableResourceServer
@Configuration
public class SpringSecurityResourceServerConfig extends ResourceServerConfigurerAdapter {
    public static final String RESOURCE_ID = "resource";
    @Autowired
    TokenStore tokenStore;
    @Override
    public void configure(HttpSecurity httpSecurity) throws Exception {
        httpSecurity.formLogin().disable();
        httpSecurity.exceptionHandling()
                .accessDeniedHandler(new PathAccessDeniedHandler())
                .authenticationEntryPoint(new AuthAuthenticationEntryPoint());
        httpSecurity.authorizeRequests()
                .antMatchers("/admin/**").hasAuthority("admin")
                .antMatchers("/user/**").hasAuthority("user")
                .and().csrf().disable()
                .sessionManagement().sessionCreationPolicy(SessionCreationPolicy.STATELESS);
    }

    @Override
    public void configure(ResourceServerSecurityConfigurer resources) {
        //当前资源服务 id,用于校验授权信息是否能够访问
        resources.resourceId(RESOURCE_ID)
                .tokenStore(tokenStore)
                /// 设置Token服务,用于识别access_token授权信息
                .tokenServices(tokenService())//验证令牌的服务
                .stateless(true);
    }

    //资源服务令牌解析服务
    @Bean
    public ResourceServerTokenServices tokenService() {
        //使用远程服务请求授权服务器校验token,必须指定校验token 的url、client_id,client_secret
        RemoteTokenServices service = new RemoteTokenServices();
        service.setCheckTokenEndpointUrl("http://localhost:8081/oauth/check_token");
        service.setClientId("blog");
        service.setClientSecret("blog");
        return service;
    }
}
通过配置@EnableResourceServer注解,将会在Filter过滤链中添加OAuth2AuthenticationProcessingFilter过滤器拦截请求,依据access_token解析授权信息, 查看请求头是否有Authorization属性,该属性代表access_token信息。
OAuth服务验证
启动授权服务以及资源服务,访问 POST http://localhost:8081/oauth/token,请求参数如下所示(使用密码模式访问):
client_id:blog
client_secret:blog
grant_type:password
username:admin
password:admin
返回结果:
{
    "access_token": "db9898be-2aef-4f86-9486-b3735db6403e",
    "token_type": "bearer",
    "refresh_token": "44d9aeff-8839-4a9b-b6ea-1ea6310bab5e",
    "expires_in": 6971,
    "scope": "all user"
}
启动资源服务,访问 GET http://localhost:8082/admin/hello,请求头信息如下:
Authorization:Bearer db9898be-2aef-4f86-9486-b3735db6403e返回信息如下:
{
    "code": 200,
    "data": "Hello Admin"
}
说明访问成功
总结
SpringSecurity中的功能都是通过组装Filter链来完成特定功能实现,
- SpringSecurity OAuth授权服务需要提供对外服务,因此还提供了AuthorizationEndpoint、TokenEndpoint、CheckTokenEndpoint等接口模块,当然你也可以用自己的实现来替换这些服务。
- SpringSecurity OAuth 资源服务提供了OAuth2AuthenticationProcessingFilter过滤器来解析access_token授权信息,获得权限信息,后续的权限验证流程与先前的SpringSecurity单体应用是一致的
参考文档
- Spring Cloud Alibaba
- OAuth2协议文档
联系方式
技术更新换代速度很快,我们无法在有限时间掌握全部知识,但我们可以在他人的基础上进行快速学习,学习也是枯燥无味的,加入我们学习牛人经验:
点击:加群讨论


