canvas实现图像裁剪
1.技术背景
随着都市类程序开发业务推进,在各类活动、个人信息等模块逐渐依赖图像裁剪、上传等功能,那么如何实现图像缩放、裁剪就成了前端工程师们关注优化的重点。
2.应用技术
本次使用的技术主要是依赖canvas,又叫画布,是H5新增内容,可以使用js脚本在其中绘制图像的元素。
可以完成图片处理、动画渲染、图表渲染等操作。
最近用uni-app的推流组件做了个图片裁切、上传的组件,拍照、选择照片完成后还需要对图片进行裁切,才能真正使用。
3.处理思路
使用两个canvas分别为操作canvas、目标canvas,操作canvas通过touchstart、touchmove、touchend、touchcancel实时跟进图片缩放、移动状态,点击确认后,使用canvas.drawImage()将前面的操作canvas绘制到目标canvas,最终调用canvas.toDataUrl()将目标canvas转为base64编码的图片传给接口。
3.1 关键方法
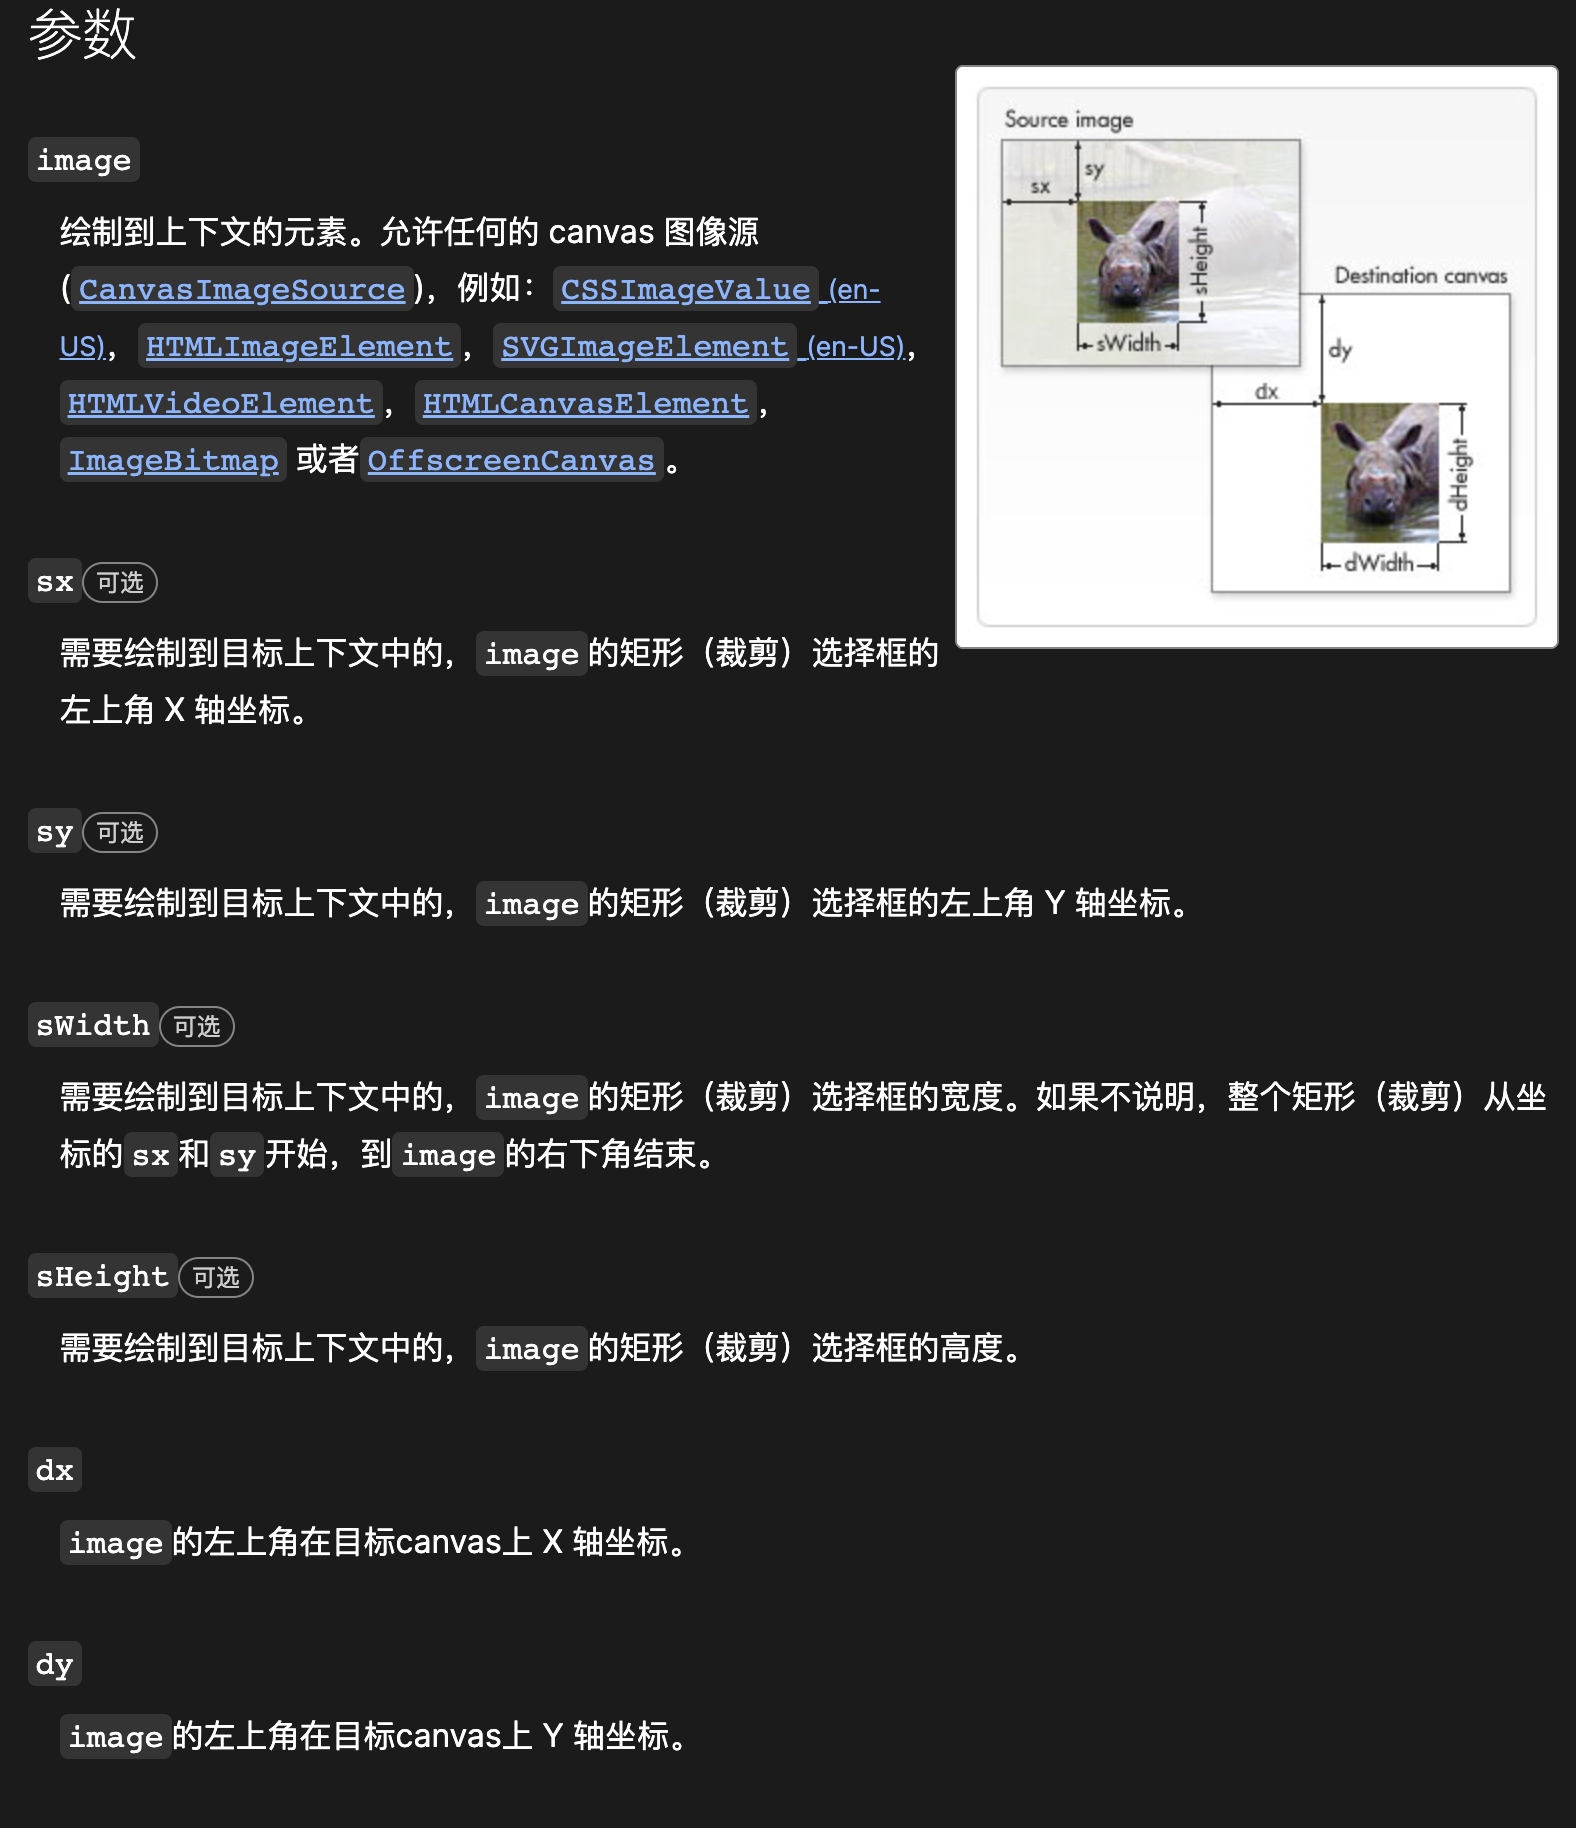
context.drawImage(img,sx,sy,swidth,sheight,x,y,width,height);
参数值
| 参数 | 描述 |
|---|---|
| img | 规定要使用的图像、画布或视频。 |
| sx | 可选。开始剪切的 x 坐标位置。 |
| sy | 可选。开始剪切的 y 坐标位置。 |
| swidth | 可选。被剪切图像的宽度。 |
| sheight | 可选。被剪切图像的高度。 |
| x | 在画布上放置图像的 x 坐标位置。 |
| y | 在画布上放置图像的 y 坐标位置。 |
| width | 可选。要使用的图像的宽度。(伸展或缩小图像) |
| height | 可选。要使用的图像的高度。(伸展或缩小图像) |
4. 具体实现
4.1创建操作canvas、目标canvas
mounted() {
    // 防止H5用户在数据挂在前移动图片
    //#ifdef H5
    this.$el.addEventListener('touchmove', (ev) => {
      ev.preventDefault();
    });
    // #endif
    // 创建canvas
    this.context = uni.createCanvasContext('canvas', this);//操作canvas
    this.targetContext = uni.createCanvasContext('target', this);//目标canvas
  },
4.2 图片加载初始化
其实这一部分就是数据计算,也就是开始涉及到一些图像缩放的算法逻辑,这一部分理解的时候需要花一点时间。
这边其实最要关注的就是一个时间点,两个主体。
时间点:图片加载完成后的如何对图片位置、大小以及对应的裁剪框位置、大小初始化,即图片和裁剪框的相对关系;
两个主体:图像、裁剪框
<template>
  <view v-show="url" class="ksp-image-cutter">

    <canvas
      id="target"
      :style="{ width: target.width + 'px', height: target.height + 'px' }"
      canvas-id="target"
    >canvas>

    <view class="body">

      <image
        v-if="url"
        lazy-load
        class="image"
        :style="{
          left: image.left + 'px',
          top: image.top + 'px',
          width: image.width + 'px',
          height: image.height + 'px',
        }"
        :src="url"
        @load="imageLoad"
      >image>


      <view
        class="plank"
        @touchstart="touchStart($event, 'plank')"
        @touchmove="touchMove"
        @touchend="touchEnd"
        @touchcancel="touchCancel"
      >
        <view
          class="frame"
          :style="{
            left: frame.left + 'px',
            top: frame.top + 'px',
            width: frame.width + 'px',
            height: frame.height + 'px',
          }"
          @touchstart="touchStart($event, 'frame')"
          @touchstart.stop.prevent="touchHandle"
        >

          <canvas
            v-if="mask.show"
            class="canvas"
            :style="{ width: frame.width + 'px', height: frame.height + 'px' }"
            canvas-id="canvas"
          >canvas>

          <view class="rect">view>


          <view
            class="frame-left"
            @touchstart="touchStart($event, 'left')"
            @touchstart.stop.prevent="touchHandle"
          >view>
          <view
            class="frame-right"
            @touchstart="touchStart($event, 'right')"
            @touchstart.stop.prevent="touchHandle"
          >view>
          <view
            class="frame-top"
            @touchstart="touchStart($event, 'top')"
            @touchstart.stop.prevent="touchHandle"
          >view>
          <view
            class="frame-bottom"
            @touchstart="touchStart($event, 'bottom')"
            @touchstart.stop.prevent="touchHandle"
          >view>
          <view
            class="frame-left-top"
            @touchstart="touchStart($event, 'left-top')"
            @touchstart.stop.prevent="touchHandle"
          >view>
          <view
            class="frame-left-bottom"
            @touchstart="touchStart($event, 'left-bottom')"
            @touchstart.stop.prevent="touchHandle"
          >view>
          <view
            class="frame-right-top"
            @touchstart="touchStart($event, 'right-top')"
            @touchstart.stop.prevent="touchHandle"
          >view>
          <view
            class="frame-right-bottom"
            @touchstart="touchStart($event, 'right-bottom')"
            @touchstart.stop.prevent="touchHandle"
          >view>
        view>
      view>
    view>

    <view class="toolbar">
      <button class="btn-cancel" @tap="oncancel">取消button>
      <button class="btn-ok" @tap="onok">选取button>
    view>
  view>
template>
  methods: {
    // 图片首次加载
    imageLoad(ev) {
      // 加载动画
      this.mask.show = true;
      //图像原本宽高获取 (关键数据:图片缩放依赖)
      this.real.width = ev.detail.width;
      this.real.height = ev.detail.height;
      //图片目前的宽高。(关键数据:图片缩放后的大小)
      this.image.width = ev.detail.width;
      this.image.height = ev.detail.height;
      // 裁剪区域的大小
      this.frame.width = this.width;
      this.frame.height = this.height;
      // 裁剪大小是否固定
      if (!this.fixed) {
        this.frame.width = this.image.width;
        this.frame.height = this.image.height;
      }
      // 获取相关元素基本信息
      const query = uni.createSelectorQuery().in(this);
      query
        .select('.body')
        .boundingClientRect((data) => {
        //容器宽高
          const bw = data.width;
          const bh = data.height;
        // 裁剪大小
          const fw = this.frame.width;
          const fh = this.frame.height;

        // 计算缩放比例
          let tw = bw * 0.8;
          let th = bh * 0.8;
          let sx = tw / fw;
          let sy = th / fh;
          let scale = sx;
          if (sx < sy) {
            scale = sy;
          }
        //计算矢量位移
          tw = fw * scale;
          th = fh * scale;
          const tx = (bw - tw) / 2;
          const ty = (bh - th) / 2;
          this.frame.width = tw;
          this.frame.height = th;
          this.frame.left = tx;
          this.frame.top = ty;

          const iw = this.image.width;
          const ih = this.image.height;
          sx = tw / iw;
          sy = th / ih;
          scale = sx;
          if (sx < sy) {
            scale = sy;
          }
          this.image.width = iw * scale;
          this.image.height = ih * scale;
          this.image.left = (bw - this.image.width) / 2;
          this.image.top = (bh - this.image.height) / 2;
          setTimeout(() => {
            // 图片大小
            this.trimImage();
          }, 100);
        })
        .exec();
    },
     // 初始化图片大小、位置
    trimImage() {
      this.mask.show = true;
      const query = uni.createSelectorQuery().in(this);
      query
        .select('.body')
        .boundingClientRect((data) => {
          const bw = data.width;
          const bh = data.height;
          const fw = this.frame.width;
          const fh = this.frame.height;
          let tw = bw;
          let th = bh;
          // let tw = bw * 0.8;
          // let th = bh * 0.8;
          const sx = tw / fw;
          const sy = th / fh;
          let scale = sx;
          if (sx > sy) {
            scale = sy;
          }
          tw = fw * scale;
          th = fh * scale;
          const tx = (bw - tw) / 2;
          const ty = (bh - th) / 2;
          const ax =
            tx -
            this.frame.left +
            (this.frame.left - this.image.left) * (1 - scale);
          const ay =
            ty -
            this.frame.top +
            (this.frame.top - this.image.top) * (1 - scale);
          this.frame.width = tw;
          this.frame.height = th;
          this.frame.left = tx;
          this.frame.top = ty;
          this.image.width *= scale;
          this.image.height *= scale;
          this.image.left += ax;
          this.image.top += ay;
        })
        .exec();
      setTimeout(() => {
        // 计算缩放、位移数据
        const scale = this.image.width / this.real.width;
        const x = (this.frame.left - this.image.left) / scale;
        const y = (this.frame.top - this.image.top) / scale;
        const width = this.frame.width / scale;
        const height = this.frame.height / scale;
        // 将图片绘制到操作canvas
        this.context.drawImage(
          this.url,
          x,
          y,
          width,
          height,
          0,
          0,
          this.frame.width,
          this.frame.height
        );
        // 开始绘制
        this.context.draw(false);
      }, 100);
    },
  }
4.3 触摸事件处理
    // 阻止手指事件冒泡传递
    touchHandle() {},
    // 手指开始触摸事件
    touchStart(ev, type) {
      this.stopTime();
      this.mask.show = false;
      if (this.touches.length === 0) {
        this.type = type;
        this.start.frame.left = this.frame.left;
        this.start.frame.top = this.frame.top;
        this.start.frame.width = this.frame.width;
        this.start.frame.height = this.frame.height;
        this.start.image.left = this.image.left;
        this.start.image.top = this.image.top;
        this.start.image.width = this.image.width;
        this.start.image.height = this.image.height;
      }
      const touches = ev.changedTouches;
      for (let i = 0; i < touches.length; i++) {
        const touch = touches[i];
        // this.touches[touch.identifier] = touch;
        this.touches.push(touch);
      }
    },
    // 手指移动事件
    touchMove(ev) {
      this.stopTime();
      ev.preventDefault();
      const touches = ev.touches;
      if (this.touches.length === 1) {
        if (this.type === 'plank' || this.type === 'frame' || this.fixed) {
          this.moveImage(this.touches[0], touches[0]);
        } else {
          this.scaleFrame(this.touches[0], touches[0], this.type);
        }
      } else if (this.touches.length === 2 && touches.length === 2) {
        const ta = this.touches[0];
        const tb = this.touches[1];
        let tc = touches[0];
        let td = touches[1];
        if (ta.identifier !== tc.identifier) {
          const temp = tc;
          tc = td;
          td = temp;
        }
        this.scaleImage(ta, tb, tc, td);
      }
    },
    touchEnd(ev) {
      this.type = '';
      this.touches = [];
      this.startTime();
    },
    touchCancel(ev) {
      this.type = '';
      this.touches = [];
      this.startTime();
    },
    startTime() {
      this.stopTime();
      this.timeoutId = setTimeout(() => {
        this.trimImage();
      }, 800);
    },
    stopTime() {
      if (this.timeoutId >= 0) {
        clearTimeout(this.timeoutId);
        this.timeoutId = -1;
      }
    },
4.4 图片放大事件
这里图片移动主要代码难点、注意点有以下两点:
1.移动范围的控制,即保证裁剪框保证在图片区域内。
2.图片缩放过程中会存在位移,即图像缩放一定是矢量位移。
// 图片移动
    moveImage(ta, tb) {
      const ax = tb.clientX - ta.clientX;
      const ay = tb.clientY - ta.clientY;
      this.image.left = this.start.image.left + ax;
      this.image.top = this.start.image.top + ay;
      if (this.image.left > this.frame.left) {
        this.image.left = this.frame.left;
      }
      if (this.image.top > this.frame.top) {
        this.image.top = this.frame.top;
      }
      if (
        this.image.left + this.image.width <
        this.frame.left + this.frame.width
      ) {
        this.image.left = this.frame.left + this.frame.width - this.image.width;
      }
      if (
        this.image.top + this.image.height <
        this.frame.top + this.frame.height
      ) {
        this.image.top = this.frame.top + this.frame.height - this.image.height;
      }
    },
         // 图片放大
    scaleImage(ta, tb, tc, td) {
      const x1 = ta.clientX;
      const y1 = ta.clientY;
      const x2 = tb.clientX;
      const y2 = tb.clientY;
      const x3 = tc.clientX;
      const y3 = tc.clientY;
      const x4 = td.clientX;
      const y4 = td.clientY;
      const ol = Math.sqrt((x1 - x2) * (x1 - x2) + (y1 - y2) * (y1 - y2));
      const el = Math.sqrt((x3 - x4) * (x3 - x4) + (y3 - y4) * (y3 - y4));
      const ocx = (x1 + x2) / 2;
      const ocy = (y1 + y2) / 2;
      const ecx = (x3 + x4) / 2;
      const ecy = (y3 + y4) / 2;
      const ax = ecx - ocx;
      const ay = ecy - ocy;
      let scale = el / ol;
      if (this.start.image.width * scale < this.frame.width) {
        scale = this.frame.width / this.start.image.width;
      }
      if (this.start.image.height * scale < this.frame.height) {
        scale = this.frame.height / this.start.image.height;
      }
      if (this.start.image.width * scale < this.frame.width) {
        scale = this.frame.width / this.start.image.width;
      }
      this.image.left =
        this.start.image.left +
        ax -
        (ocx - this.start.image.left) * (scale - 1);
      this.image.top =
        this.start.image.top + ay - (ocy - this.start.image.top) * (scale - 1);
      this.image.width = this.start.image.width * scale;
      this.image.height = this.start.image.height * scale;
      if (this.image.left > this.frame.left) {
        this.image.left = this.frame.left;
      }
      if (this.image.top > this.frame.top) {
        this.image.top = this.frame.top;
      }
      if (
        this.image.left + this.image.width <
        this.frame.left + this.frame.width
      ) {
        this.image.left = this.frame.left + this.frame.width - this.image.width;
      }
      if (
        this.image.top + this.image.height <
        this.frame.top + this.frame.height
      ) {
        this.image.top = this.frame.top + this.frame.height - this.image.height;
      }
    },
4.5 图片绘制上传
理解前面代码后,下面的代码没有难点了,重点掌握CanvasContext.toDataURL({})方法
canvas.toDataURL(type, encoderOptions)
type 可选
图片格式,默认为 image/png
encoderOptions 可选
在指定图片格式为 image/jpeg 或 image/webp的情况下,可以从 0 到 1 的区间内选择图片的质量。如果超出取值范围,将会使用默认值 0.92。其他参数会被忽略
**方法返回一个包含图片展示的 data URI **。可以使用 type 参数其类型,默认为 PNG 格式。图片的分辨率为96dpi。
// 确认按钮事件
    onok() {
      const scale = this.image.width / this.real.width;
      const x = (this.frame.left - this.image.left) / scale;
      const y = (this.frame.top - this.image.top) / scale;
      const width = this.frame.width / scale;
      const height = this.frame.height / scale;
      let tw = width;
      let th = height;
      if (this.fixed) {
        tw = this.width / 2;
        th = this.height / 2;
      } else {
        if (tw > this.maxWidth / 2) {
          const sc = this.maxWidth / 2 / tw;
          tw = tw * sc;
          th = th * sc;
        }
        if (th > this.maxHeight / 2) {
          let sc = this.maxHeight / 2 / th;
          th = th * sc;
          tw = tw * sc;
        }
      }
      this.target.width = tw;
      this.target.height = th;
      // uni.showLoading({
      //   title: '正在裁剪',
      // });
      setTimeout(() => {
        this.targetContext.drawImage(
          this.url,
          x,
          y,
          width,
          height,
          0,
          0,
          tw,
          th
        );
        this.targetContext.draw(false, () => {
          const CanvasContext = my.createCanvasContext('target');
          CanvasContext.toDataURL({}).then((dataURL) => {
            this.upLoadPic(dataURL);
          });
        });
      }, 100);
    },
5.完整代码
组件式开发,开箱即用,注意这边依赖uni框架、小程序下的native交互,H5慎用!!