Spring Security-用户注销及记住我
用户注销
在配置类增加退出映射地址
 @Override
 protected void configure(HttpSecurity http) throws Exception {
     //退出/注销
     http.logout().logoutUrl("/logout").logoutSuccessUrl("/test/hello").permitAll();
 }
完整代码:
package com.config;
import org.springframework.beans.factory.annotation.Autowired;
import org.springframework.context.annotation.Bean;
import org.springframework.context.annotation.Configuration;
import org.springframework.security.config.annotation.authentication.builders.AuthenticationManagerBuilder;
import org.springframework.security.config.annotation.web.builders.HttpSecurity;
import org.springframework.security.config.annotation.web.configuration.WebSecurityConfigurerAdapter;
import org.springframework.security.core.userdetails.UserDetailsService;
import org.springframework.security.crypto.bcrypt.BCryptPasswordEncoder;
import org.springframework.security.crypto.password.PasswordEncoder;
@Configuration //配置类
public class SecurityConfig extends WebSecurityConfigurerAdapter {
@Autowired
UserDetailsService userDetailsService;
@Override
protected void configure(AuthenticationManagerBuilder auth) throws Exception {
auth.userDetailsService(userDetailsService).passwordEncoder(passwordEncoder());
}
@Bean
PasswordEncoder passwordEncoder(){
return new BCryptPasswordEncoder();
}
@Override
protected void configure(HttpSecurity http) throws Exception {
//退出/注销
http.logout().logoutUrl("/logout").logoutSuccessUrl("/test/hello").permitAll();
//配置没有权限访问跳转的页面
http.exceptionHandling().accessDeniedPage("/403.html");
http.formLogin().loginPage("/login.html") // 自定义登录页面
.loginProcessingUrl("/user/login") //登录访问路径
.defaultSuccessUrl("/test/index").permitAll() //登录成功后 跳转路径
.and().authorizeRequests()
// /user/login","/test/add" 面允许任意访问
.antMatchers("/","/user/login","/test/add").permitAll() //设置哪些路径可以不认证 直接访问
//当前登录用户 只有具备admins权限才可以访问这个路径
//.antMatchers("/test/index").hasAnyAuthority("admins","abc")
//.antMatchers("/test/index").hasRole("sale")
.antMatchers("/test/index").hasAnyRole("sale","p22")
.anyRequest().permitAll()
.and().csrf().disable() ; // 关闭csrf的防护
}
}在static下 增加 success.html
  登录成功
 退出
修改配置类,登录成功后 跳转到 成功页面success.html
package com.config;
import org.springframework.beans.factory.annotation.Autowired;
import org.springframework.context.annotation.Bean;
import org.springframework.context.annotation.Configuration;
import org.springframework.security.config.annotation.authentication.builders.AuthenticationManagerBuilder;
import org.springframework.security.config.annotation.web.builders.HttpSecurity;
import org.springframework.security.config.annotation.web.configuration.WebSecurityConfigurerAdapter;
import org.springframework.security.core.userdetails.UserDetailsService;
import org.springframework.security.crypto.bcrypt.BCryptPasswordEncoder;
import org.springframework.security.crypto.password.PasswordEncoder;
@Configuration //配置类
public class SecurityConfig extends WebSecurityConfigurerAdapter {
@Autowired
UserDetailsService userDetailsService;
@Override
protected void configure(AuthenticationManagerBuilder auth) throws Exception {
auth.userDetailsService(userDetailsService).passwordEncoder(passwordEncoder());
}
@Bean
PasswordEncoder passwordEncoder(){
return new BCryptPasswordEncoder();
}
@Override
protected void configure(HttpSecurity http) throws Exception {
//退出/注销
http.logout().logoutUrl("/logout").logoutSuccessUrl("/test/add").permitAll();
//配置没有权限访问跳转的页面
http.exceptionHandling().accessDeniedPage("/403.html");
http.formLogin().loginPage("/login.html") // 自定义登录页面
.loginProcessingUrl("/user/login") //登录访问路径
.defaultSuccessUrl("/success.html").permitAll() //登录成功后 跳转路径
.and().authorizeRequests()
// /user/login","/test/add" 面允许任意访问
.antMatchers("/","/user/login","/test/add").permitAll() //设置哪些路径可以不认证 直接访问
//当前登录用户 只有具备admins权限才可以访问这个路径
//.antMatchers("/test/index").hasAnyAuthority("admins","abc")
//.antMatchers("/test/index").hasRole("sale")
.antMatchers("/test/index").hasAnyRole("sale","p22")
.anyRequest().permitAll()
.and().csrf().disable() ; // 关闭csrf的防护
}
}在成功页面添加 超链接, 写设置退出路径
退出登录成功后,在成功页面点击退出 , 再去访问其他contoller不能进行访问
启动测试: 在地址栏输入 http://localhost:8080/login.html 输入正确用户名/密码 ,可以看到 success.html页面内容, 然后再打开一个浏览器窗口 , 在地址栏访问 localhost:8080/test/index
页面显示 hello index
然后 点击 成功页面的 退出 , 实际访问 /test/add

在刷新刚刚 另一个页面 localhost:8080/test/index , 发现 需要登录 ,
记住我 (7天内免登录) 自动登录
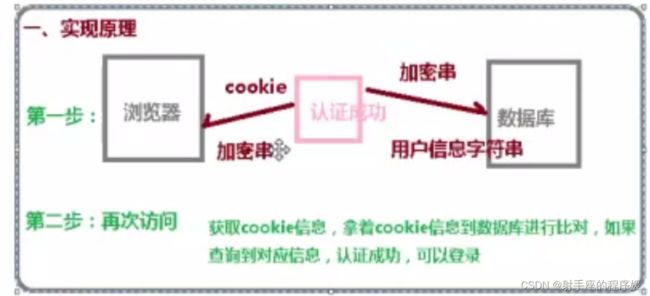
security 中实现
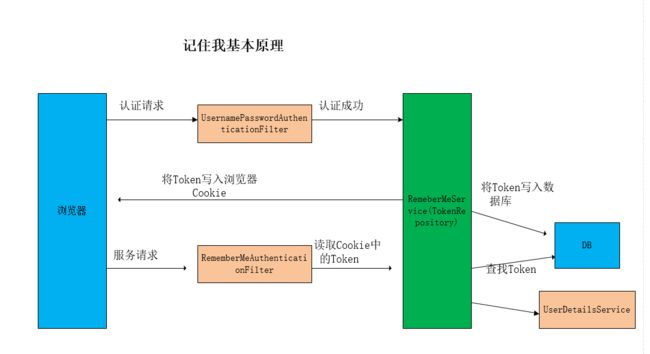
用户认证成功之后调用RemeberMeService根据用户名名生成Token由TokenRepository写入到数据库,同时也将Token写入到浏览器的Cookie中 重启服务之后,用户再次登入系统会由RememberMeAuthenticationFilter拦截,从Cookie中读取Token信息,与persistent_logins表匹配判断是否使用记住我功能。最中由UserDetailsService查询用户信息
具体实现
1.创建表:
create table persistent_logins (
`username` varchar(64) not null,
`series` varchar(64) not null,
`token` varchar(64) not null,
`last_used` timestamp not null default CURRENT_TIMESTAMP on update CURRENT_TIMESTAMP,
primary key (`series`));
-
修改配置类,注入数据源, 配置操作数据库对象
配置文件
 spring:
   datasource:
     driver-class-name: com.mysql.cj.jdbc.Driver
     url: jdbc:mysql://localhost:3306/ssm
     username: 自己的用户
     password: 自己的密码
配置类

@Autowired
private DataSource dataSource; //注入数据源
@Bean
public PersistentTokenRepository persistentTokenRepository(){
JdbcTokenRepositoryImpl jdbcTokenRepository = new JdbcTokenRepositoryImpl();
jdbcTokenRepository.setDataSource(dataSource);
//启动时自动创建表 ,因为表已经创建 因此这里注释掉
//jdbcTokenRepository.setCreateTableOnStartup(true);
return jdbcTokenRepository;
}修改 配置类, 增加 remeberme配置
配置类完整代码
package com.config;
import org.springframework.beans.factory.annotation.Autowired;
import org.springframework.context.annotation.Bean;
import org.springframework.context.annotation.Configuration;
import org.springframework.security.config.annotation.authentication.builders.AuthenticationManagerBuilder;
import org.springframework.security.config.annotation.web.builders.HttpSecurity;
import org.springframework.security.config.annotation.web.configuration.WebSecurityConfigurerAdapter;
import org.springframework.security.core.userdetails.UserDetailsService;
import org.springframework.security.crypto.bcrypt.BCryptPasswordEncoder;
import org.springframework.security.crypto.password.PasswordEncoder;
import org.springframework.security.web.authentication.rememberme.JdbcTokenRepositoryImpl;
import org.springframework.security.web.authentication.rememberme.PersistentTokenRepository;
import javax.sql.DataSource;
@Configuration //配置类
public class SecurityConfig extends WebSecurityConfigurerAdapter {
@Autowired
UserDetailsService userDetailsService;
@Autowired
private DataSource dataSource; //注入数据源
//配置数据库对象
@Bean
public PersistentTokenRepository persistentTokenRepository(){
JdbcTokenRepositoryImpl jdbcTokenRepository = new JdbcTokenRepositoryImpl();
jdbcTokenRepository.setDataSource(dataSource);
//启动时自动创建表 ,因为表已经创建 因此这里注释掉
//jdbcTokenRepository.setCreateTableOnStartup(true);
return jdbcTokenRepository;
}
@Override
protected void configure(AuthenticationManagerBuilder auth) throws Exception {
auth.userDetailsService(userDetailsService).passwordEncoder(passwordEncoder());
}
@Bean
PasswordEncoder passwordEncoder(){
return new BCryptPasswordEncoder();
}
@Override
protected void configure(HttpSecurity http) throws Exception {
//退出/注销
http.logout().logoutUrl("/logout").logoutSuccessUrl("/test/add").permitAll();
//配置没有权限访问跳转的页面
http.exceptionHandling().accessDeniedPage("/403.html");
http.formLogin().loginPage("/login.html") // 自定义登录页面
.loginProcessingUrl("/user/login") //登录访问路径
.defaultSuccessUrl("/success.html").permitAll() //登录成功后 跳转路径
.and().authorizeRequests()
// /user/login","/test/add" 面允许任意访问
.antMatchers("/","/user/login","/test/add").permitAll() //设置哪些路径可以不认证 直接访问
//当前登录用户 只有具备admins权限才可以访问这个路径
//.antMatchers("/test/index").hasAnyAuthority("admins","abc")
//.antMatchers("/test/index").hasRole("sale")
.antMatchers("/test/index").hasAnyRole("sale","p22")
.anyRequest().permitAll()
// 记住我 设置
.and().rememberMe().tokenRepository(persistentTokenRepository())
// 设置有效时长 单位 秒
.tokenValiditySeconds(60)
.userDetailsService(userDetailsService)
.and().csrf().disable() ; // 关闭csrf的防护
}
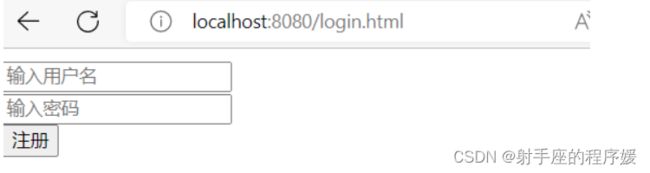
}3.在登录页面 增加复选框
登陆页面添加记住我复选款(name必须是remember-me)
修改 static 下的 login.html
启动 测试
进入登录页面: http:/localhost:8080/login.html ,输入正常的用户名及密码
等时间差不过 到点 后 ,关闭浏览器, 在访问登录成功页面 ,直接跳转到 登录页面