快速入门Torch构建自己的网络模型
真有用构建自己的网络模型
-
- 读前必看
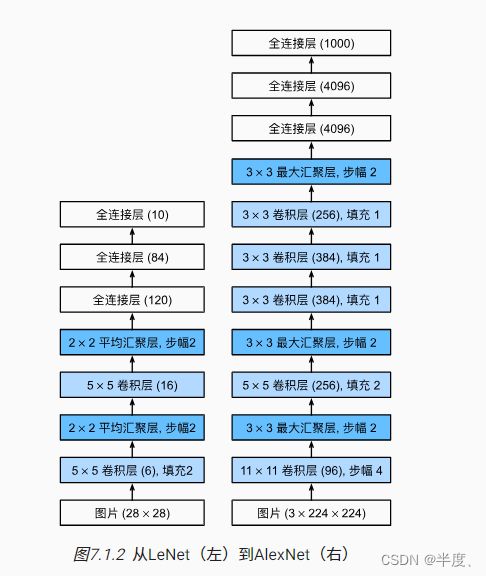
- 刚学完Alex网络感觉很厉害的样子,我也要搭建一个
- 可以看着网络结构实现上面的代码你已经很强了,千万不要再想实现VGG等网络!!!90%你能了解到的模型大佬早已实现好,直接调用就OK
- 下面是源码用nn.Module实现的AlexNet,和我们实现的区别并不大,将模型print出来能看懂就可以
- 不忘初心,构建自己的网络模型,将AlexNet输入改为单通道图片:
- Tips
读前必看
- 如何用框架复现论文中的模型不重要,重要的是明白网络模型原理!!!
- 如何用框架复现论文中的模型不重要,重要的是明白网络模型原理!!!
- 如何用框架复现论文中的模型不重要,重要的是明白网络模型原理!!!
刚学完Alex网络感觉很厉害的样子,我也要搭建一个
回想一下torch构建网络的几种方法
- nn.Sequential直接顺序实现
- nn.Module继承基类构建自定义模型
feature = nn.Sequential(
    nn.Conv2d(3, 64, kernel_size=11, stride=4, padding=2),
    nn.ReLU(inplace=True),
    nn.MaxPool2d(kernel_size=3, stride=2),
    nn.Conv2d(64, 192, kernel_size=5, padding=2),
    nn.ReLU(inplace=True),
    nn.MaxPool2d(kernel_size=3, stride=2),
    nn.Conv2d(192, 384, kernel_size=3, padding=1),
    nn.ReLU(inplace=True),
    nn.Conv2d(384, 256, kernel_size=3, padding=1),
    nn.ReLU(inplace=True),
    nn.Conv2d(256, 256, kernel_size=3, padding=1),
    nn.ReLU(inplace=True),
    nn.MaxPool2d(kernel_size=3, stride=2),
)
现在需要计算卷积后图像的维度,根据公式 image_shape = (image_shape - kernel_size + 2 * padding) / stride + 1计算
in_shape= 224
conv_size = [11, 5, 3, 3, 3]
padding_size = [2, 2, 1, 1, 1]
stride_size = [4, 1, 1, 1, 1]
# image_shape = (image_shape - kernel_size + 2 * padding) / stride + 1
for i in range(len(conv_size)):
    in_shape = (in_shape - conv_size[i] + 2 * padding_size[i]) / stride_size[i] + 1
    in_shape = math.floor(in_shape)
    if i in [0, 1, 4]:
        in_shape = (in_shape - 3 + 2 * 0) / 2 + 1
        in_shape = math.floor(in_shape)
print(in_shape)
计算结果是6,输出通道是256,所以特征有25666个,将下面代码添加到Sequential中完成自定义AlexNet构建
nn.Linear(256 * 6 * 6, 4096),
nn.ReLU(inplace=True),
nn.Dropout(p=dropout),
nn.Linear(4096, 4096),
nn.ReLU(inplace=True),
nn.Linear(4096, num_classes)
可以看着网络结构实现上面的代码你已经很强了,千万不要再想实现VGG等网络!!!90%你能了解到的模型大佬早已实现好,直接调用就OK
下面是源码用nn.Module实现的AlexNet,和我们实现的区别并不大,将模型print出来能看懂就可以
class AlexNet(nn.Module):
    def __init__(self, num_classes: int = 1000, dropout: float = 0.5) -> None:
        super().__init__()
        # _log_api_usage_once(self)
        self.features = nn.Sequential(
            nn.Conv2d(3, 64, kernel_size=11, stride=4, padding=2),
            nn.ReLU(inplace=True),
            nn.MaxPool2d(kernel_size=3, stride=2),
            nn.Conv2d(64, 192, kernel_size=5, padding=2),
            nn.ReLU(inplace=True),
            nn.MaxPool2d(kernel_size=3, stride=2),
            nn.Conv2d(192, 384, kernel_size=3, padding=1),
            nn.ReLU(inplace=True),
            nn.Conv2d(384, 256, kernel_size=3, padding=1),
            nn.ReLU(inplace=True),
            nn.Conv2d(256, 256, kernel_size=3, padding=1),
            nn.ReLU(inplace=True),
            nn.MaxPool2d(kernel_size=3, stride=2),
        )

        self.avgpool = nn.AdaptiveAvgPool2d((6, 6))
        self.classifier = nn.Sequential(
            nn.Dropout(p=dropout),
            nn.Linear(256 * 6 * 6, 4096),
            nn.ReLU(inplace=True),
            nn.Dropout(p=dropout),
            nn.Linear(4096, 4096),
            nn.ReLU(inplace=True),
            nn.Linear(4096, num_classes),
        )

    def forward(self, x: torch.Tensor) -> torch.Tensor:
        x = self.features(x)
        x = self.avgpool(x)
        x = torch.flatten(x, 1)
        x = self.classifier(x)
        return x
不忘初心,构建自己的网络模型,将AlexNet输入改为单通道图片:
model = AlexNet()
model.features[0] = nn.Conv2d(1, 64, kernel_size=11, stride=4, padding=2)
print(model)
Tips
Q1: padding是卷积之后还是卷积之前还是卷积之后实现的?
padding是在卷积之前补0,如果愿意的话,可以通过使用torch.nn.Functional.pad来补非0的内容。
Q2:padding补0的默认策略是什么?
四周都补!如果pad输入是一个tuple的话,则第一个参数表示高度上面的padding,第2个参数表示宽度上面的